Ledger Nano Gen5 hardware wallet: review and how to use it
Every blockchain needs its own app, and youve only got 1.1 MB to fit them in.
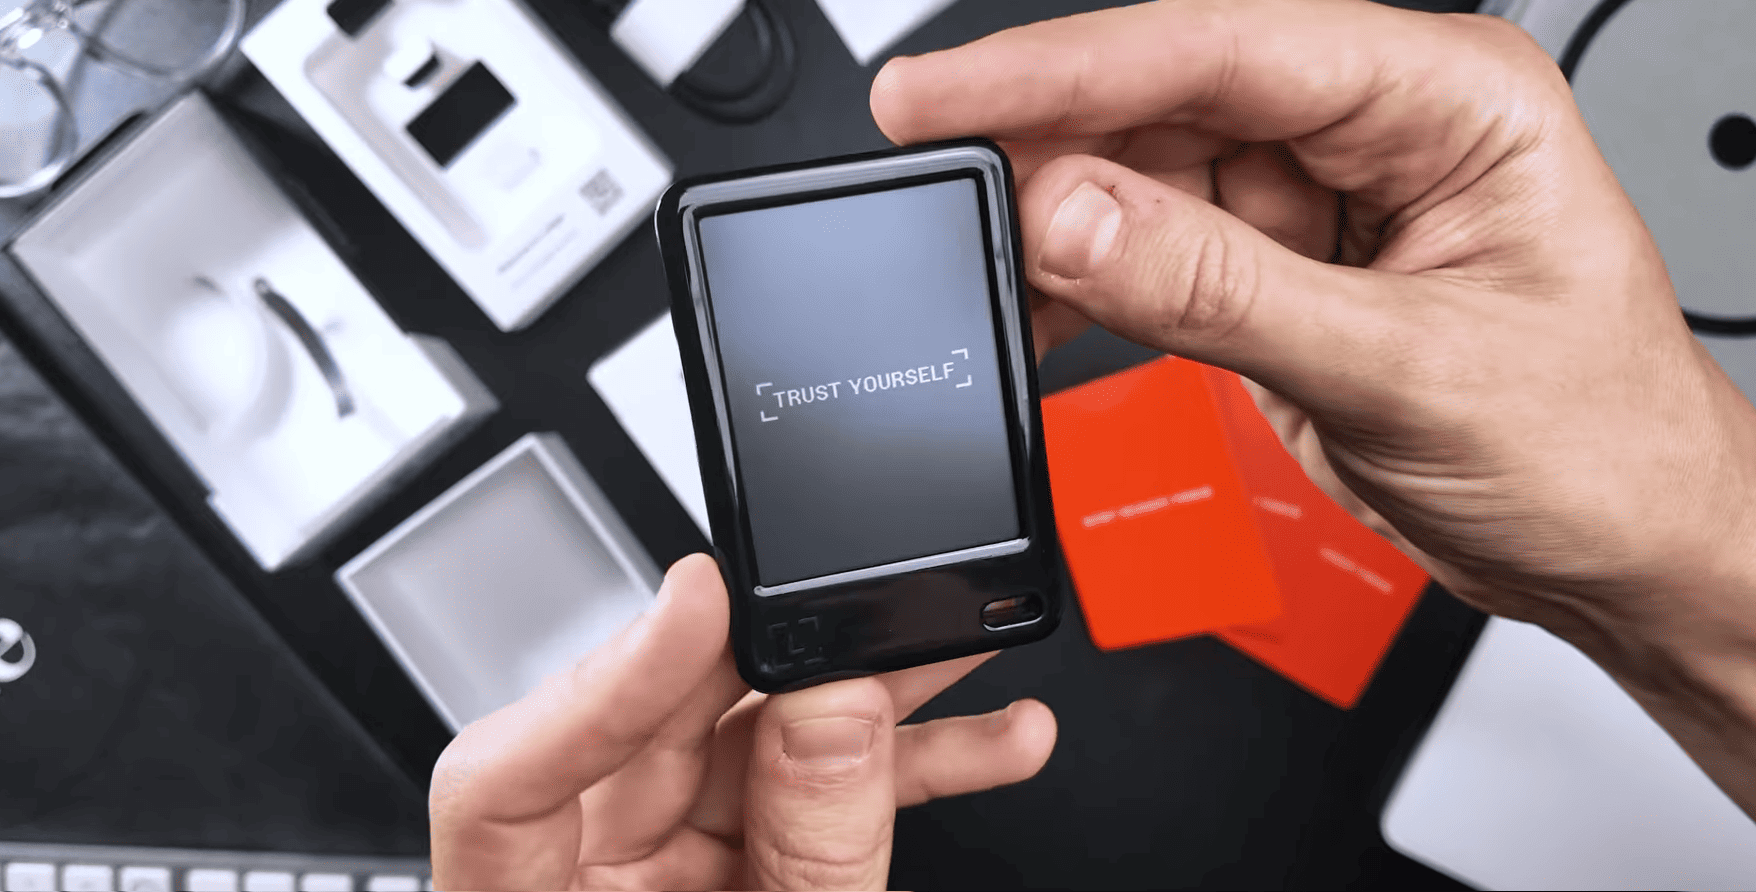
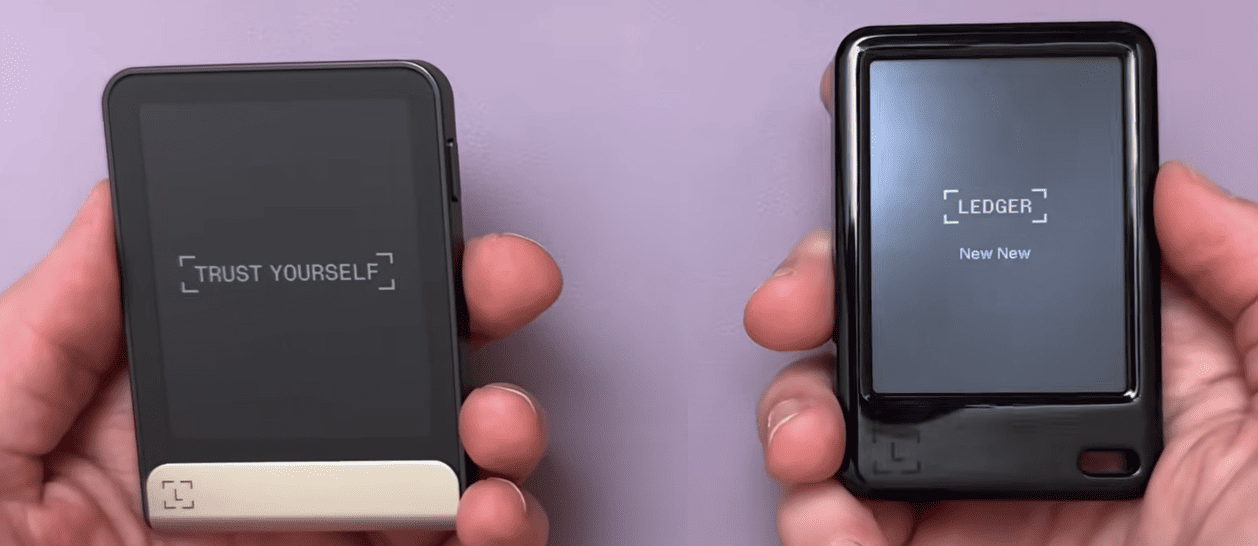
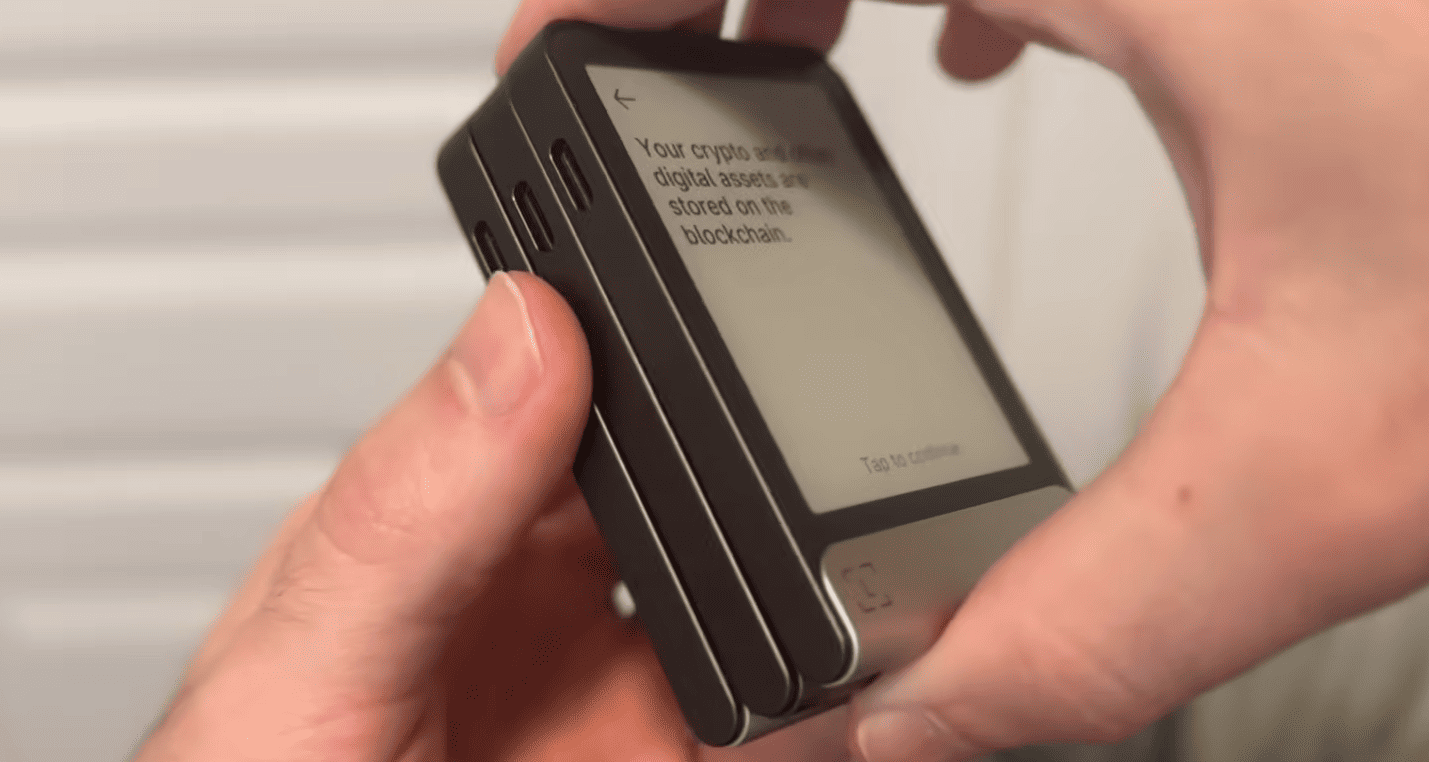
Security meets convenience: every transaction is shown in full, human-readable form on the large touchscreen before you sign.
Ledger Nano Gen5 is a hardware wallet with a large touchscreen, support for Bluetooth and NFC technologies, and compatibility with all platforms: Windows, macOS, Android, and iOS.
Security here is ensured by the certified ST33K1M5 chip. And a set of features, including transaction preview before sending, Clear Signing and Passphrase, makes it one of the safest. More on that below.
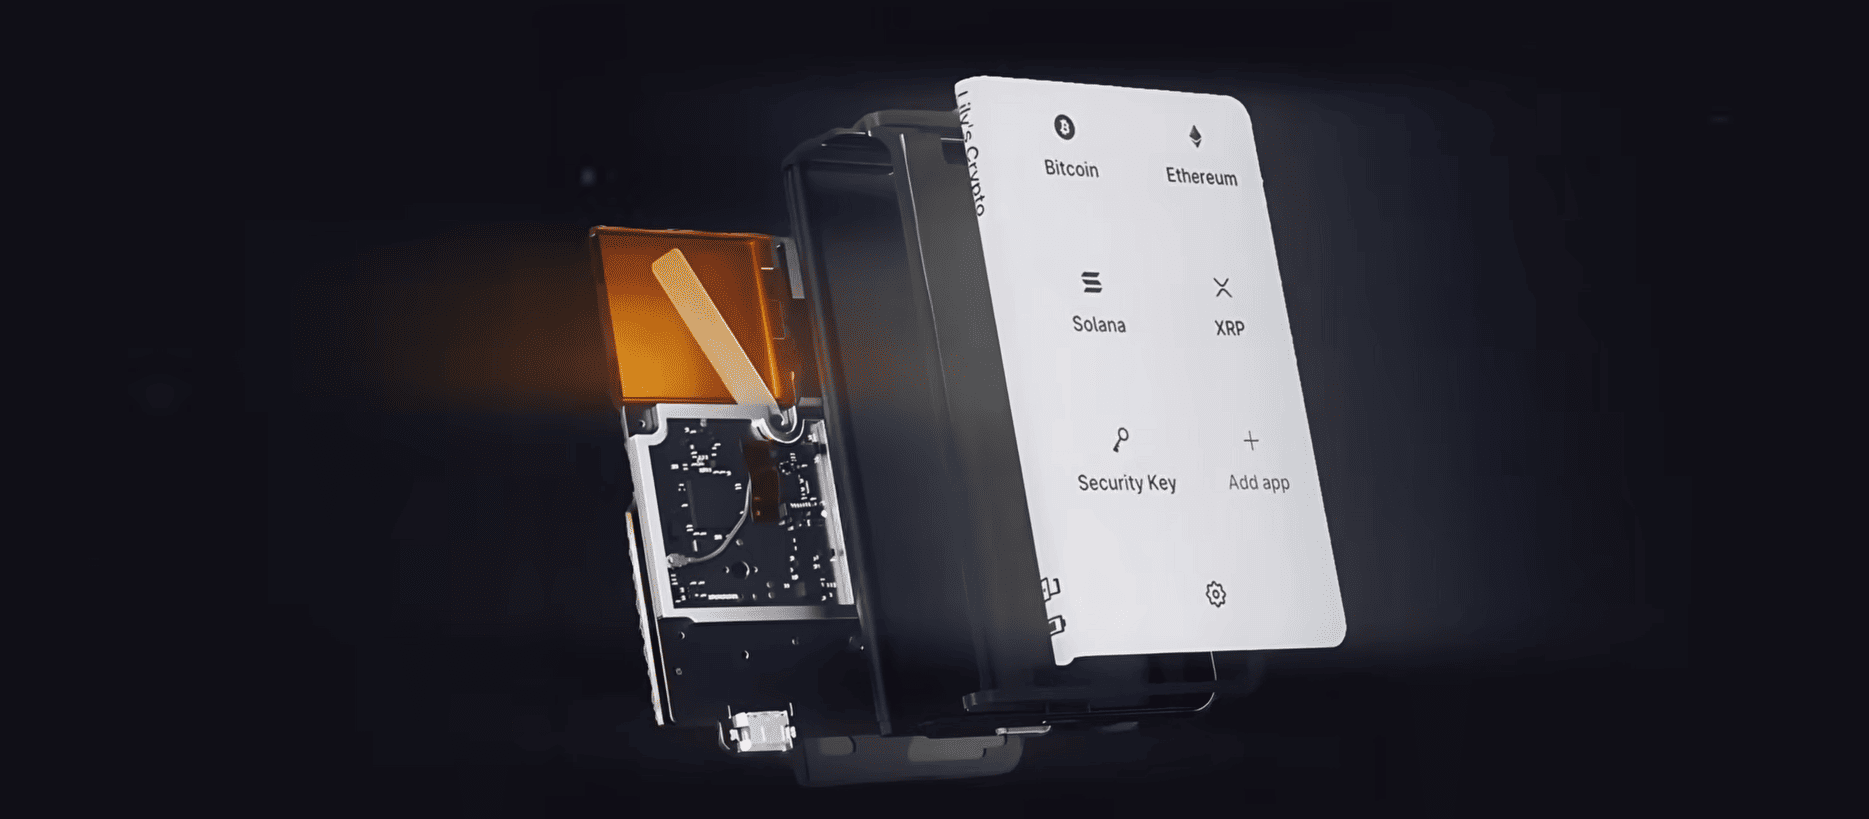
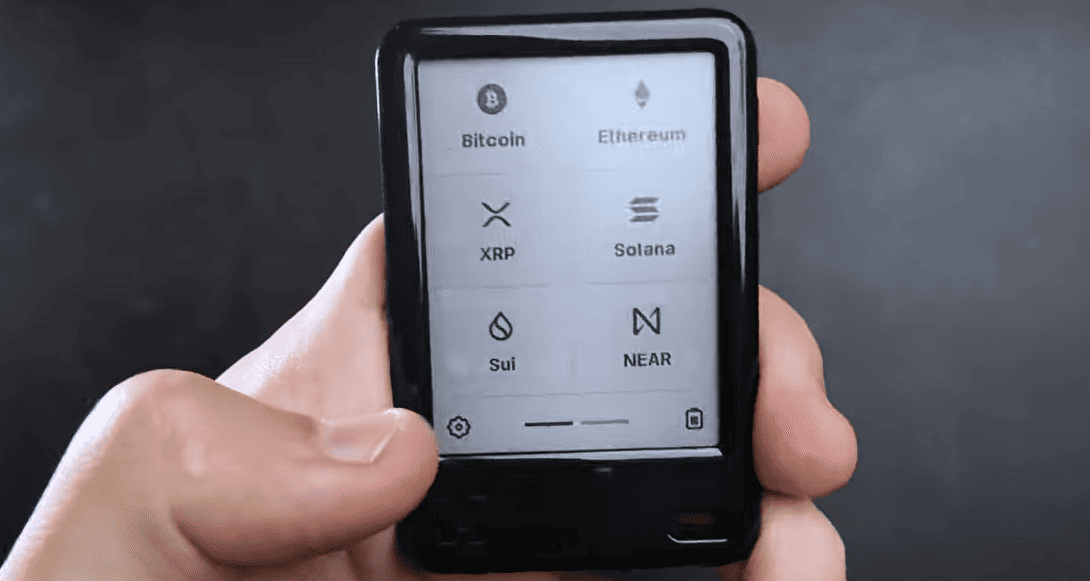
It supports thousands of assets, including all popular ones - Bitcoin, Ethereum, Tether, Ripple, BNB, Solana, USDC, Doge, ADA, SUI, and others.
The package includes: the device itself, a USB-C cable, 3 recovery phrase sheets, and a Ledger Recovery Key (NFC card).
However, let's start the review, as always, with the most important thing – security.
Security and Features
The wallet generates a 24-word recovery phrase out of the box - this is the most reliable standard. But there are other security features as well.
Device Security:
- Chip with EAL 6+ certification – keys are stored at a bank-level of protection, inaccessible during either physical or remote attacks.
- PIN code – protects data: 3 wrong attempts trigger data erasure, eliminating brute-force attacks.
- Screen is directly connected to the chip – there's no vulnerable controller, making data substitution impossible.
- Firmware verification ensures only official software is running.
The internal chip has the highest rating among cold wallets - EAL 6+. It's where the keys are stored, and it's protected from remote and physical attacks. Such chips are used in bank cards and biometric passports.
It's important that the Ledger screen is connected directly to the chip! Unlike competitors, there is no vulnerable shared microcontroller here, so even during physical capture, an attacker cannot inject malicious code between the display and the chip.
Let's look further at security.
Advanced Security Features:
- Hidden Wallets (
passphrase) – creates an unlimited number of hidden wallets for diversifying your crypto portfolio. - Transaction Check – scans Ethereum transactions before signing and blocks malicious contracts.
- Clear Signing – displays transactions in a human-readable format, not as crypto-mathematical symbols.
- Bluetooth connections are encrypted.
- Multisignature – requires multiple participants to approve transactions.
- Recovery Card – a secure key fob that allows you to create an encrypted backup of your 24-word secret recovery phrase.
Also, all Ledger models have 95% open-source code, and we like that Ledger has a whole team of white-hat hackers called Ledger Donjon. They search for vulnerabilities in their own and others' hardware wallets, helping the entire community.
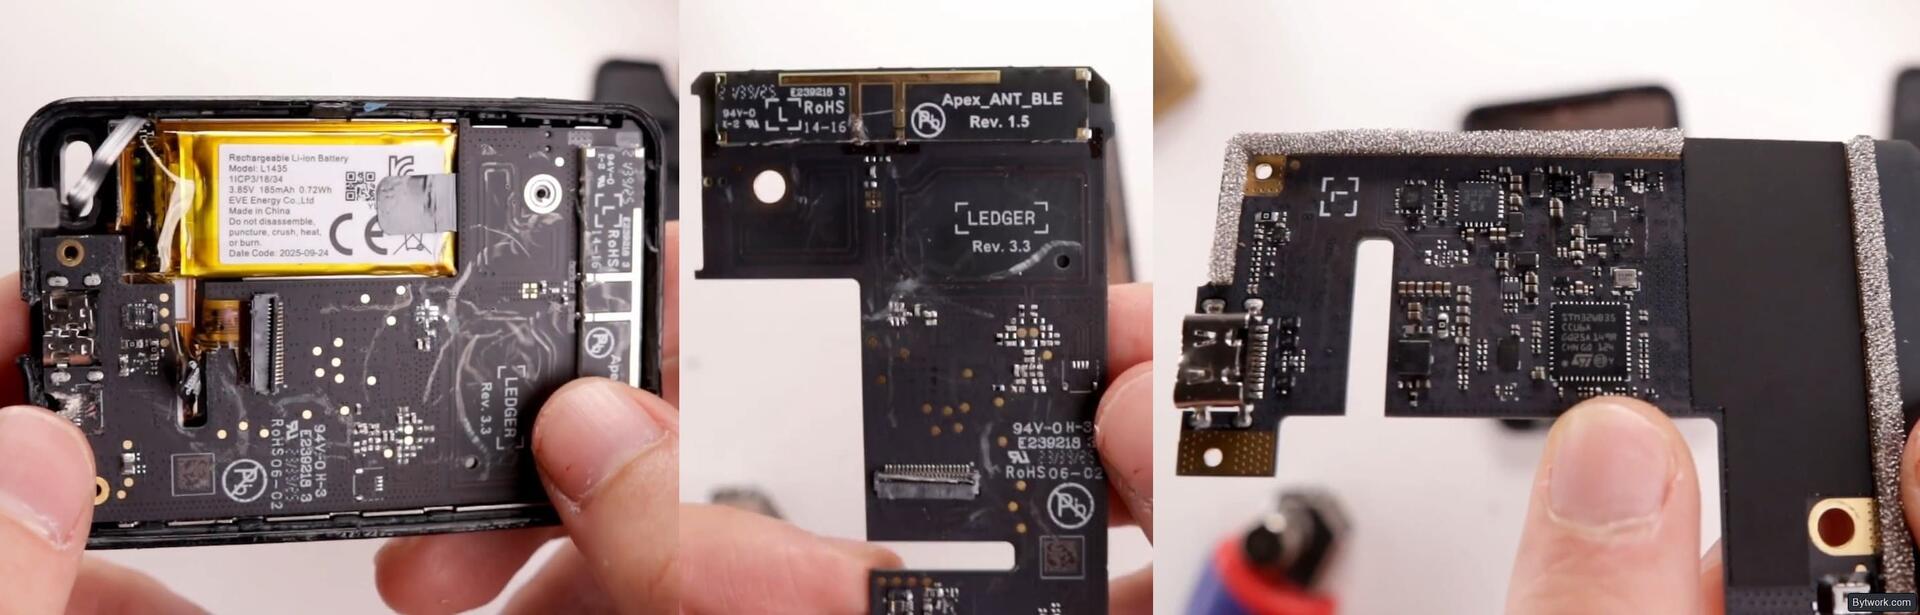
We cracked open the wallet to see what's inside. We see an STM32 WB35 chip and an EAL6+ secure element. The presence of multiple revisions indicates that the wallet has been iteratively improved.
Finally, Gen5 can be used not only for cryptocurrencies, NFTs, and dApps but also as a super-secure two-factor authentication device for logging into websites, including Gmail and exchanges like Coinbase that support physical 2FA devices.
To summarize security, it's important to emphasize: all Ledger wallets offer the same level of protection. So it doesn't matter if you buy their most affordable option, Nano S+, or the most premium Stax - they all provide the same security.
Screen, Body, and Convenience
The body and screen of the Gen5 are identical to the Flex and Stax models, so the new device is recognizable and works the same. Compared to the S Plus and X, which look like flash drives, the upgrade is noticeable: instead of small displays and buttons, now there's a full-fledged touchscreen!
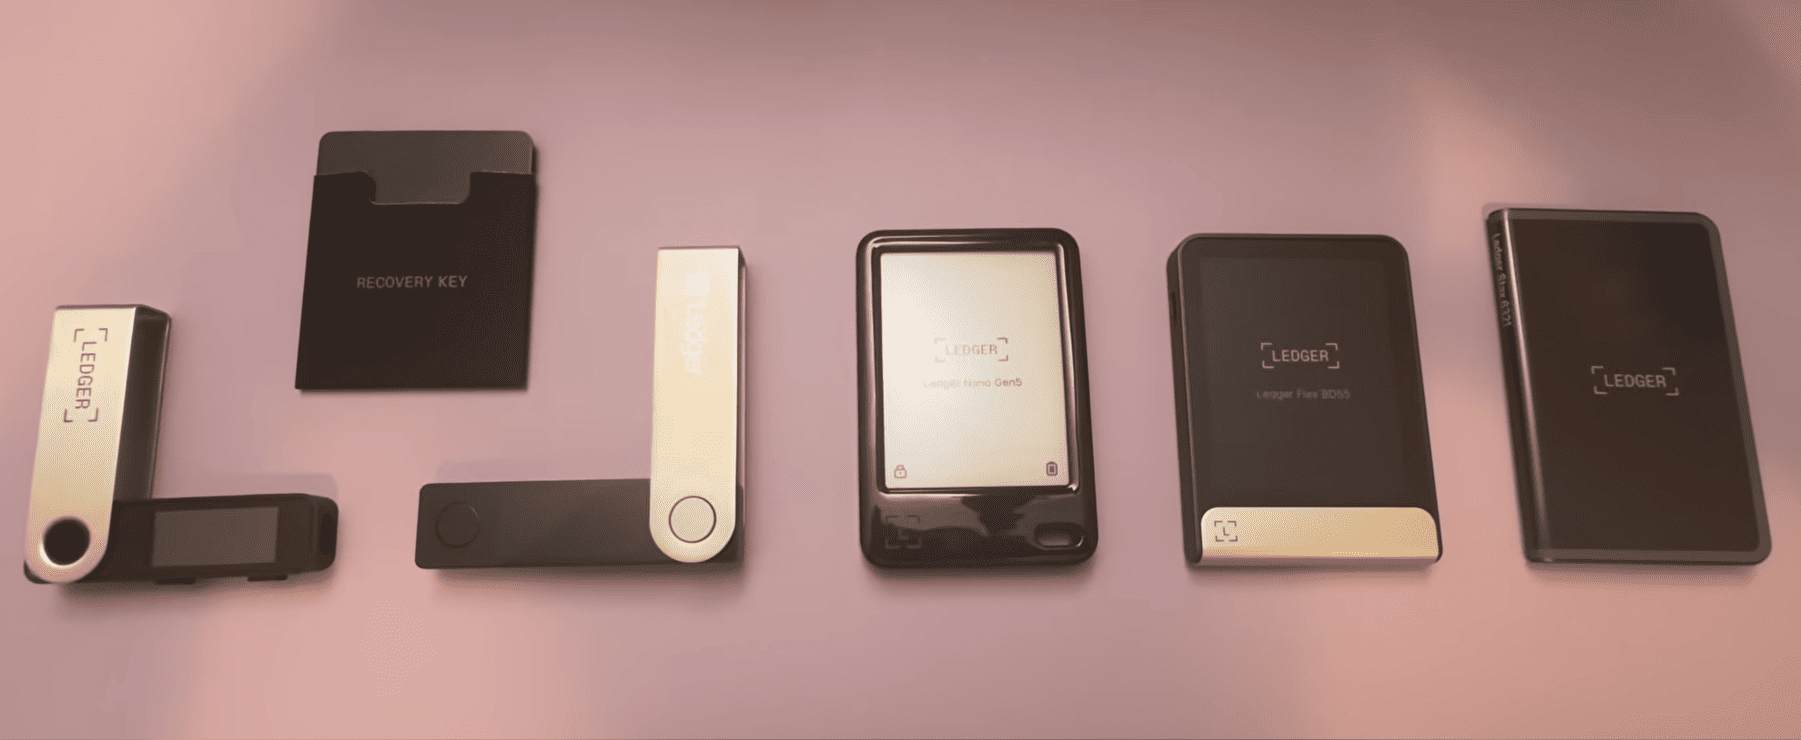
Gen5 is in the middle of the image.
Digital Ink Display
Digital ink technology reflects light like regular paper, while using electricity only when the image changes.
The previous Nano used an energy-intensive LED screen, while Gen5, Flex, and Stax switched to digital ink (E-Ink) technology. - it's a kind of electronic paper that reflects light like regular paper and consumes energy only when updating the image. It doesn't emit light itself, so eyes get less tired, and the battery charge lasts for weeks.
However, the price for energy saving is the lack of a backlight, so you can't use the device in the dark!
Let's compare the displays: Stax got a large curved plastic E-Ink, Flex - a compact Gorilla Glass, Gen5 also has glass. Image clarity is better on Flex, followed by Stax and Gen5, but the differences are noticeable only upon close inspection: Gen5 text looks slightly more squared, but readability doesn't suffer.
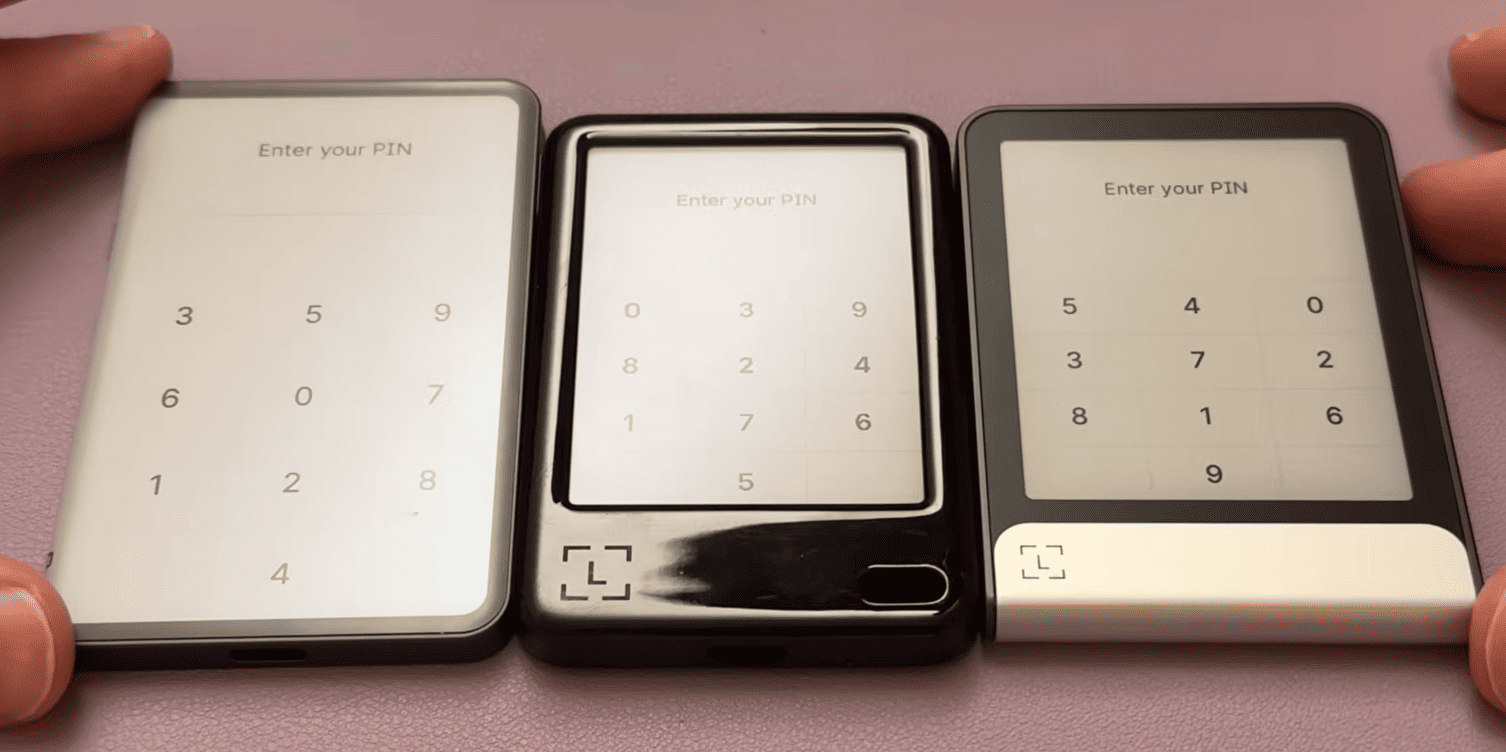
From left to right: Stax, Gen5, and Flex
The speed and accuracy of touch response are the same for all 3 models. The screens are scratch and glare resistant.
Build Quality Comparison
The Gen5 body is made entirely of plastic. All touch models from Ledger have built-in magnets, but here they are essentially only needed for the case/cover, which can be purchased separately.
At the same time, Flex and Stax go further, having all-metal bodies that can literally be stacked together - it's cool, but not really necessary.
But if we step back from the details, Gen5 is the main star of the lineup because it offers the same security and technology as more expensive models but at a significantly lower price! For $179 you get performance and protection without overpaying, unlike the $400 Stax and $250 Flex.
Let's move on to practice – for this, we'll create and set up a new wallet.
Setup and Connection to the App
Gen5, like all Ledger models, works in conjunction with their Ledger Wallet app. This is your universal hub for working with crypto: buy, sell, stake, exchange, use dApps and NFTs - practically everything you want to do with crypto assets can be done in this single dashboard.
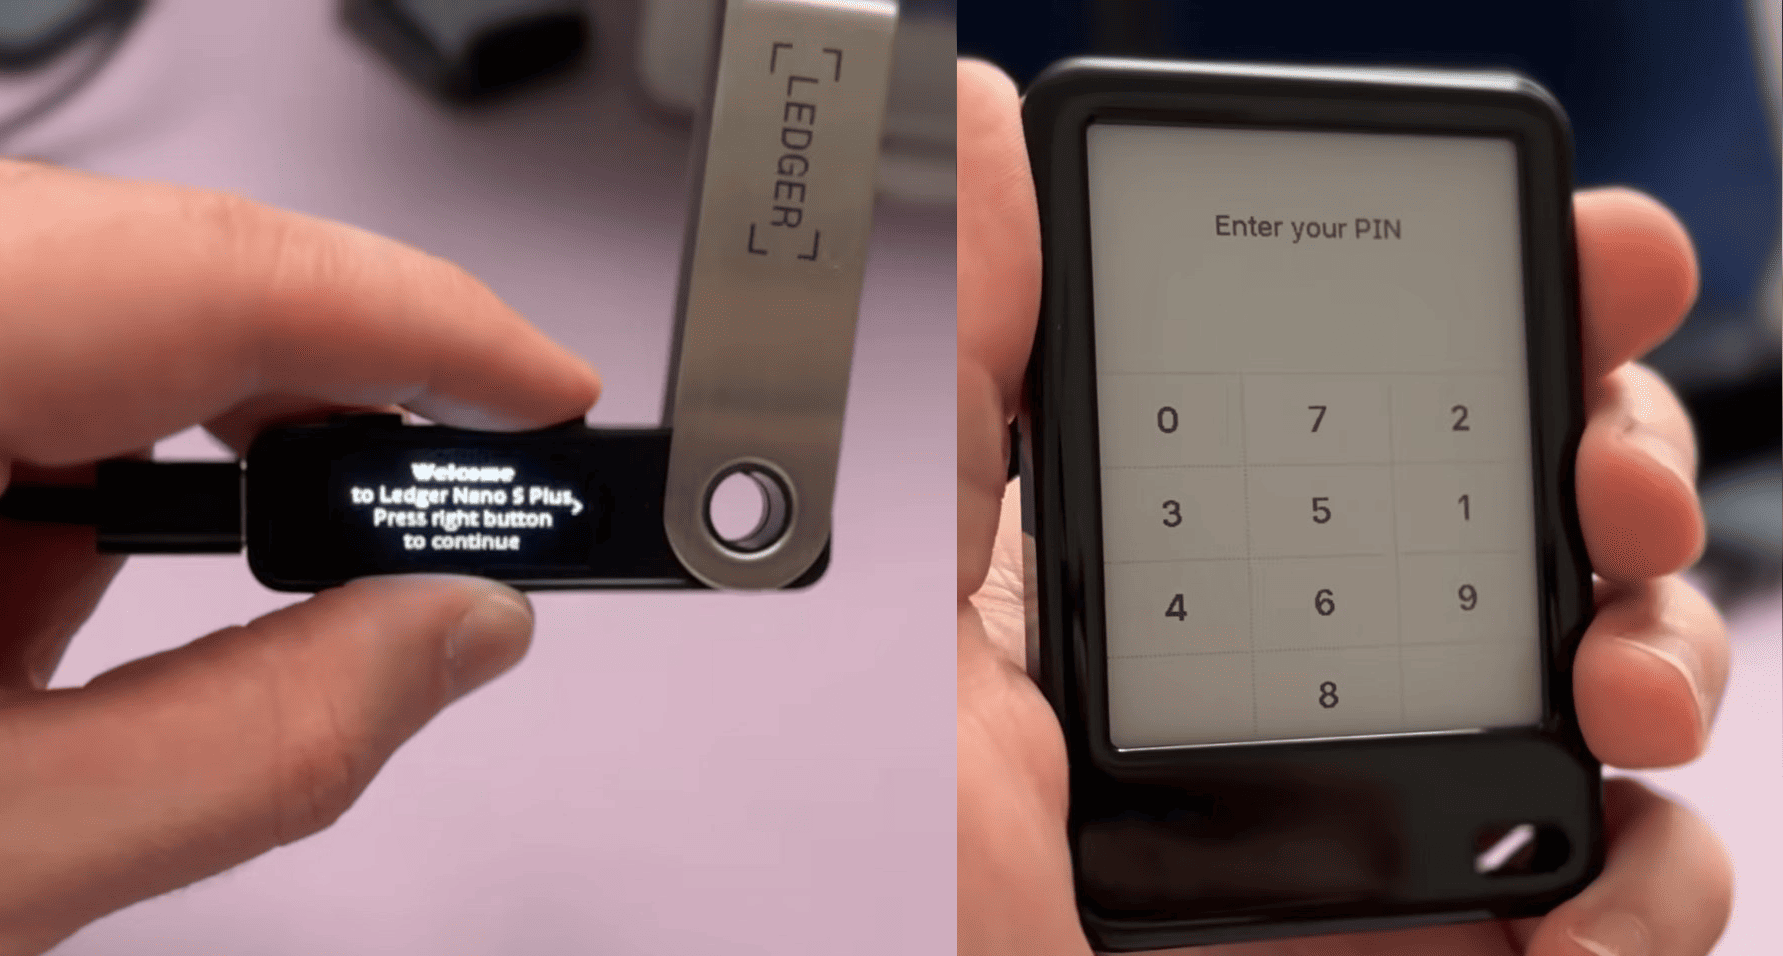
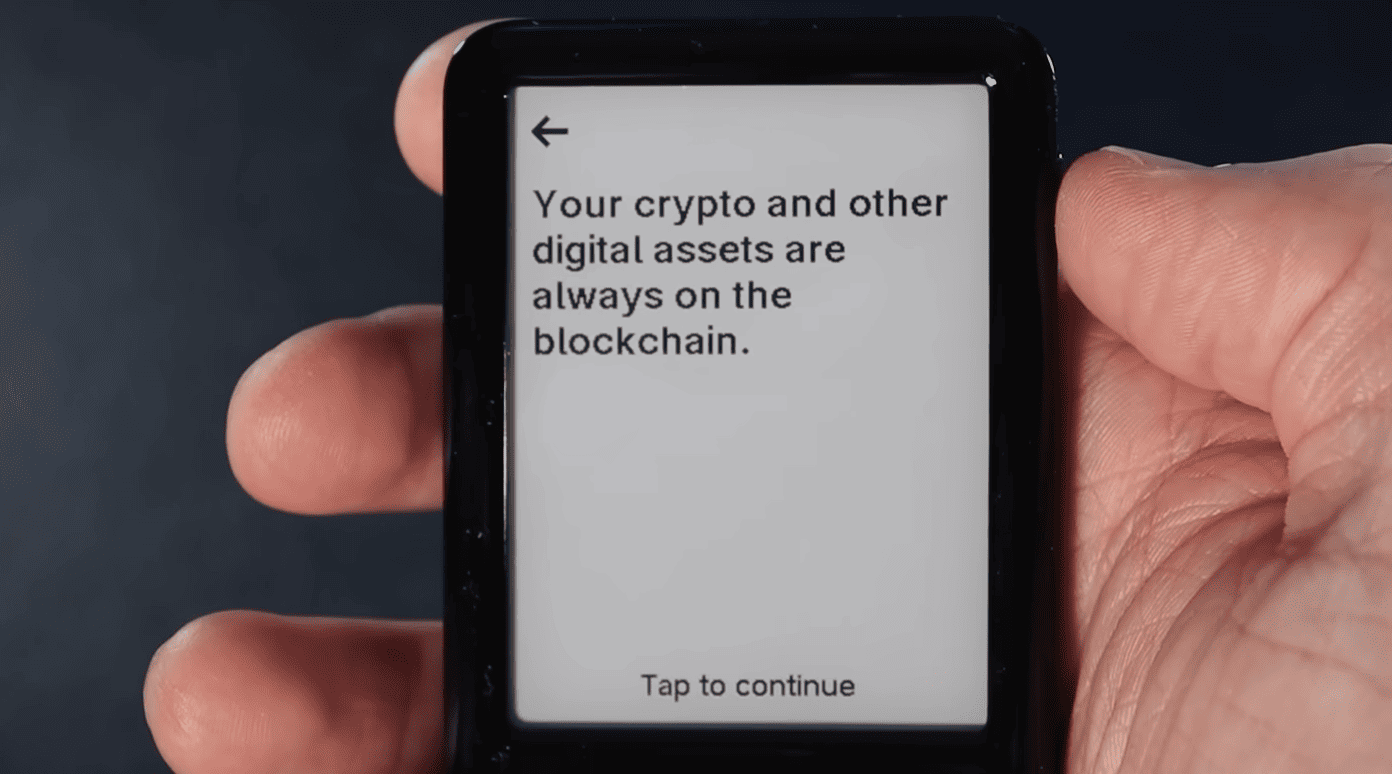
Turn on your hardware device using the button on the side. Then tap the screen to continue. Read all the tutorial prompts and keep tapping Tap to continue.
Next, choose setup via the Ledger Wallet app for PC or mobile devices.
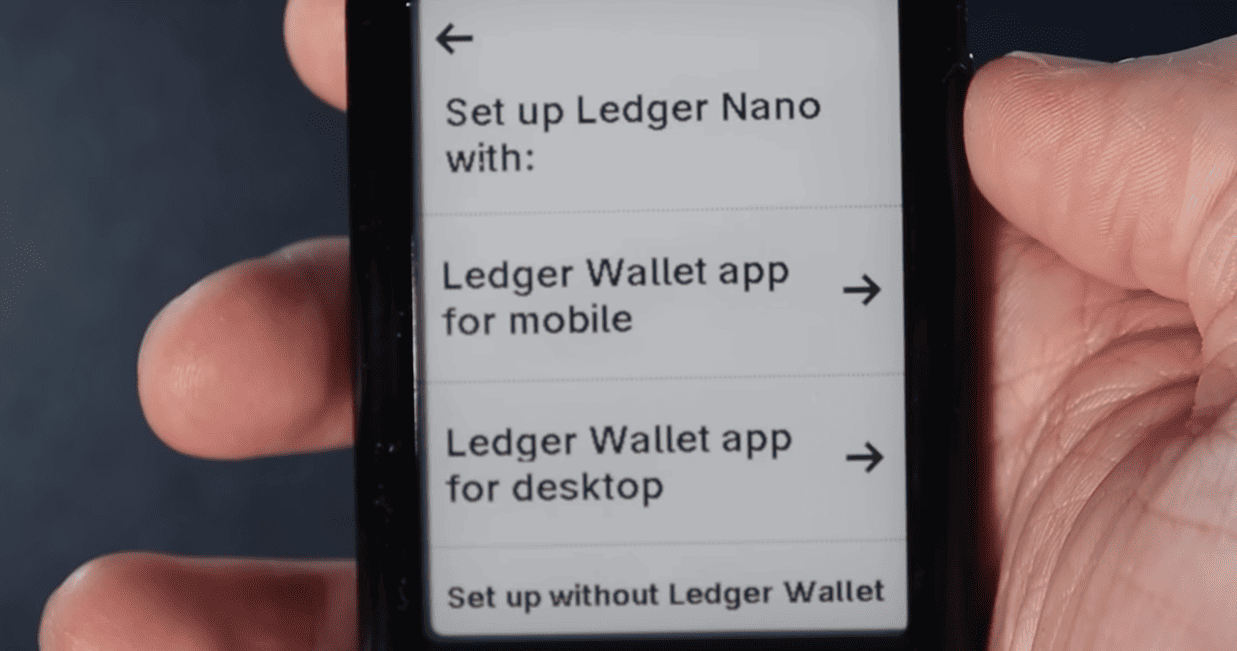
Next, go to ledger.com/start, download the appropriate version for Windows, Mac OS, Linux, iOS, or Android, and open it.
If you see a request to allow accessory connection, click Allow. Then select Check Ledger Nano Gen5 and confirm on the hardware device.
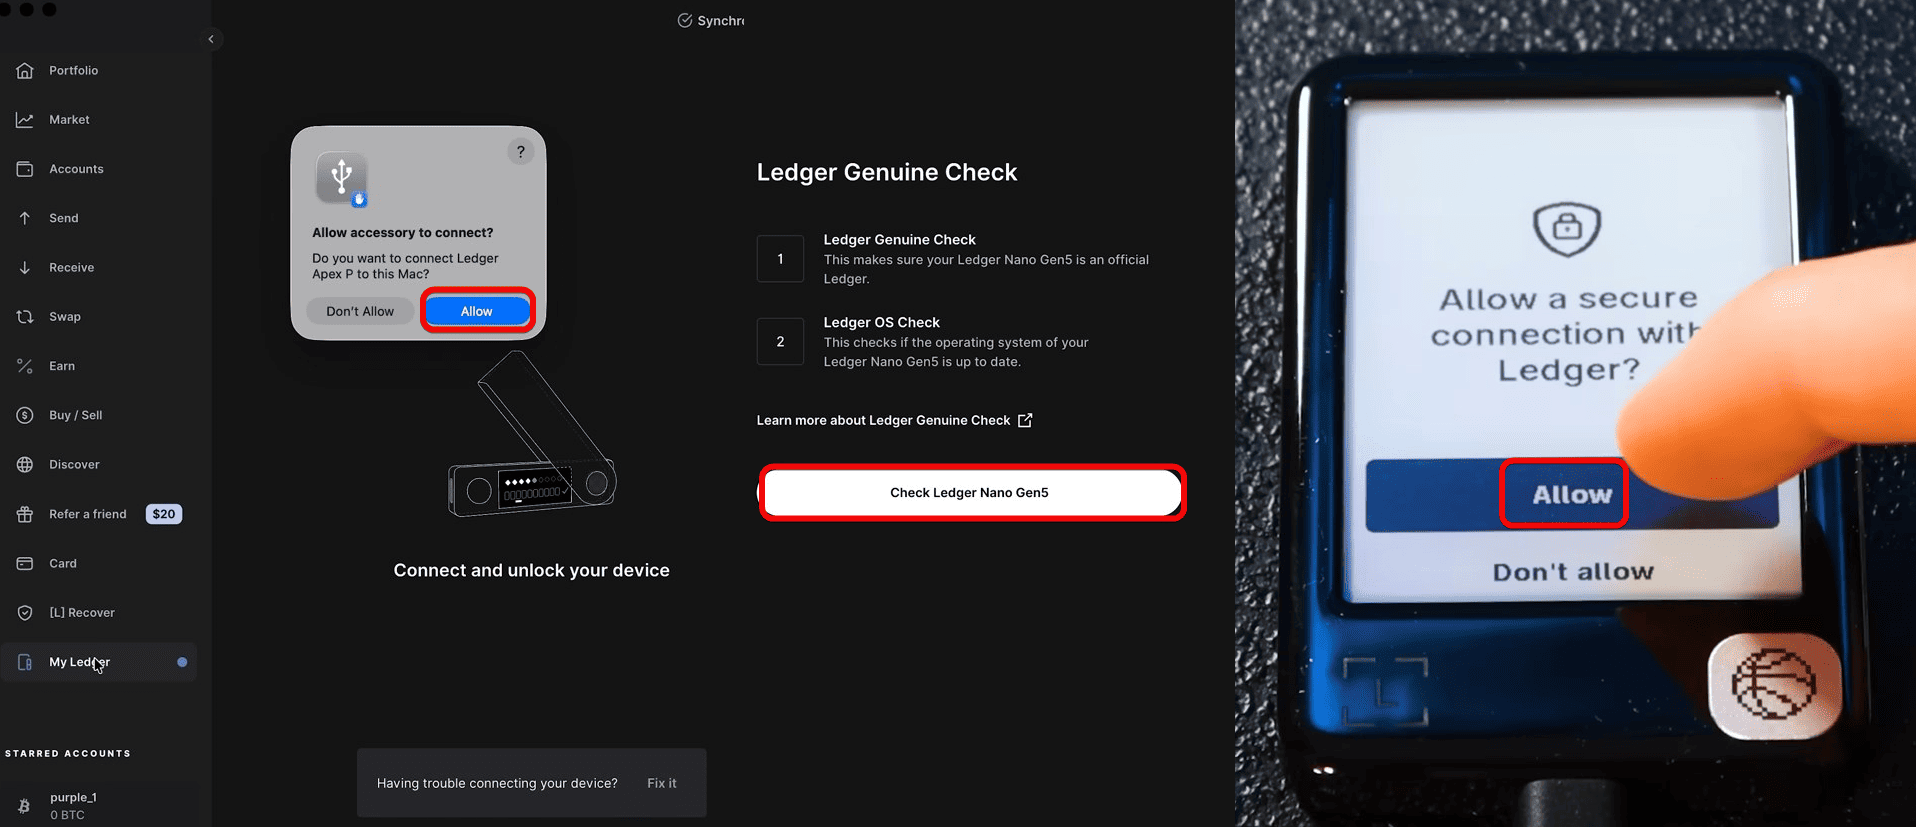
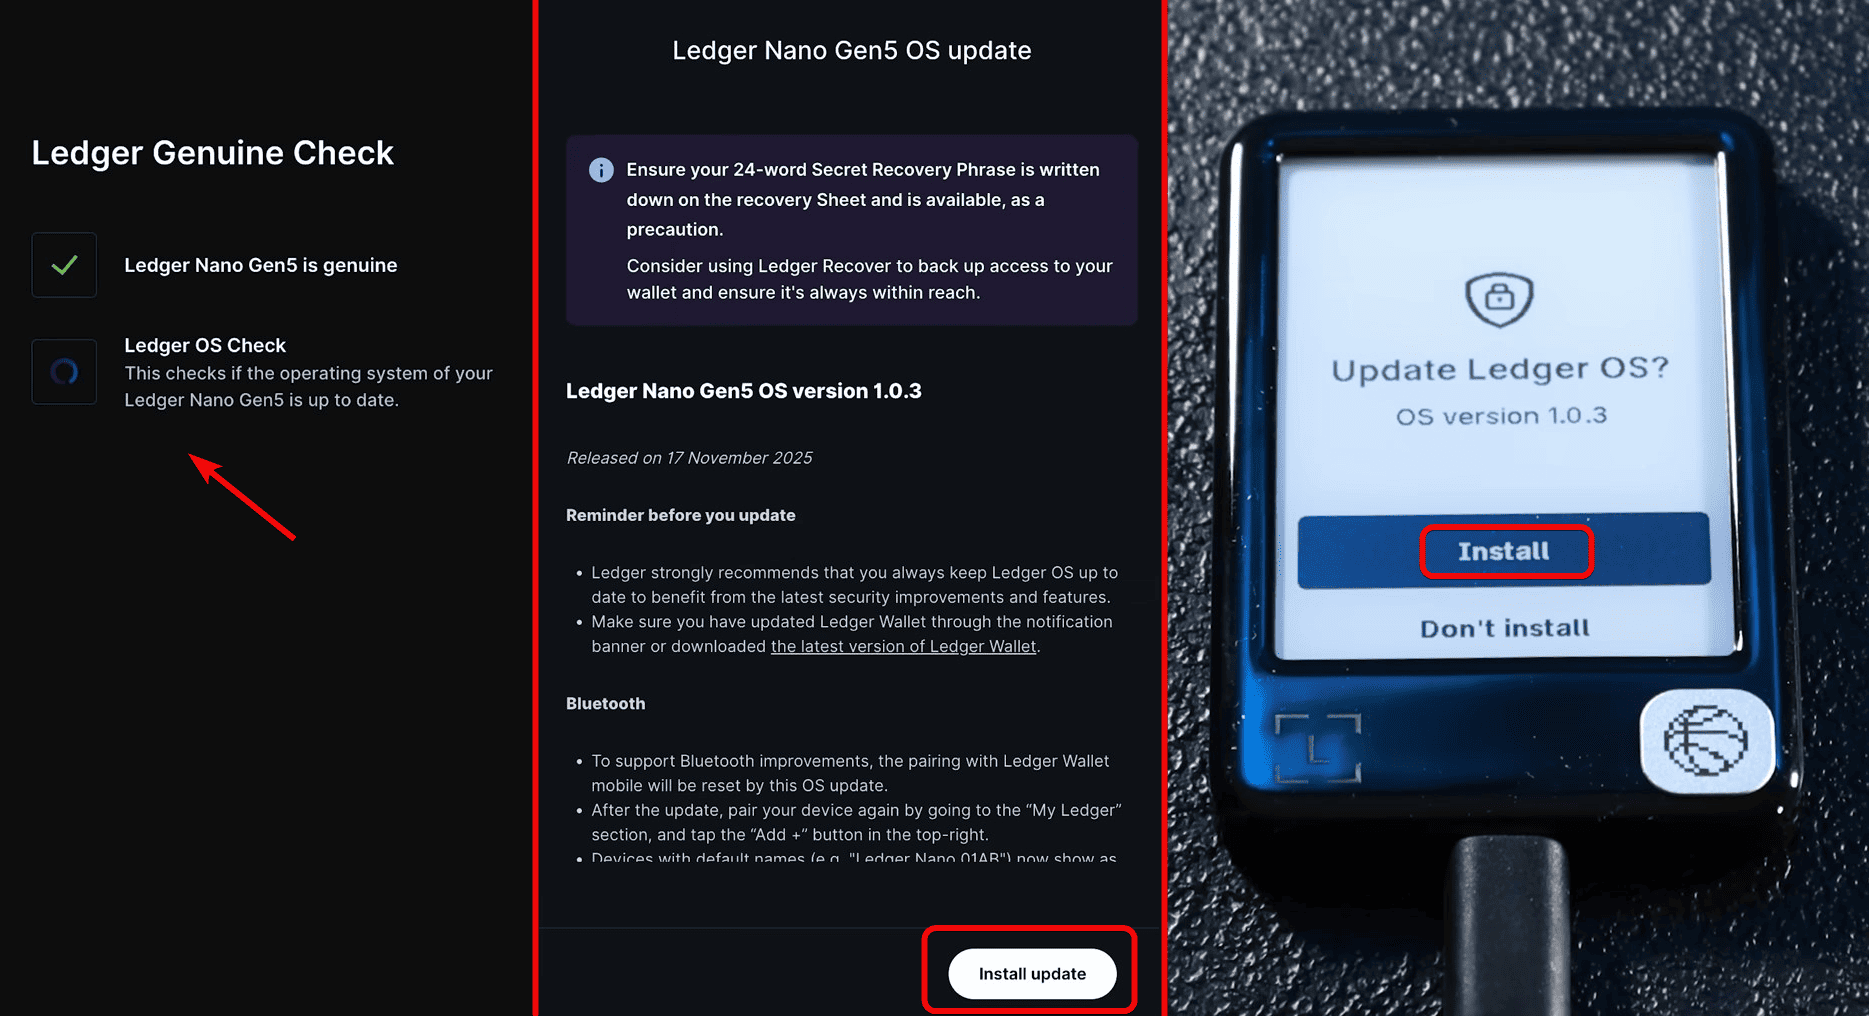
After successful verification, update the device OS via the app: click Install update, then Install on the Nano Gen5.
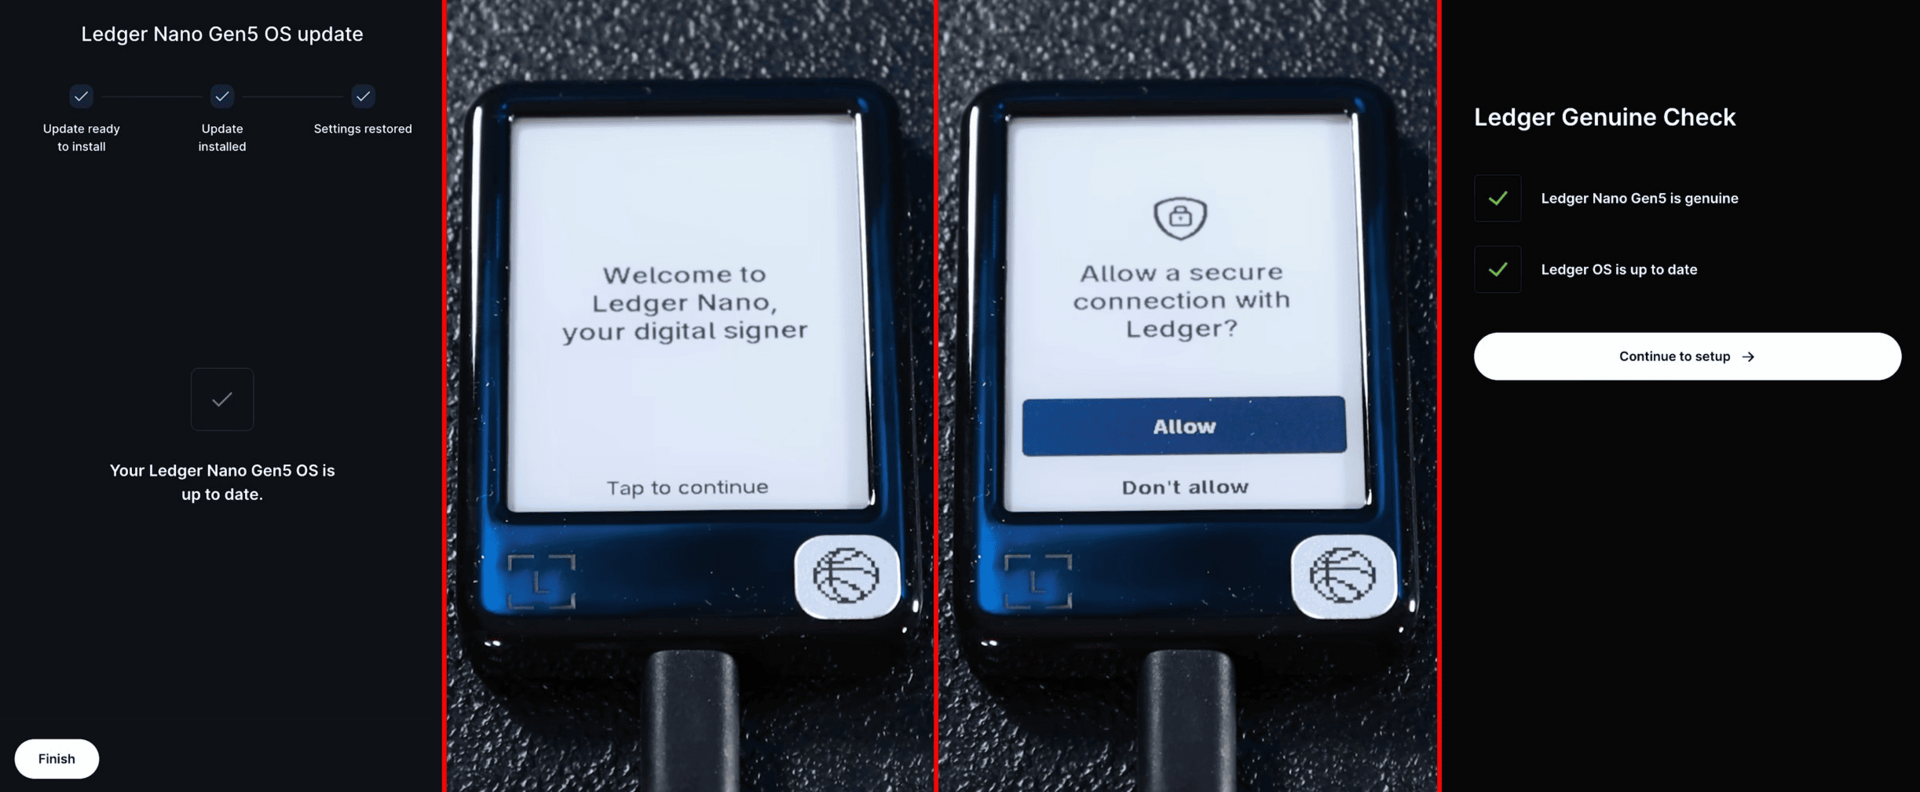
After the update is complete, click Finish, confirm the OS version, and click Continue to setup.
Next is an optional step where you can give your Gen5 a unique name. If not, click Maybe later. Let's name ours bytwork.com.
Setting a PIN Code
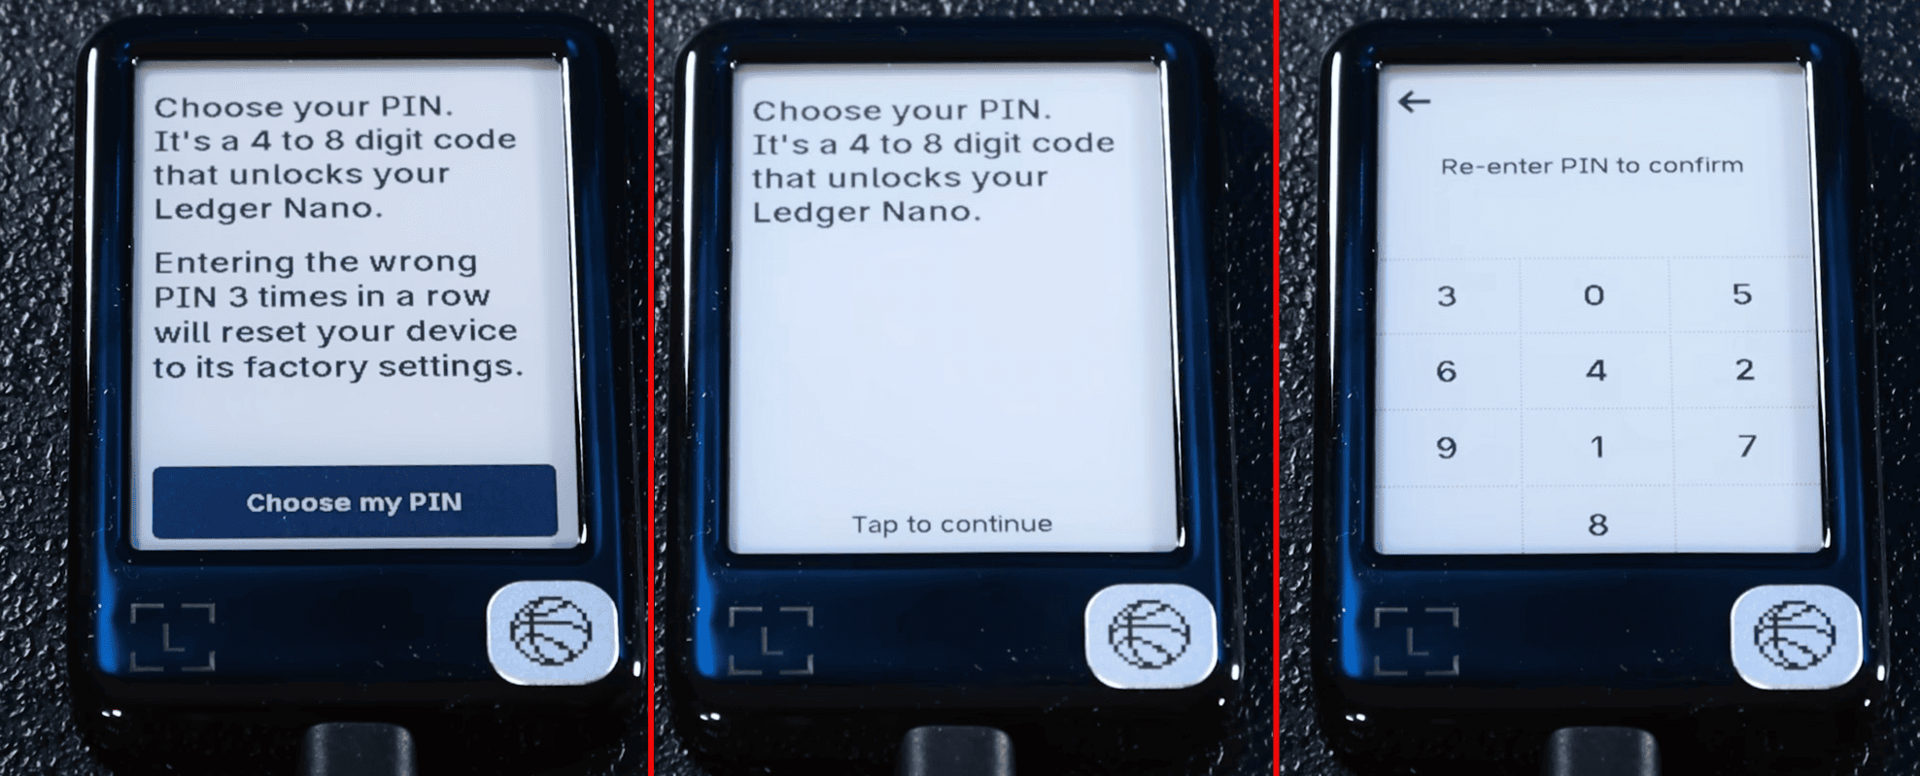
The next step is setting a PIN code. Tap the screen, then select Choose my PIN. Enter a 4-8 digit PIN code, then repeat to confirm. After setting the PIN, tap the screen to continue.
Then choose the setup option. We'll set it up as a new Ledger.
Creating a New Wallet
Tap the screen, then select Set up as a new Ledger device. The hardware device will show warnings about the importance of storing the seed phrase. Click I understand.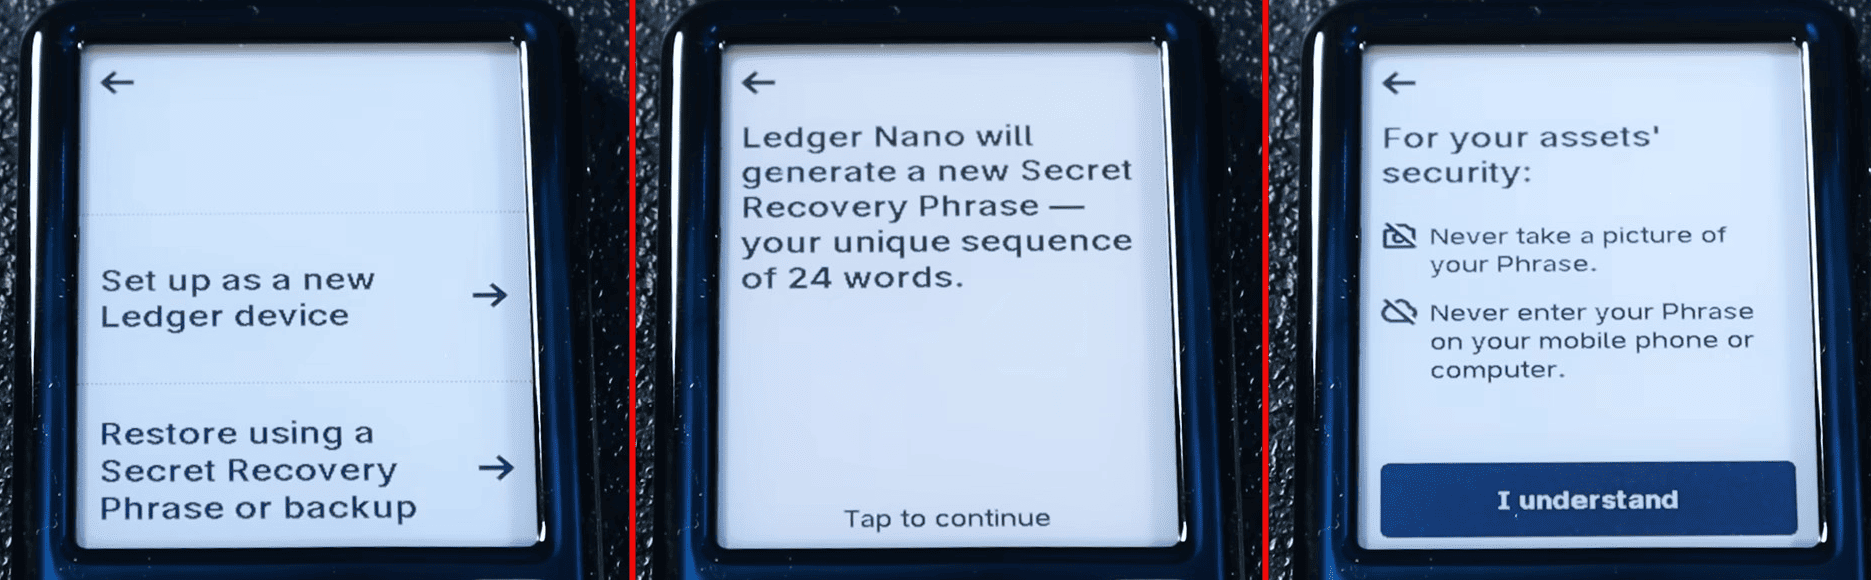
Before creating the seed phrase, carefully read the on-screen instructions and confirm that you understand the key security rule: never show these words to anyone or enter them anywhere!
Ledger will generate a new secret recovery phrase of 24 words for you. These are the keys to your future wallet. Then, using the recovery sheet, carefully write down all 24 secret words.
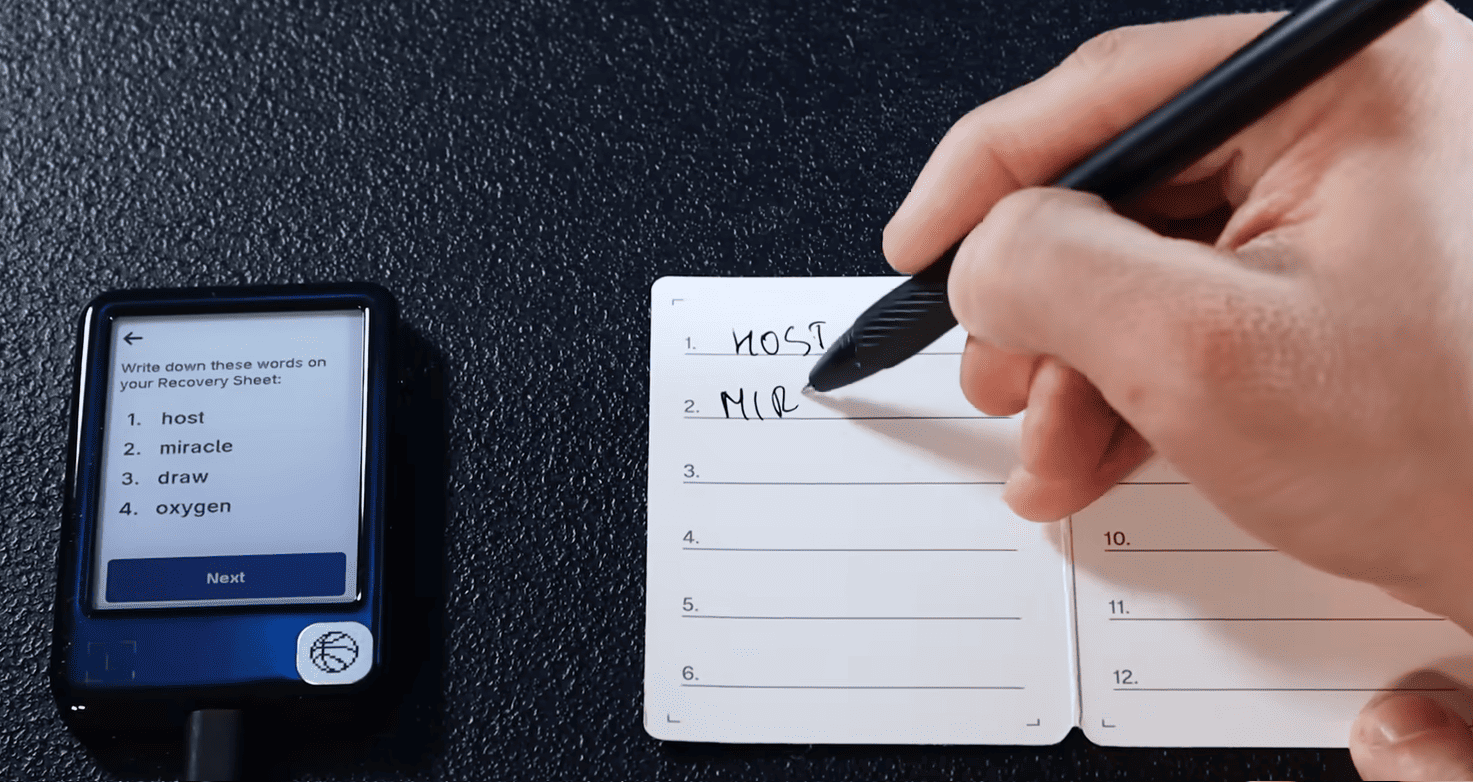
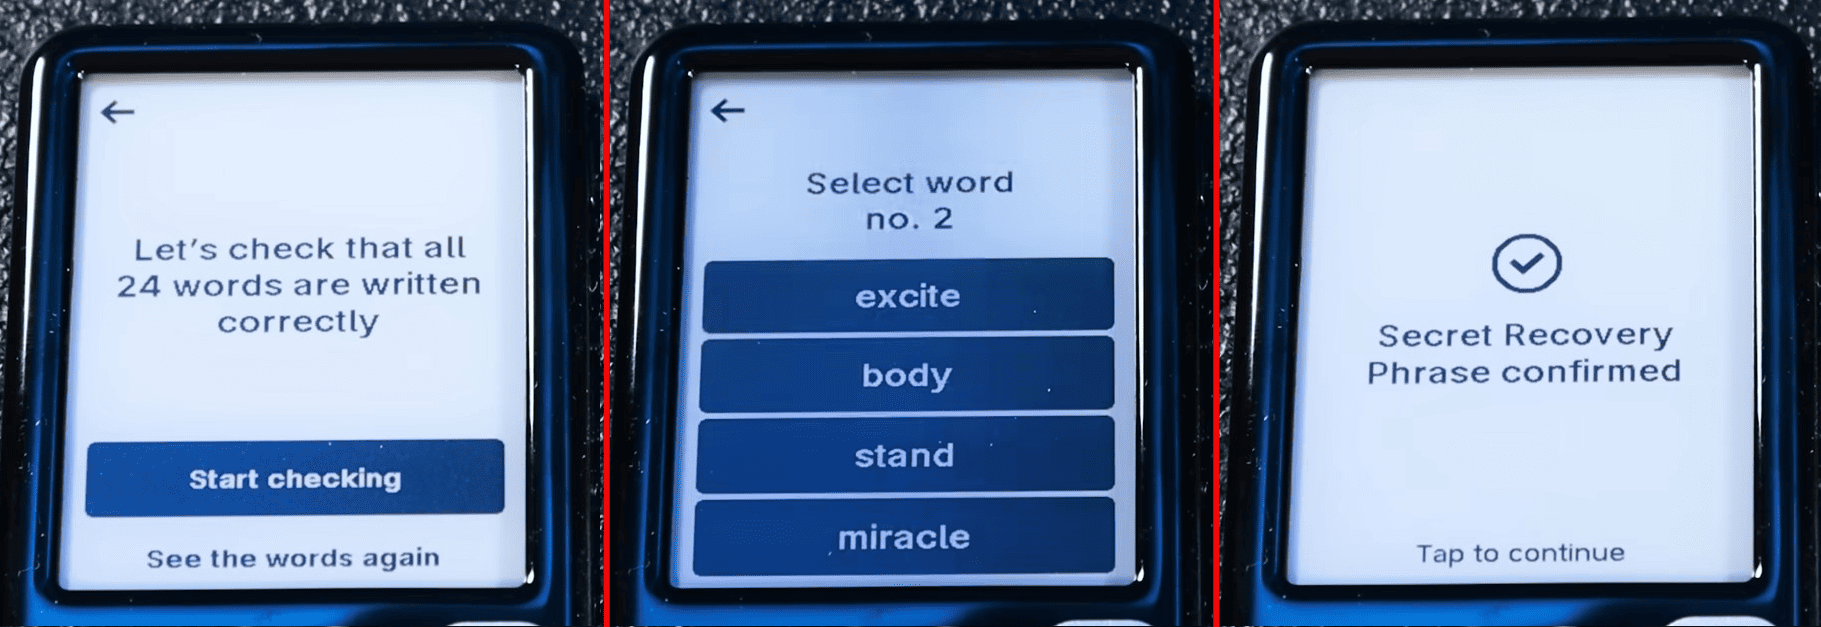
Write down all 24 words in the correct order by tapping Next. After writing, tap Start checking and confirm the words one by one, selecting the correct options. After completion, you will see the message Secret Recovery Phrase confirmed on the device screen.
Keep the seed phrase safe and never show it to anyone!
Next, the wallet will show a warning that only scammers might ask for your recovery phrase. Click I understand and Continue to proceed.
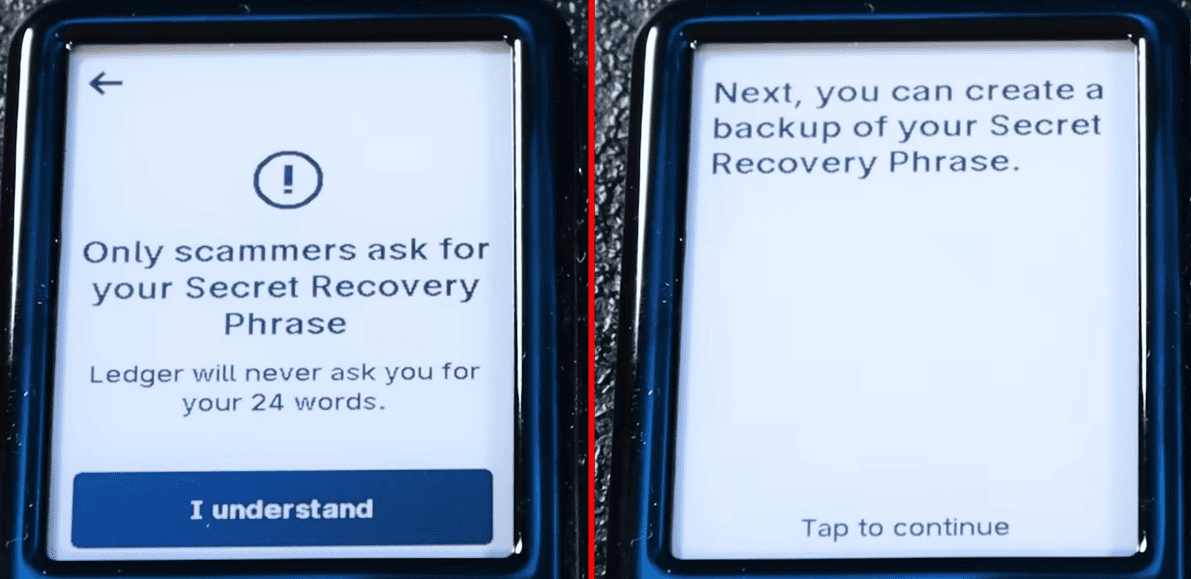
The next step is creating a backup of your secret recovery phrase.
Backup
With a backup, you can access your assets even without the 24-word seed phrase. This step is optional but recommended.
Ledger offers 2 backup methods:
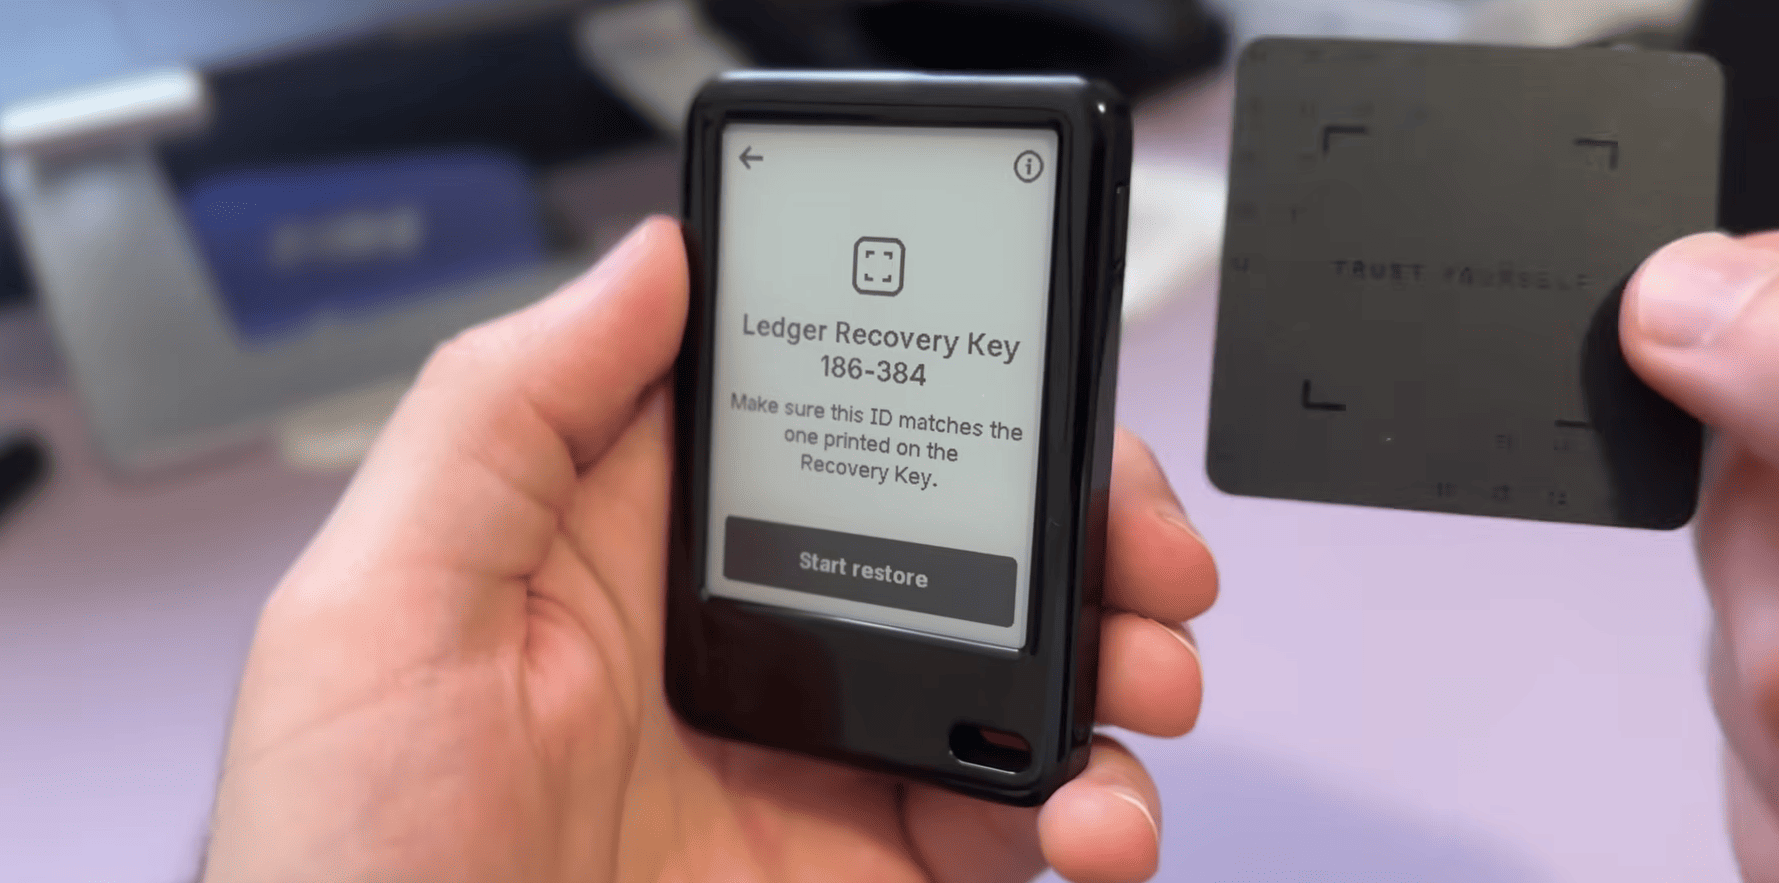
- Ledger Recovery Key - the card included in the package
- Ledger Recover – a paid subscription
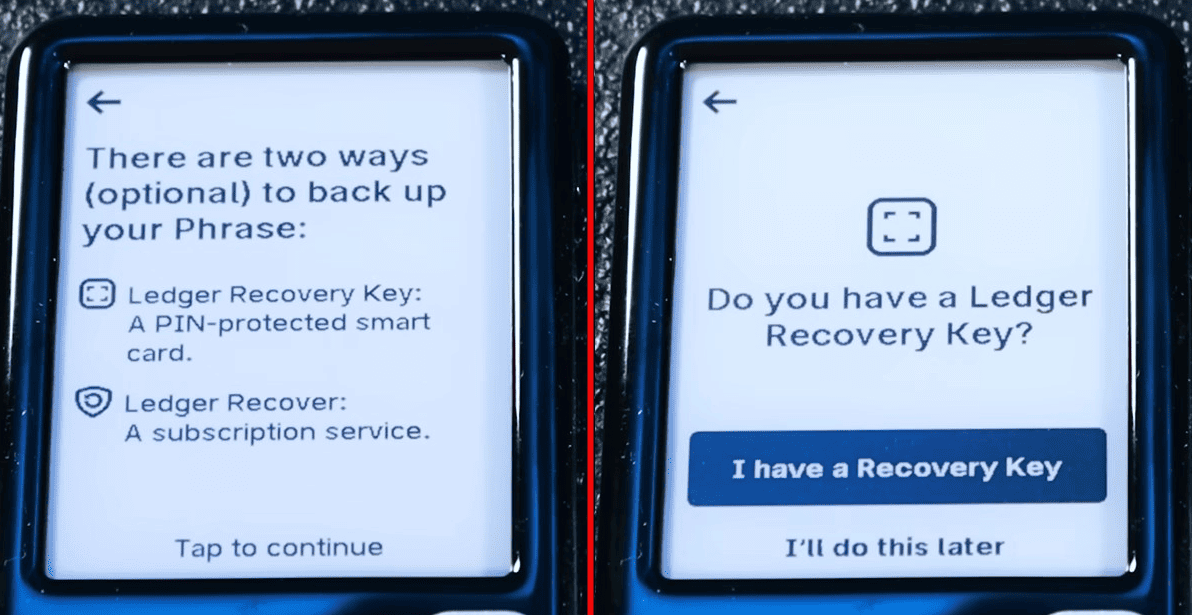
You have the card, so select I have a Recovery Key. Remove the case and place it against the back of the Ledger.
Press the Start Setup button, set and confirm a PIN code. Next, review the information and click I understand. Then create the backup, tap the screen, and again place the card against the back of the Gen5.
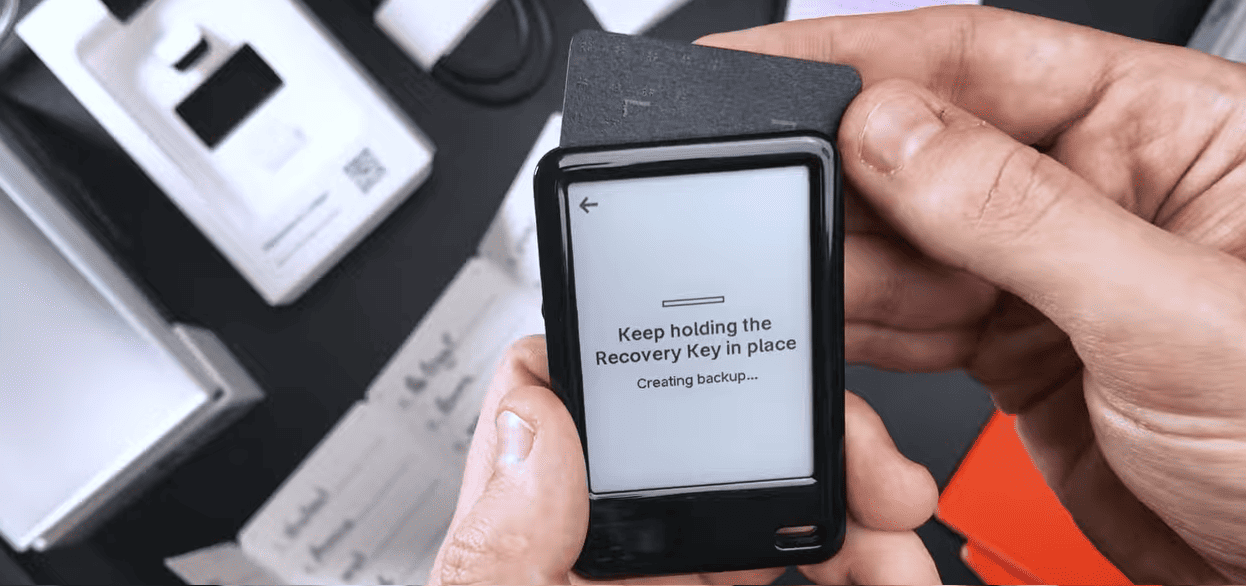
Congratulations, the backup of your secret recovery phrase is created! Tap the device screen and read the final hints. You can also rename the recovery card. Now you can start using the wallet.
How to Use
All Ledger wallets work on an app system, and Gen5 also requires installing a separate blockchain app for each cryptocurrency.
Why this is important and secure:
- Each app generates private keys, verifies addresses, and signs transactions inside the secure chip.
- Apps do not interact, so a failure or hack of one does not threaten your other funds.
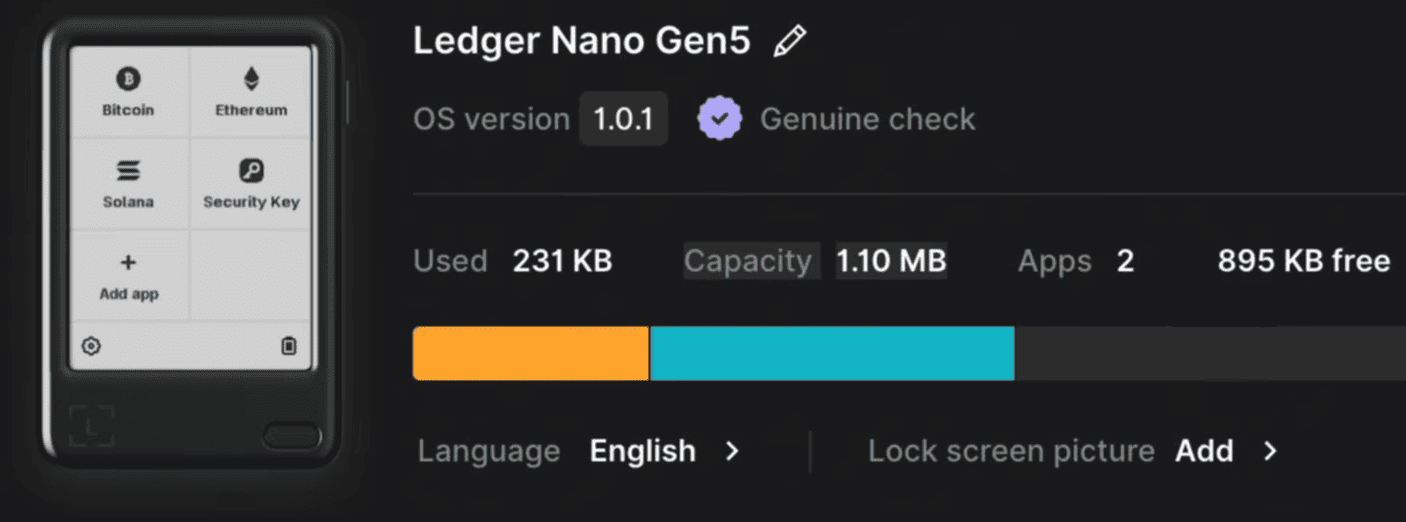
To continue with default apps, click Install now in the Ledger Wallet app. By default, Bitcoin, Ethereum, and Solana will be installed.
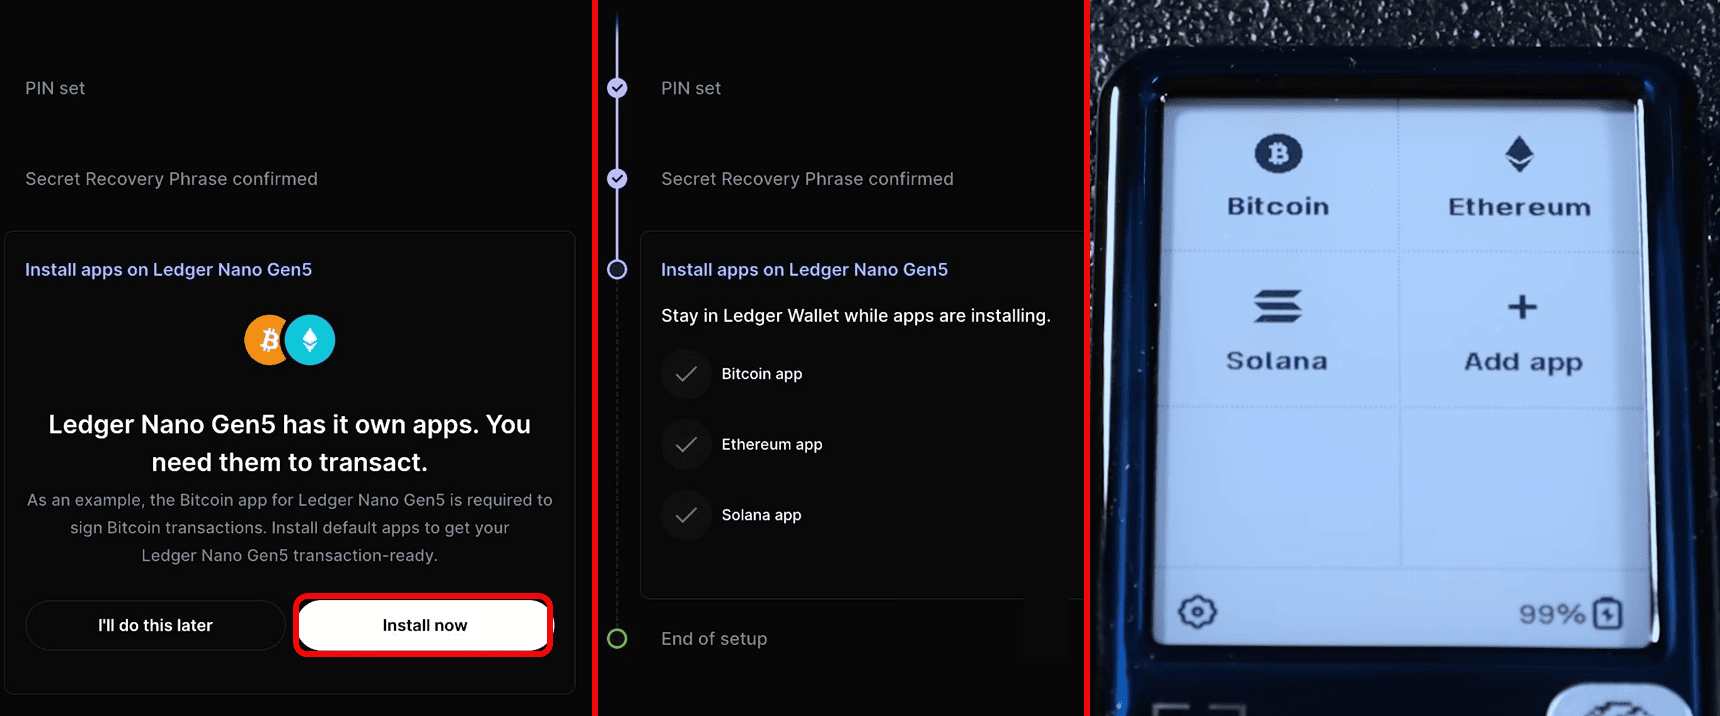
The device has about 1.10 MB of memory and can install 10–20 apps. Removing an app does not delete coins - private keys are stored in the seed phrase, and the app can always be reinstalled.
Now let's quickly understand addresses.
How to Create an Address
To get an address, go to the Accounts tab in the app. Click Add Account here and select a coin.

Select Solana and open the corresponding app on the Gen5 device. The app will create a new account - confirm this.
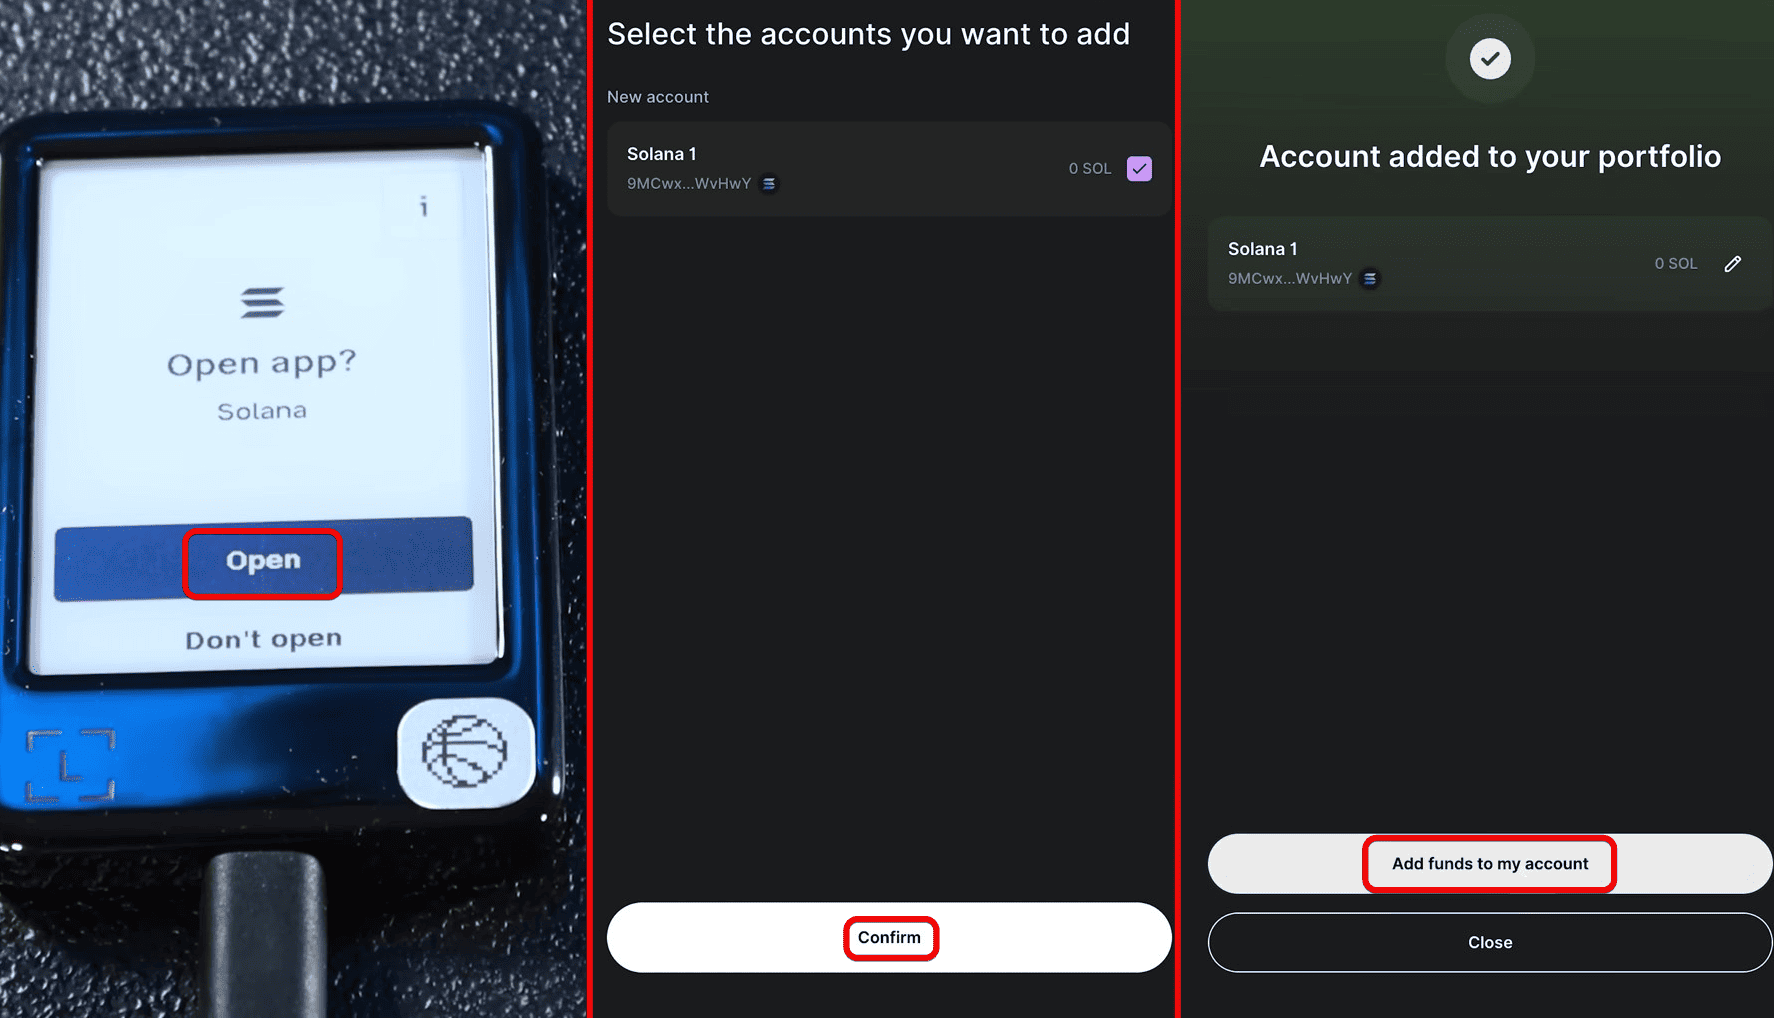
After adding the account to the portfolio, click Add funds to my account and select Receive for transfer or Buy for in-app purchase. Click Receive, then Continue and copy the address.
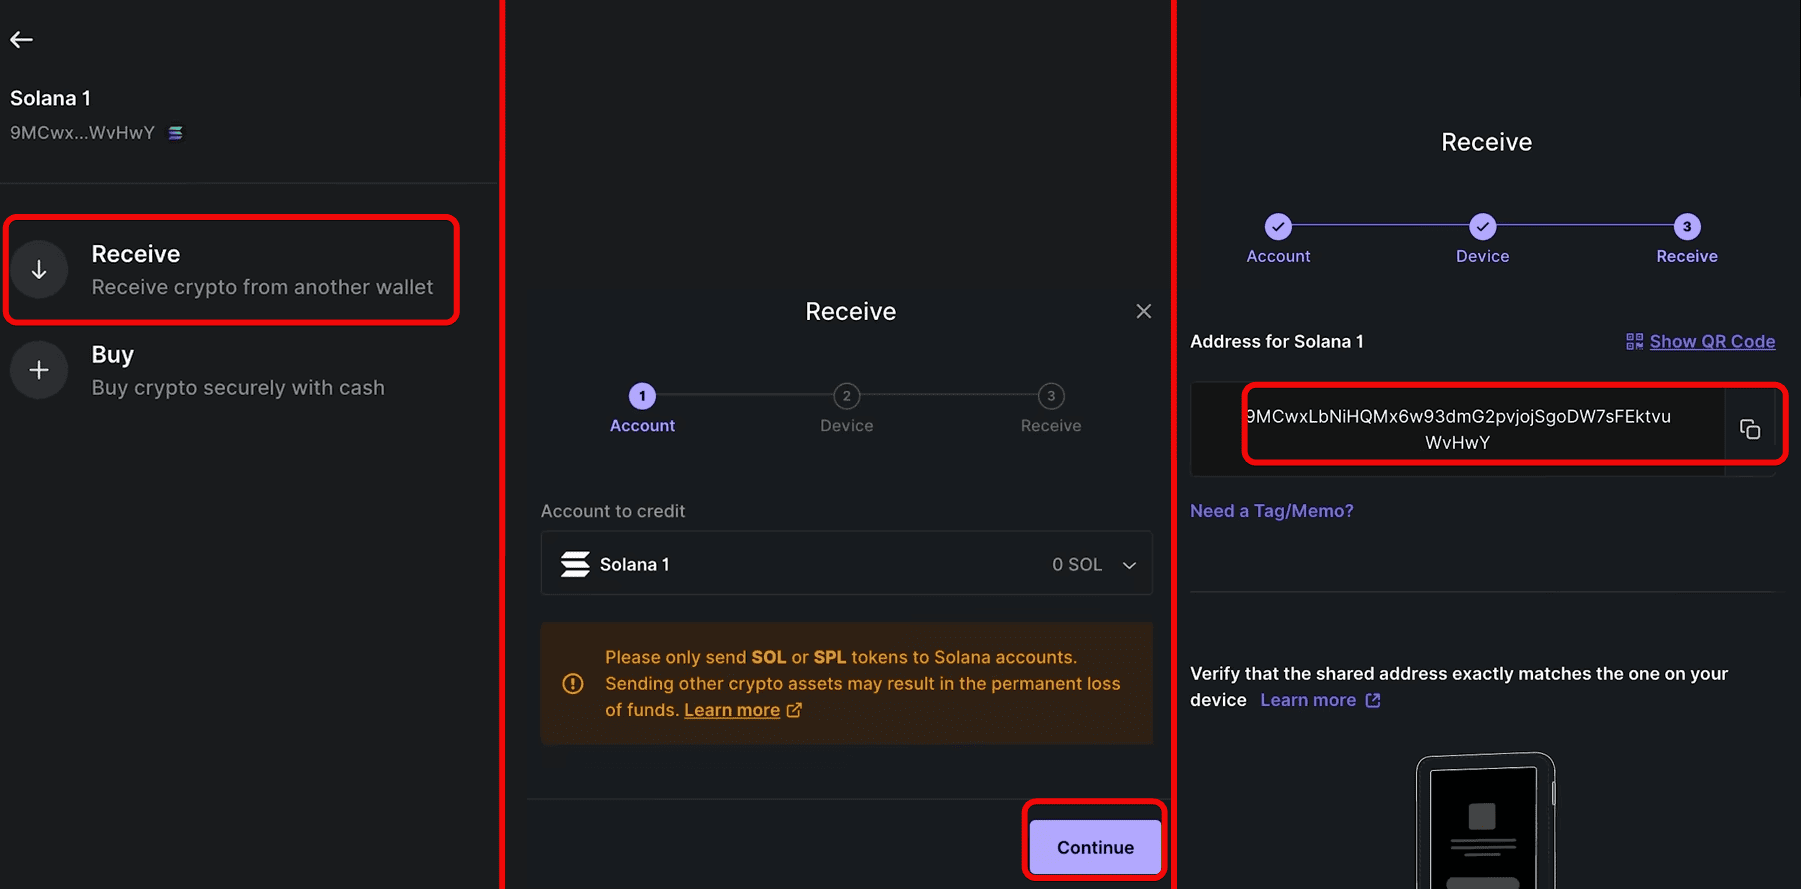
How to Deposit
Now let's get some cryptocurrency. Get the address in the app and verify it on the device – they must match!
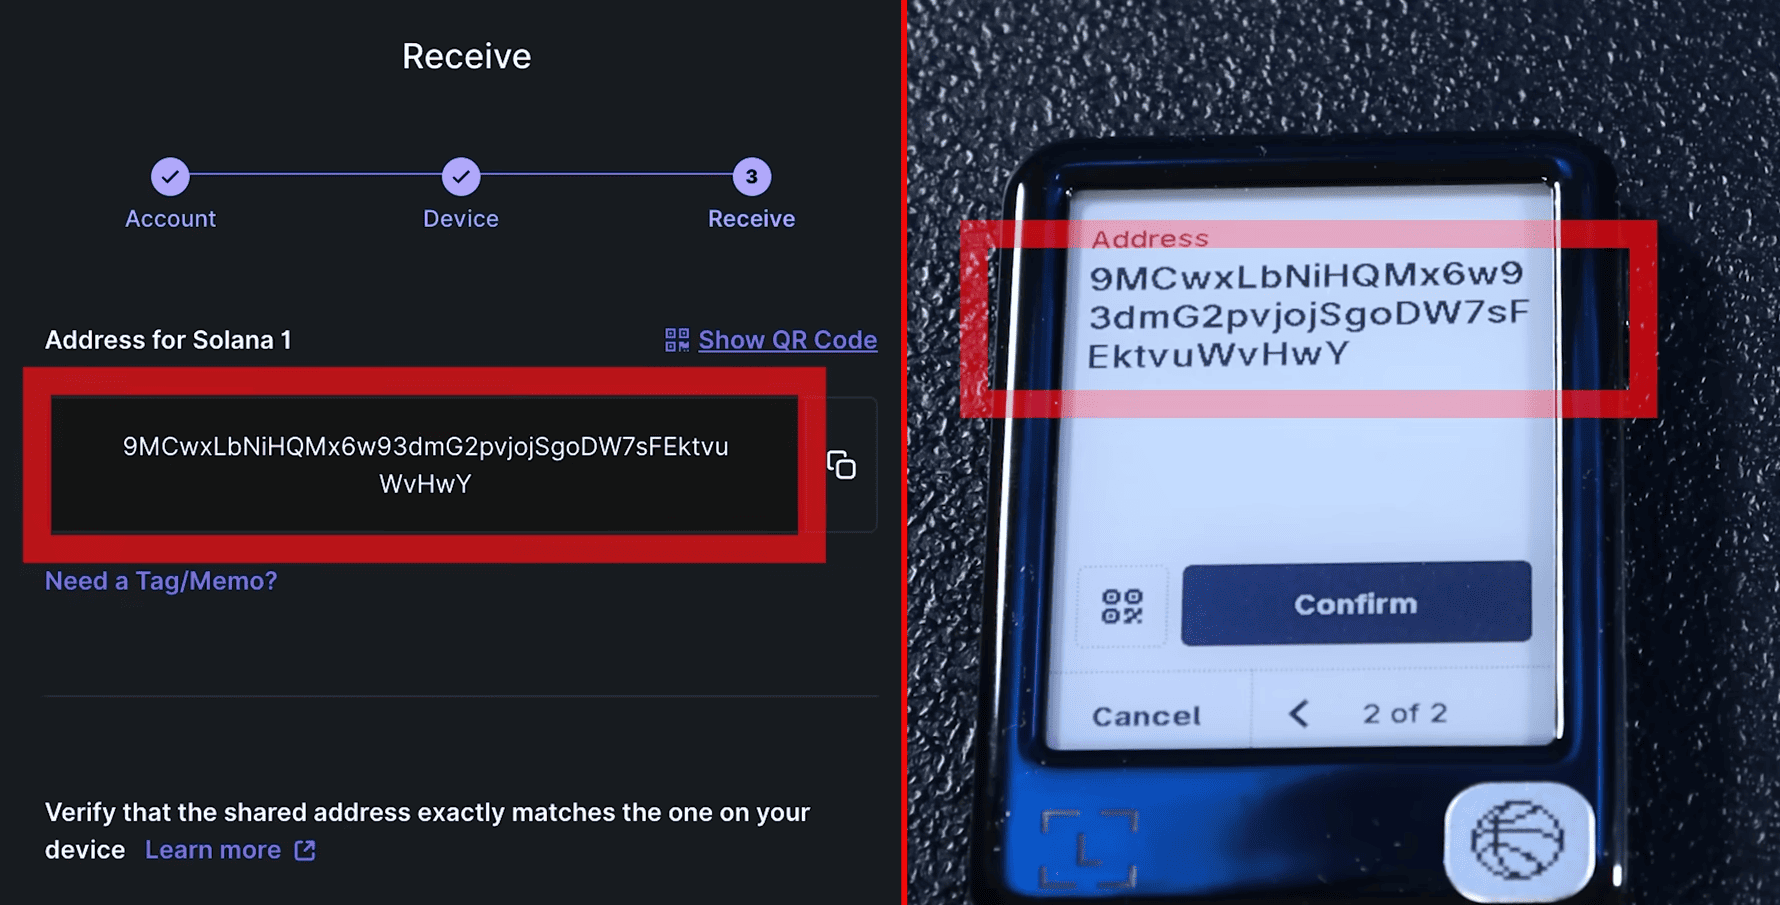
If the address on Gen5 matches the address in the Ledger app, you can share it with the sender. Or send coins to yourself, for example from an exchange.
Exchange
Now let's see how to make exchanges and whether it's profitable.
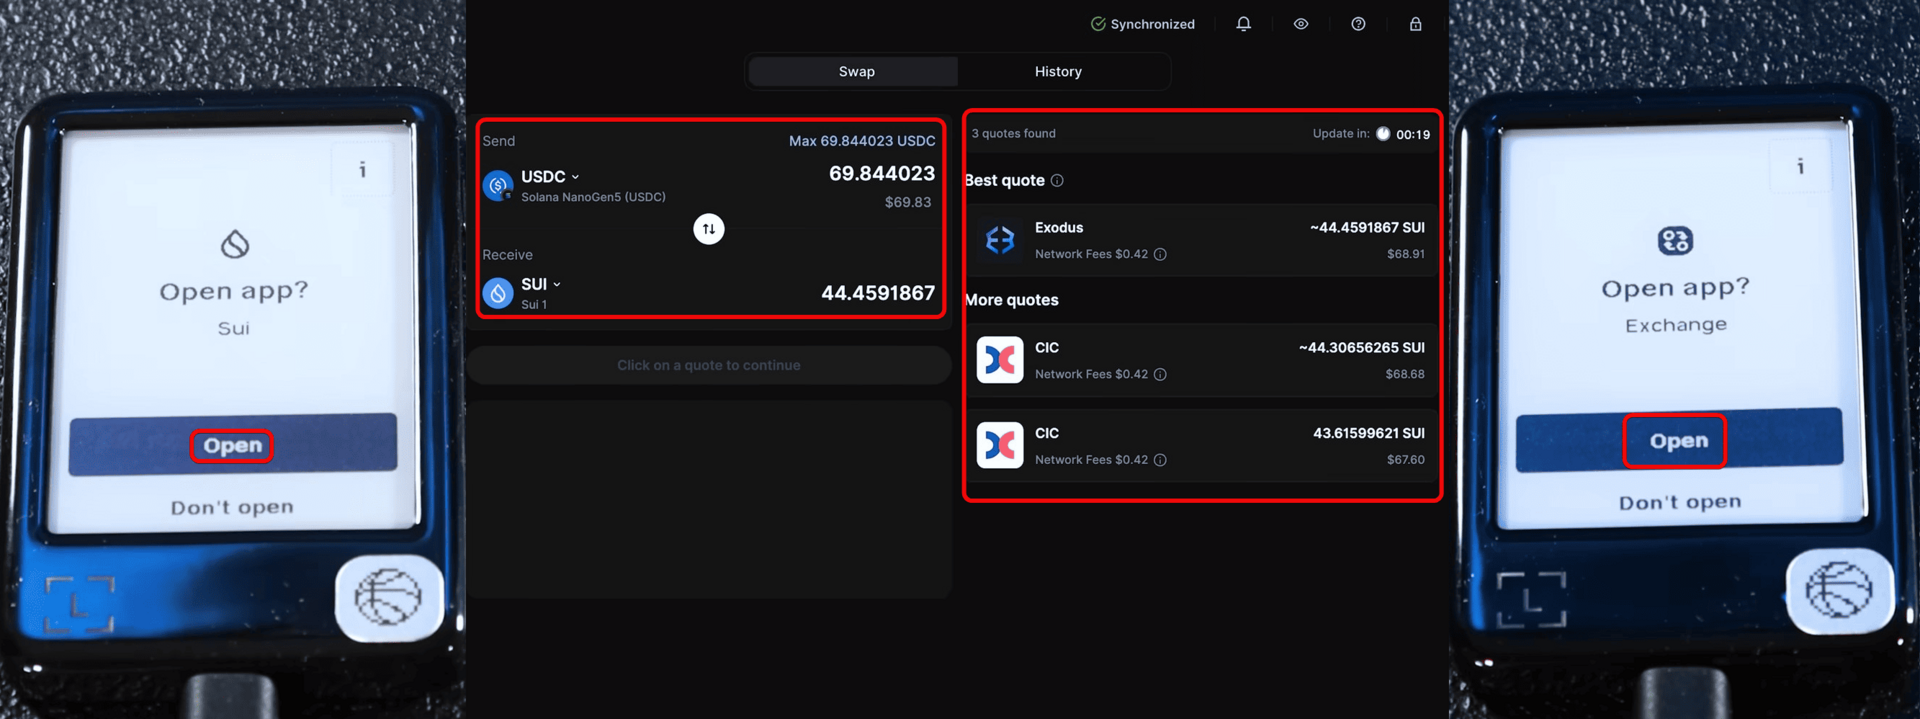
For example, let's exchange USDC for SUI. We'll send USDC on the Solana network to get some SUI tokens.
The wallet found 3 exchange routes. As a provider, choose CIC or via the Exodus wallet. After selecting the pair, press the Swap button. On Gen5, open the Exchange app.
Next, review the swap transaction details on your Gen5. Scroll through to review the details. The network fee here is $0.45 - this is the standard transaction fee in the blockchain.
If everything looks good, hold the signing button to sign the transaction.
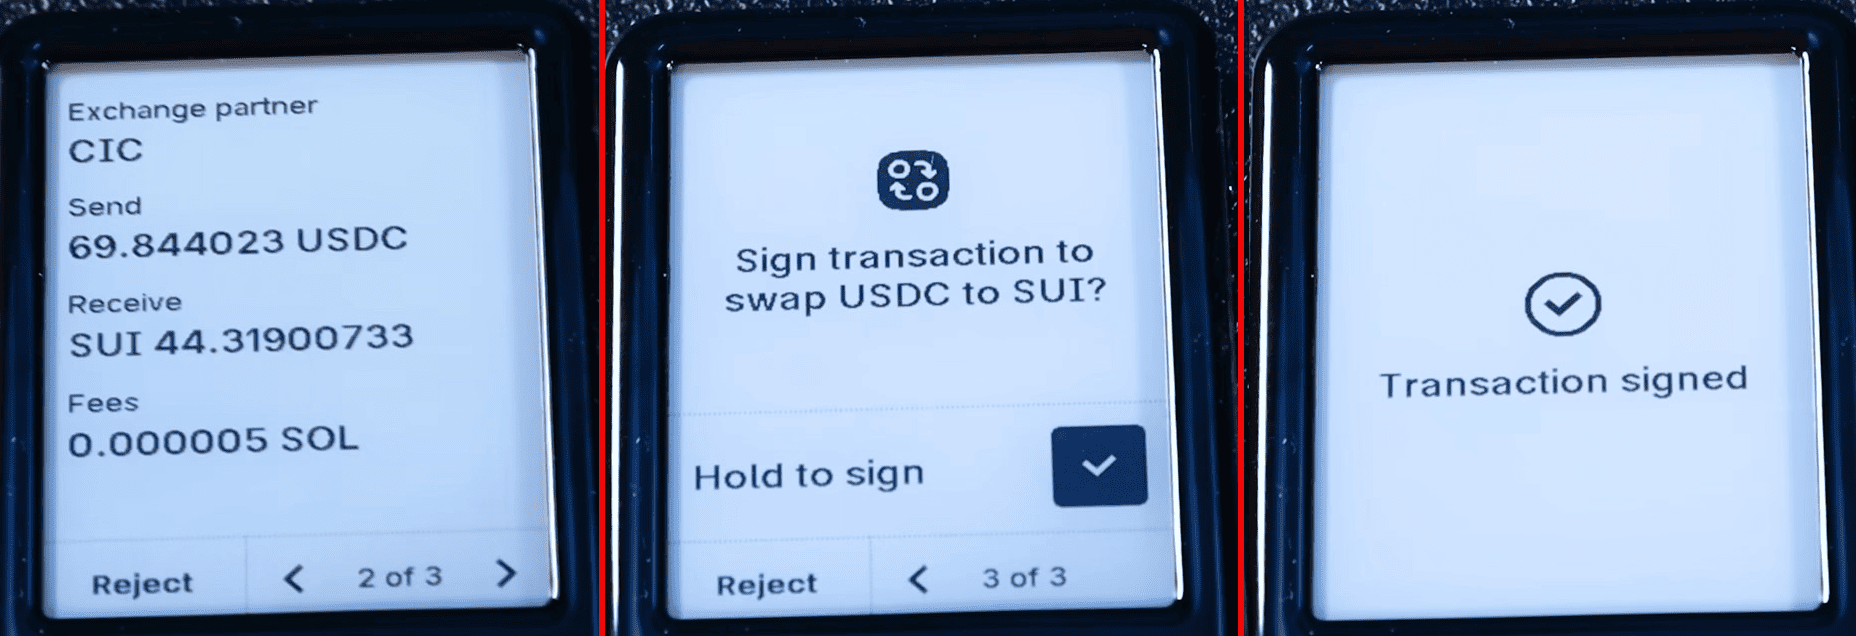
Congratulations, your exchange is complete!
How to Withdraw
Now we'll show how to send cryptocurrency. In the Accounts section, select the coin you want to send. We'll send Solana. Click the Send button. Paste the recipient's address and click Continue. You can also add a Memo tag. Many exchanges require filling in this tag. But we're not withdrawing to an exchange, so we'll skip this tag.
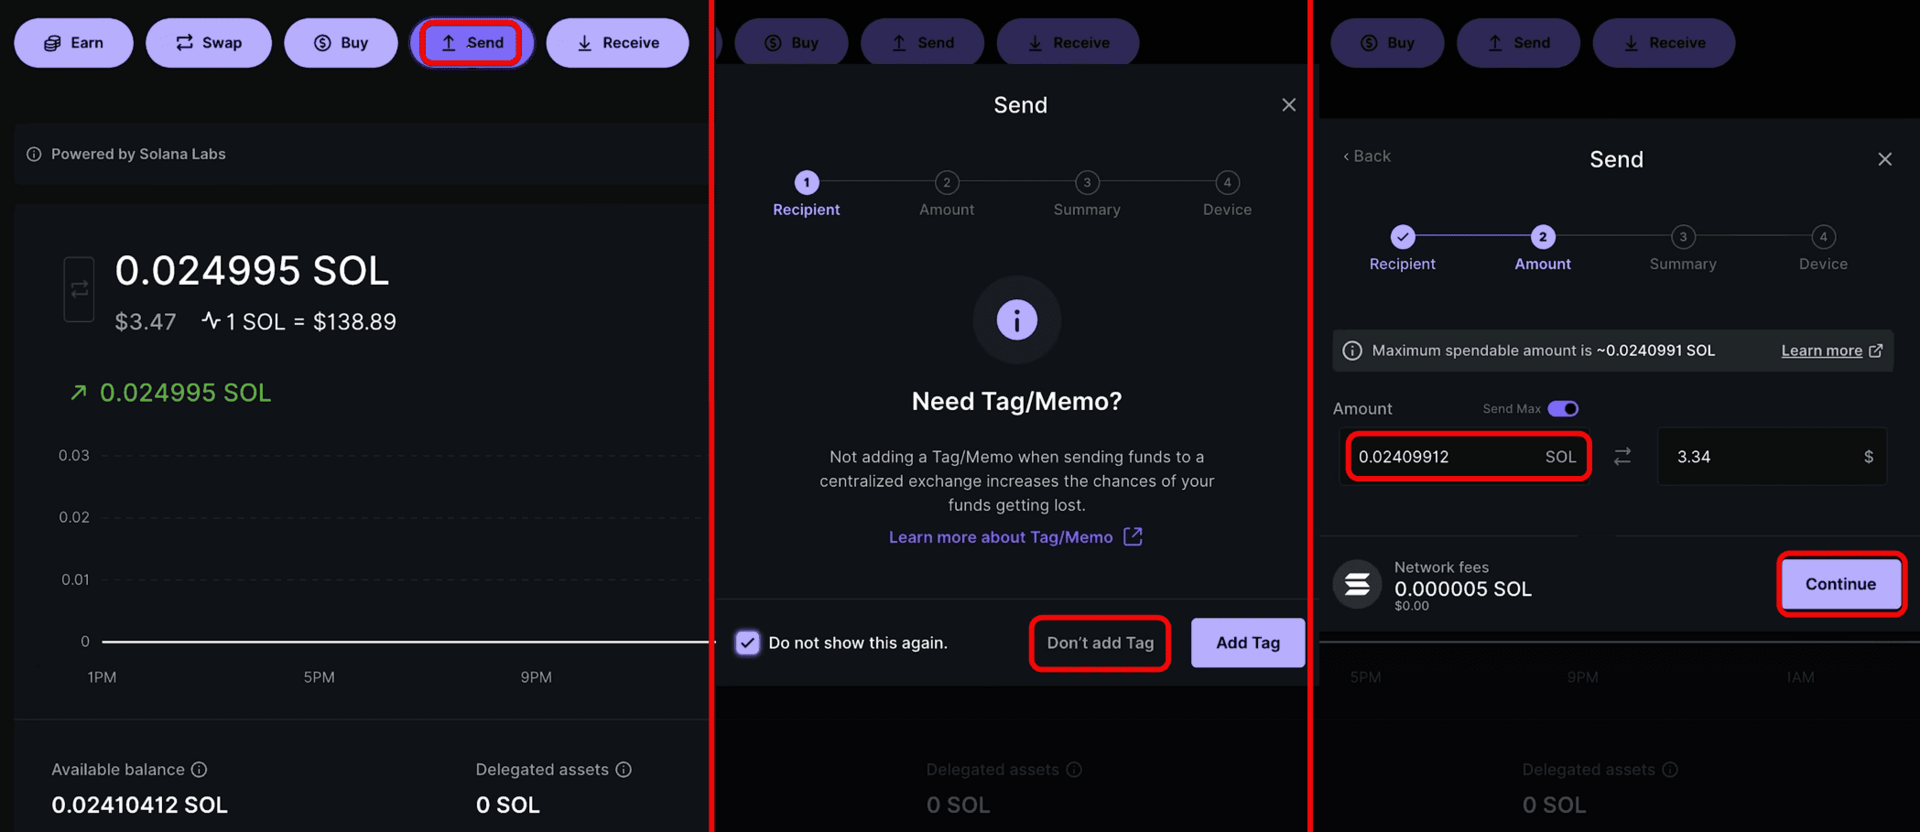
Next, select the amount and click Continue. Review the transaction details and click Continue again.
Next, open the corresponding coin app on your Gen5. On the screen, review the details, and if everything looks good, hold the signing button to sign the transaction.
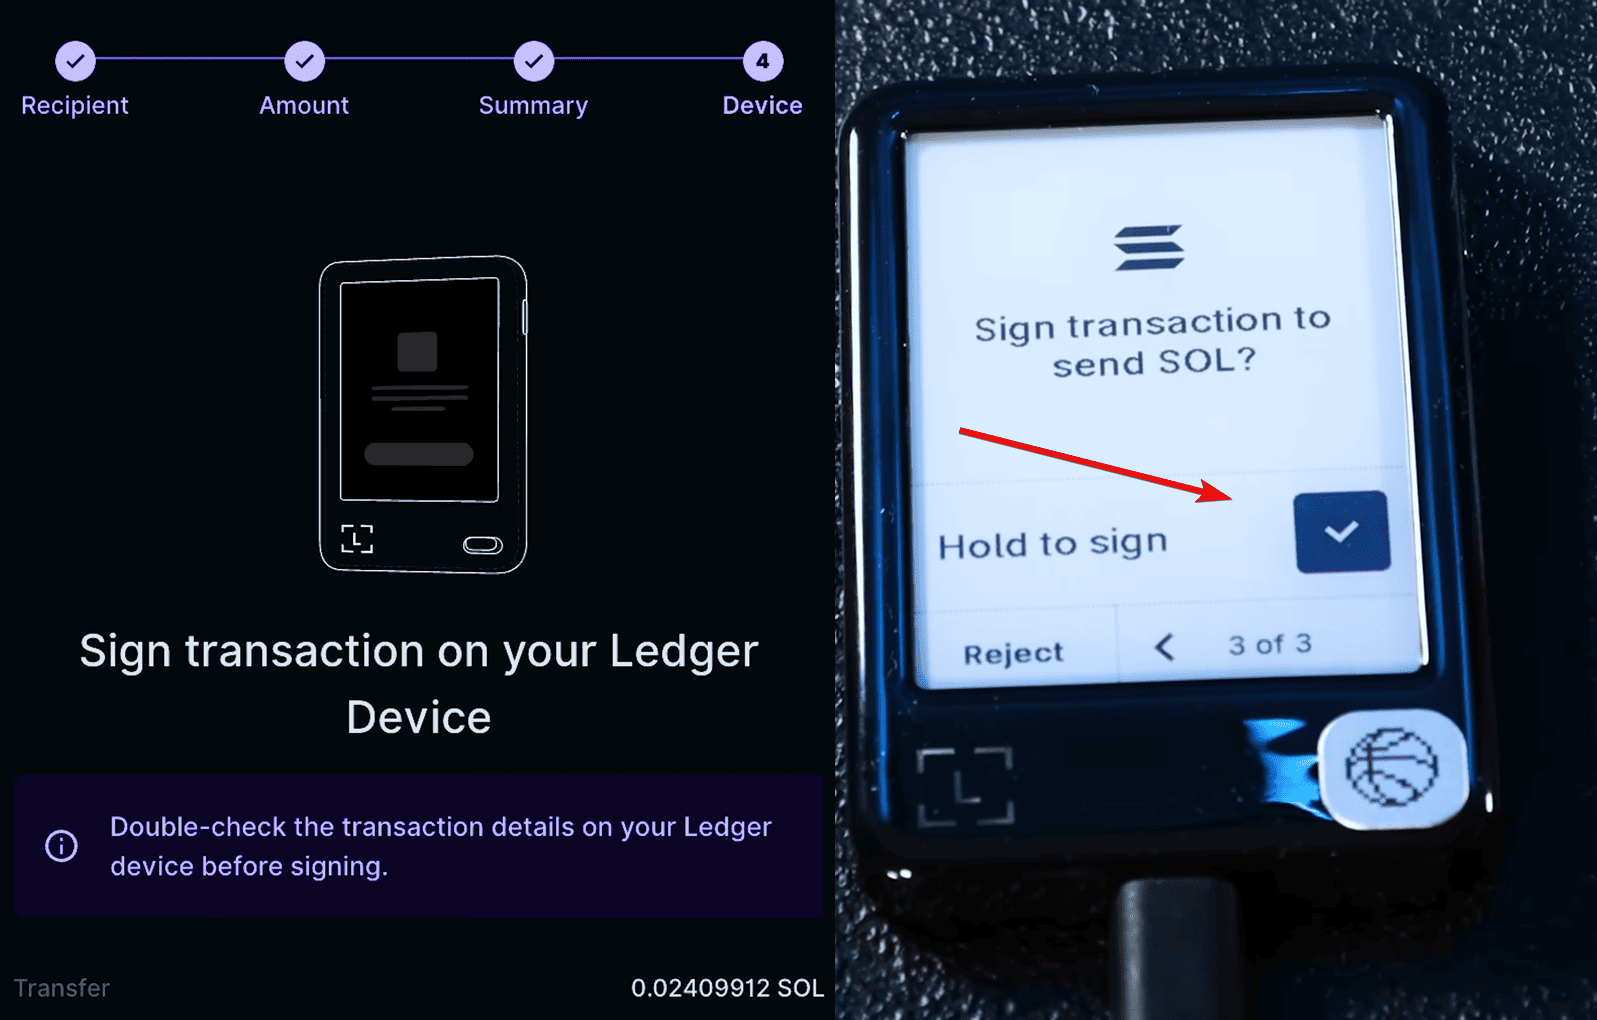
Congratulations, you have successfully sent your cryptocurrency!
Adding Tokens
To add tokens, first click in the app Accounts > Add Account and select the desired token from the list. Then confirm the addition on the hardware device.
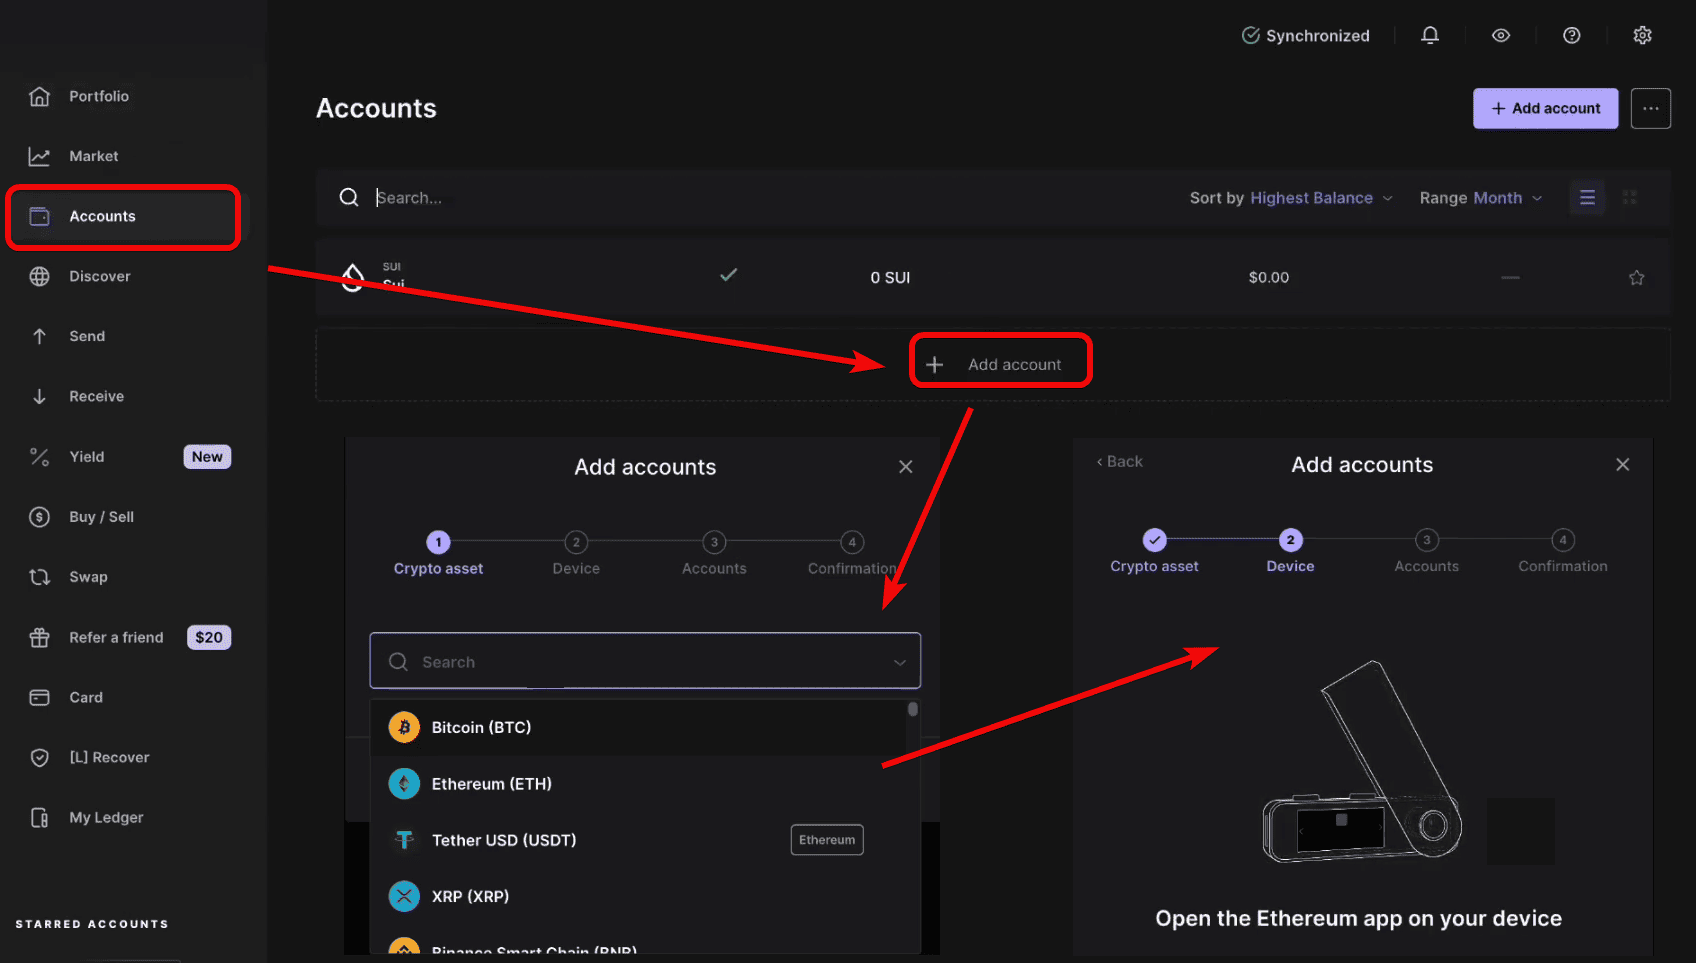
For this, open the Ethereum app on Gen5 and confirm.
Staking
To start staking Ethereum, go to the Earn tab on the left, then you will see your available assets. If you already have Ethereum in your wallet, it will appear in this list.
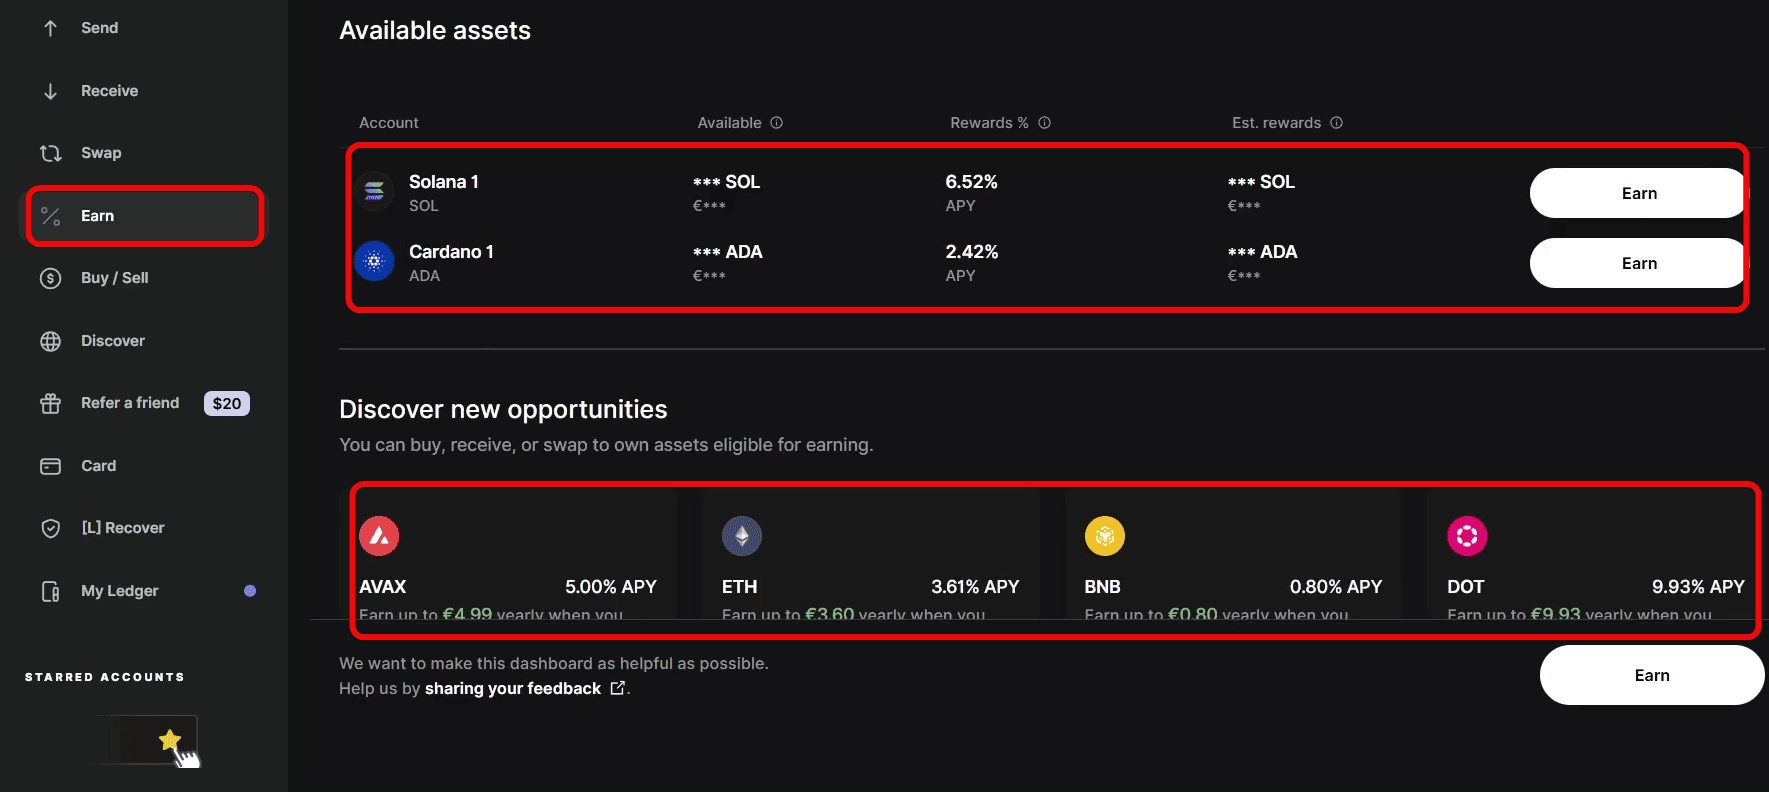
What conditions do you get?
- Solana - 6.52% APY
- Cardano - 2.42% APY
- AVAX - 5.00%
- ETH - 3.61%
- BNB - 0.80%
- DOT - 9.93%
If you already use Ledger and store SOL, ADA, etc. there, then staking is a logical way to earn passive income from them. The main thing is to consider the risks and conditions of the specific network.
Advanced Settings
The wallet has a ton of various settings: you can set screen lock time, choose language, change PIN, and set a passphrase for hidden wallets.
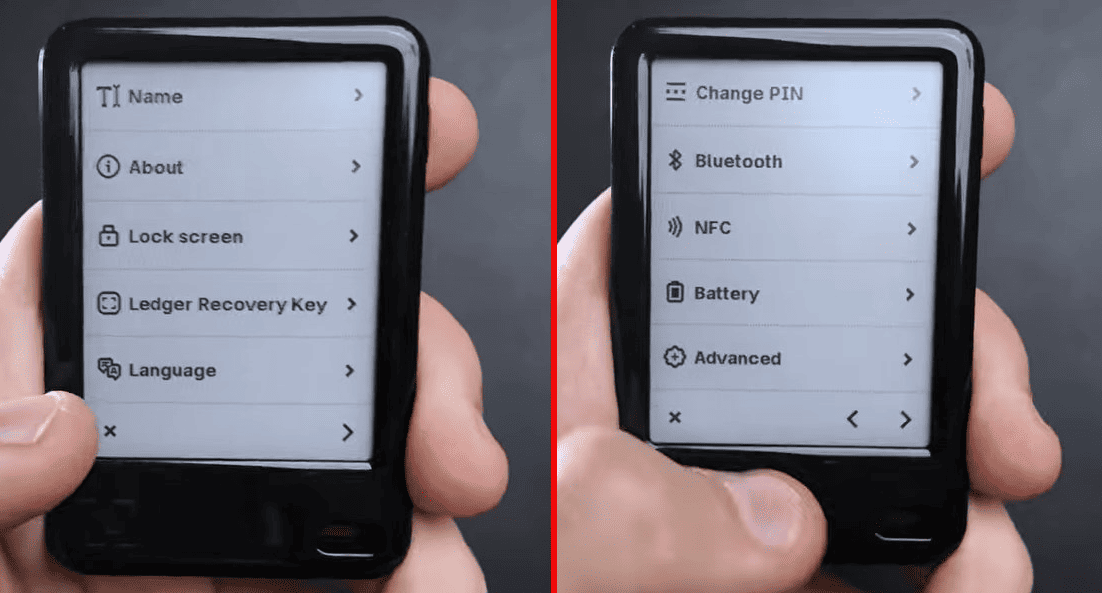
Let's review all security and recovery options.
Import and Recovery
Gen5 can be recovered via a seed phrase. Let's recover a wallet and also install the mobile version of the app. For this:
- Select
Ledger Wallet app for mobile - Scan the QR and download the official app
- Confirm the connection on both devices and allow authentication.
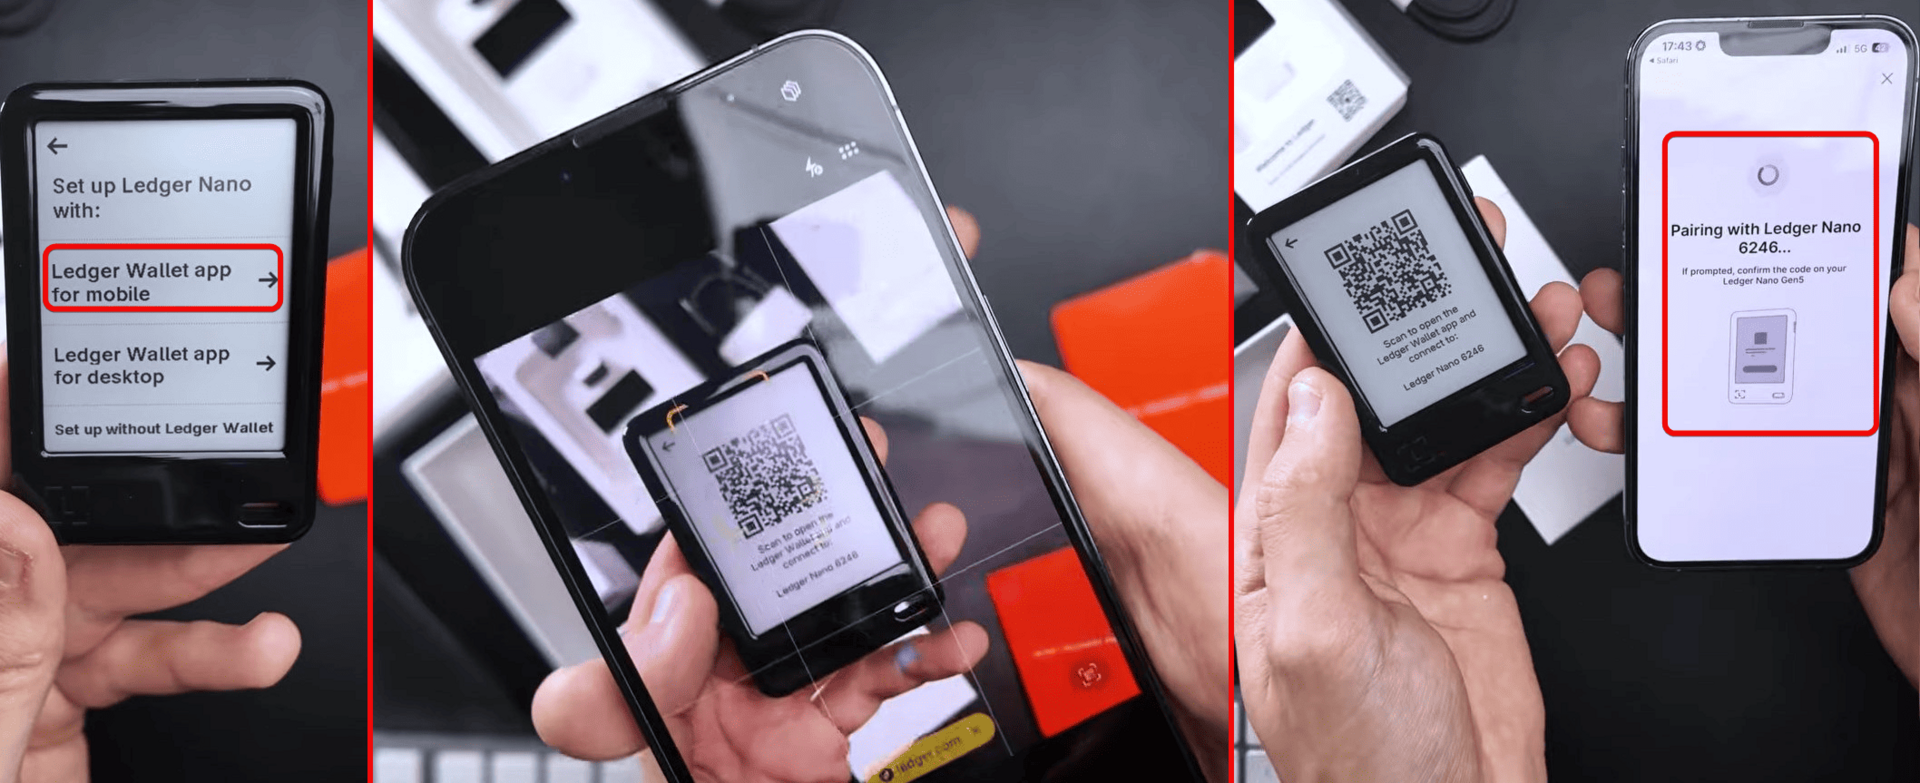
After successful verification, give the device a name and set a PIN. Remember: 3 wrong PIN attempts - and the device will be wiped!
Finally, click Restore using a Secret Recovery Phrase or backup.
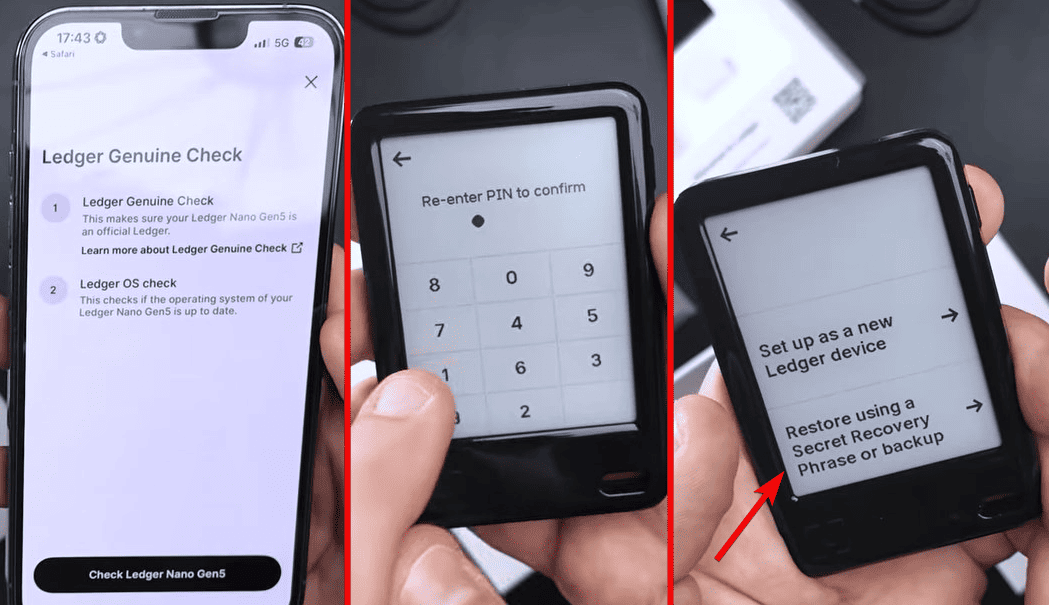
If you have the words from the recovery phrase – just enter them. If you have the card, just place the recovery card against the back of Gen5 and access to your wallet will be restored.
The Ledger app easily syncs between PC and mobile versions.
Hidden Wallets - Passphrase
You can go further for maximum security. You can create a hidden wallet inside the main one, so if someone finds your seed phrase or forces you to open the wallet, you can safely open this decoy and show that there's no point in robbing you.
This process of creating a hidden wallet is called adding a passphrase. Essentially, it's adding one memorable word to your 24 words. This 25th word creates a completely separate wallet, unrelated to the main one!
What's even better, you can access this wallet using a separate PIN code on the device. So, you can have 2 wallets accessible via different PINs.
Go to Settings > Advanced > Passphrase, choose to attach to a PIN, and you will see 2 options:
Set passphrase and attach it to a new PINSet temporary passphrase
We need the first option.
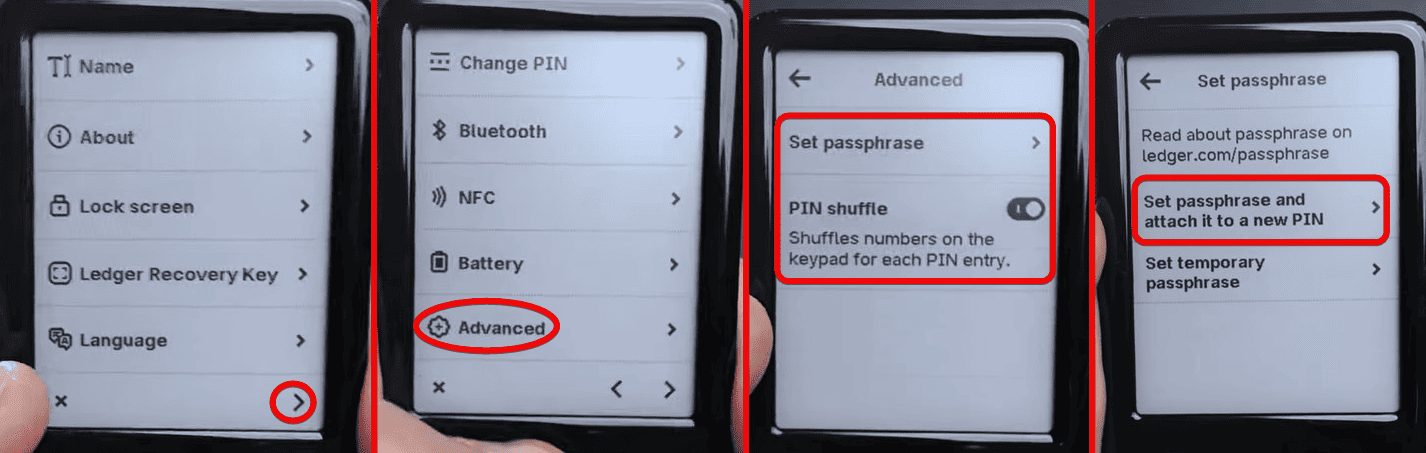
Set a PIN (for example, 3333) and enter a passphrase (for example, bytwork). You'll get a separate wallet accessible only with this PIN and word. If necessary, show the empty wallet.
Remember, if you forget the passphrase – you will lose the hidden funds forever!
Multisignature
Another advanced security setting is requiring transaction signatures from multiple people simultaneously.
You can create a wallet where a transaction is signed by, say, 3 out of 5 participants. Even if someone gets your device and PIN, they won't withdraw funds without the other signatures. In this case, 1 key, even if compromised, won't allow withdrawing funds.

This is especially important for large funds and companies where security is critical.
Attention! Multi-signature transactions – this is a complex setup. Carefully study the guide on multisignature to understand how they work and if you need them.
Comparing the Ledger Lineup
It remains to compare all Ledger wallets and draw conclusions.
| Feature | Nano S Plus | Nano X | Nano Gen 5 | Flex | STAX |
| Price | $59 | $149 | $179 | $249 | $399 |
| Screen | 1.3 OLED | 1.3 OLED | 2.8 e-ink | 2.8 Gorilla Glass | 3.7 curved e-ink |
| Screen Resolution | 128x64 | 128x64 | 300x400 | 480x600 | High |
| Body Material | Plastic | Plastic | Plastic | Aluminum | Aluminum |
| Control | Buttons | Buttons | Touchscreen | Touchscreen | Touchscreen |
| Bluetooth | No | Yes | Yes | Yes | Yes |
| NFC | No | No | Yes | No | No |
| Ledger Recovery Key | No | No | Yes (included) | Yes (included) | Yes (included) |
| Battery | No | Yes | Yes | Yes | Yes |
| Weight | ~20 g | ~34 g | 46 g | 58 g | ~60 g |
| Multisig Support | No | No | Yes | Yes | Yes |
| Color Options | Yes | Yes | No (black only) | Yes | Yes |
Comparing Gen5 with other models, it's clear that it's cheaper than Flex and STAX, but inferior to them in screen quality and body materials (plastic instead of metal). At the same time, it surpasses button models. It's like comparing a button phone (who remembers those?) with a touchscreen one.
Verdict: Is It Worth Using?
In the end, Gen5 gained not only security but also a convenient touchscreen. The price for this, of course, is higher than average hardware wallets.
Firmware verification is good, but the limited 1.10MB memory for apps – that's the stone age.
After installing the Security Key app, there is only enough space left for eight blockchain applications. Users who work with multiple blockchain networks may find it inconvenient to constantly offload apps due to limited memory.
| Pros | Cons |
| Highest level of protection – EAL 6+ chip | High price for a budget model ($179), close to the premium segment. |
| Large touchscreen E-ink display (more convenient than old models). | Fully plastic body (less durable). |
| Clear display of all transaction details on the screen. | Low resolution (300x400), simple glass (not Gorilla Glass). |
| Display connected directly to the chip, data cannot be substituted. | Too little memory for apps (1.10 MB, ~10-20 apps). |
| NFC key fob (Recovery Key) for seed phrase included. | Stickers sold separately. |
| Connects via USB-C, Bluetooth, NFC (can be used as an authorization key). | Cannot be used in the dark - no backlight. |
| Long battery life (up to a year in standby) thanks to E-ink. |
Revelation on security: the security of hardware wallets is roughly the same, and the difference between EAL6+ and EAL5+ chip certifications is hardly noticeable - it's more of a marketing thing. The main threats are phishing, seed phrase theft, and signing fraudulent transactions. Fraudulent transactions happen due to small screens when you don't see the full sending address.
Real security lies in the ability to use hardware wallets. Having studied hundreds of wallets, we described this in the security guide using SafePal as an example.
Whether to use this wallet or choose one from the comparison rating - the final answer is always yours.
Technical Support:


