Electrum: How to use it – installation and funding [4.6.2]
- Reliance on SPV server: risk of confidential information leakage through IP binding.
- Interface: language must be manually changed.
- No direct support: answers available only on forums.
- Pre-generated seeds: risk of compromise from insecure generation.
- Ease: installation without downloading the blockchain.
- Integration: compatibility with Trezor and Ledger.
- Anonymity: creation of new addresses for each transaction.
- Security: 2FA and multisignature.
- Recovery: seed phrase and encryption.
- Offline transactions: protection through cold storage.
- Speed: low fees with Lightning Network.
- Flexibility: transaction replacement and fee adjustment.
- Pay-to-many: sending funds to multiple recipients.
What you need to know
This guide explains how to use Electrum effectively and avoid common mistakes that may result in losing access to your funds. Based on years of personal experience, this guide will help you understand all the intricacies of security and wallet management.
You will learn how to access three key benefits:
Simplicity:
- Lightweight Wallet: install in minutes without having to download the entire blockchain.
- Integration: compatible with Trezor and Ledger hardware wallets.
- Anonymity: HD wallet creates new addresses for each transaction.
Reliability:
- Security: use 2FA and multi-signature features.
- Recovery: use seed phrase and encryption for access to funds.
- Offline transactions: protect yourself from hacking with the cold storage feature.
Managed transactions:
- Fast and Cheap: reduce Fees with Lightning Network.
- Replace fees: adjust the transaction fee to expedite confirmation of unconfirmed transactions.
- Pay-to-Many: send funds to multiple recipients at once:
Let's figure out how to use all the functionality of Electrum to the maximum. Let's start with the first step - downloading and installing.
Download and System Requirements
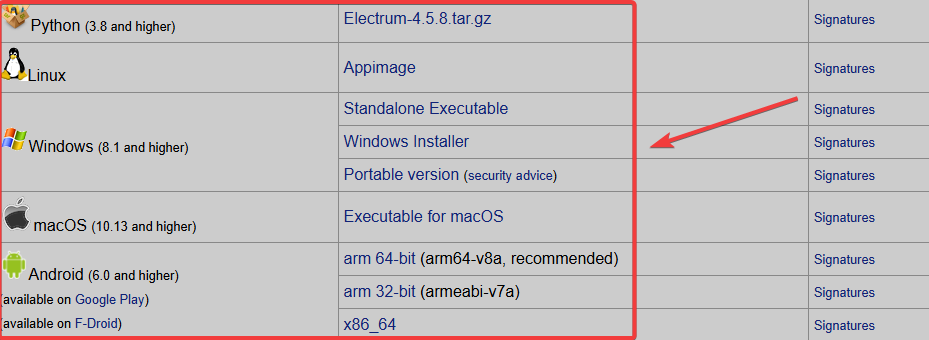
Download the official client from the website https://electrum.org/#download.
System requirements:
- Windows: 8.1 and higher (32/64-bit).
- macOS: versions 10.13 High Sierra and above.
- Linux: versions from 3.8 supporting Python.
- Android: 6.0 and above.
- There is no version for IOS.
RAM: minimum 100–300 MB. Our running program takes up 60 MB of memory.
Disk space: 100–200 MB, including program files and local data cache. The lightweight client does not require downloading the full blockchain.
Processor: any modern CPU with a clock speed of 1 GHz or more will do.
Internet: A permanent connection is required to connect to the wallet servers.
After downloading, you can proceed with installation and first launch.
Installation and launch
Run the downloaded file electrum-setup.exe
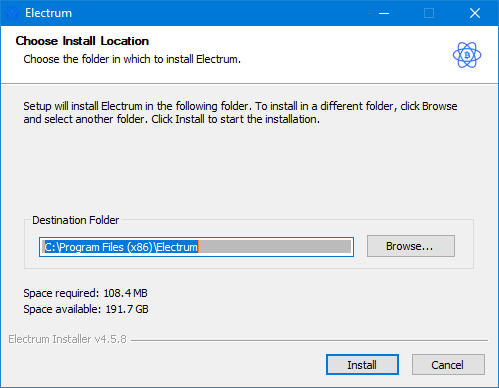
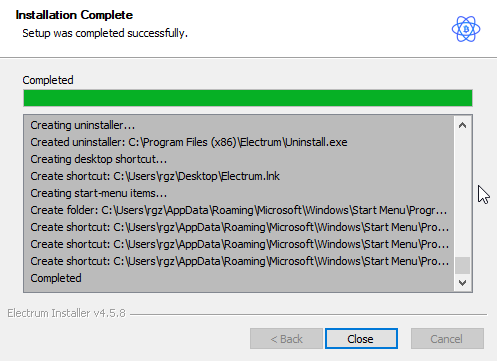
Follow the standard installation wizard
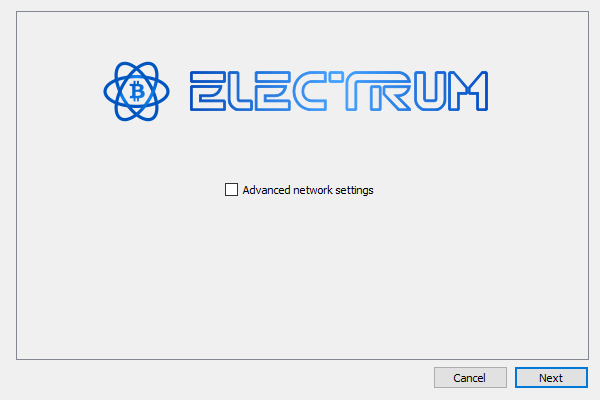
Run the installed application. You will be greeted by the initial screen where you can select advanced network settings. We will look at them later, so leave this checkbox empty.
Creating a secure wallet: 2FA, seed phrase and encryption
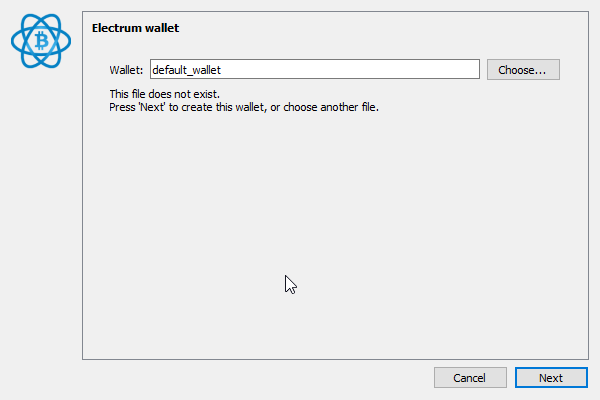
When you first start Electrum, it automatically creates a wallet named default_wallet unless you specify otherwise.
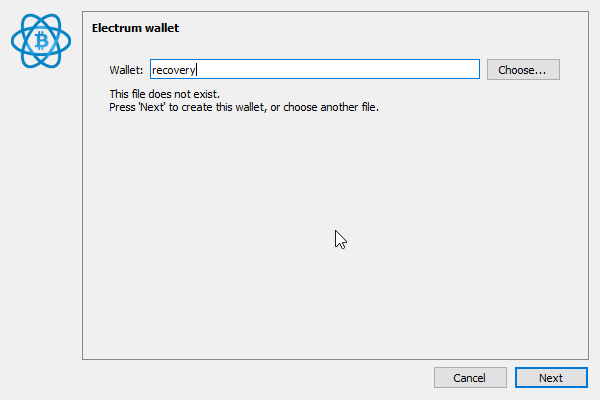
The Choose button allows you to upload a file of an existing wallet. If you are creating it for the first time, then come up with a name (for your convenience) and click Next.
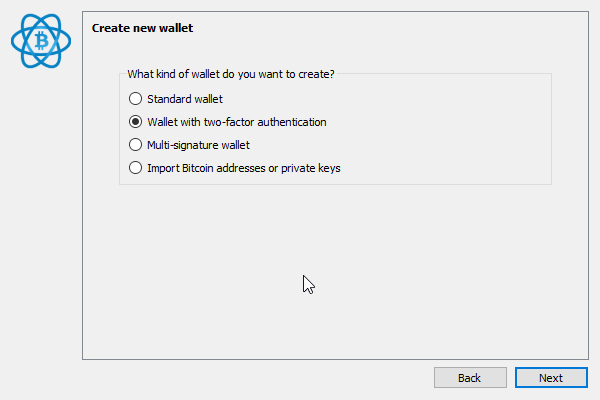
You will be asked to choose one of 4 wallet types:
- Standard wallet — a basic wallet designed for a single user.
- Wallet with two-factor authentication— a wallet for increasing security with two-factor authentication.
- Multi-signature wallet — a wallet that requires multiple parties to sign a transaction for it to be processed.
- Import Bitcoin addresses or private keys — wallet for importing existing Bitcoin addresses or private keys.
The type selection is final for a specific wallet. Once created, the type cannot be changed. If you need a different type, you will need to create a new wallet, selecting the desired option.
For additional protection select Wallet with two-factor authentication. This will enhance security: in addition to the password, you will need a temporary code generated by the application on your smartphone. Even knowing the password, an attacker will not be able to access without this code. However, there is a ~0.0002 BTC fee for this service.
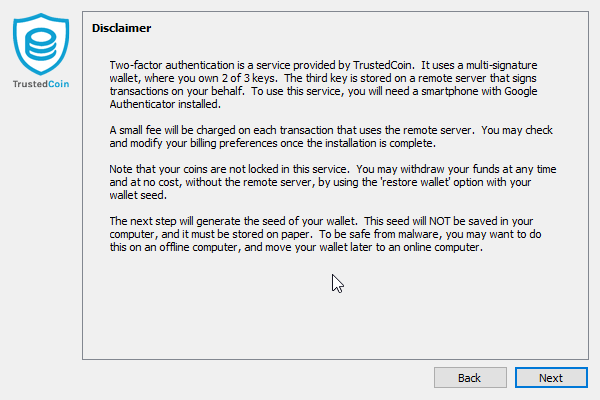
A warning about the specifics of 2fa will be displayed. Read it and click Next. Next need to generate phrase For recovery (SEED).
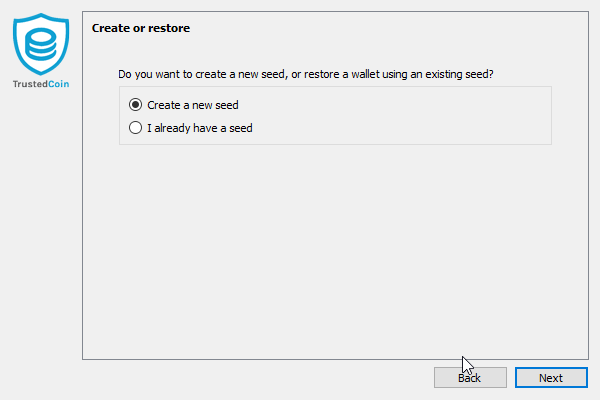
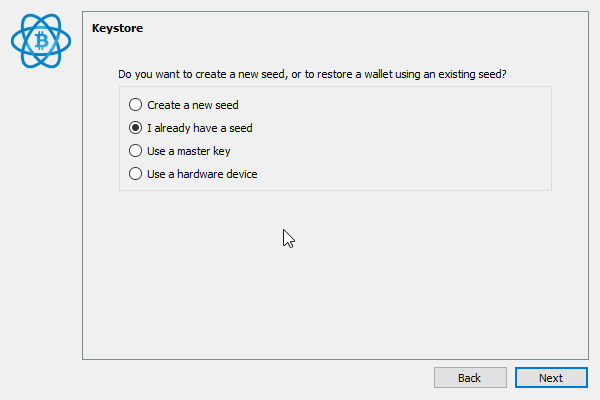
Please select one of the two options:
1. Create a new seed - will generate a new unique phrase. It consists of 12 or 24 words. Write it down and keep it in a safe place.
2. I already have a seed - Use an existing seed phrase: if you already have a seed phrase from another wallet, such as a hardware wallet, enter it to restore access.
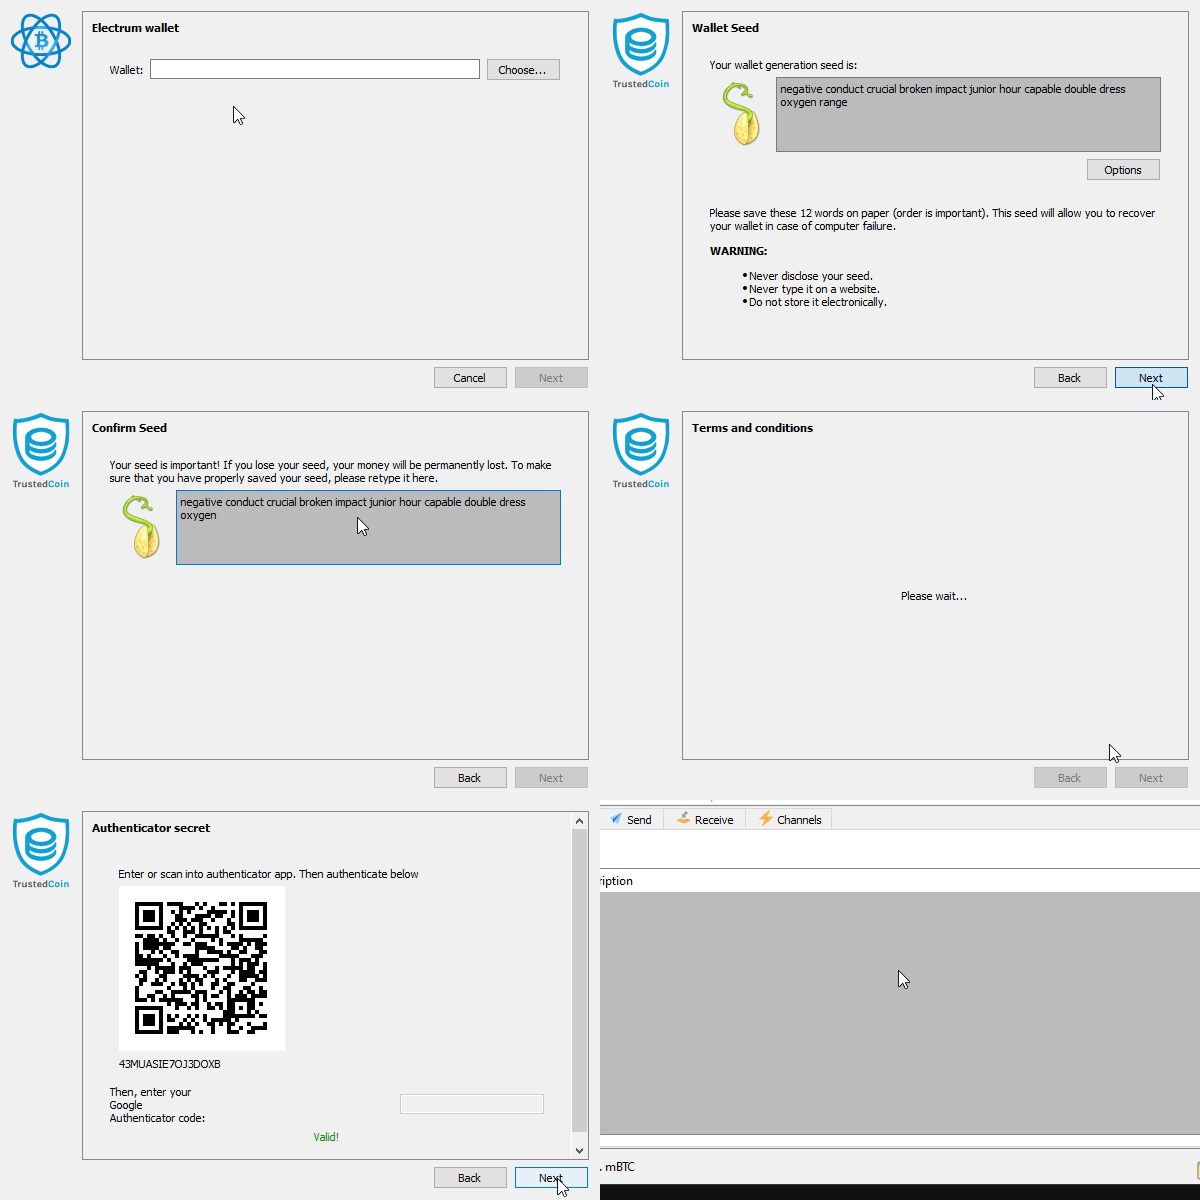
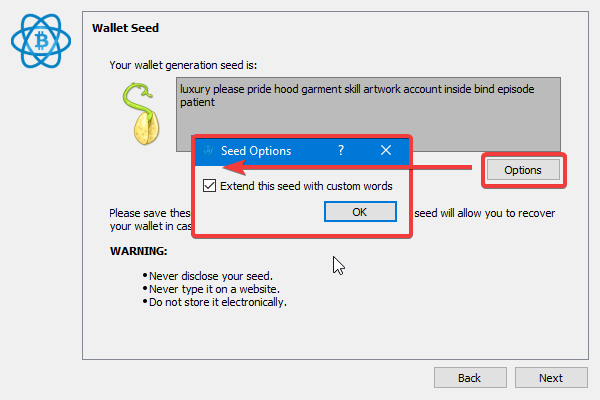
Select Create a new seed. A window will open with your seed phrase. This is an important step. Write down the seed phrase on paper. Keep it in a safe place, away from computers and cloud storage. This will protect the phrase from cyber attacks and hardware failures.
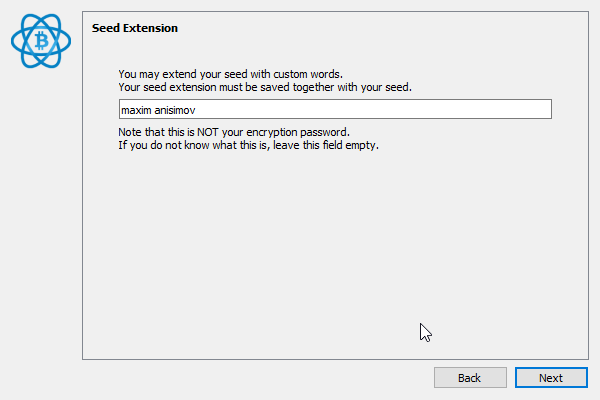
Optional: Click Options to expand the seed phrase with additional words. This will increase security.
Warning! Extending the seed phrase may cause incompatibility with other wallets. For example, a wallet with a 36-word phrase cannot be restored to a wallet that does not support that length. Compatibility can be restored, but this is a complex process.
Use seed phrase extension? Choose whether you need extra security or high compatibility.
Author's experience:
"Extended seed phrases are case sensitive, so be careful when entering them. I once couldn't restore my wallet because I made a mistake with the case of a letter - I entered a lowercase letter instead of an uppercase one."
Next, you need to confirm the main seed phrase and enter it into the program.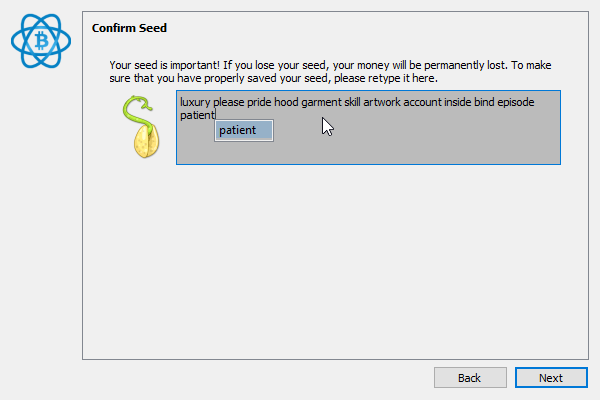
You need to manually enter the words to make sure they are correct. This is why the wallet does not support copying and pasting. Click Next.
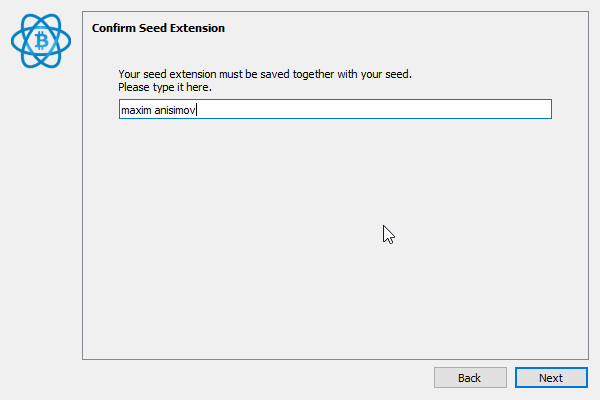
Now confirm the extension of the seed phrase if you used the Extend option.
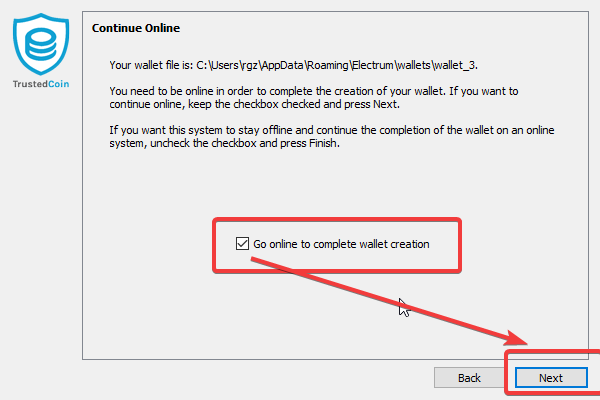
The program will display a message about the location of the wallet file and that you need to be online to install 2fa.
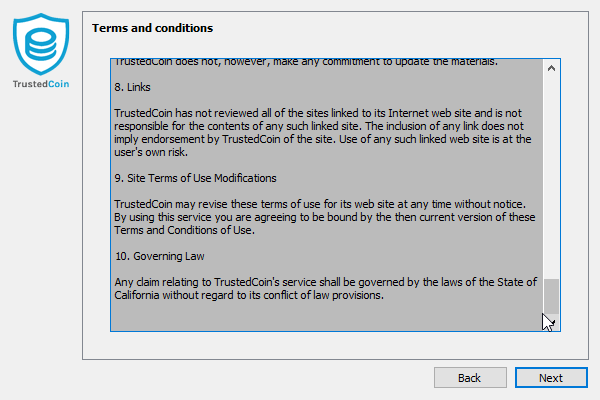
Agree to the terms.
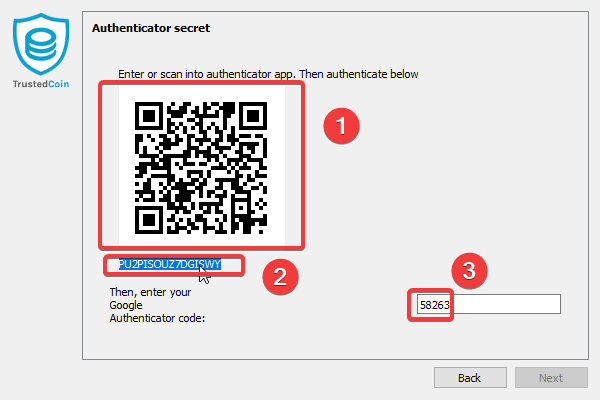
- Scan the QR code using Google Authenticator or any compatible 2FA app.
- Be sure to write down the 2FA recovery key. You will need it if you lose access to your smartphone.
- Enter the generated code.
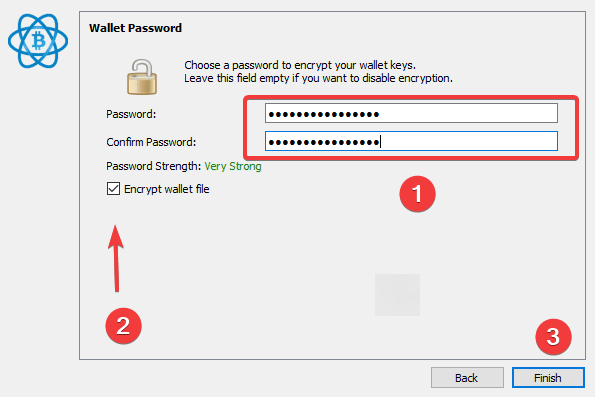
You have linked two-factor authentication. Now you need to encrypt your wallet.
- Create a complex password. It is advisable to use capital letters, numbers and symbols.
- Check
Encrypt wallet file. - Click
Finish.
The wallet has been created. The first thing you should always do is backup copies.
Backup
Electrum allows you to create backup copies of your wallets in the .backup format. These files contain information such as seed phrases, private keys, and other settings. Keep them in a safe place to prevent loss of funds due to theft or damage.
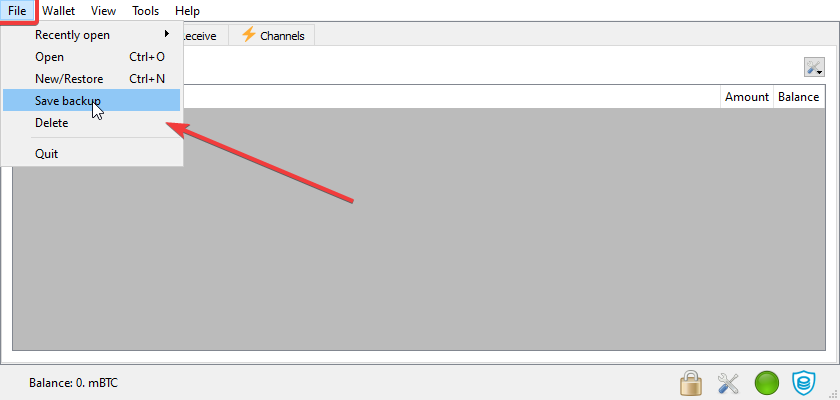
Go to File → Save backup.
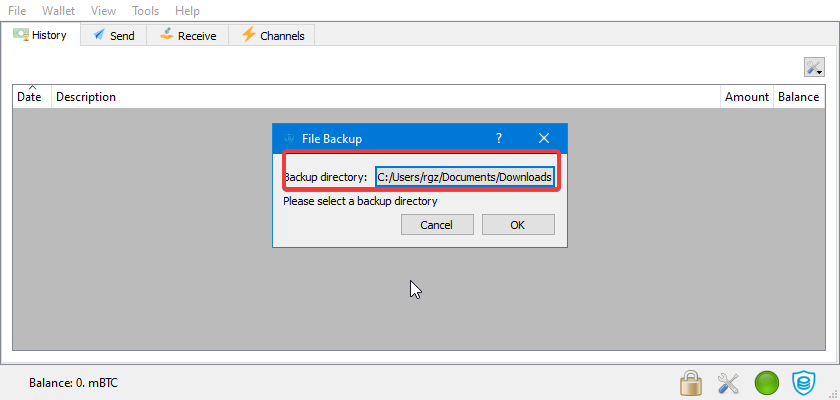
Choose a safe place to save. This can be an external hard drive, flash drive, or other reliable storage.
Warning: Do not store this file on a device with a permanent internet connection or in the cloud without encryption.
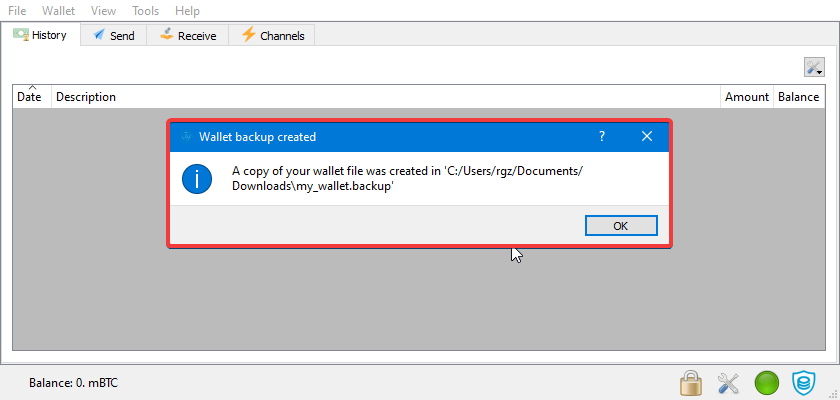
The program will display a message that the copy has been saved.
For extra security, make multiple copies on different devices. Keep the flash drive or hard drive in a safe.
After completing all the security steps, you can start using your wallet.
How to use
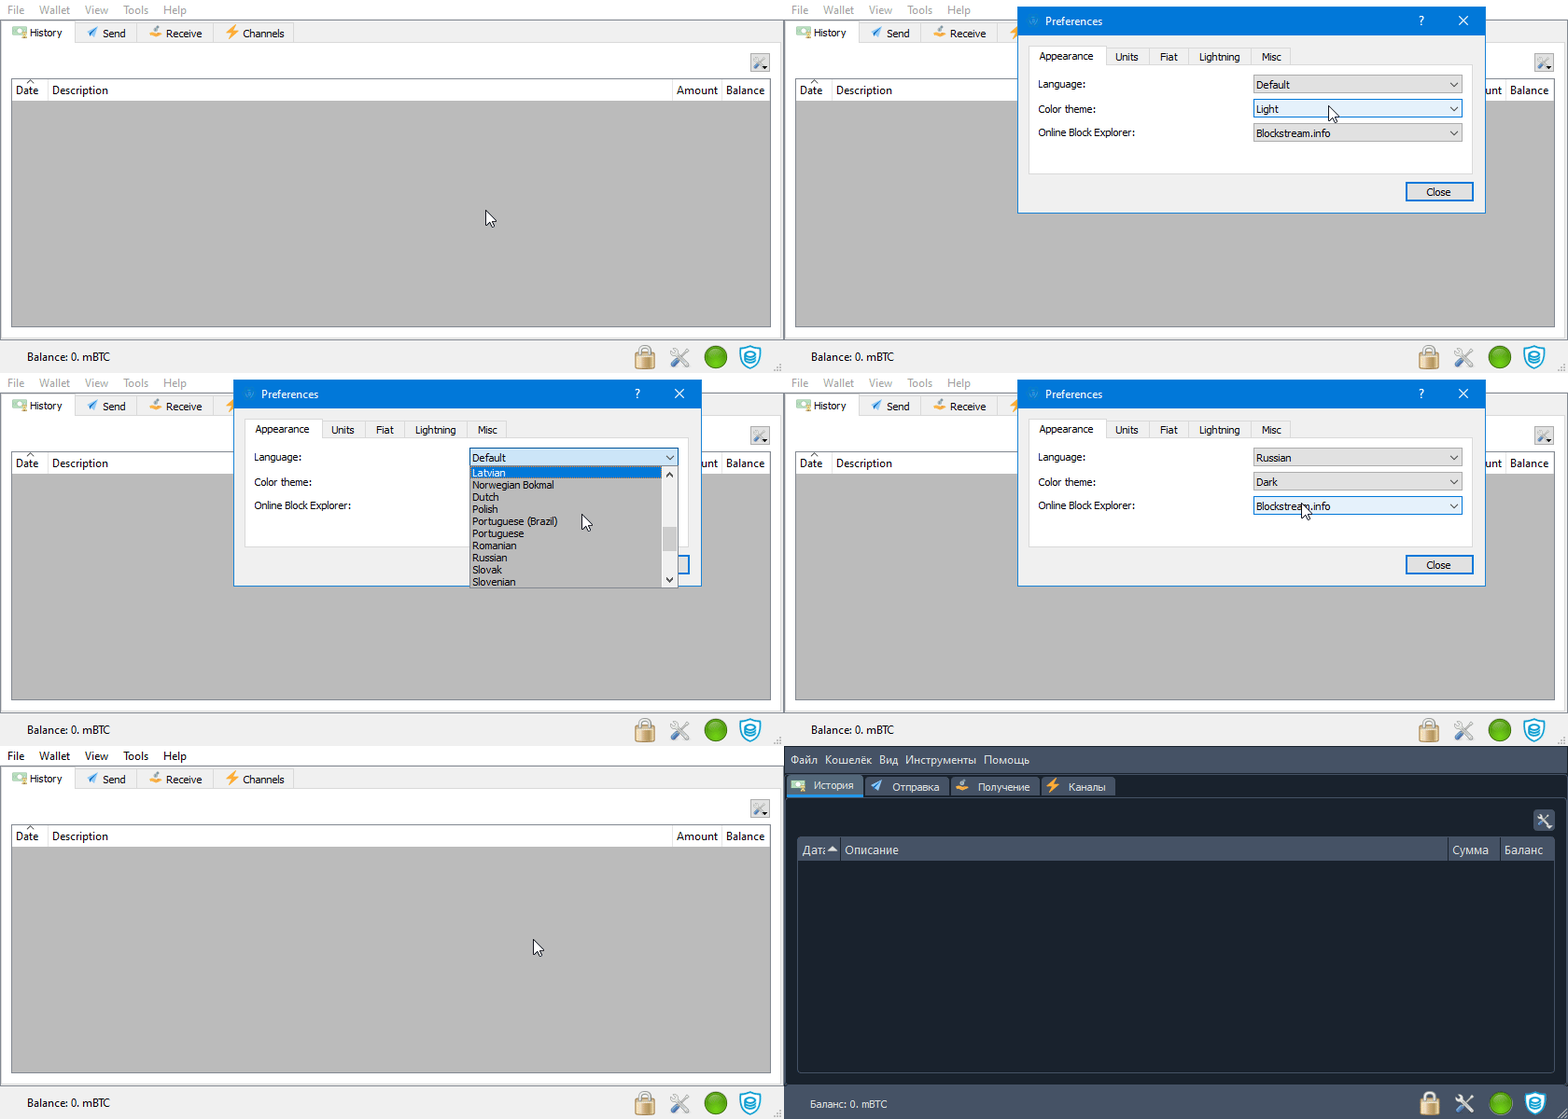
Customize the interface: select the preferred language, enable dark mode, and choose the currency for displaying your balance.
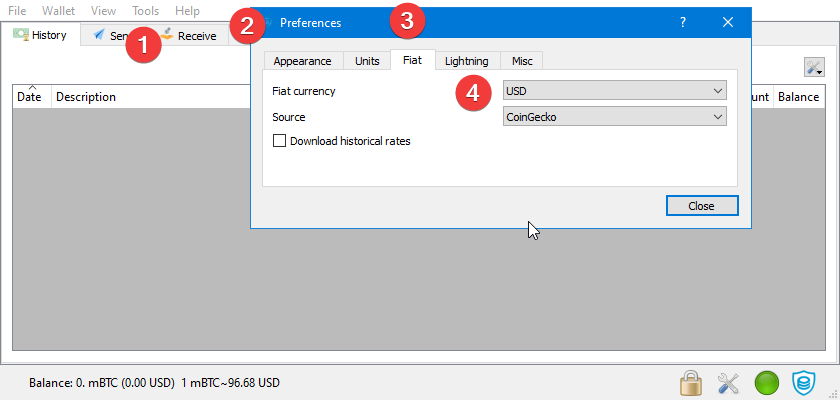
Configure the balance display to immediately see the amount in dollars. To do this, go to Menu → Tools → Preferences → Fiat
This will eliminate the need to use a calculator or currency converter to understand the balance.
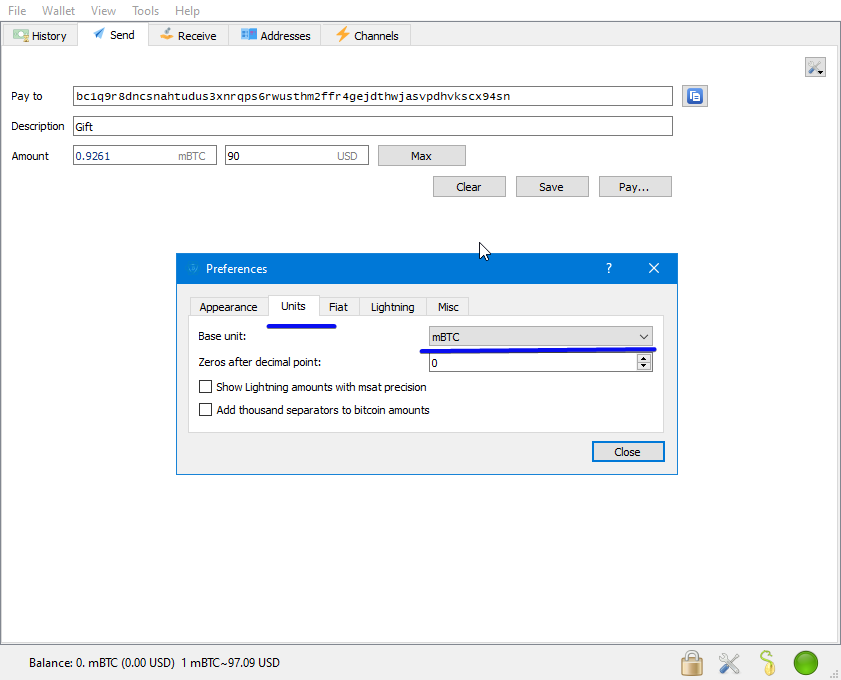
You can also customize the balance display in different views.
Menu → Tools → Preferences → Units
Instead of long fractional BTC values, compact units like mBTC (0.001 BTC) or Satoshis can be displayed. This is convenient so as not to get confused by zeros. You can set up the balance display in Satoshi or in the traditional representation - BTC.
Creating an address
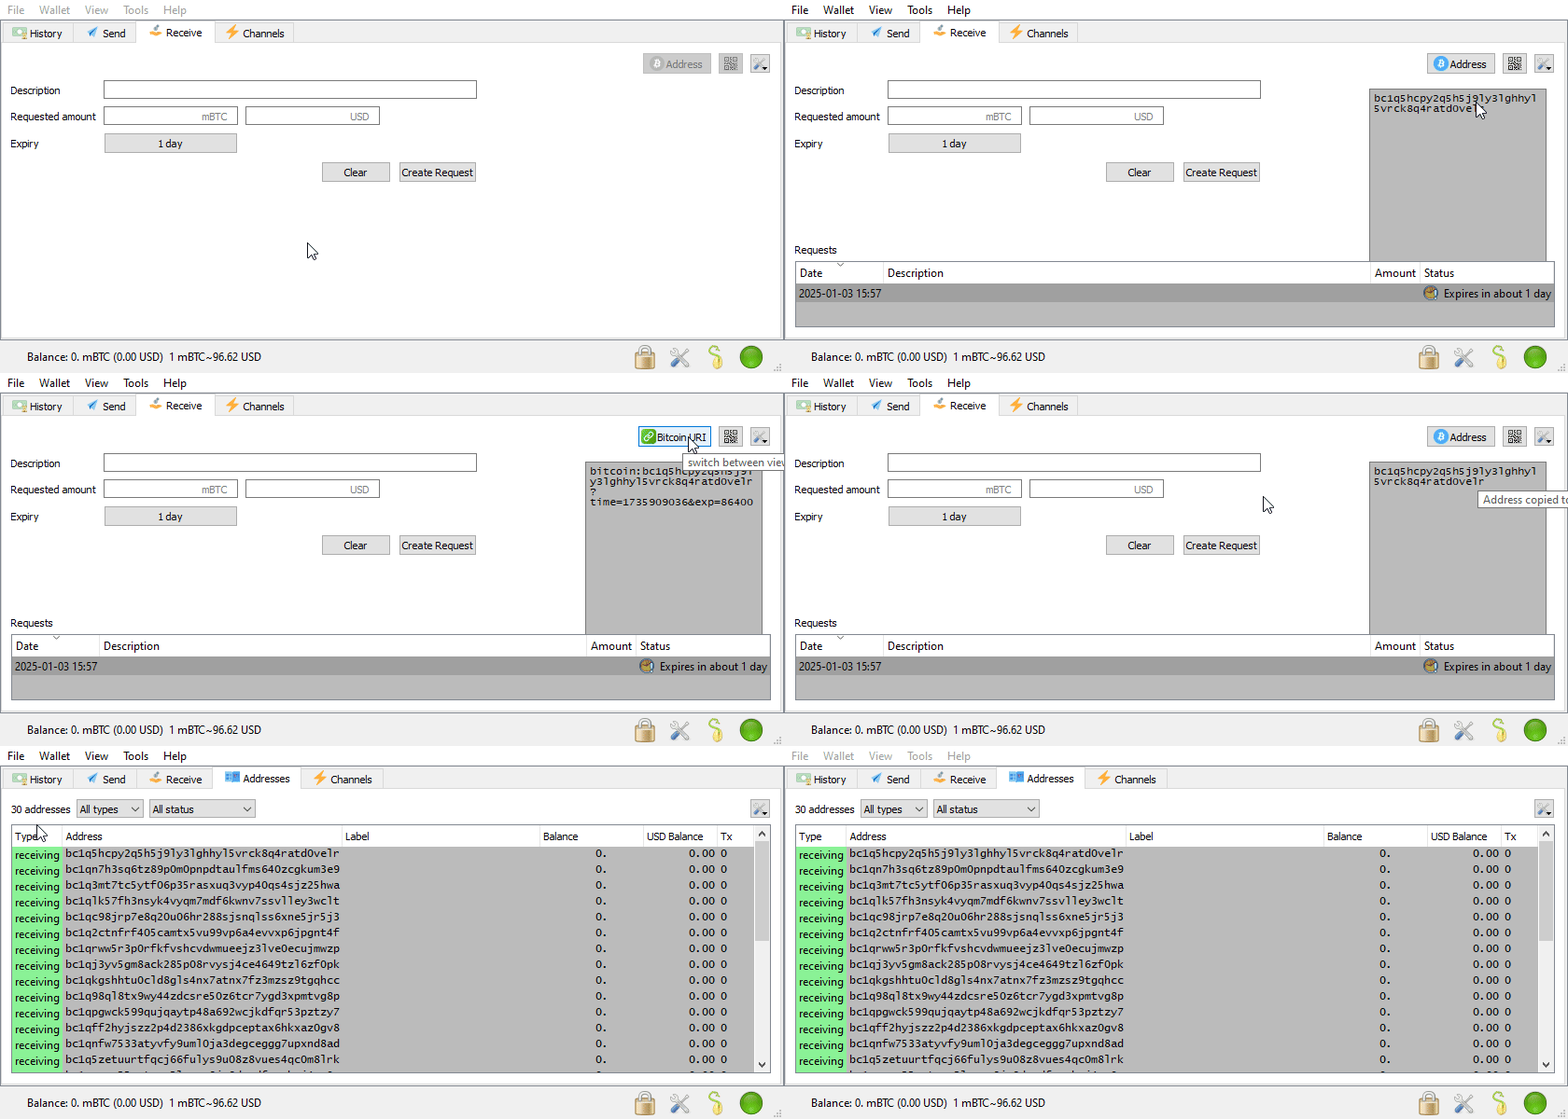
Different address representations are available:
QR code,- classic address (
bc1), - address for the
Lightningnetwork Bitcoin URI.
Go to the Receive tab. Click Create new Request. On the right, you will see your address. Share this address with those who want to send you coins.
Not sure how to properly create and use an address in Electrum? Check out our detailed article where we make the process as simple and straightforward as possible!
Replenishment
To top up your wallet, share your address (Receive tab) or QR with those who want to send you coins.
Use exchanges, P2P platforms, exchangers or other wallets to transfer funds to Electrum.
Checking Balance
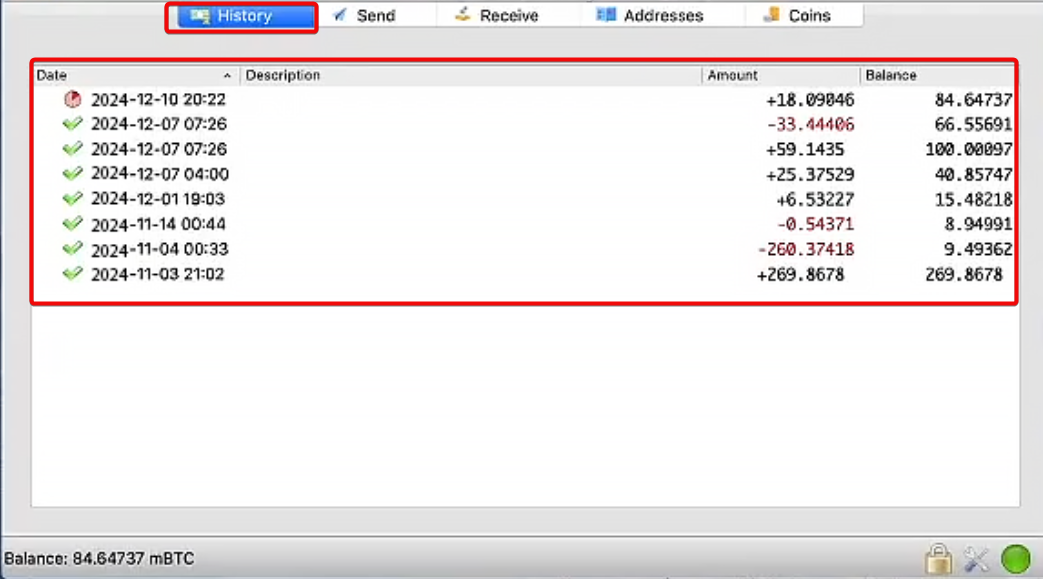
All blockchain payments are displayed in the History tab.
View all incoming and outgoing transactions, amounts, and confirmations. History may not be displayed if the address was only used to receive funds but the transactions were not confirmed, or if a third-party signing tool was used. Electrum tracks all transactions that affect the wallet balance.
Withdrawal of funds
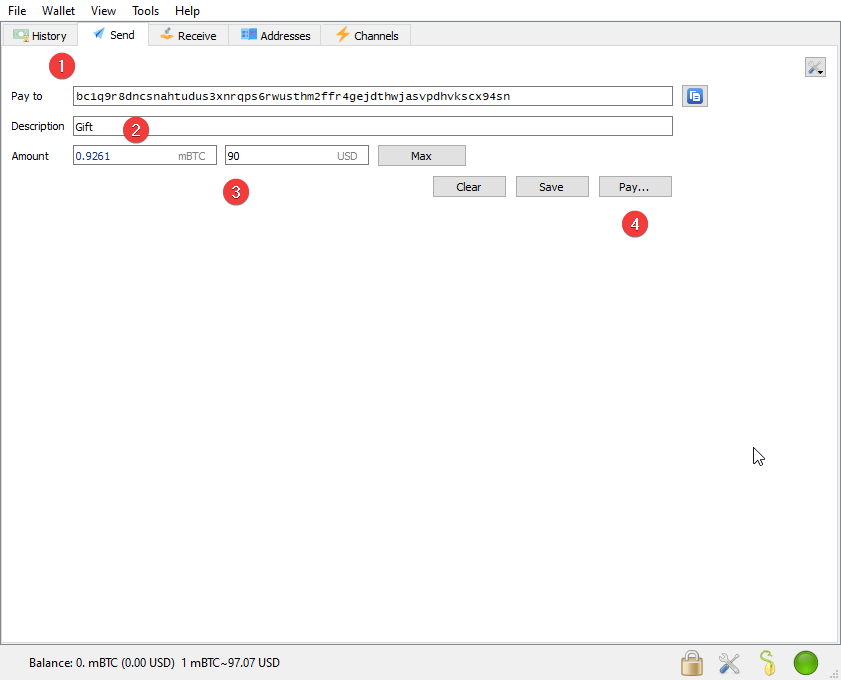
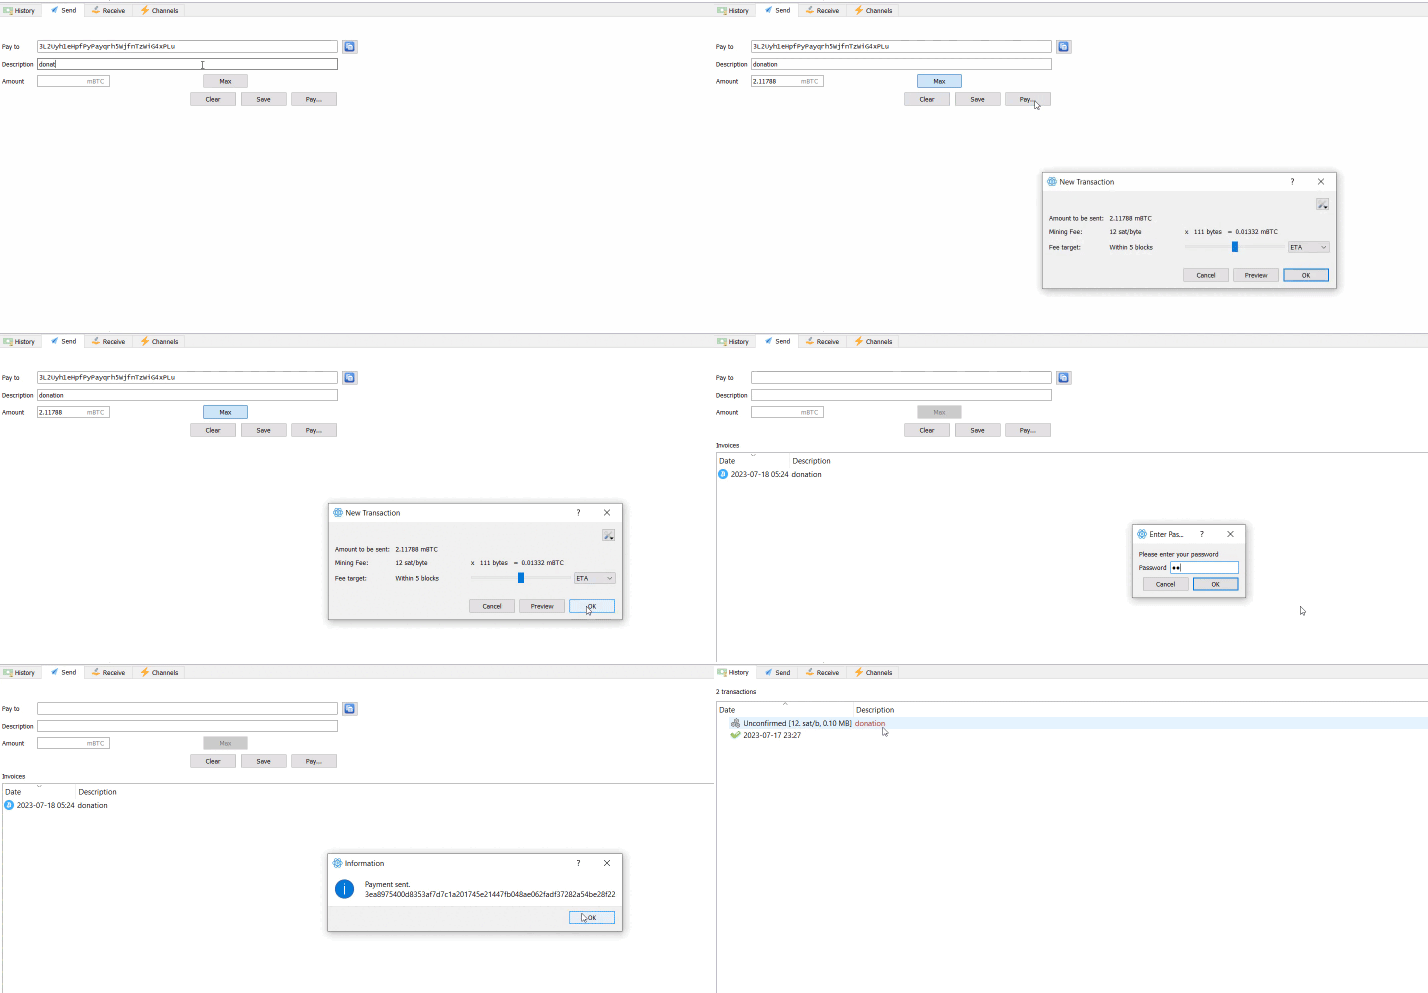
To send cryptocurrency, use the Send tab and enter the recipient's address along with the amount you want to withdraw. You can also specify the purpose (description) of the payment.
Check the data and click Pay. A commission selection window will open.
Commission
Electrum automatically adjusts the fee, but it may be too high if the user does not control its level manually.
Use the slider to quickly select the fee level depending on the number of blocks.
Read the main article: how to reduce fees in Electrum. In it you will learn how to control fees, what will protect your transactions from overpayments and help you save.
Additional options are also available when sending transactions:
When you click on the settings button, you can also choose the method for receiving the payment address: 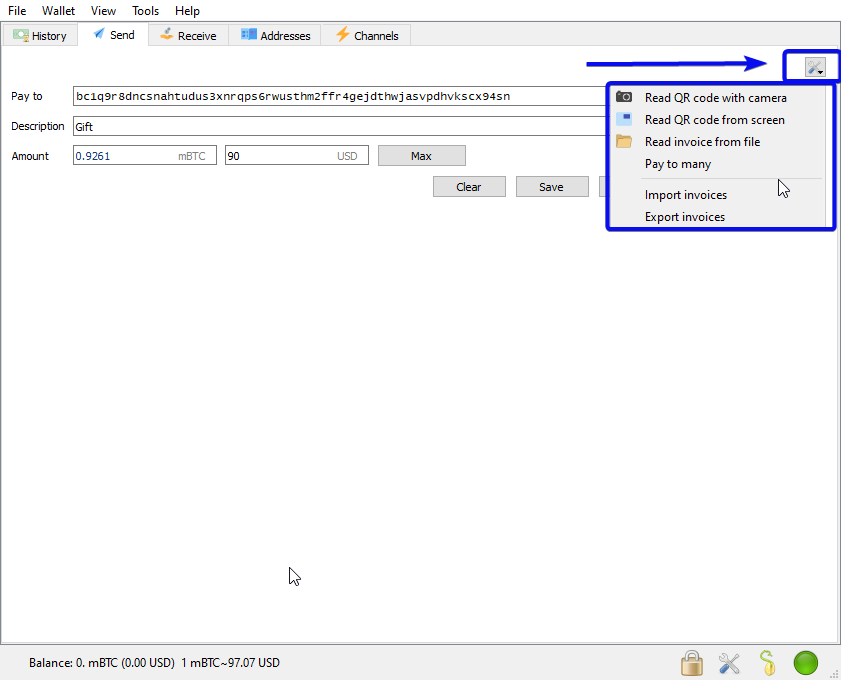
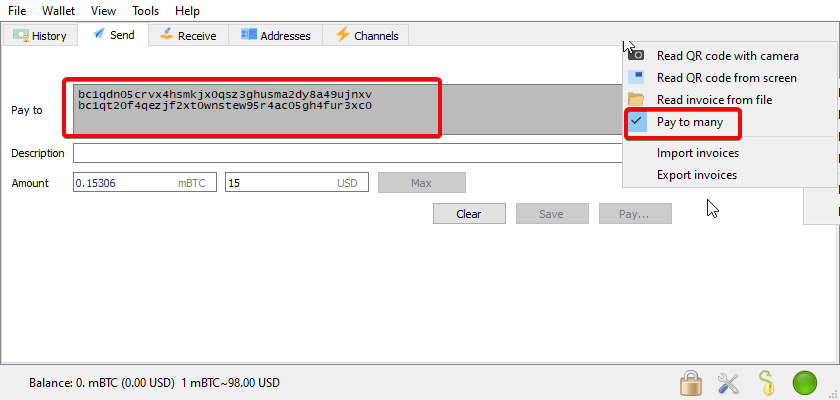
Read QR code with camera: scan QR code with camera.Read QR code from screen: recognize QR code from image.Read invoice from file: load invoice data from a file.Pay to many: make transfers to several addresses at once.Import invoices: load an invoice into Electrum from a file (e.g. json).Export invoices: export payment details.
You have learned the basic features of use. Below are the advanced settings for increasing the security and speed of payments. Electrum offers many not obvious functions. Let's also consider all the recovery options to easily restore the wallet in case of failure.
Recovery
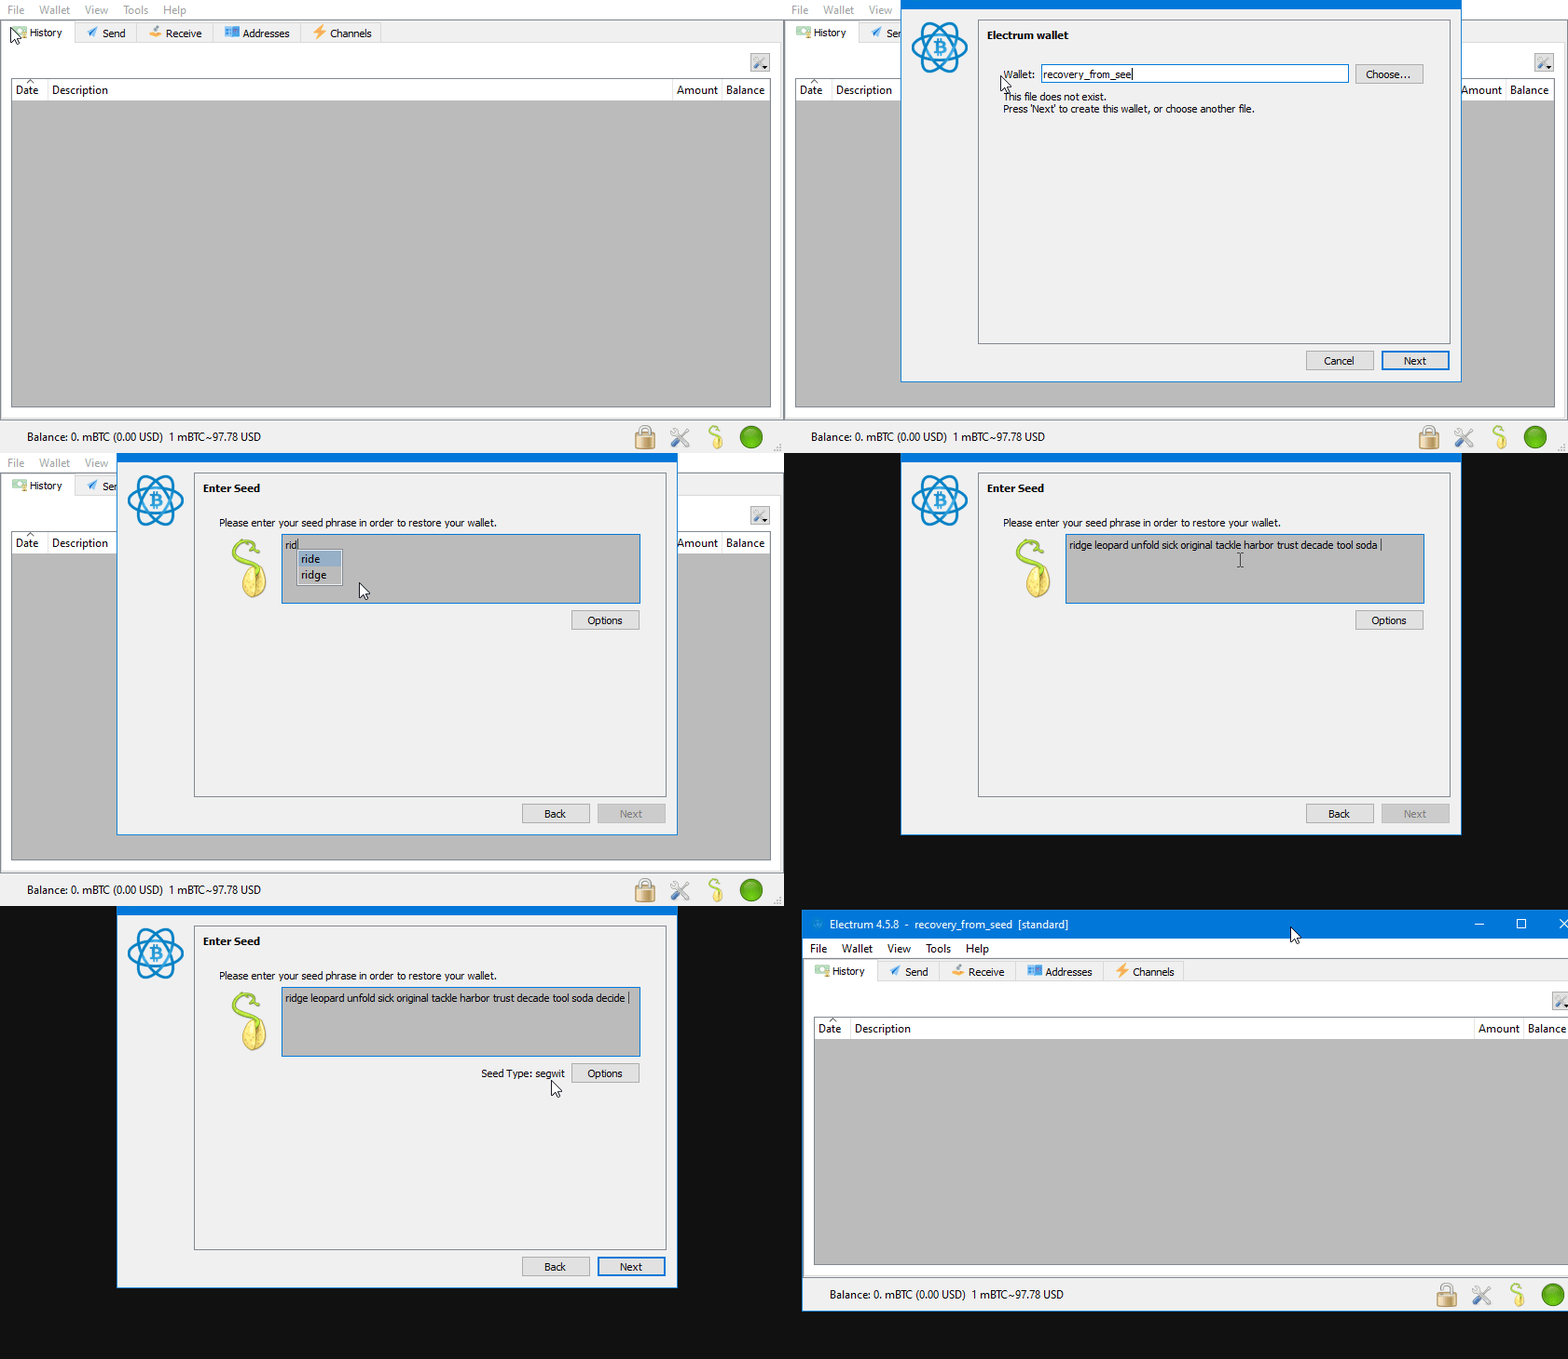
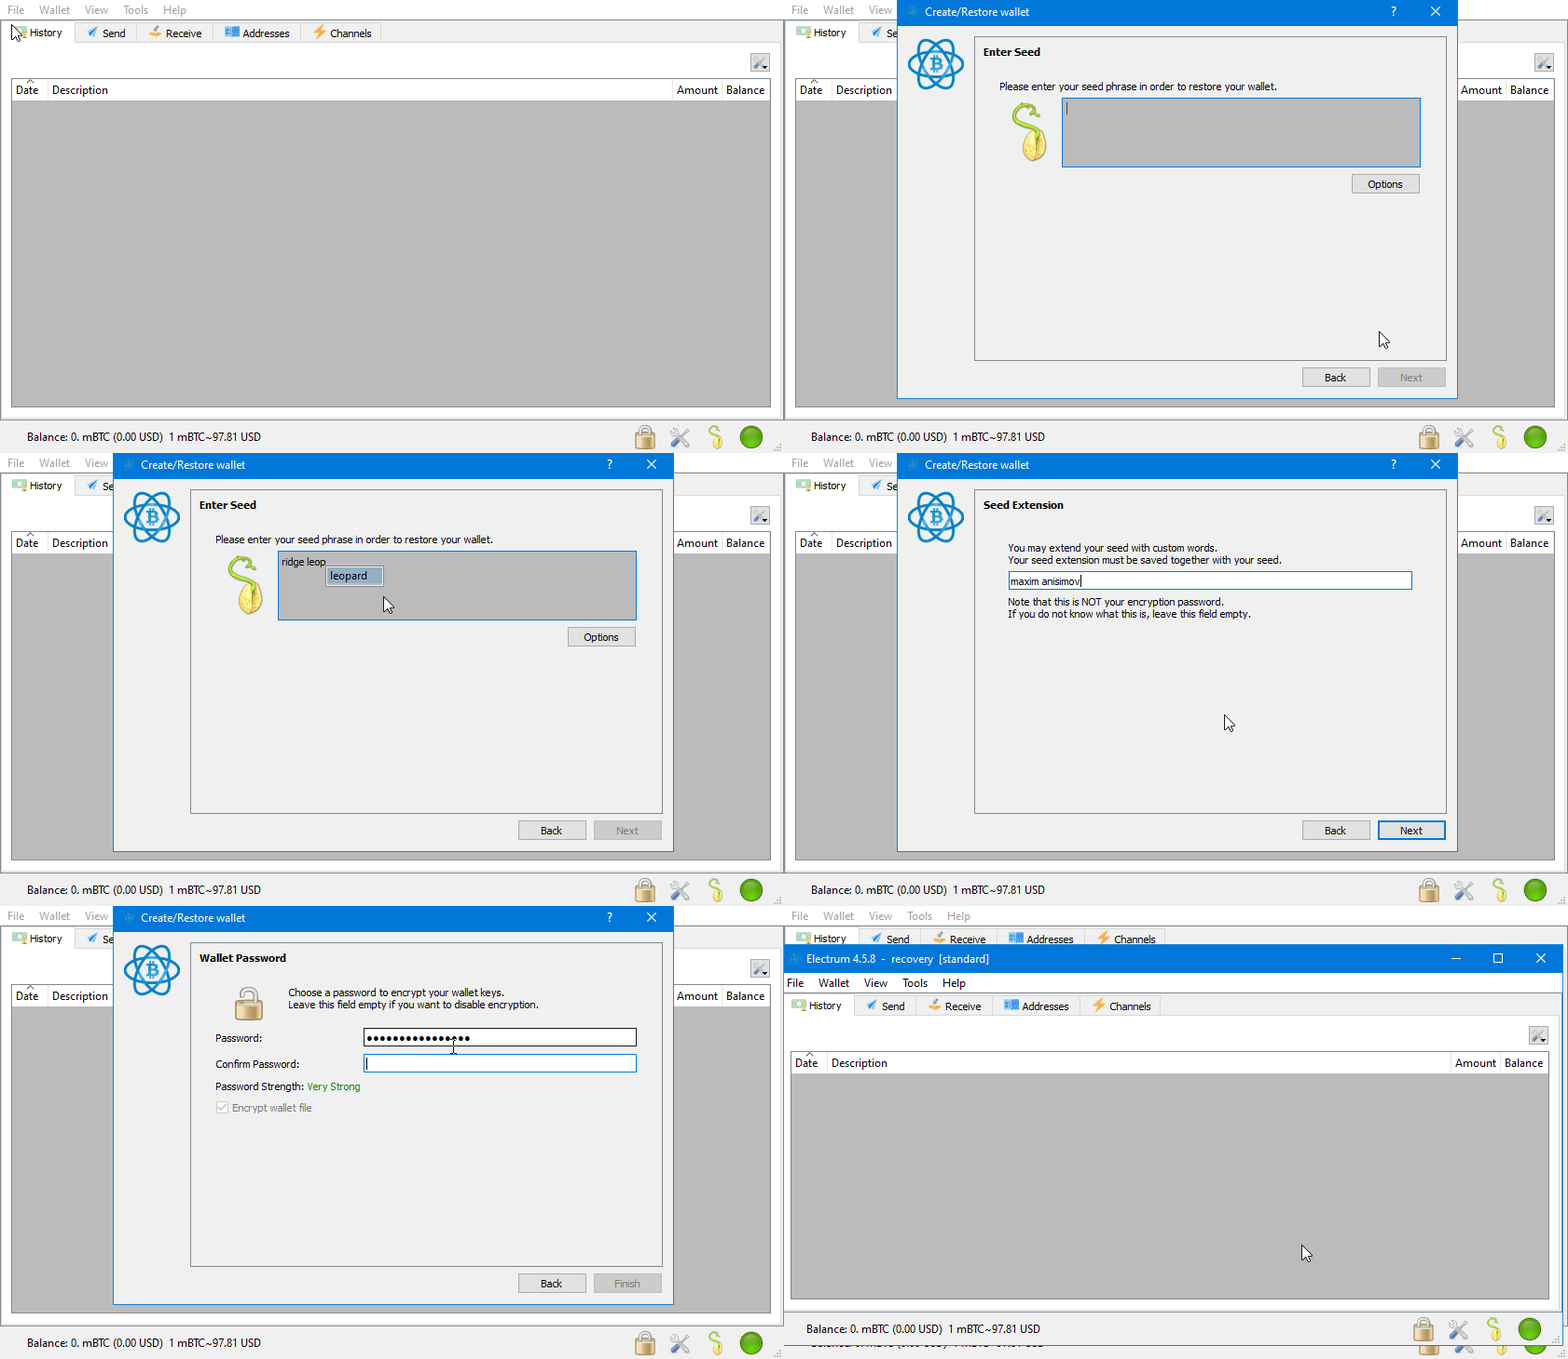
The recovery process is essentially creating a new wallet from the seed phrase.
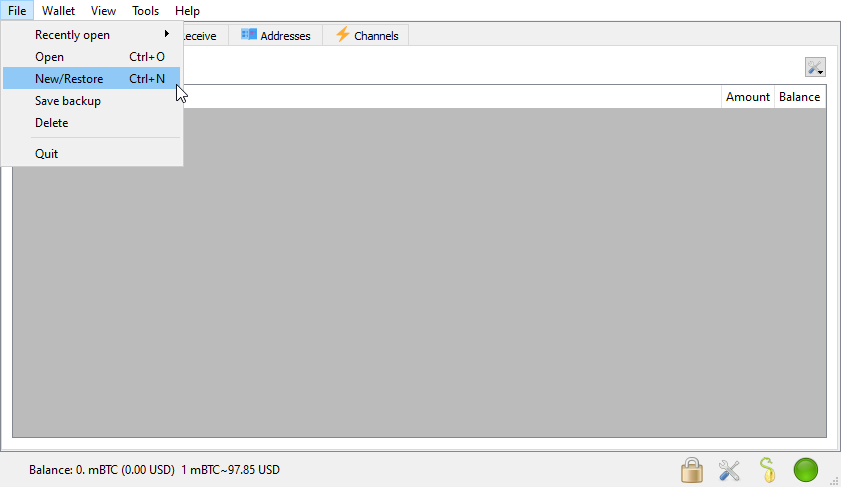
Go to menu File → New/Restore
A menu will open where you can come up with a name for the restored wallet.
Alternatively: you can click the Choose button to select an existing file. For example, if you are transferring a wallet from a USB flash drive.
Important: when restoring by seed phrase, the data in the selected file will be overwritten.
We will choose the option to create a new wallet, because it is safer. Next, you will be asked to choose the type of wallet. We will create a standard one.
There are three ways to restore:
I already have a seed— recovery using a seed phrase (12, 18 or 24 words).Use a master key— enter a master key (xpub/xprv), suitable for recovery or view-only access .Use a hardware device— connecting a hardware wallet (Ledger, Trezor, etc.) for integration.
Choose the method with the seed phrase.
If you used the Extend seed with custom words option when creating your wallet, then check the box in the options and enter additional words (passphrase):
Enter your seed phrase. The next screen will prompt you to enter additional words and then create a password for the new wallet. Once all steps are completed, the wallet will be 100% restored (balance, transactions, addresses).
For an explanation of the recovery functions, see the main article Electrum recovery methods.
What to do if you forgot your password
If you forgot your password, restore your wallet from the seed phrase as shown above. If you do not have the seed phrase, you will have to restore your password.
For a detailed explanation of recovery approaches, see the article recovery software overview.
Private Key
There are two functions for working with private keys in the wallet: 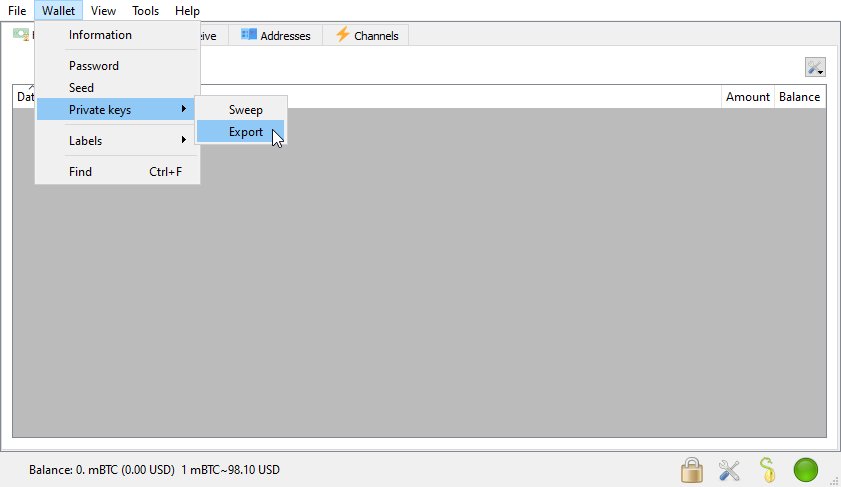
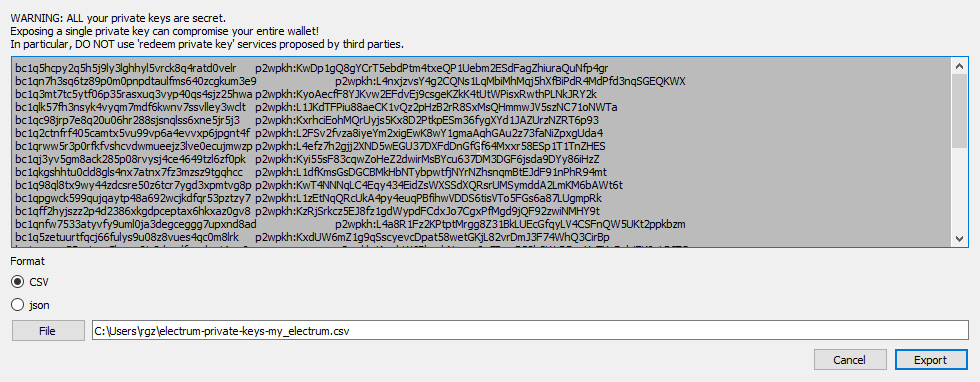
Sweep- move funds from an address that you have access to via your private key. Used to transfer from outdated or insecure addresses, such as a paper wallet to Electrum.Export- export private keys in WIF format to transfer funds to other wallets or create backup copies.
To export a private key, enter your wallet password. You will see a window for saving private keys with a choice of json or csv format.
Important! Only export in a secure environment to avoid loss of funds.
Read more in the main article: how to import / delete a private key in electrum.
Keys xpub/ypub/zpub and xprv/yprv/zprv
The application supports the following key prefixes: xpub/ypub/zpub and xprv/yprv/zprv:
|
Prefix |
Key type |
Description |
Standard |
Format and start of address |
|
xpub |
Public (Legacy) |
Old format, high commissions. |
BIP-32 |
P2PKH, starts with 1 |
|
xprv |
Private (Legacy) |
Managing Legacy Addresses. |
BIP-32 |
P2PKH, starts with 1 |
|
ypub |
Public (SegWit) |
Compatible with Legacy, low fees. |
BIP-49 |
P2WPKH-in-P2SH, 3 |
|
yprv |
Private (SegWit) |
Managing Wrapped SegWit. |
BIP-49 |
P2WPKH-in-P2SH, 3 |
|
zpub |
Public (Native) |
Native SegWit, minimal fees. |
BIP-84 |
P2WPKH (Bech32), bc1 |
|
zprv |
Private (Native) |
Native SegWit Management. |
BIP-84 |
P2WPKH (Bech32), bc1 |
SEED-phrase
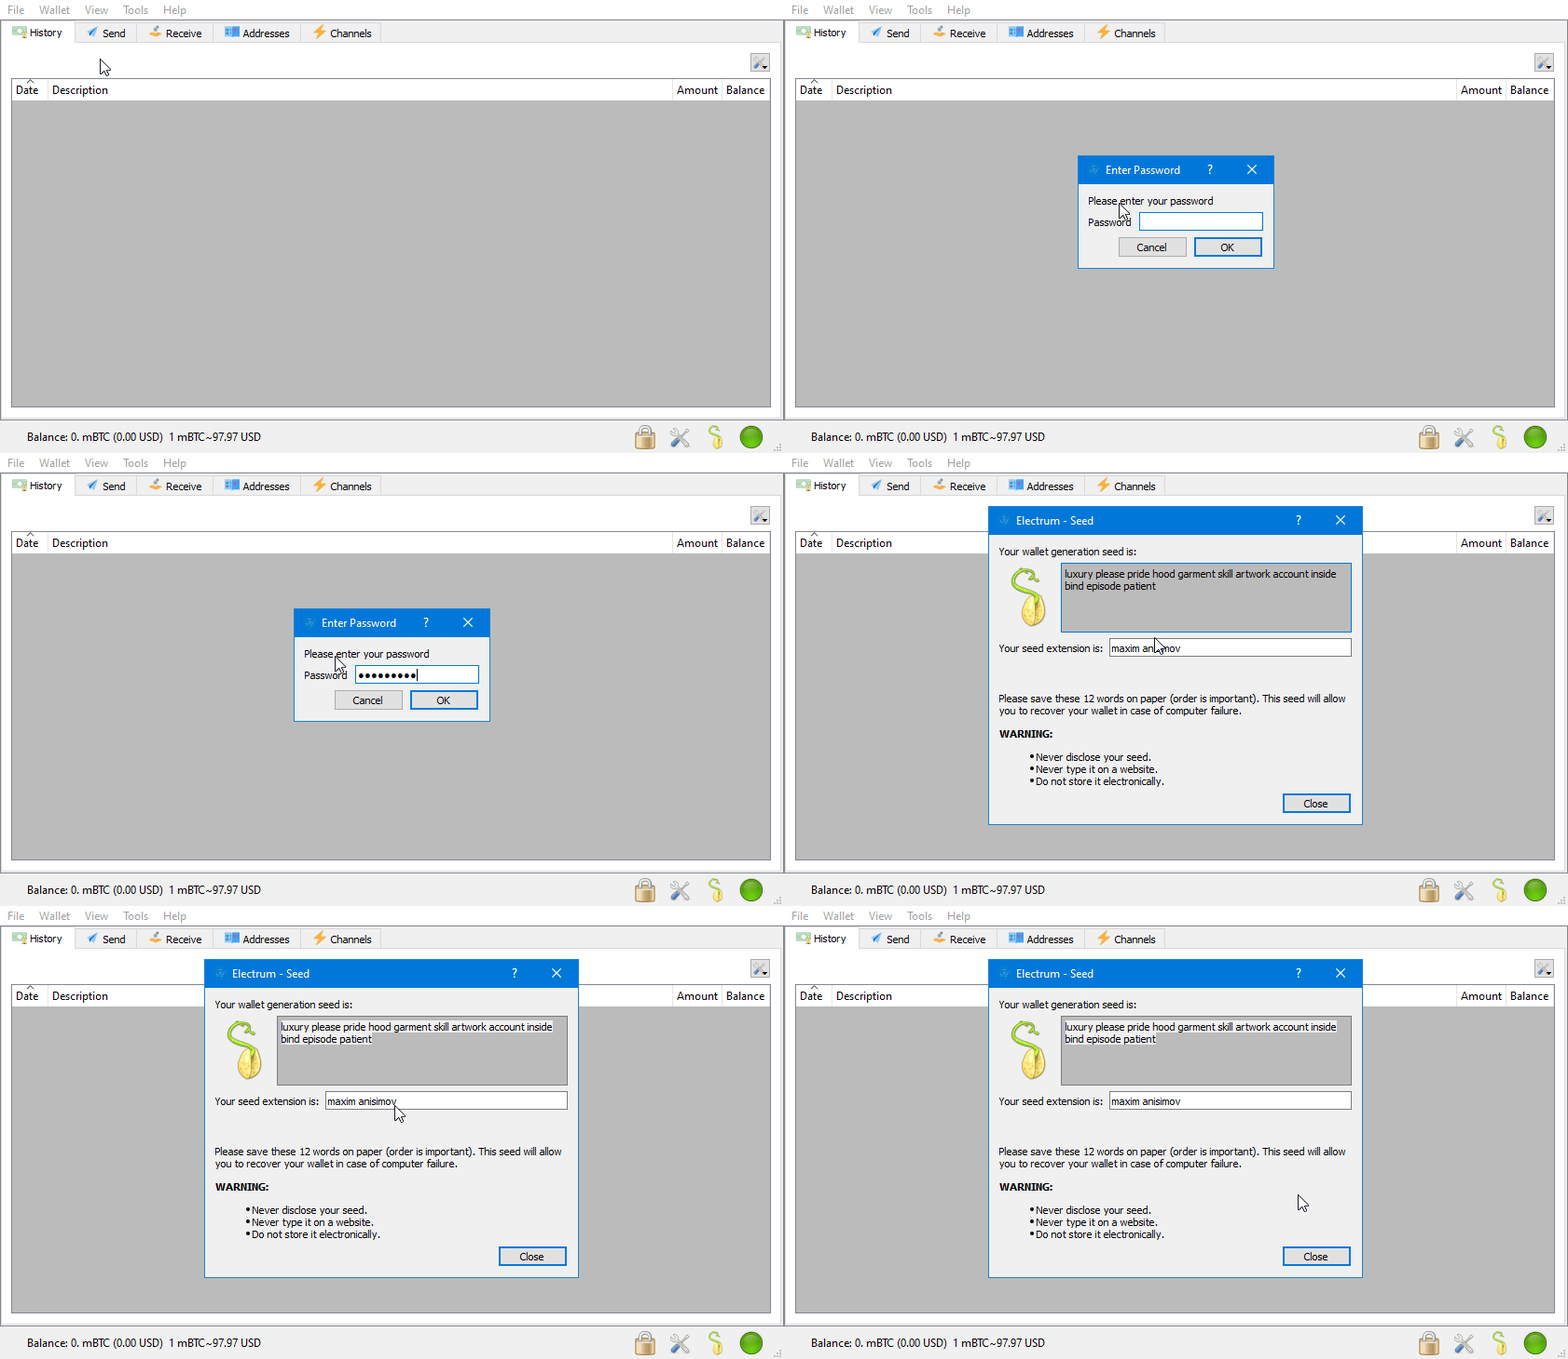
You can view the Seed phrase for your wallet by going to the menu Wallet → Seed. The application will request a password. After entering it, your secret phrase and extended phrase, if one was created, will be displayed.
Find out in the main article: how the seed phrase is generated.
Update
In the menu, select Help and find Check for updates. If a new version is available, a notification will appear. Click Yes to download and install. The program will update and restart.
If the changes are not compatible with your version or you haven't updated for a long time, then update manually. Download the new version from the official website and run the installer. Don't forget to make backups before updating.
How to update your wallet to the latest version, read the full update guide.
Functionality
Multi-signature and integration
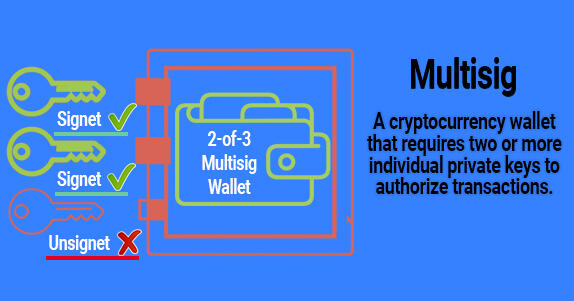
MultiSig is a feature that requires multiple signatories to complete a transaction. This is used both for co-spending and for increased security. Some people use this feature as a "family budget."
To use MultiSig, Electrum can be integrated with hardware wallets. For example, Trezor and Ledger.
Learn how to do this in the main articles:
- Trezor: How to access standard and hidden accounts in Electrum.
- Ledger Nano not found on Electrum / connection error.
Offline transactions and cold storage
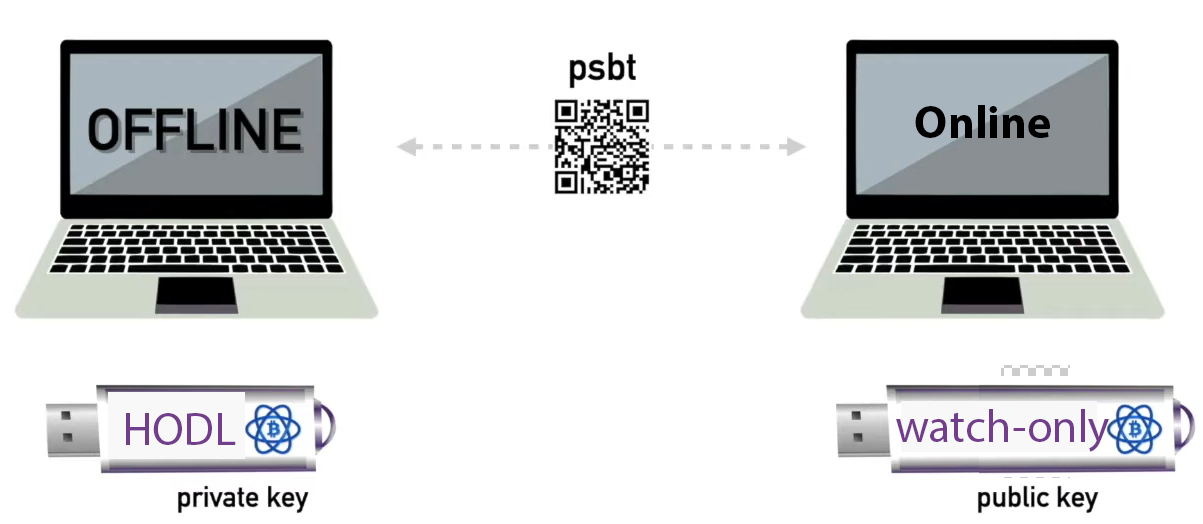
Offline transactions are used to store large amounts of Bitcoin. With traditional cold storage of cryptocurrency, the wallet is not connected to the Internet, and transactions are not carried out. With offline transactions, you combine cold storage and the ability to spend funds, and here's how:
- Create an unsigned transaction in an online wallet
- But sign it on an offline computer (without internet)
- Submit the signed transaction via an online device.
- This way the private key never leaves the offline device. However, we will send funds securely from the online device, even if it is compromised.
Cold storage
On an offline device, create a primary (cold) Electrum wallet. This is where the private key will be stored, and the computer will not be connected to the network. This provides maximum cyber resistance against attacks via the Internet. Let's call this computer HODl.
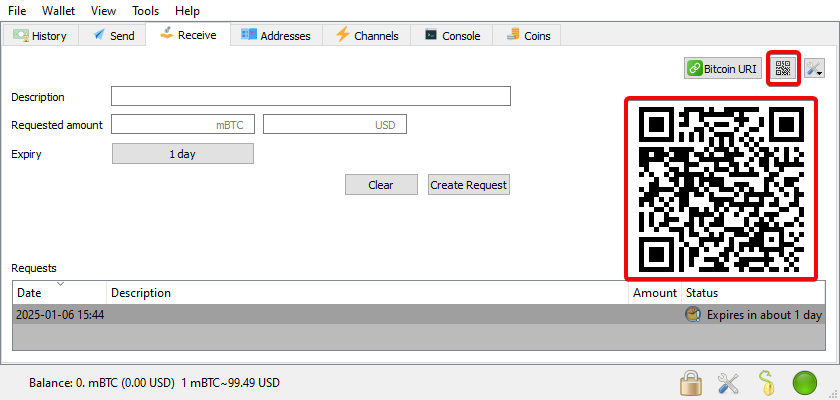
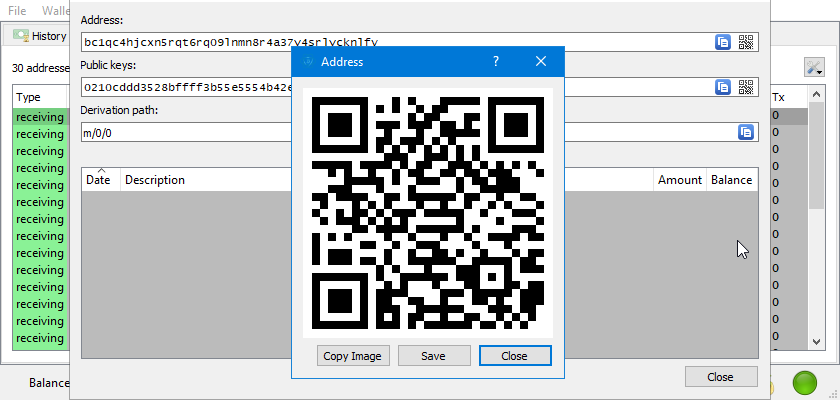
Go to Address → click on your address. The icon to the right of the address will show the QR code:
Watch-only
On an online device, create a watch-only (a watch-only wallet) into which the public key from the offline wallet is imported using this QR code (or address). This wallet allows you to monitor your balance and transactions, but cannot spend funds. Let's call this online computer watch-only.
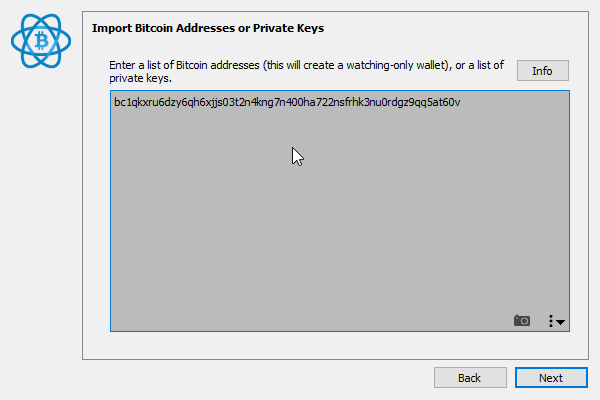
Let's create a watch-only. Click File → New/Restore. Select Import Bitcoin addresses or private keys.
Here, on the online device, you either paste the wallet address or scan the QR. This is necessary to get data from our cold (Hodl) wallet.
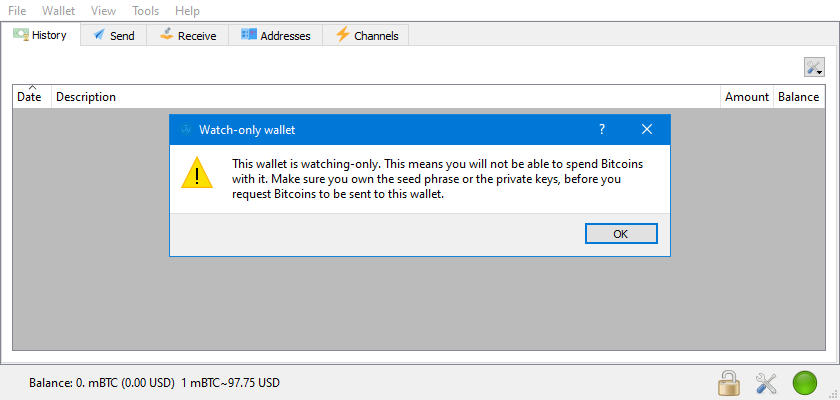
We will be warned that this is a viewing address. That is as it should be.
Once two wallets have been created, transactions can be created.
Creating and signing transactions (PSBT):
- Creating a transaction: in the watch-only wallet, create a transaction in PSBT format to send to an offline device.
- Transaction Signing: On an offline device (HODL), sign the PSBT with your private key. Then export the signed transaction as a QR code and return it to your online device.
- Submitting a transaction: Import the signed transaction on an online device, verify it, and submit it to the network via the Electrum server.
The QR code example shows how you can securely transfer data between devices without connecting them to the network.
This method does not offer better security than using hardware wallets. However, it is an alternative for users who for some reason cannot use hardware wallets (for example, due to legal or technical restrictions).
Lightning
Lightning Network is a second-layer blockchain technology that allows for thousands of transfers (transactions) per second with low fees through "channels" between users, bypassing the main blockchain.
To open a Lightning channel, you need to have at least 0.002 BTC plus the network fee. It is important that you have a wallet with native SegWit (addresses start with bc1). If you have a wallet with P2SH SegWit (starts with 3), you will not be able to open a channel. Be sure to backup your wallet file (wallet.backup) before proceeding.
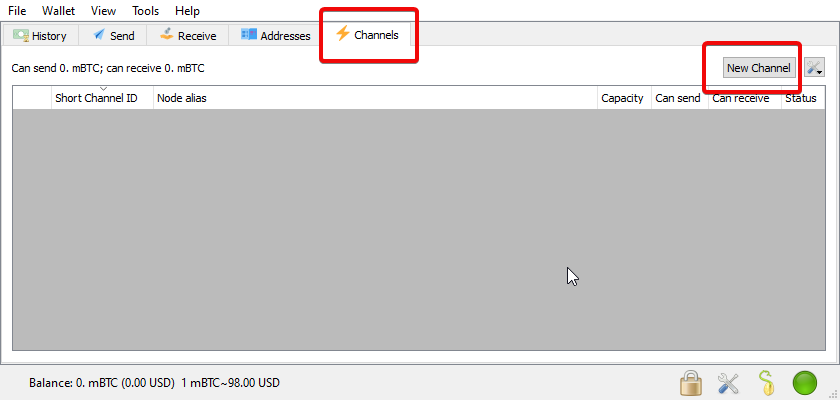
Go to the Channels tab and click New Channel.
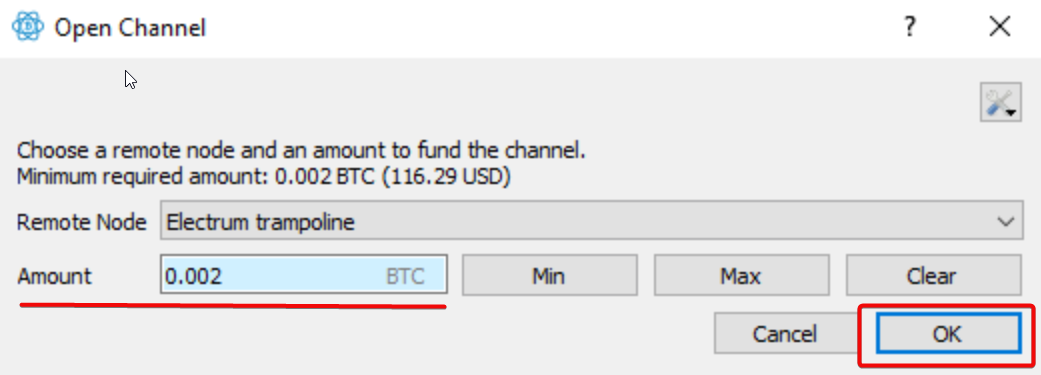
A warning will appear about the need to create a backup, confirm it. On the next screen, select the amount to fund the channel (minimum 0.002 BTC).
The author's experience shows that for informational purposes it is better to start with a minimum amount.
After clicking OK the payment gateway will be in the OPENING status. Wait for confirmation from the network.
When the transaction is confirmed, the channel status will change to FUNDED and the channel will become active.
When the Lightning Network channel is open and funded, you can send express payments through this channel. To do this, use the same Send tab.
For express payments, get a Lightning invoice or scan a QR code. Paste the invoice (starting with lnbc1) into the Pay to field on the Send tab.
Click Pay and Confirm. The payment will be processed in a few seconds. The Lightning payment service has a lightning bolt icon. They are displayed in the blockchain transaction history.
Warning! Experience shows that you should not open a Lightning channel when the network is overloaded, as this is fraught with high transaction fees.
Pay to many
Use the Pay to many option to send a crypto payment to multiple addresses at once.
Tip: Use the view tab if you can't find the features you need.
Go to Send → click on the settings icon on the right, select Pay to many. Enter the address and amount of each recipient in separate lines.
Replace-by-Fee
RBF (Replace-by-Fee) is a function for replacing an unconfirmed transaction with a higher fee. This function is implemented by the Bitcoin BIP-125 standard.
Read in the main article: Replace-by-Fee: how to increase/change fees.
Sign verify message
The Sign verify message function verifies that the address contains the stated amount of BTC and that it belongs to the person who signed the message. Thus, with the help of crypto signature, other people can verify your ownership of the cryptocurrency. Therefore, the transaction becomes transparent.
Read in the main article: signing messages in Electrum, Ledger Live, and MEW.
Encrypt/decrypt message
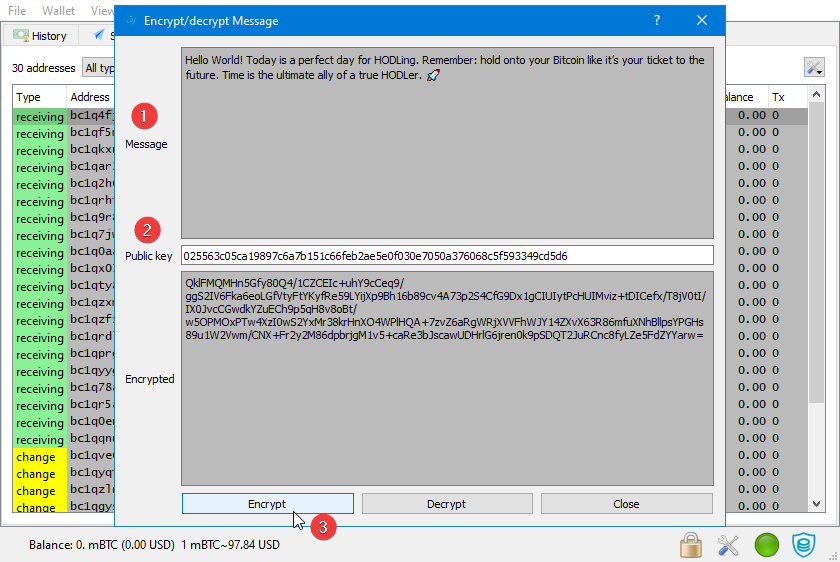
The function allows you to transmit confidential data (for example, passwords, links, keys to files) via encrypted messages that can only be decrypted by those you trust.
Navigate to Tools → Encrypt/decrypt Message. Enter the message. Enter the public key of the person to whom the information is sent.
The message is encrypted with a public key that is visible to everyone. For example, you can encrypt a message for a friend using his public key. However, only the owner of the private key associated with this public key can decrypt it. In other words, no one except your friend can decrypt the message.
Coin Control
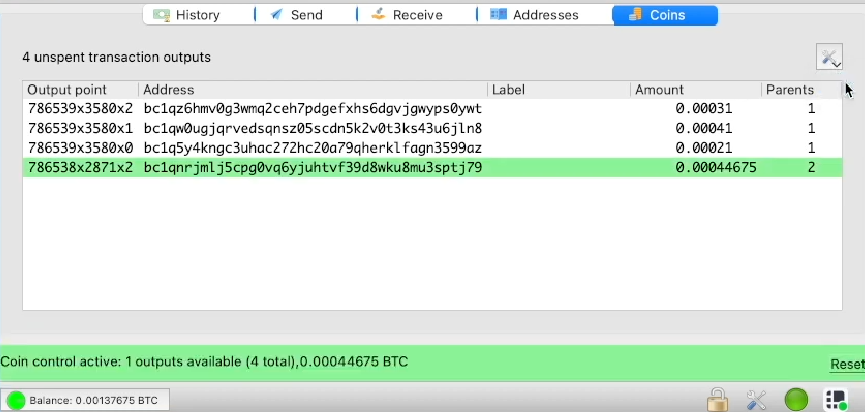
The Coins tab provides a detailed overview of all unspent transaction outputs (UTXO), which are coins available for use in new transactions.
Each item in the list includes balance and address information. Given that Electrum can use multiple UTXOs for a single transaction, this tab gives a full picture of what specific funds can be spent and how to combine them correctly.
Read more in the article: how to send Bitcoin from a specific address - Coin Control.
Problems, Solutions and Conclusions
Hack
Electrum was the target of a phishing attack in which attackers exploited a vulnerability in version 3.3.3 of the client. They created fake servers that sent messages asking for software updates via malicious links. This resulted in the theft of funds. The attack damaged the wallet's reputation, but the vulnerability was quickly fixed and no similar incidents have occurred since.
Network settings
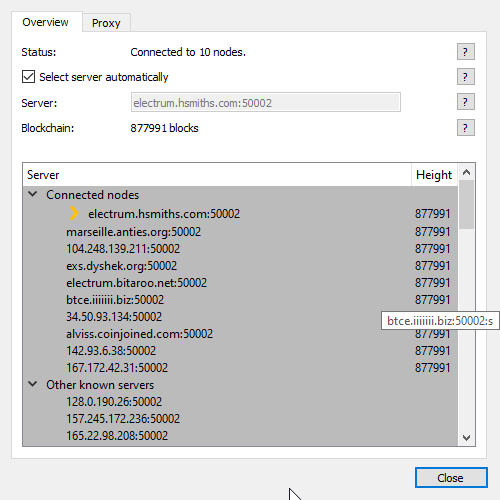
The settings are located in the menu Tools → Network.
- Blockchain connection: electrum does not store the entire blockchain, but connects to remote servers (SPV) to retrieve transaction and balance data.
- Security: Choosing a trusted server reduces the risk of a data manipulation attack (e.g. MITM).
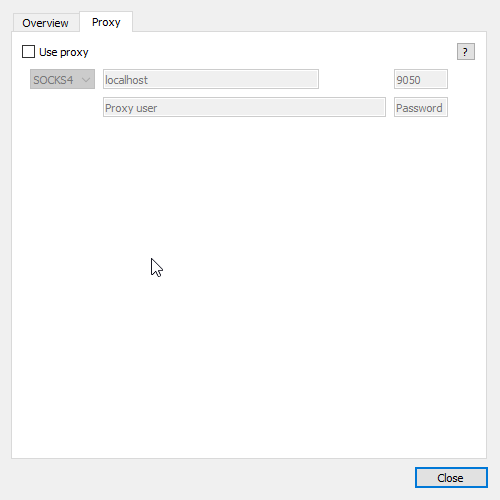
- Privacy: Using a proxy hides your IP address, protecting you from being tracked.
If it doesn't connect
After importing the private key, the Electrum wallet may not show the balance. The main reason is a problem with the connection to the server.
How to solve according to bitcointalk:
- Make sure you have the latest version of Electrum.
- Check your network, server and proxy settings.
- Go to
Tools→Network. In the Overview tab, see which server you have installed. Try checking theselect server automatically. - Disable
Proxy.
Enable logging:
Tools → Preferences → Misc → Write logs to file.
Logs are located in the folder:
C:\Users\[Your user]\AppData\Roaming\Electrum\logs
Additional steps:
- Check the internet: make sure the network is working, TCP ports 50002 and 443 are open.
- Add Electrum to your antivirus and firewall exception list. Avoid disabling your security software entirely.
- Flush DNS: Run ipconfig /flushdns and change DNS to 8.8.8.8 or 1.1.1.1
- Use the portable version: download it from the official website and run it from a separate folder.
Plugins
According to the documentation, the lightweight client supports the following plugins:
- Audio modem - offline transaction signature.
- Cosigner pool - working with multi-signatures via an encrypted server.
- Email - payment requests via email.
- Labelsync - wallet label synchronization.
- Revealer - encrypted backup copies of seed phrases.
- 2fa - two-factor authentication.
- Virtual Keyboard - virtual keyboard for passwords.
Classic Electrum only supports Bitcoin. But there are forks that support Dash, Litecoin, etc.
Version history:
4.6.2:
- The
minrelayfeehas been reduced from 1 to 0.1sat/vbyte(range is now 0.1–50). - Added support for the
Mutinynettest network. - Eliminated duplicate transaction requests to the server.
- Added a log file size limit on disk.
Tech support
Electrum has no support. You use a non-custodial wallet, which means you are the owner, manager, CFO, and marketer of your crypto space all rolled into one.
The software client was developed in 2011 by programmer Thomas Voegtlin and is a non-commercial platform. Like Bitcoin Core, Electrum is an open-source project supported by the community. Therefore:
- You can ask questions at bitcointalk.org.
- And also on Reddit.
- Create Issues on Github.
- Documentation: https://electrum.readthedocs.io
- Official announcements are posted at X.
And also write in the comments about your experience of using it.

