MyEtherWallet: Cold Storage of Private Keys and Offline Transactions
Offline Transaction Capability for Security
You will learn how to create an offline wallet that will safeguard your crypto assets from hacks as well as how to effectively use staking, token swaps, and integration with DeFi protocols for maximum benefit.
MyEtherWallet (MEW) is a wallet that provides access to Ethereum and its network tokens – ERC-20. It supports features such as swapping, buying, selling, NFTs, and staking.
Supported networks: Ethereum, Arbitrum, BNB, ETC, Optimism, Polygon and others.
Offline storage capability is one of the most valuable features of this wallet. The wallet is created without internet access, which eliminates the risk of hacks.
A simple process: you create an offline wallet, write down your access keys on paper, laminate it, and store it in a secure place. This is cold storage of your cryptocurrency – the safest method since the keys remain solely in your possession, just like in a safe.

Meanwhile, we can send transactions offline. In this guide, you will learn how to do that. But first, let's review the features of both online and offline wallets.
Security and Features
The security of the offline version of MEW is built on open-source code and offline transactions.
Security:
- Store your private keys and Keystore on physical media (e.g., USB or paper).
- Open-source code – the entire MEW code is available for audit.
- Send transactions offline – use offline mode to enhance the security of your operations.
In terms of accessibility, the wallet works on all types of devices.
Convenience and Compatibility:
- Wide accessibility – use the web interface, mobile app (iOS or Android), or a hardware wallet.
- Utilize Ethereum Name Service (ENS) – create readable wallet names instead of long addresses for convenience.
- Connect to smart contracts – participate in token sales or use DeFi protocols.
Finally, the online web version offers economic functions:
Economy:
- Decentralized exchange functionality – swap tokens within the wallet. MEW automatically searches for the best rates.
- Staking – stake ETH to earn rewards.
- Access to DeFi – get instant entry into DeFi protocols for lending, borrowing, and yield farming.
Now it's time for practice, so let's download and test the wallet.
Download and Installation
The wallet is available as a standalone product from MEW: a browser extension (called Enkrypt) and a mobile app.

There is also a universal interface for interacting with other wallets or key files. For example, you can access your assets through:
- Third-party wallets and extensions (such as MetaMask or OKX mobile wallet) or hardware devices.
- A key file (Keystore),
- A recovery phrase (Mnemonic Phrase),
- A private key.
Most often, MEW is used as an interface for interacting with other wallets to enhance convenience and security.
Offline wallet – the second most popular feature. Let's create an offline version.
Creating a New Wallet
There are 2 ways to create a new MEW wallet:
- Online via the website form.
- Offline by downloading wallet files from GitHub.
We will create an offline wallet, but the subsequent steps will be identical for the other versions, aside from downloading the files and initial wallet setup.
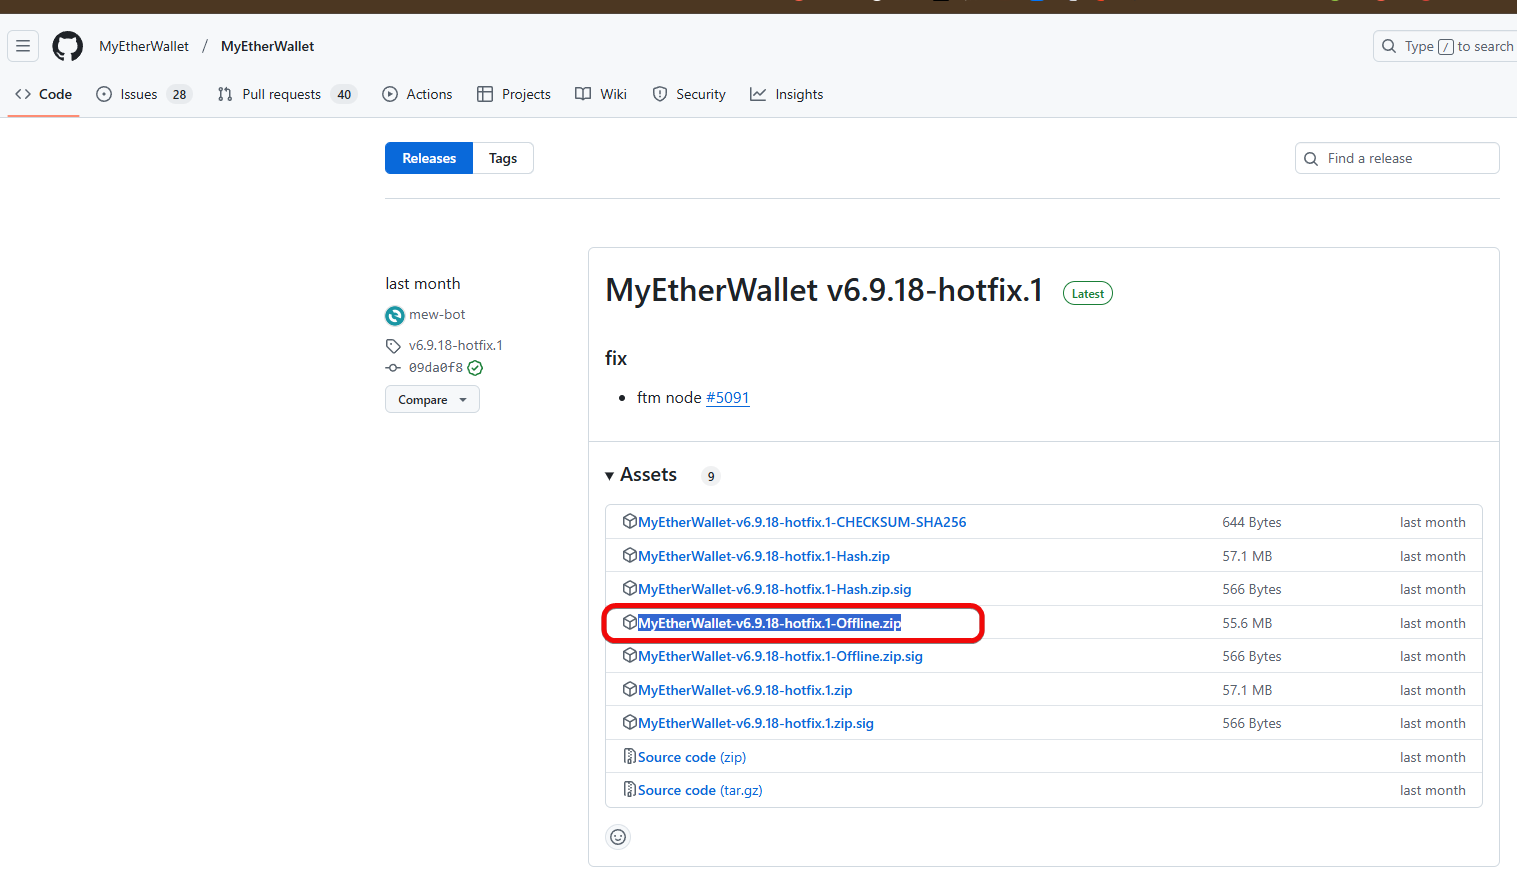
So, go to the GitHub releases section and download the .zip archive of the offline version.
It is advisable to save the wallet files onto a clean USB flash drive. If you don't have a flash drive, you can use Bluetooth, SD/microSD cards, external HDD/SSD, etc.
Tip: for maximum security, you can create a USB drive with a clean Linux operating system to prevent the theft of private keys by malicious software. This is an optional but useful step.
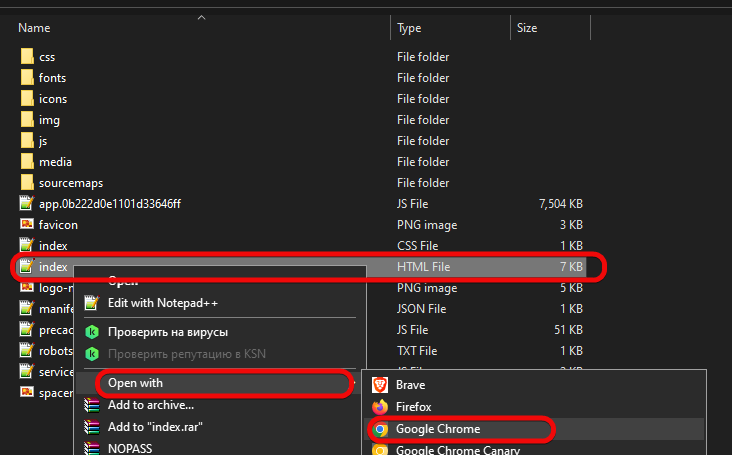
Extract the archive and open index.html using any browser.
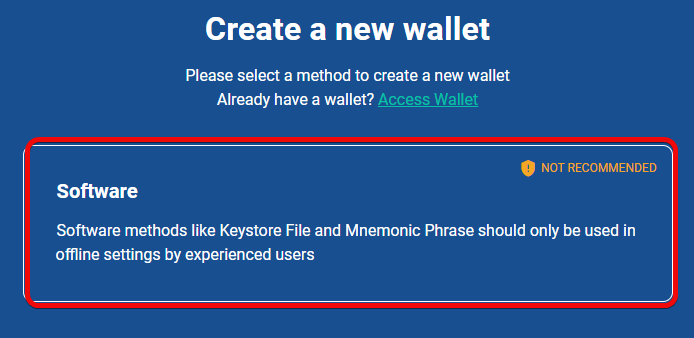
An .html file will open – an interface for accessing your coins or creating a new wallet. Click Create Wallet.

A window will appear offering to create a software wallet. There is also a warning here – it is advisable to create the wallet offline and for experienced users. Click Software.
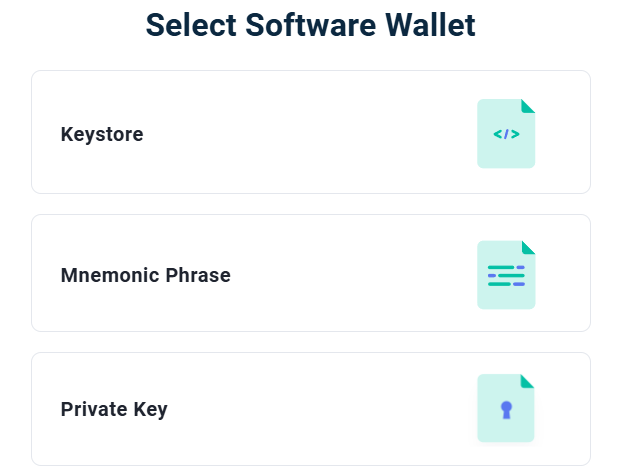
We see two options: creating via a Keystore file or a mnemonic phrase. Which one should you choose?
|
Method |
Advantages |
Disadvantages |
When to Use |
|
Keystore |
High level of security; convenient for storage on a device |
Loss of file/password → loss of access; risk of theft |
Storage on a specific device; working with files |
|
Mnemonic Phrase |
Easy to write down; can be restored on any device; can be stored in multiple locations |
Vulnerability if accessed by others; requires careful storage |
Flexibility; long-term storage; frequent device changes |
We will choose Mnemonic Phrase because a recovery phrase allows you to restore your wallet in almost any ETH wallet.

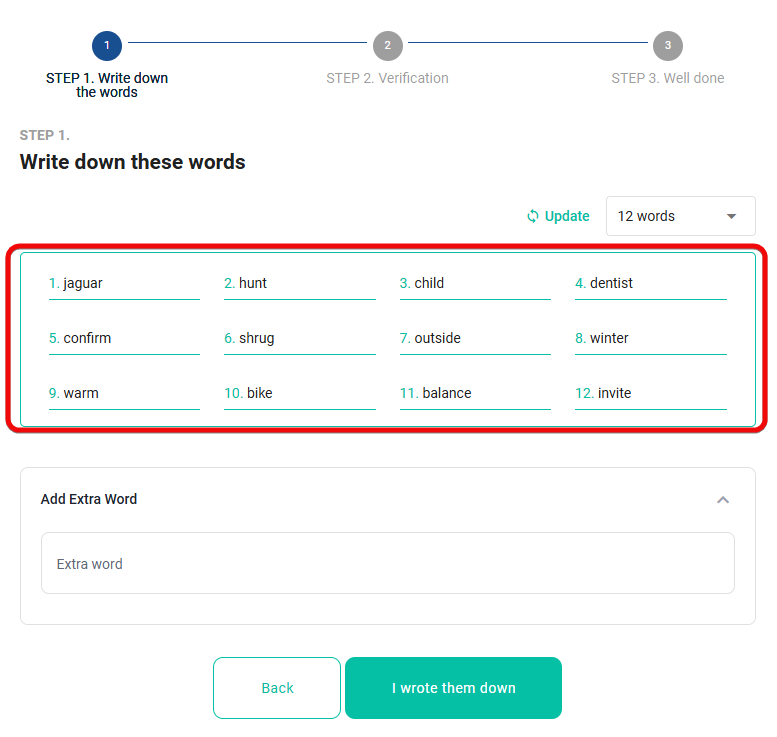
A window will appear displaying 12 words from your phrase. You can also choose 24 words and add an extra word in the Add Extra Word field.
Note regarding Add Extra Word: on one hand, it provides additional protection for your mnemonic phrase; on the other, not all wallets support extended mnemonic phrases.
What to choose? If you require maximum security – use the extra word. If you need compatibility with other wallets, forgo adding it.
Write down the 12 or 24 words on paper, as they will be needed to restore access to your wallet. Then click I wrote them down.
The wallet wants to ensure that the words have been written down correctly. Therefore, you need to confirm 3 words by selecting the correct ones. In our case, these are the 3rd, 9th, and 10th words.
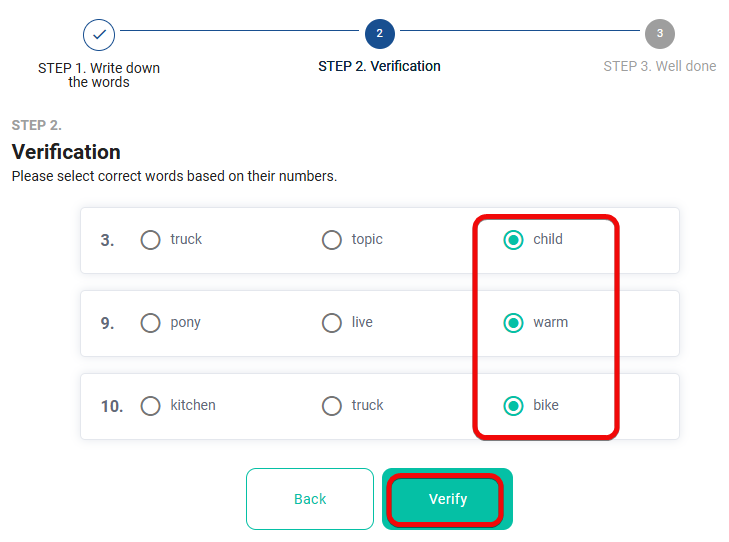
Warning: never share your mnemonic phrase with anyone. We have revealed it solely for instructional purposes!
Click Verify and now the wallet is created. You can access it both online and offline.
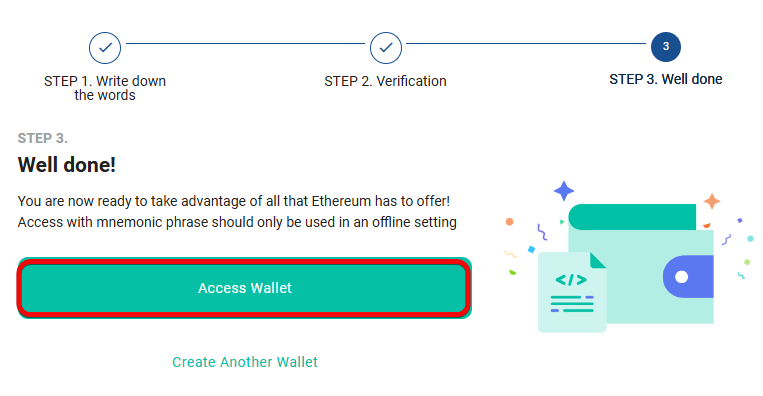
You can now proceed to use it.
How to Use the Offline Wallet
Access the wallet by clicking the Access Wallet button and entering your mnemonic phrase.
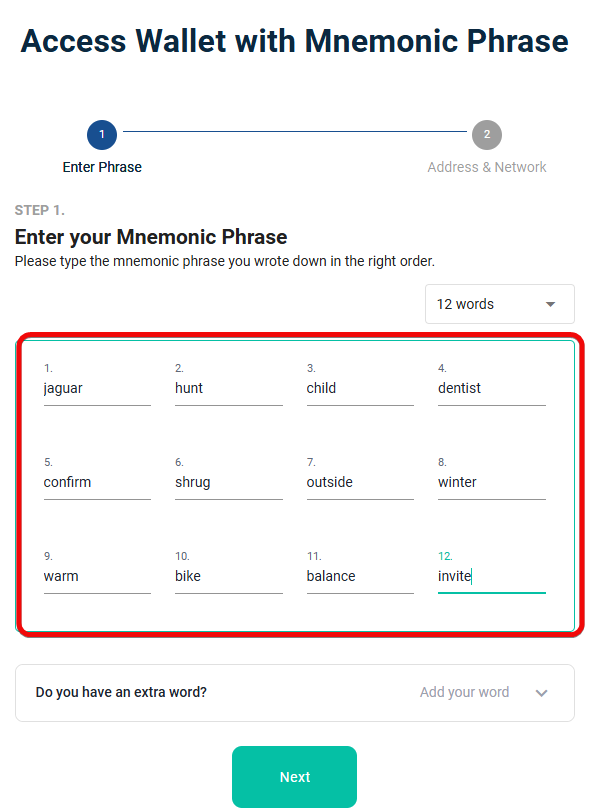
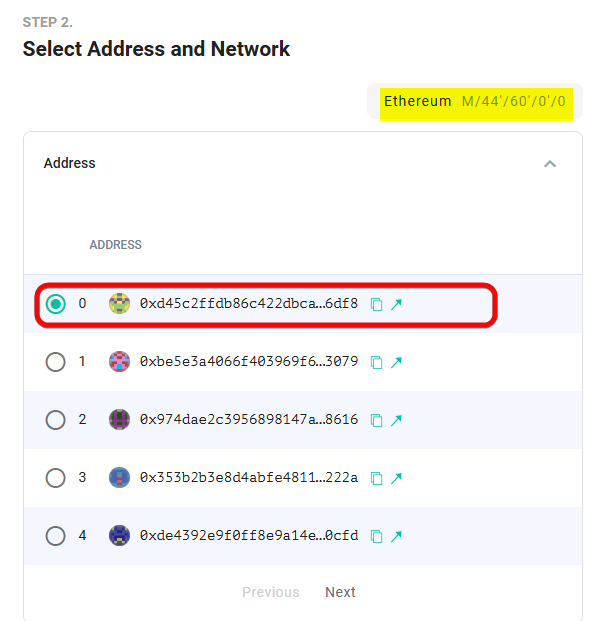
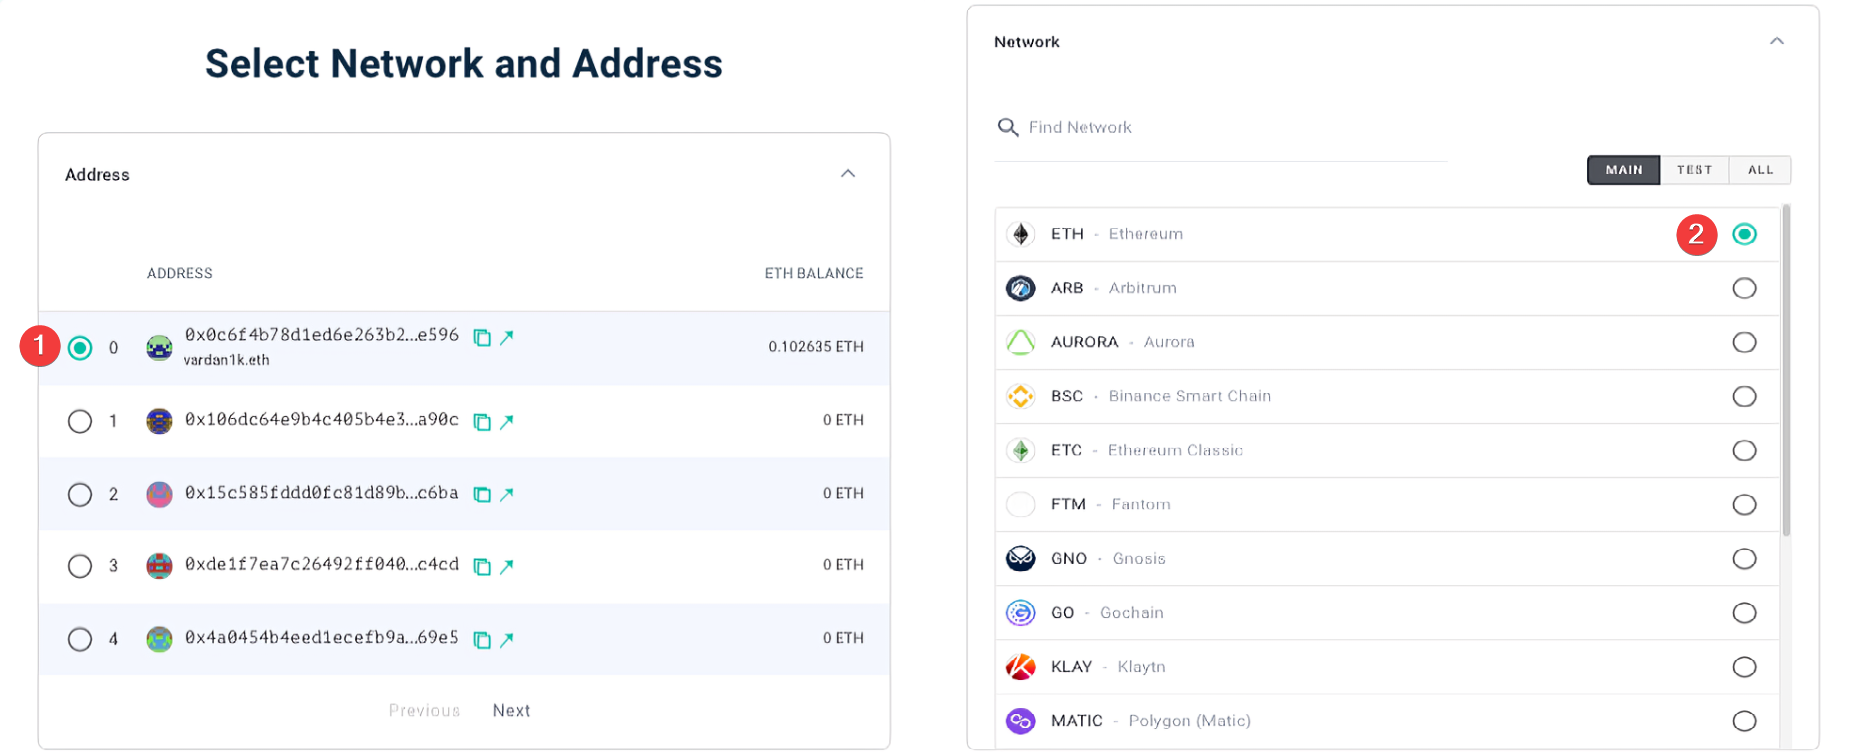
After clicking the Next button, the wallet will prompt you to select networks and addresses.
Create an Address
Upon opening, the wallet offers you to choose an address and a method for obtaining keys for compatibility with different wallets – the derivation path (e.g., m/44'/60'/0'/0/0). If you do not need addresses of a particular type, such as test addresses, then select the default path for ETH – m/44'/60'/0'/0/0.
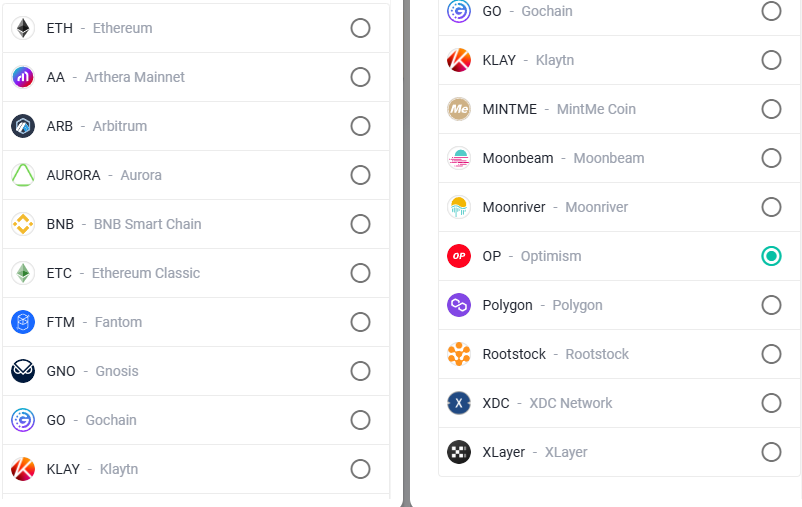
Regarding network selection, the wallet offers the following:
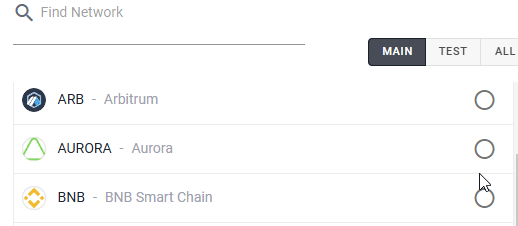
|
Abbreviation |
Network Name |
|
ETH |
Ethereum |
|
AA |
Arthera Mainnet |
|
ARB |
Arbitrum |
|
AURORA |
Aurora |
|
BNB |
BNB Smart Chain |
|
ETC |
Ethereum Classic |
|
FTM |
Fantom |
|
GNO |
Gnosis |
|
GO |
Gochain |
|
KLAY |
Klaytn |
|
MINTME |
MintMe Coin |
|
Moonbeam |
Moonbeam |
|
Moonriver |
Moonriver |
|
OP |
Optimism |
|
Polygon |
Polygon |
|
Rootstock |
Rootstock |
|
XDC |
XDC Network |
|
XLayer |
XLayer |
Let's choose ETH. The network can be changed at any time.
After entering the offline version, you are greeted with a window offering the ability to send and receive cryptocurrency.
The address is displayed on the left. Here, you can copy the address or view your paper wallet.
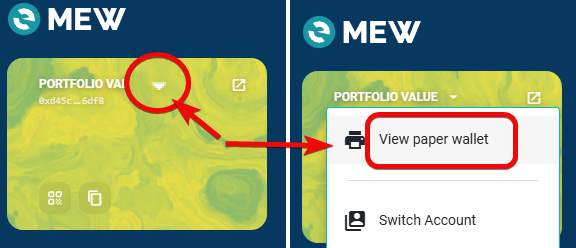
Create a Paper Wallet
The View paper wallet option will display and allow you to print your paper wallet along with the address and private key.
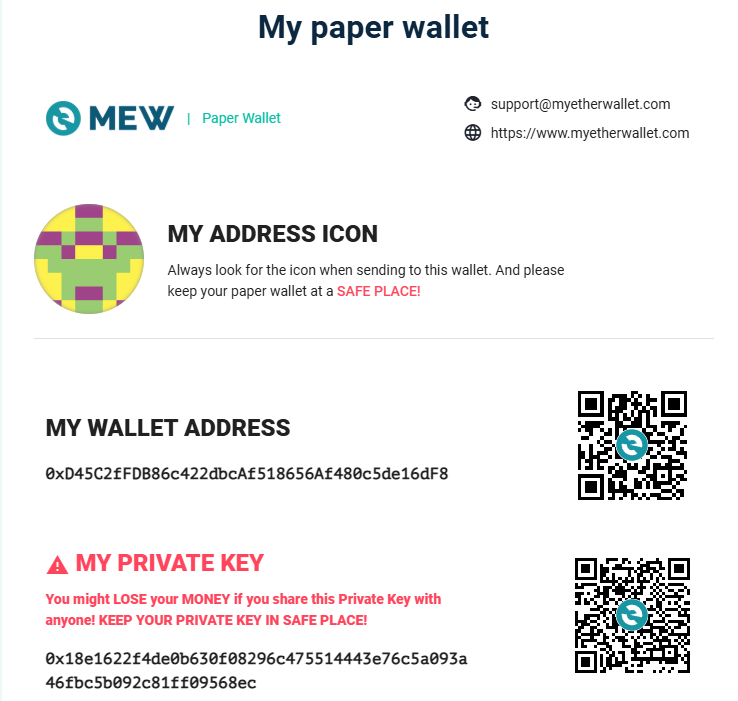
A paper wallet is a printed document that contains your public address, private key, and often a QR code for convenient scanning. It allows you to store cryptocurrency offline, which is considered the safest form of storage.
Tip: keep the printed copy in a secure location. You can make several copies, laminate them, and store them in different places. Next, we will look at how to fund the wallet.
Offline Transactions
You can send Ethereum from a paper wallet either online or offline.
Offline transactions require 2 computers – one with an internet connection and one without.
For an offline transaction, you need to create it using the MEW tool – Offline Helper. It allows you to pre-formulate a “promised payment” that you will later sign on the offline computer.
Here's how it works:
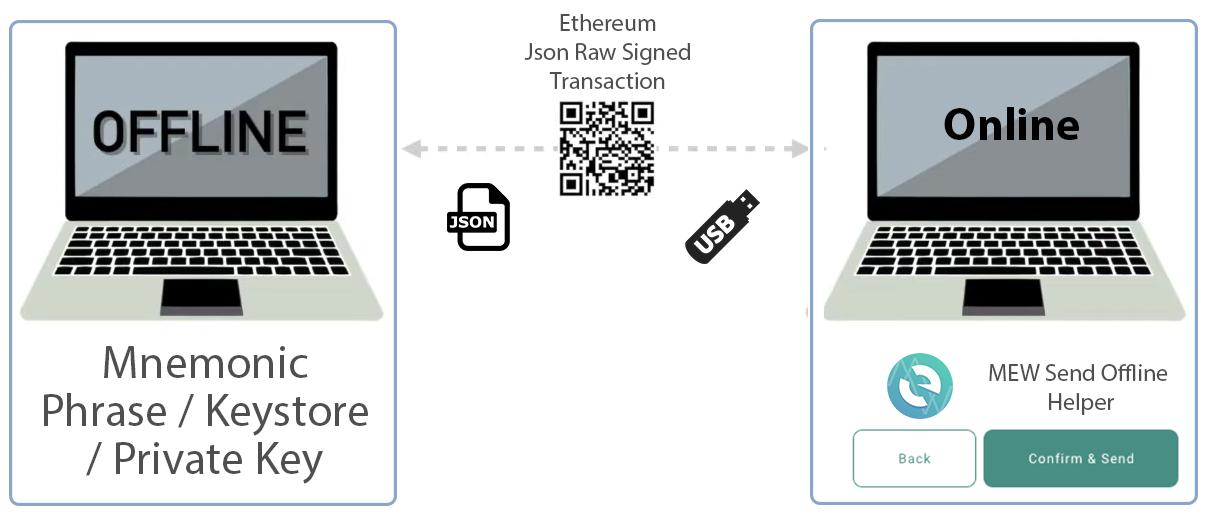
The mnemonic phrase / Keystore / private keys never go online from the offline computer. It acts as a "cold wallet" that merely approves and signs transactions.
Transaction information is transferred either as JSON files via a USB flash drive or through a QR code.
Creating an Offline Transaction
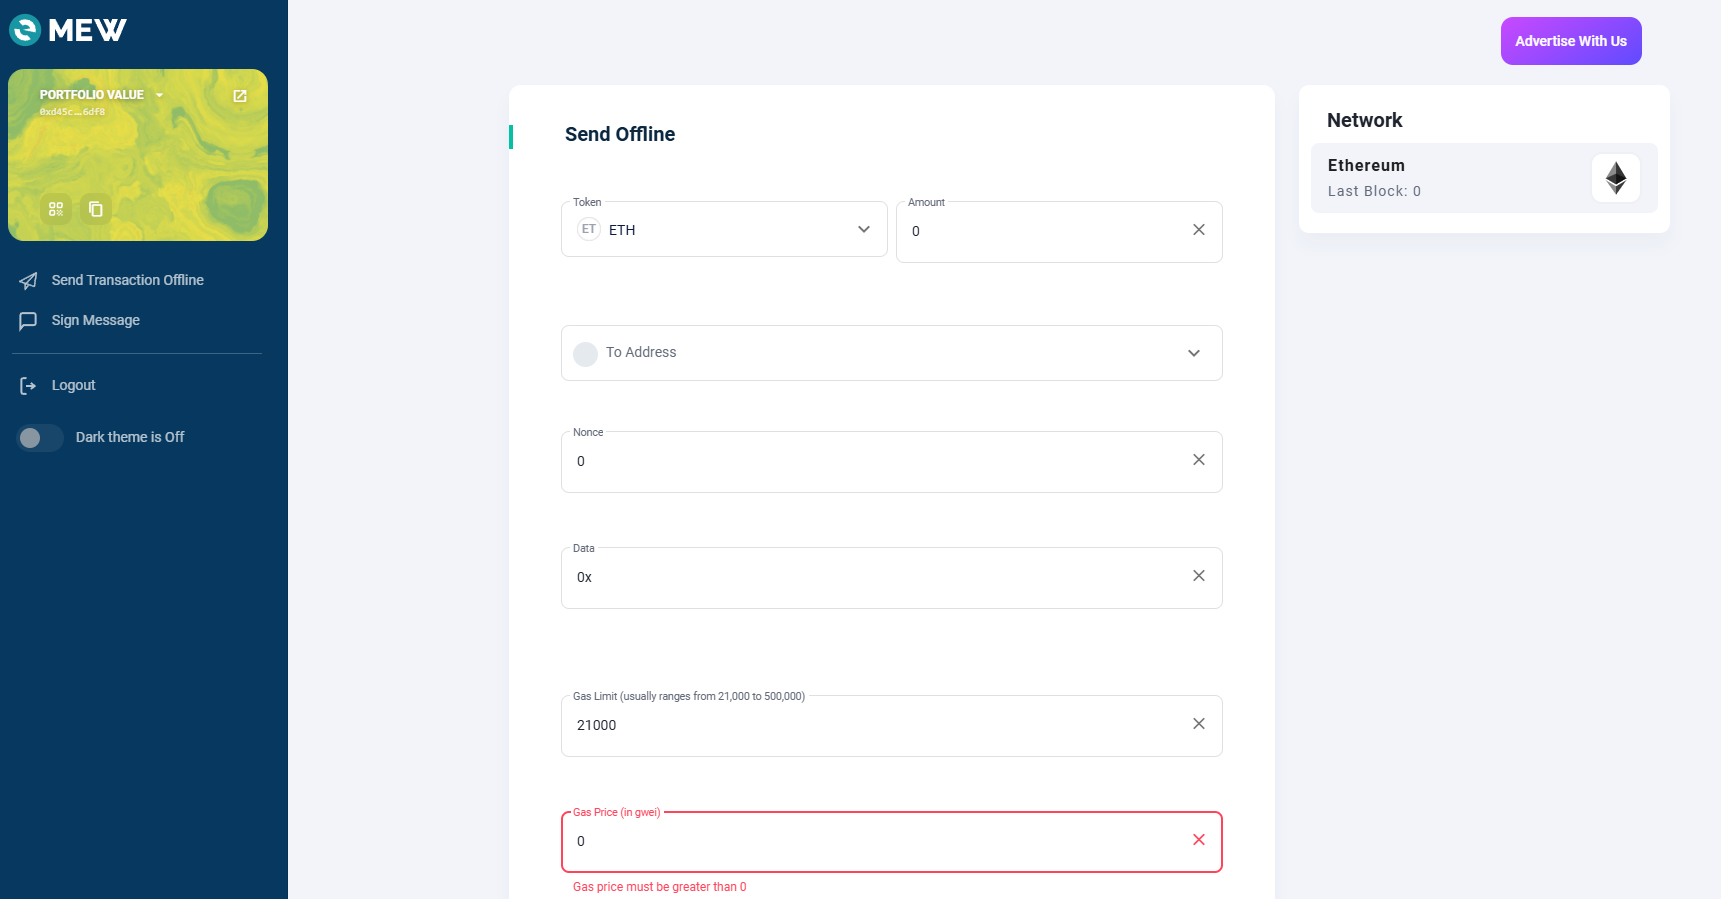
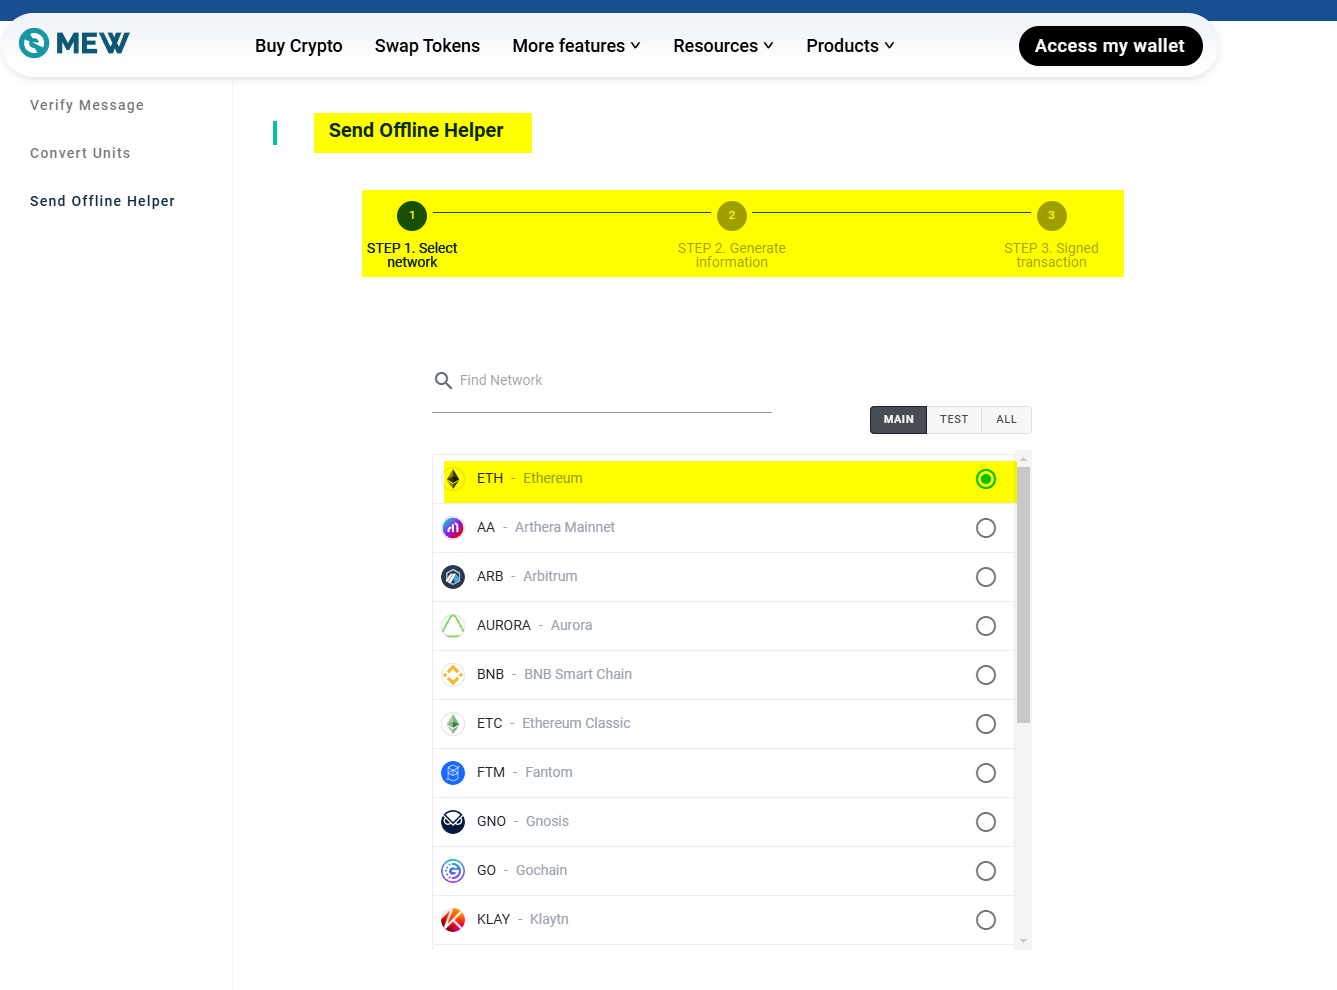
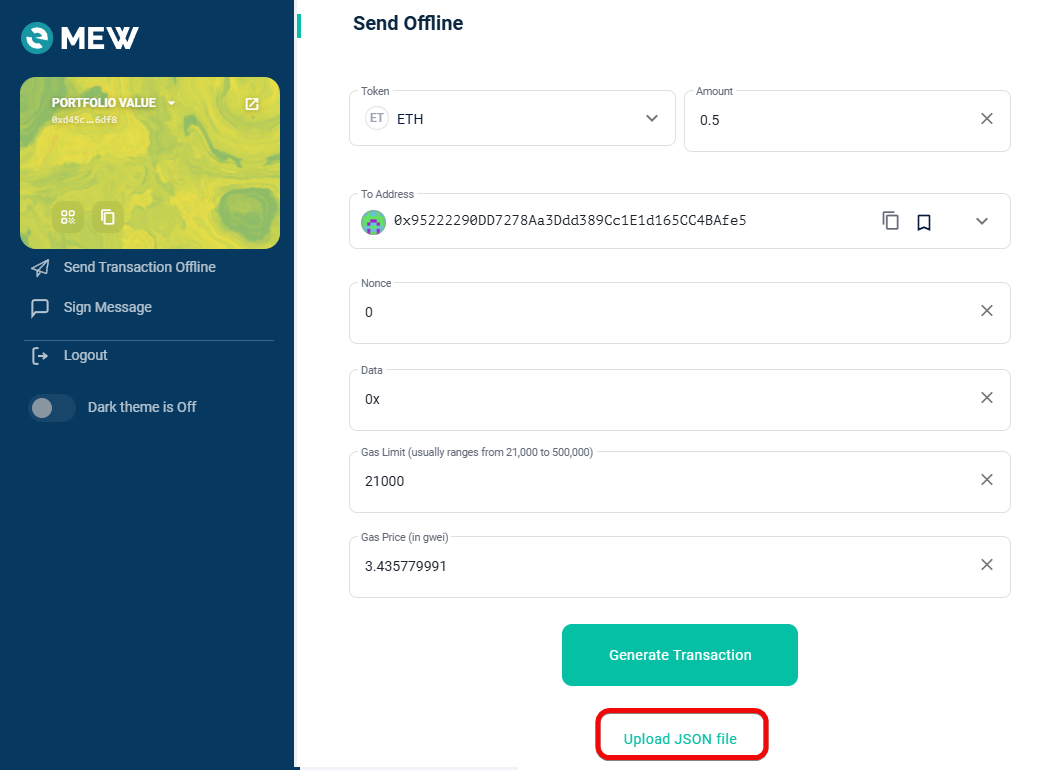
Go to the MEW website and navigate to the Send Offline Helper section, and make sure to select the Ethereum network.
Then, enter your Ethereum address from which the transaction will be sent.
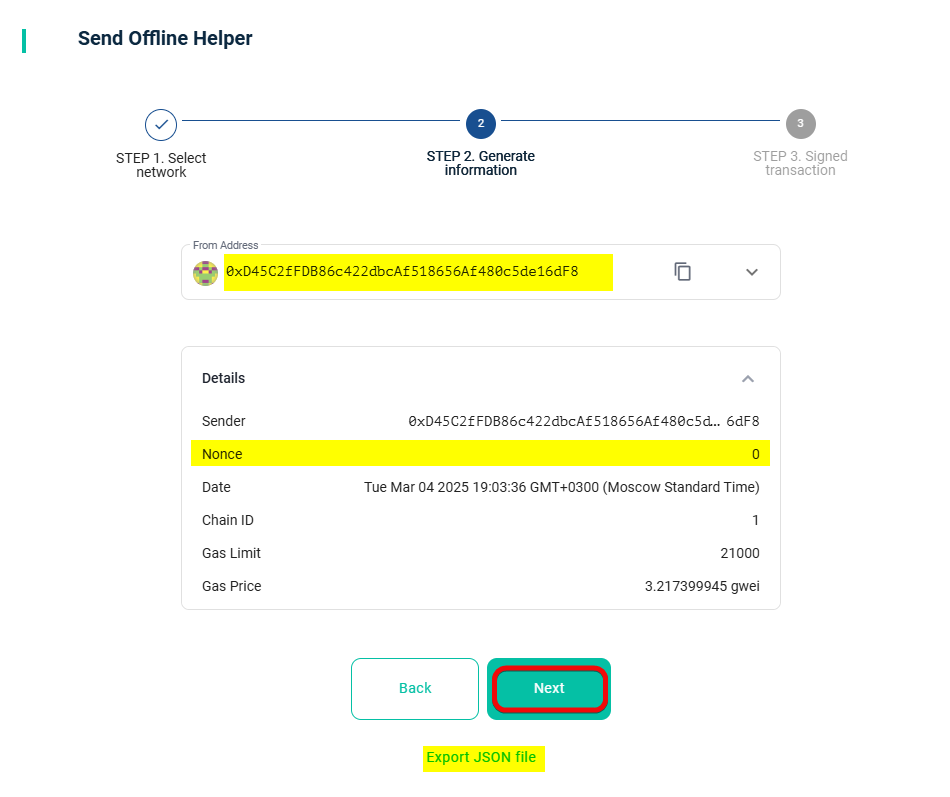
After entering, the site will automatically determine the current fee – Gas Price – and the transaction counter for the wallet – the Nonce field.
Nonce increases with each transaction; it is unique to the address and necessary for offline signing. It currently shows a value of 0 because we are initiating our very first offline transaction.
We need to save the Gas Price and Nonce. To do this, click Export JSON file and save the file to a USB flash drive.
Alternatively, you can note down these details of the upcoming transaction on your smartphone, as there is nothing confidential here.
Signing the Offline Transaction
Now, switch to the offline PC that has your mnemonic phrase.
After connecting the flash drive, open index.html in your browser – the offline version of MyEtherWallet (ensuring that there is no internet connection).
Unlock access to the offline wallet by entering your mnemonic phrase or Keystore.
Paste the recipient's address from the text file to minimize manual entry errors. Specify the transaction amount – in this case, 0.5 ETH – and load the Gas Price and Nonce from the saved JSON file.
Finally, obtain your signed, generated transaction by clicking Generate Transaction.
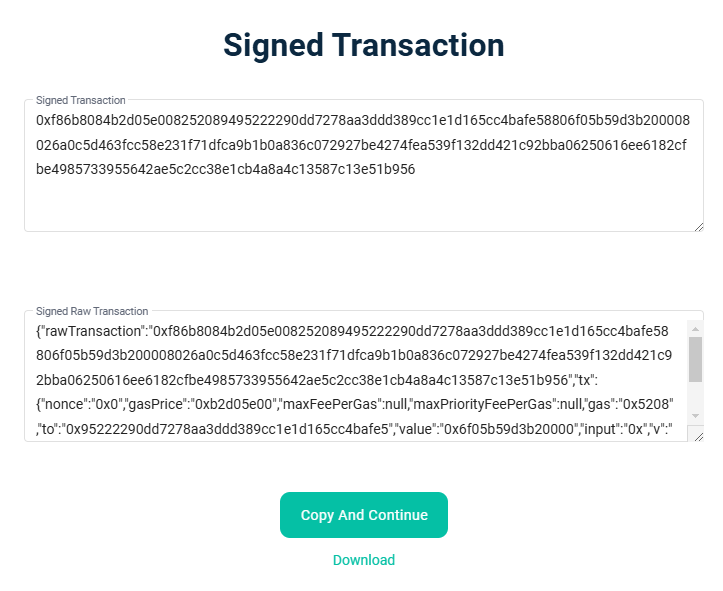
The transaction will be signed locally, generating 2 formats: Signed Transaction and Signed raw transaction.
Signed Raw Transaction– the signed transaction in a readable format (for example, JSON) with separate fields showing what and how it was signed.Signed Transaction– the same transaction, but encoded as a single string and ready to be sent to the network.
Save these details to your flash drive.
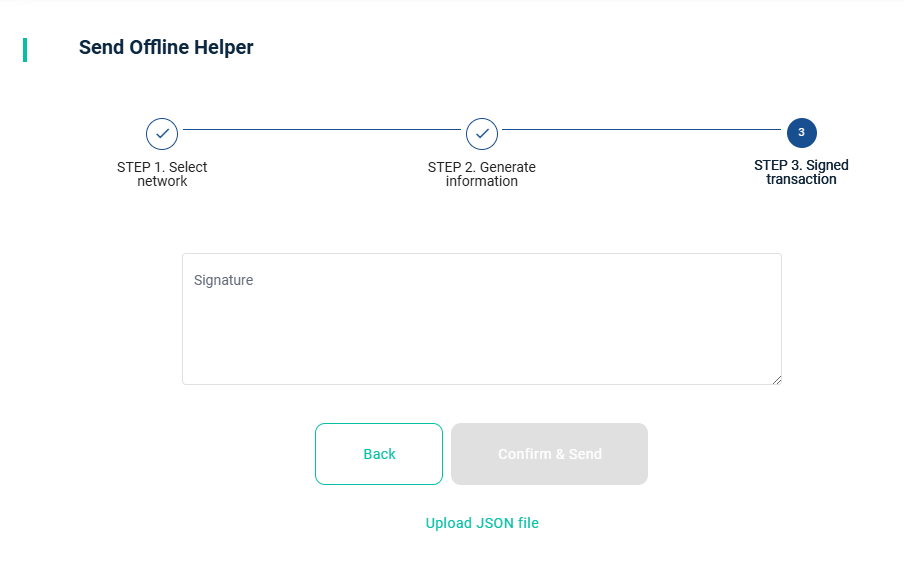
Sending the Offline Transaction
Return to the online PC, navigate again to the Send Offline Helper page. Select Ethereum, paste your address, and upload the JSON file of the signed transaction (from the offline PC) – signed transaction.
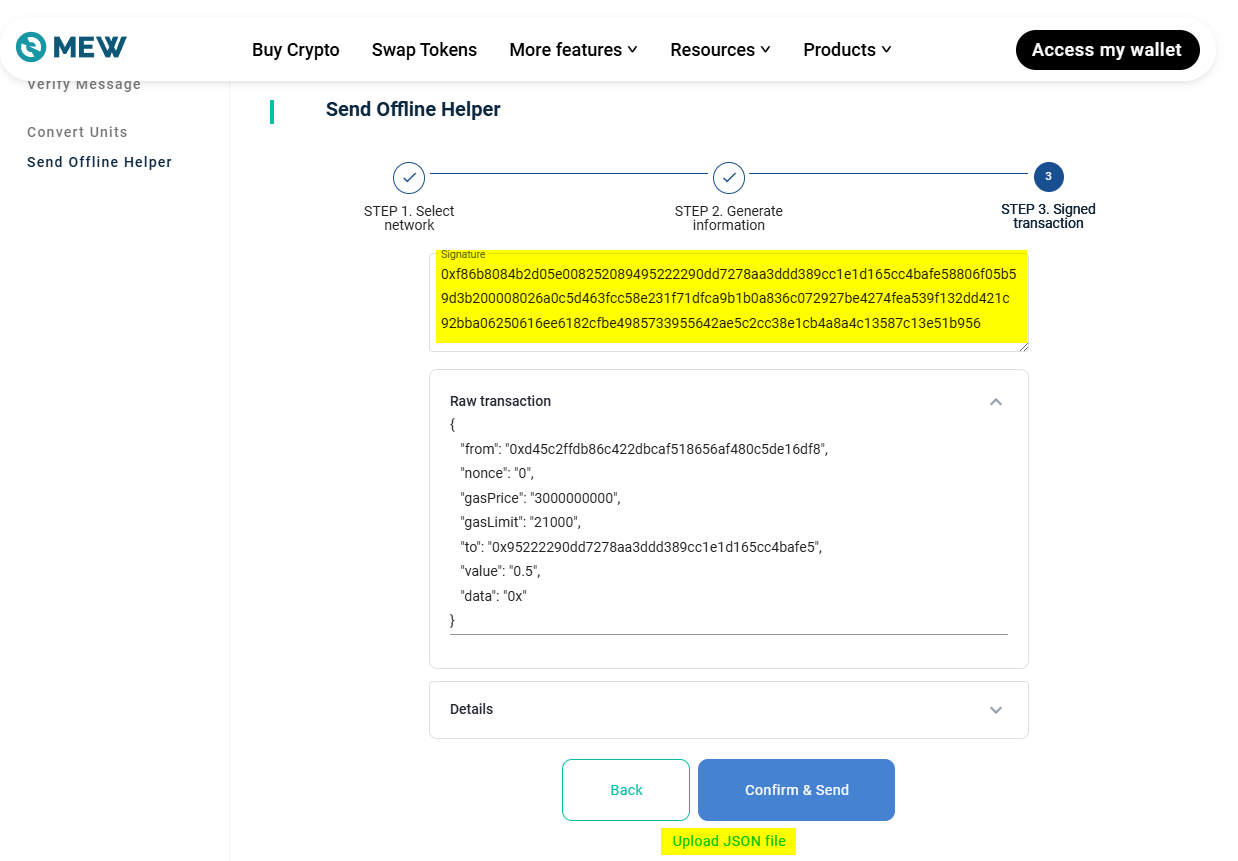
Review the transaction details before sending, then click Confirm and Send. We have successfully sent the transaction to the network!
The two-PC approach ensures secure management of cryptocurrency without a hardware wallet – your private keys always remain on the offline computer.
Now, let's examine how to use the online wallet without a second PC.
How to Use the Online Wallet
The online wallet is simpler but less secure.
The main menu includes 3 tabs: Portfolio, Apps, and NET Manager. This is where you manage your assets and connect to DApps.
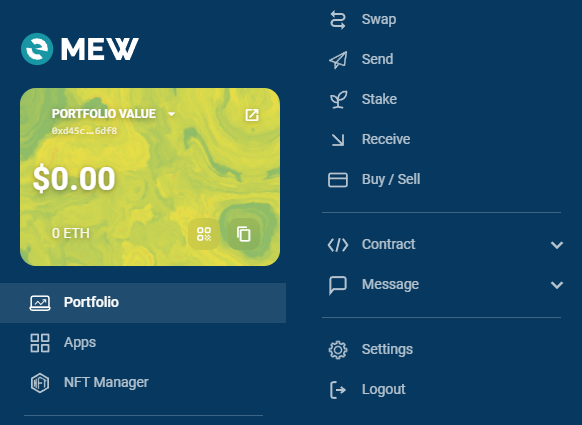
Next to it, there are tabs for the main cryptocurrency operations: Swap, Send, Stake, Receive, Buy / Sell.
How to Fund
The Receive tab is used for funding. It provides an address and a QR code.
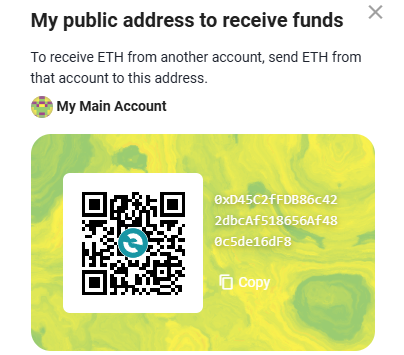
If you don't already have Ethereum, you can buy it from exchangers or on exchanges. Here you will find a convenient comparison of exchanges based on fees and reliability.
To receive funds from another wallet, simply provide your wallet address, then follow the instructions: select the currency, enter the amount, and complete the transaction.
Buy / Sell
The Buy / Sell tab offers operations through a bank card, but the rates are usually not favorable.
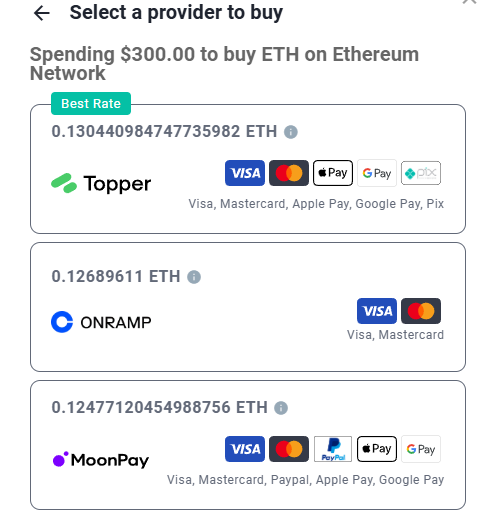
The Buy button opens a list of services such as Topper and ONRAMP, but their fees are extremely high. For example, purchasing $50 worth of ETH through ONRAMP may yield only about $45 equivalent, and through Moonpay – roughly $38.
In other words, you could lose more than 10% in fees. It is usually more advantageous to buy Ethereum on an exchange and then transfer it to your wallet.
How to Withdraw
Click Send, enter the recipient's address (which starts with 0x), and the amount of tokens to send.
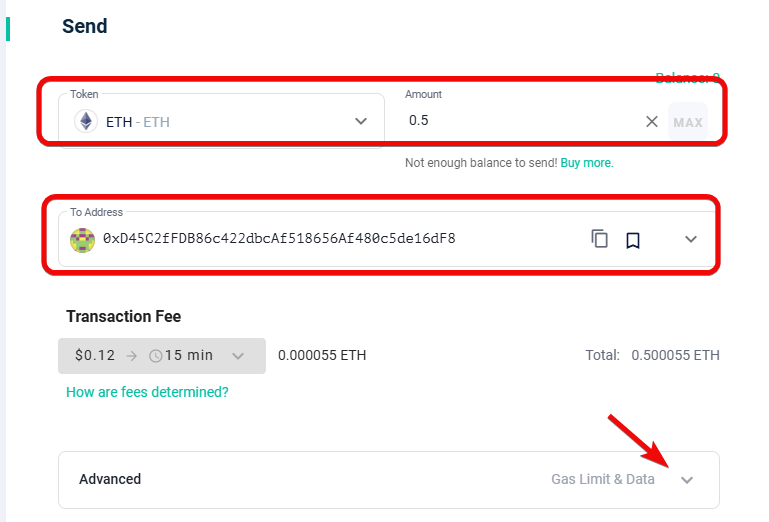
The Advanced field contains fee settings. Here, you can manually adjust the Gas Limit.
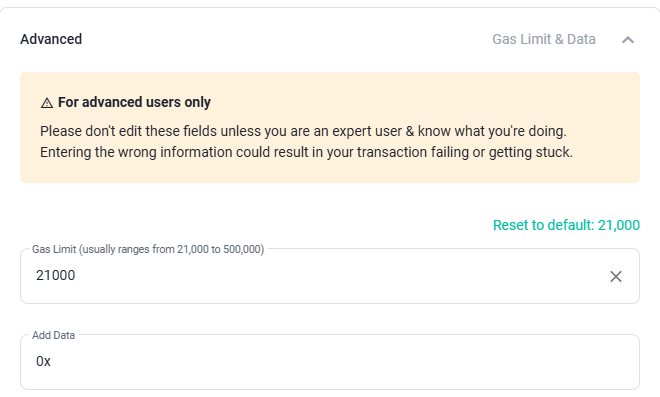
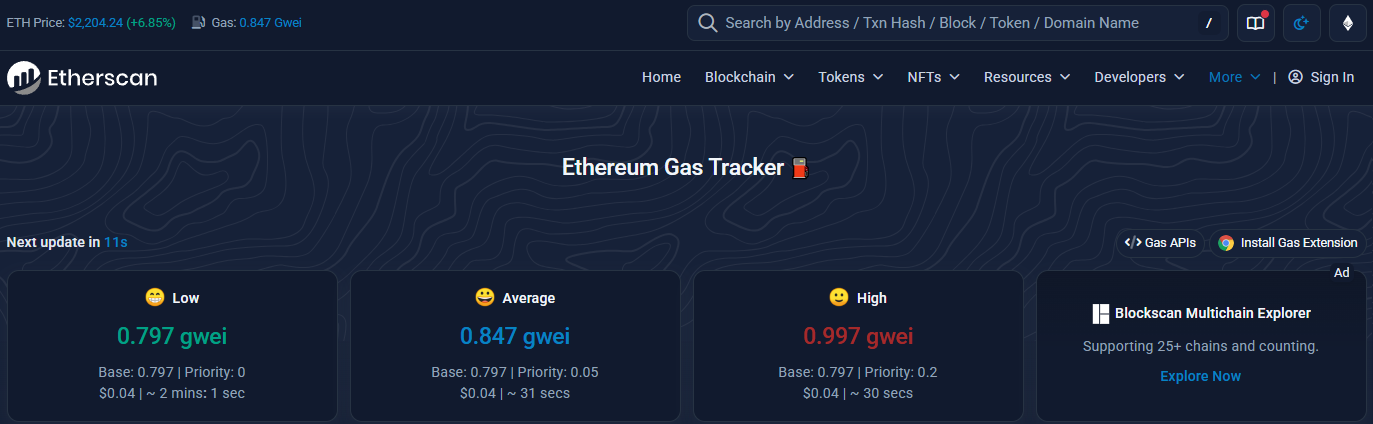
You can check the current gas price at the Ethereum Gas Tracker.
After confirmation, the transaction will be sent, and you can track it on Etherscan by entering the address.
Swap
The Swap tab allows you to convert tokens directly within the wallet interface.
MEW integrates several exchange providers, such as 0x, Paraswap, 1inch, and Changelly, allowing you to get competitive rates.
Two types of swaps are available:
- Token swaps within a single network
- Cross-chain swaps, for example, ETH to BTC.
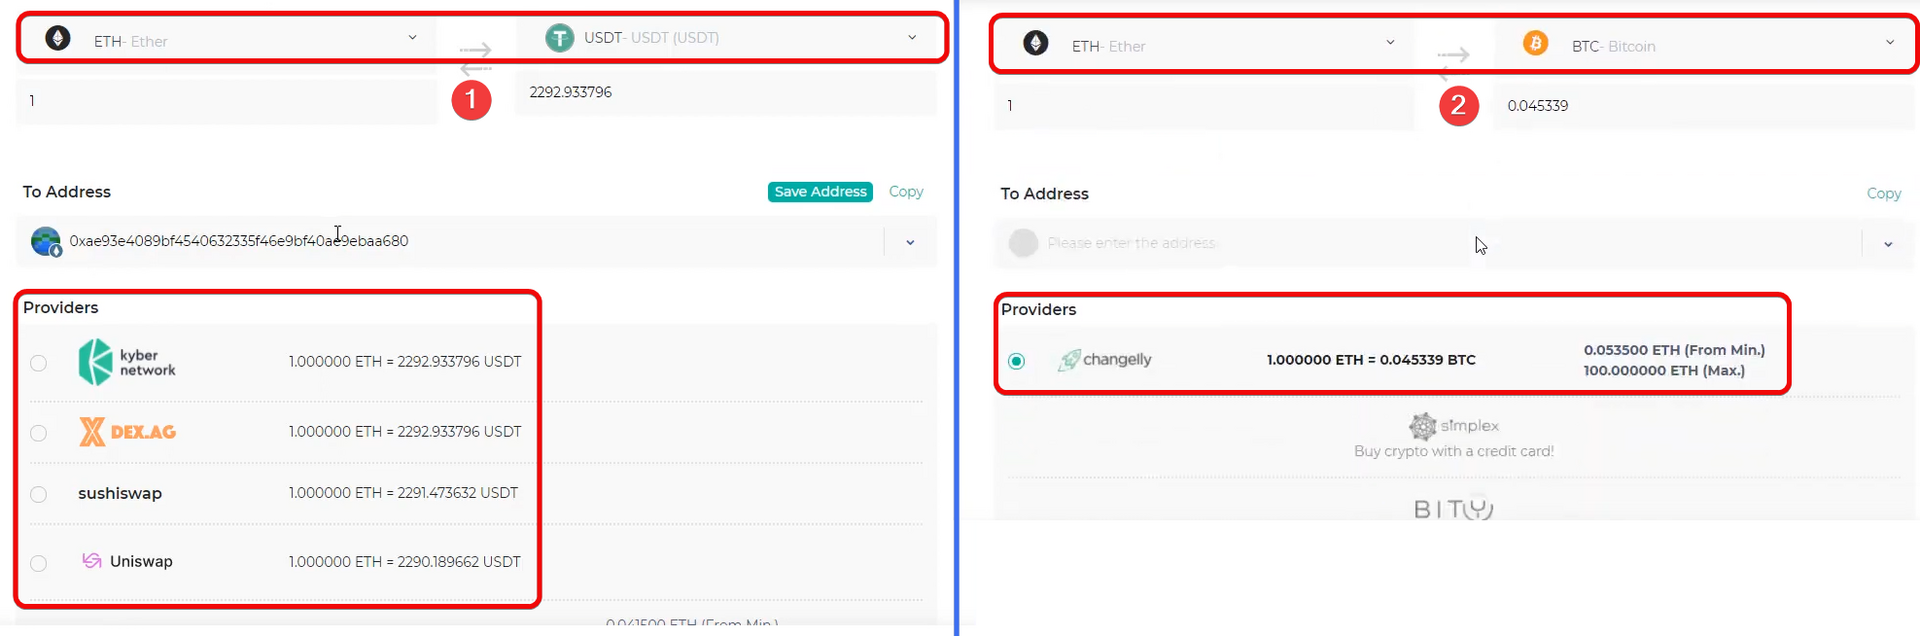
For cross-chain swaps, separate wallets for each network are required. You must specify a refund address for the currency being sent and a receiving address for the target currency.
Staking
Staking involves locking up coins to earn interest.
MEW offers 2 staking methods:
- Full validator staking (with the required 32 ETH),
- Partial staking through the Coinbase pool – staking any amount of ETH
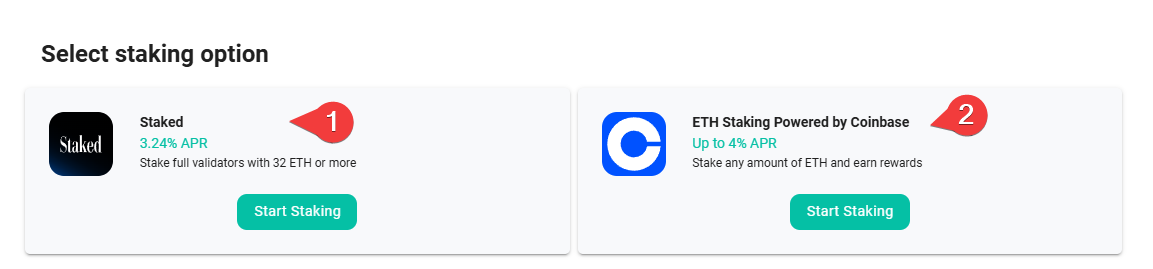
The expected yield from staking is around 3-4% per annum.
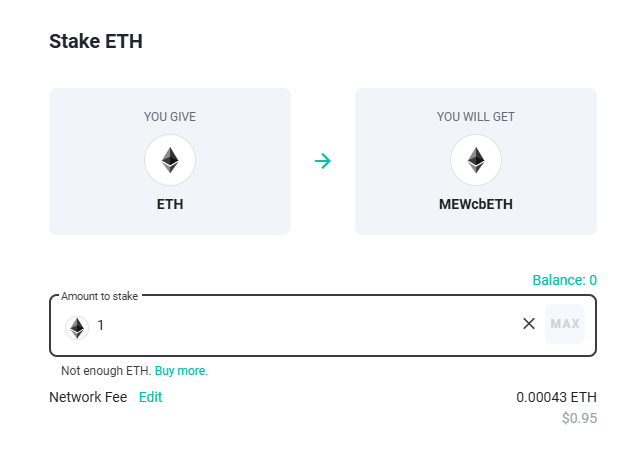
When staking, tokens called MEWcbETH are credited. They automatically accumulate rewards, and the conversion rate between ETH and MEWcbETH is updated daily at 13:00.
You can stop staking and withdraw your coins at any time.
DApps
This tab contains decentralized applications.
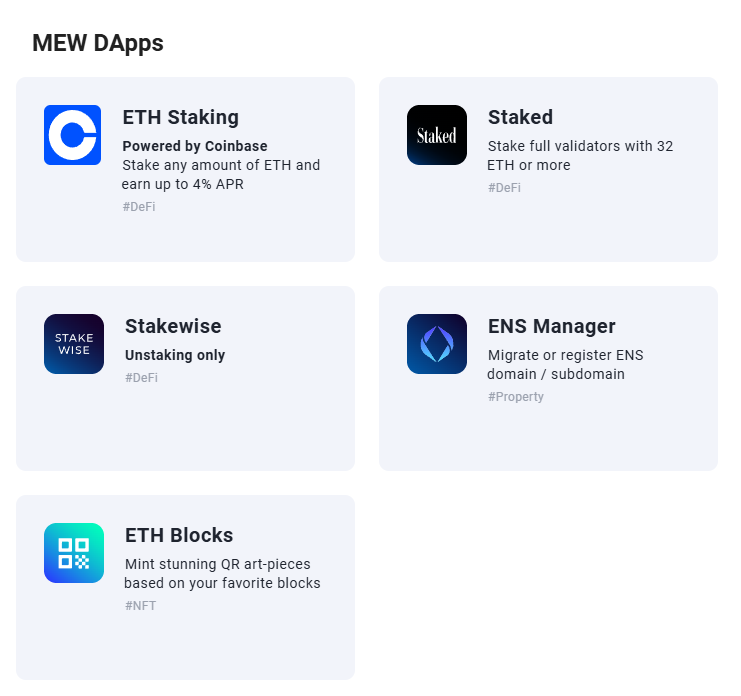
There are relatively few here compared to other wallets. This includes staking, which we have already seen, and the ENS Manager for managing and creating names on the ETH network. For example, Vitalik Buterin has the domain vitalik.eth on the network.
ETH Blocks allows you to mint NFTs associated with memorable transactions, significant events, or personal milestones.
The design of these NFTs is dynamic and changes based on block data, thereby creating unique works of art.

Additionally, MEW has a dedicated tab for NFTs.
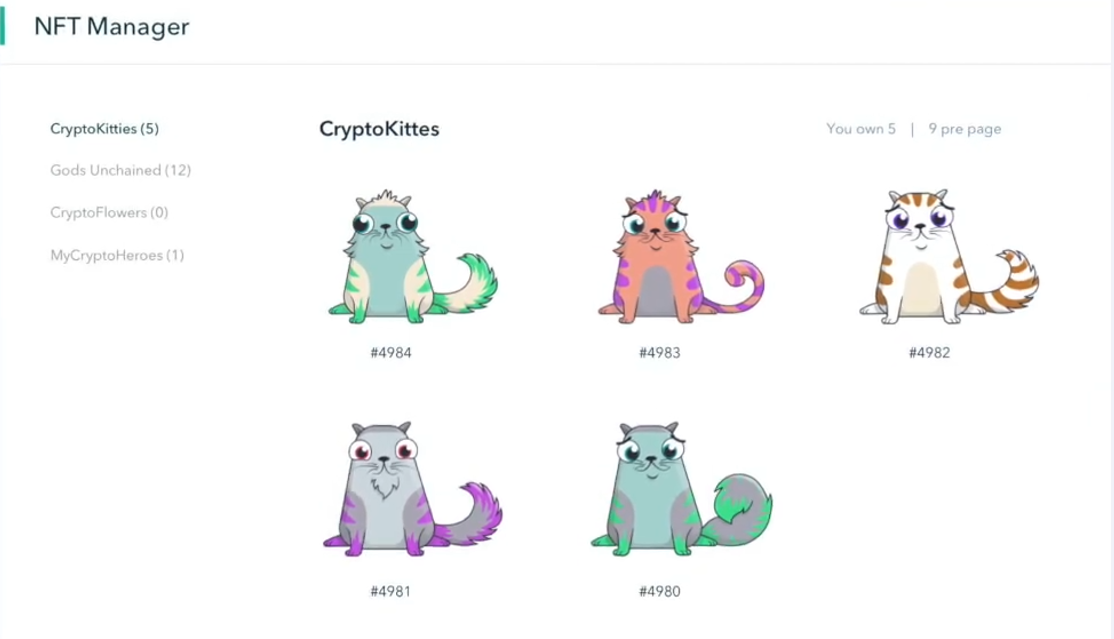
NFT
The wallet includes a built-in NFT Manager. You can easily view and manage your NFT collection by selecting the appropriate section on your account card. All NFTs are displayed here with their details.
Adding Tokens
To add a token that is not in the list, navigate to the Portfolio tab. Scroll down and locate the token menu. On this page, there is a link for adding tokens or a menu icon (three dots) if you have already added tokens previously.
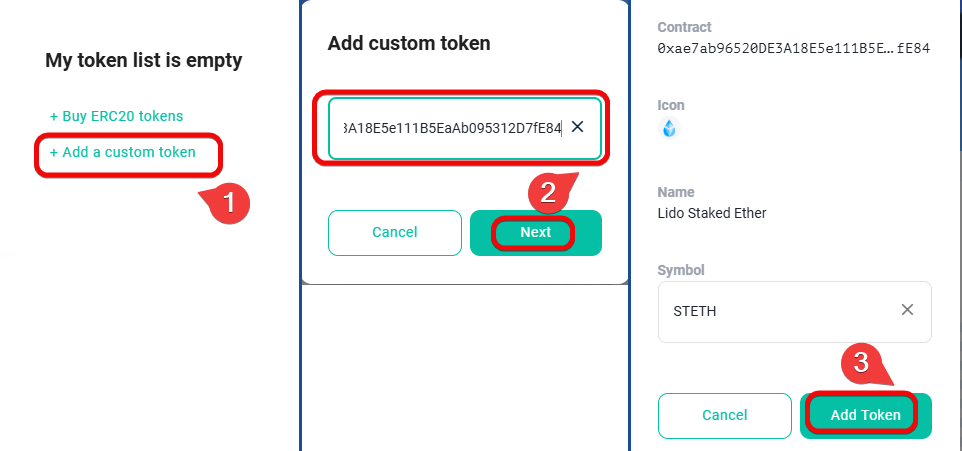
- Click
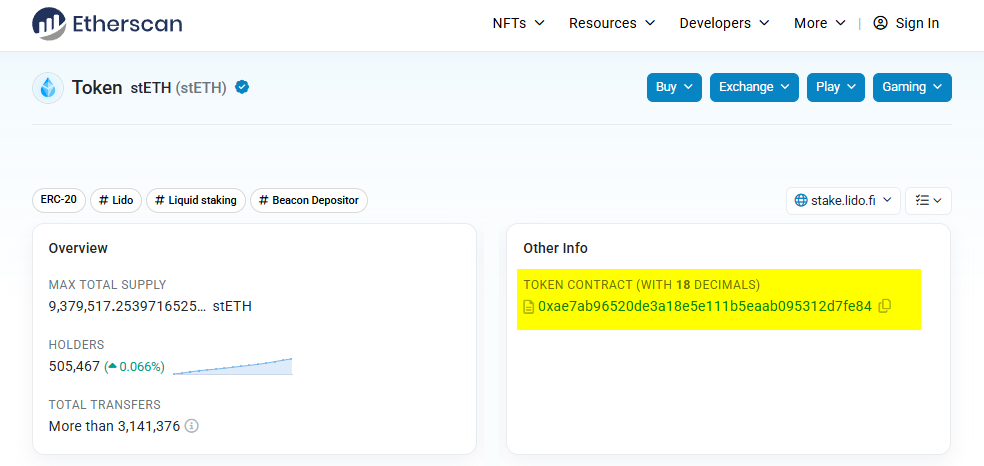
Add a custom token. - Enter the contract address, which you can obtain from Etherscan.
- Confirm your selection by clicking
Add Token.
You can obtain contract addresses from the Other Info section on Etherscan.
Advanced Settings
Sign Message
The primary purpose of signing a message is to prove that you own a specific Ethereum address.
A good example of its use is to prove that you truly own a certain balance.
To use this function, go to the Sign Message section.
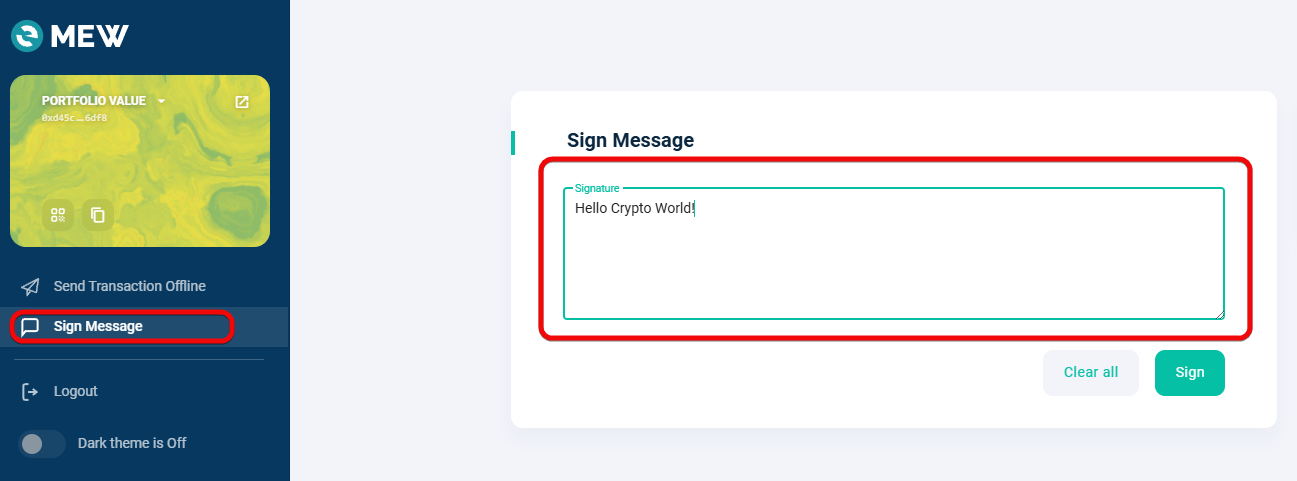
Type the message you wish to sign. It can be a phrase, a confirmation, or any other text. The message may include the date and time.
MEW generates a code (signature) that includes:
- The address from which the signature was generated.
- The original message.
- The cryptographic signature itself.
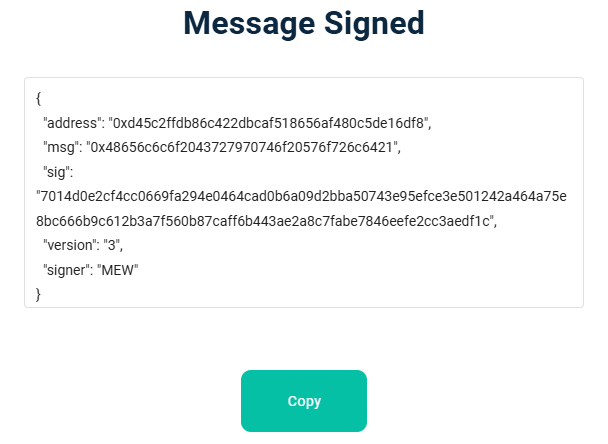
Now, you can present this message to the world without revealing your private key.
To verify the signed message, go to the online tool Verify Message and paste the message. You will see the result:
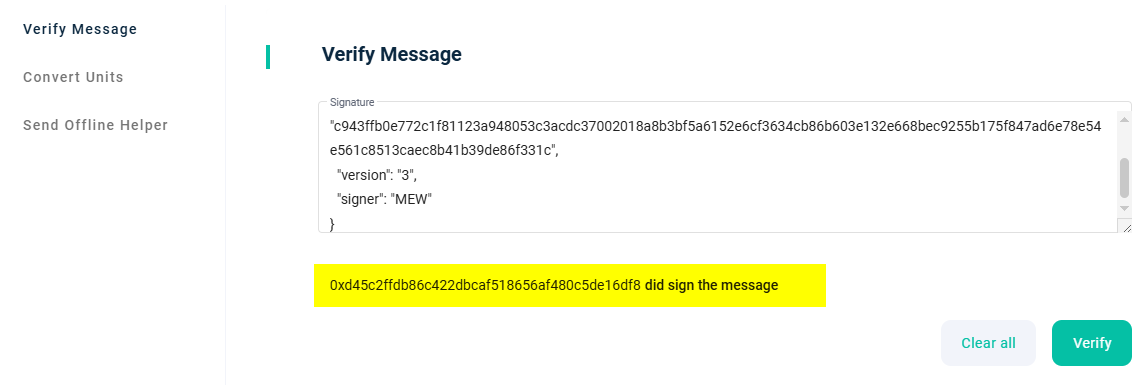
We can see which wallet address sent this message.
Import and Recovery
Access can be recovered using 3 methods:
- Mnemonic phrase,
- Keystore file,
- Private key.
Recovery can be done via the Select Software Wallet tab.
Mnemonic Phrase
Enter the 12- or 24-word phrase into the wallet interface.
This method restores all associated addresses in their original order.
Recovery via Keystore File
Use the encrypted JSON file along with its password. This method will also restore all addresses and balances.
Recovery via Private Key
Enter the 64-character hexadecimal string to gain access. This method is less secure since the key is transmitted in plain text.
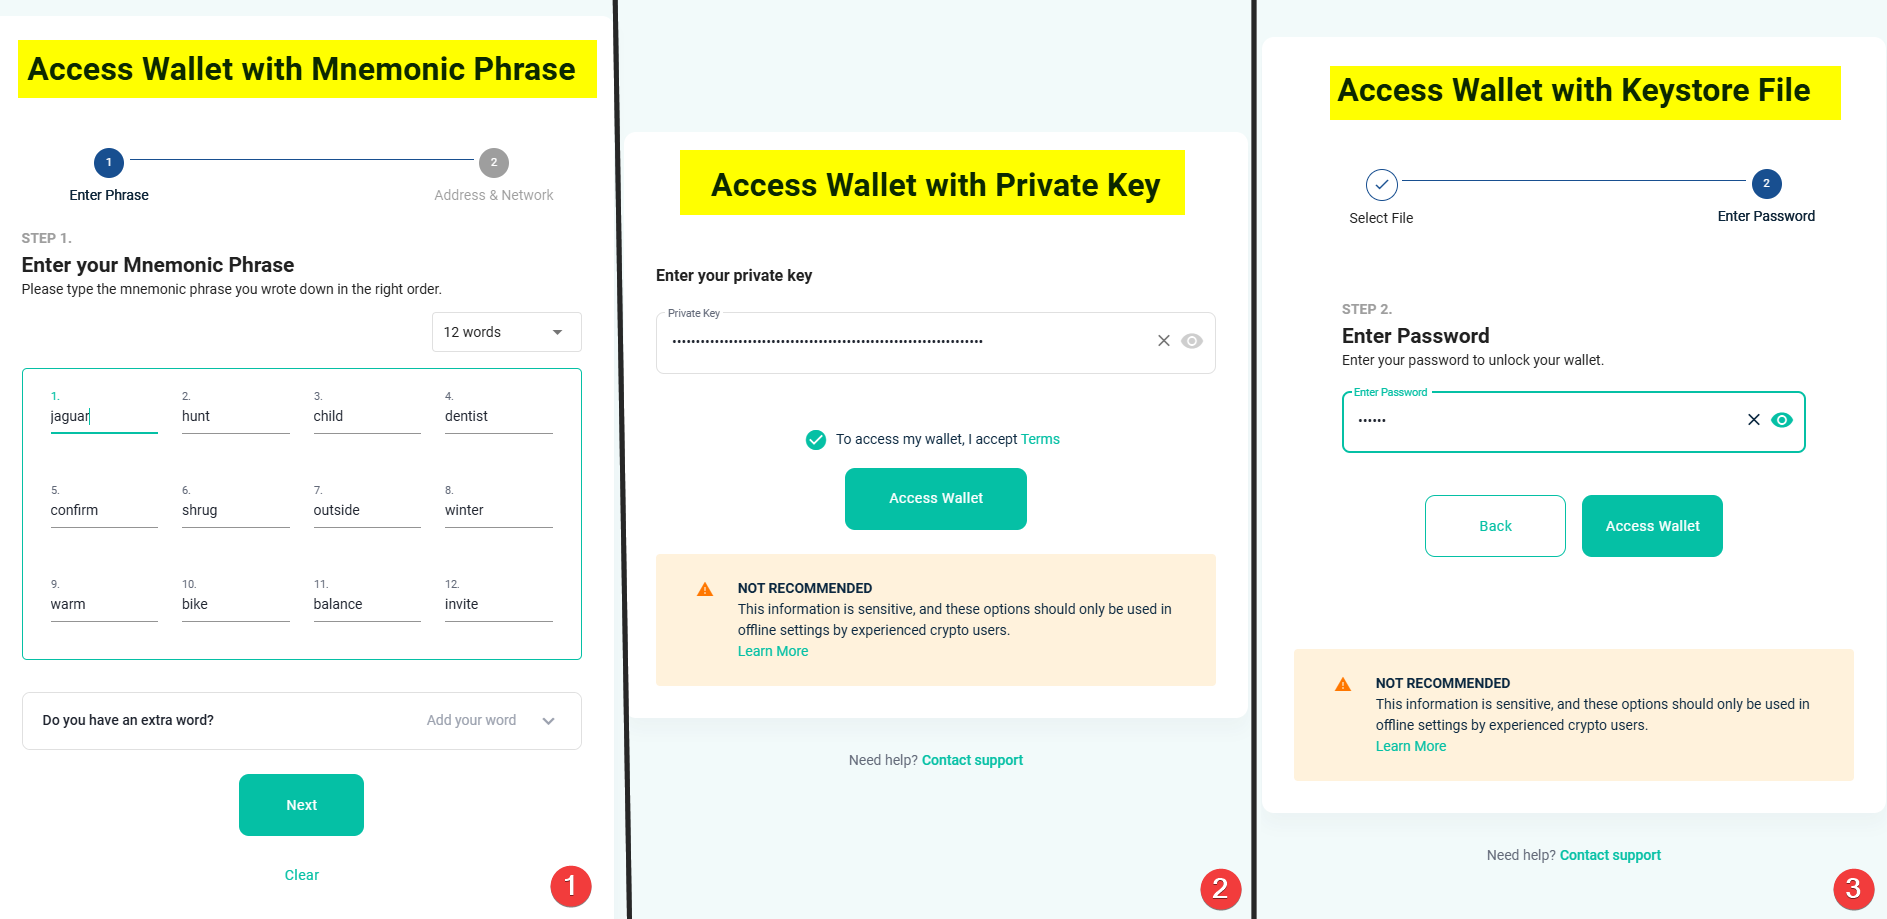
MEW recommends using the mnemonic phrase instead of directly entering the private key.
Integration with Hardware Wallets
MEW acts as a web wallet that enables you to work with addresses generated by hardware wallets, ensuring the secure protection of your private keys.
Trezor
To connect Trezor, first plug it into your PC, then select the Hardware Wallet option in the MEW interface, and then choose your Trezor model from the list.
Proceed to authorization: in the Trezor Connect window that appears, click Allow once for this session and confirm the export of your public key. Then, enter your PIN and passphrase (if applicable).
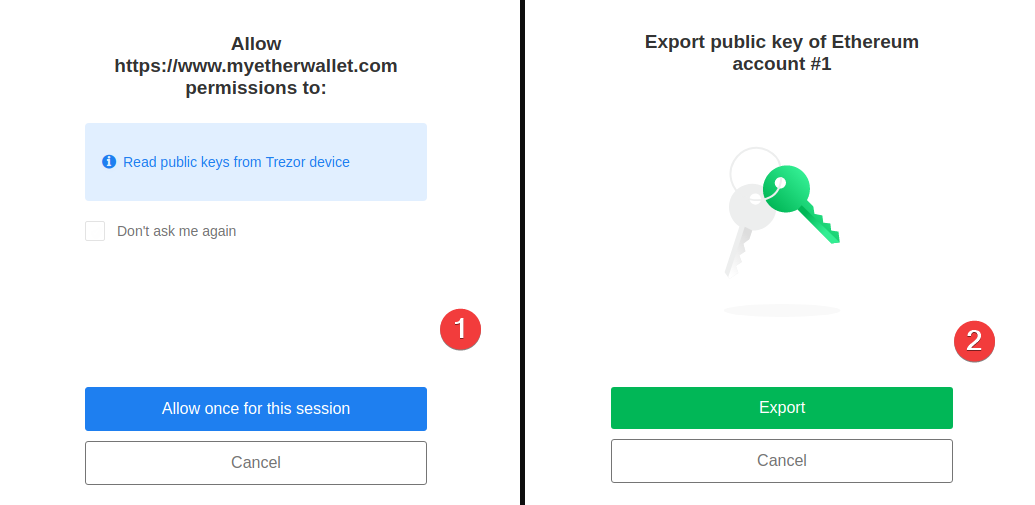
Select the Ethereum network or the desired token in the HD Derivation Path field.
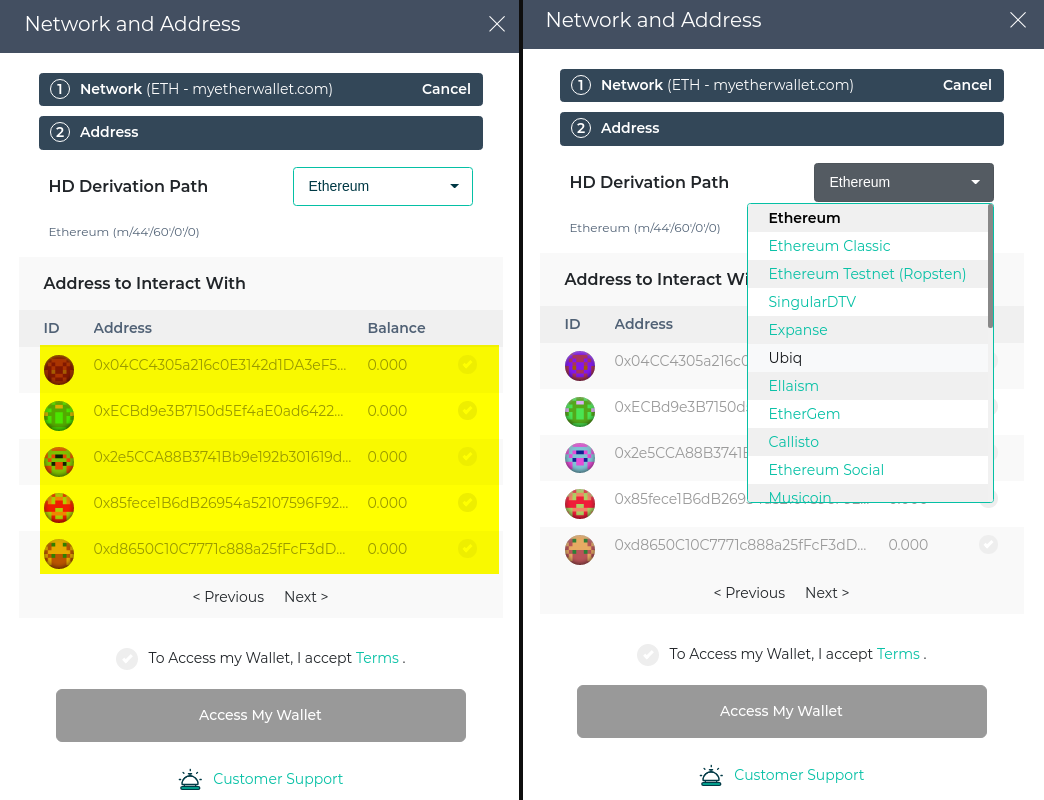
Proceed to view the addresses: all of them are generated based on the Trezor mnemonic phrase, ensuring consistency and security.
Ledger
Before proceeding, ensure that your Ledger device is unlocked, connected to your computer, and that the Ethereum (ETH) app is open.
In the MEW interface, establish a connection to Ethereum by selecting Ethereum – Ledger Live, as shown in the screenshot.

After that, click the Connect via USB button and choose your address from the list, which is usually the first one. Then, ensure that the Ethereum network is selected.
If all steps are correctly completed, the balance of your Ethereum network accounts will be displayed on the screen.
We have covered all the functionalities. But now, let's add a note of caution – the wallet has experienced hacks in the past.
Hacks and Vulnerabilities
Approximately $17 million was stolen in a phishing attack in 2018. Hackers redirected traffic from the official website to a phishing site by compromising DNS routes.
- Subsequently, counterfeit browser extensions began appearing in the Chrome Web Store. Dozens of users lost access to their wallets until the MEW team managed to have these extensions removed via Google.
- From 2019 to 2023, phishing campaigns were conducted through Google Ads with "MyEtherWallet" advertisements that led to cloned sites (over 100 domains annually). MEW, together with PhishFort, launched a monitoring and blocking system for such resources.
- In 2019, a vulnerability was discovered in the mobile version of MEW Connect that allowed, if the device was infected, for the recipient address in transactions to be altered; a patch was released within 24 hours.
These incidents highlighted that the main threat to MEW users is social engineering, not a breach of the platform itself.
Key protective measures include using hardware wallets (such as Ledger, Trezor) for offline transaction signing, verifying the domain and SSL certificate, and installing ad blockers to filter out phishing advertisements.
Conclusion: Is It Worth Using?
Downsides:
- No 2FA. Security relies solely on the protection of your private key/mnemonic phrase.
- No automatic switching between ETH networks such as Arbitrum, Optimism, etc.
- No advanced security features such as address whitelisting, scam contract warnings, gasless transactions, watch-only mode, etc.
Conclusion: if you need a wallet for long-term offline storage and do not want to spend money on hardware devices, then using MEW in cold mode is quite secure. However, if you need a wallet for frequent transactions and DeFi operations, consider Rabby Wallet. With its full range of features, it is the king of hot wallets.
Share your experiences and questions in the comments. We will respond to everyone!
Technical Support
Support is available via email: support@myetherwallet.com


