Rabby wallet setup guide: beats MetaMask on fees, NFTs & usability
There is no expand view mode.
Automatic switching of ETH networks.
Learn how Rabby Wallet saves time, protects your assets, and simplifies managing them.
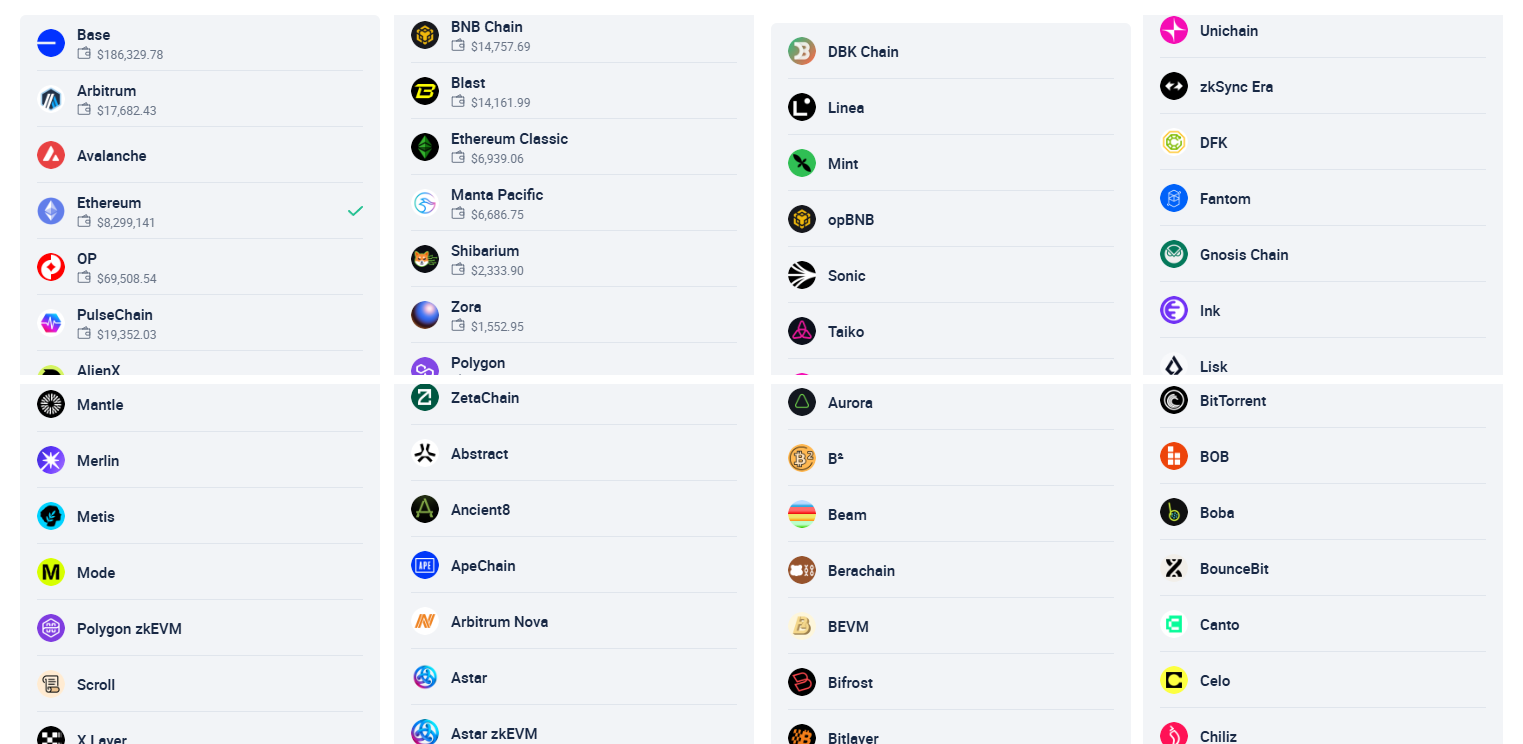
Rabby Wallet is a multi-chain crypto wallet with automatic switching between popular networks. It supports Ethereum and other networks, including Arbitrum, Avalanche, Base, Optimism, Polygon, Binance Smart Chain, PulseChain, and additional EVM-compatible networks. This makes it easy to work with tokens such as ETH, USDT, USDC and others on supported networks.
However, it does not support blockchains like Bitcoin, Solana, or XRP.
The wallet is similar to MetaMask, but has notable differences in terms of security and ease of use with different networks.
|
Function |
Rabby |
MetaMask |
Trust |
|
Security |
Alerts about fake apps, transaction preview, permission revocation. |
|
Private key protection only. |
|
Network support |
Automatic network switching for DApps. |
Manual network selection. |
Manual selection. |
|
Airdrops |
Points system (Rabby Points, promotions) and integration with DeBank. |
No built-in airdrop features |
No built-in airdrop features |
|
Fees |
Detailed control of fees, support for custom RPCs. |
Basic fee management. |
Basic fee management. |
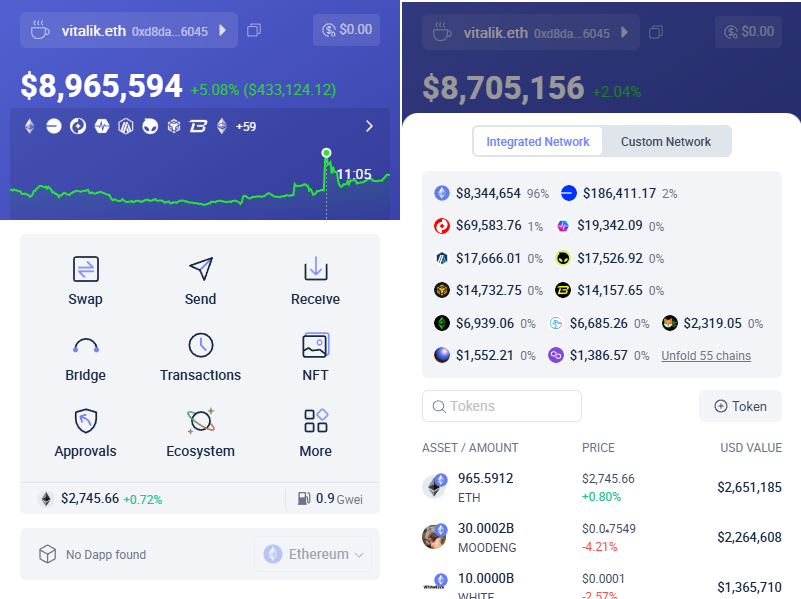
Rabby acts as a cryptocurrency portfolio manager, showing your assets across networks and a graph of balance trends.
Security and features
This is one of the most advanced wallets in terms of security.
- Transaction simulation – use the transaction result preview before it is sent to the network to see how it will affect the balance and how much fee will be deducted. This protects against fraudulent contracts. For example, you can identify hidden fees or conditions that lead to automatic debits or sending tokens to other addresses.
- Whitelist of addresses - allows you to eliminate the risk of sending funds to unknown addresses.
- Permissions - view and revoke permissions from suspicious or unused applications.
In addition, Rabby does not require verification, and only you have access to private keys. The Additional security features include:
- Suspicious transactions – the wallet automatically hides spam tokens and suspicious transactions with phishing links to keep your asset list clean.
- Open source – wallets for all platforms have open source code, helping the community to ensure the absence of malicious functions.
- Audit – Rabby undergoes an annual security audit from independent companies such as SlowMist and Cure53.
In economic terms, the wallet offers:
GasAccount – use a single account to pay fees in different networks
Watch-only wallet – add addresses of large cryptocurrency holders or exchanges to track their activity.
Exchange functions: Bridge and Swap – exchange tokens in one or different networks with a search for the best exchange rates.
Finally, the convenience is also better than in MetaMask:
- Automatic connection to different networks. The wallet works with different DApps and networks without manual switching.
- NFTs from different EVMs are displayed in one tab with the ability to add to favorites.
- The transaction history of all networks is displayed in one tab.
Let’s explore these features in practice by downloading and installing the wallet.
Download and installation
Rabby is available as a browser extension, a PC application, and a mobile app. We’ll choose the extension for its convenience.
First, go to Rabby's official website, download and install the extension.
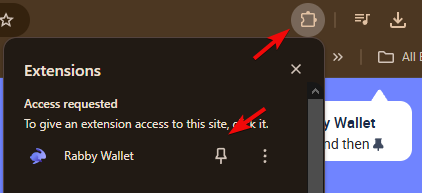
After installation, pin it for quick access.
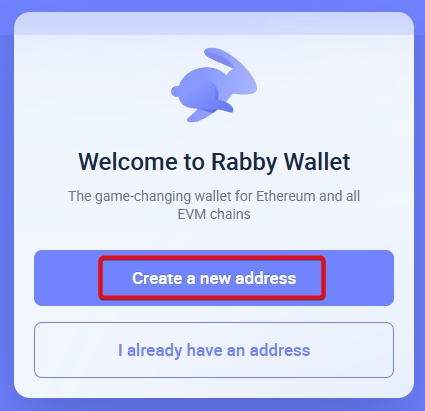
You will see two options to add an address: create a new one or import an existing one.
Create a new wallet
Since we are starting from scratch, select Create a New address.
Rabby will warn you about the importance of backing up your recovery phrase.
Backup
Rabby will generate a 12-word phrase needed to restore your wallet in case of loss of access. Read the security tips carefully.
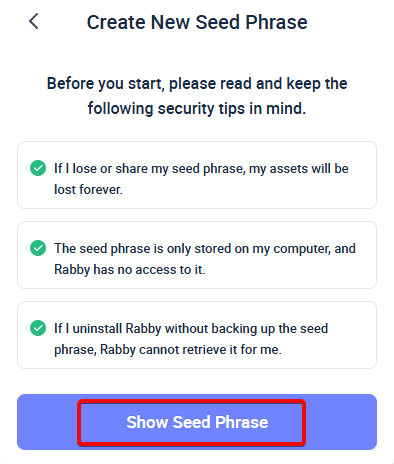
Make sure no one is spying on your screen and click Show Seed Phrase.

Make sure to write down your seed phrase in the correct order and store it securely. Losing this phrase means you will lose access to your wallet and assets forever.
After saving the phrase, click I’ve Saved My Phrase.
Next, set and confirm your password, accept the terms of use and click Confirm.
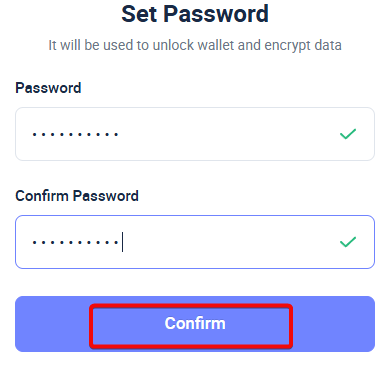
You have successfully installed your wallet and made a backup. Now you can start using it.
How to use
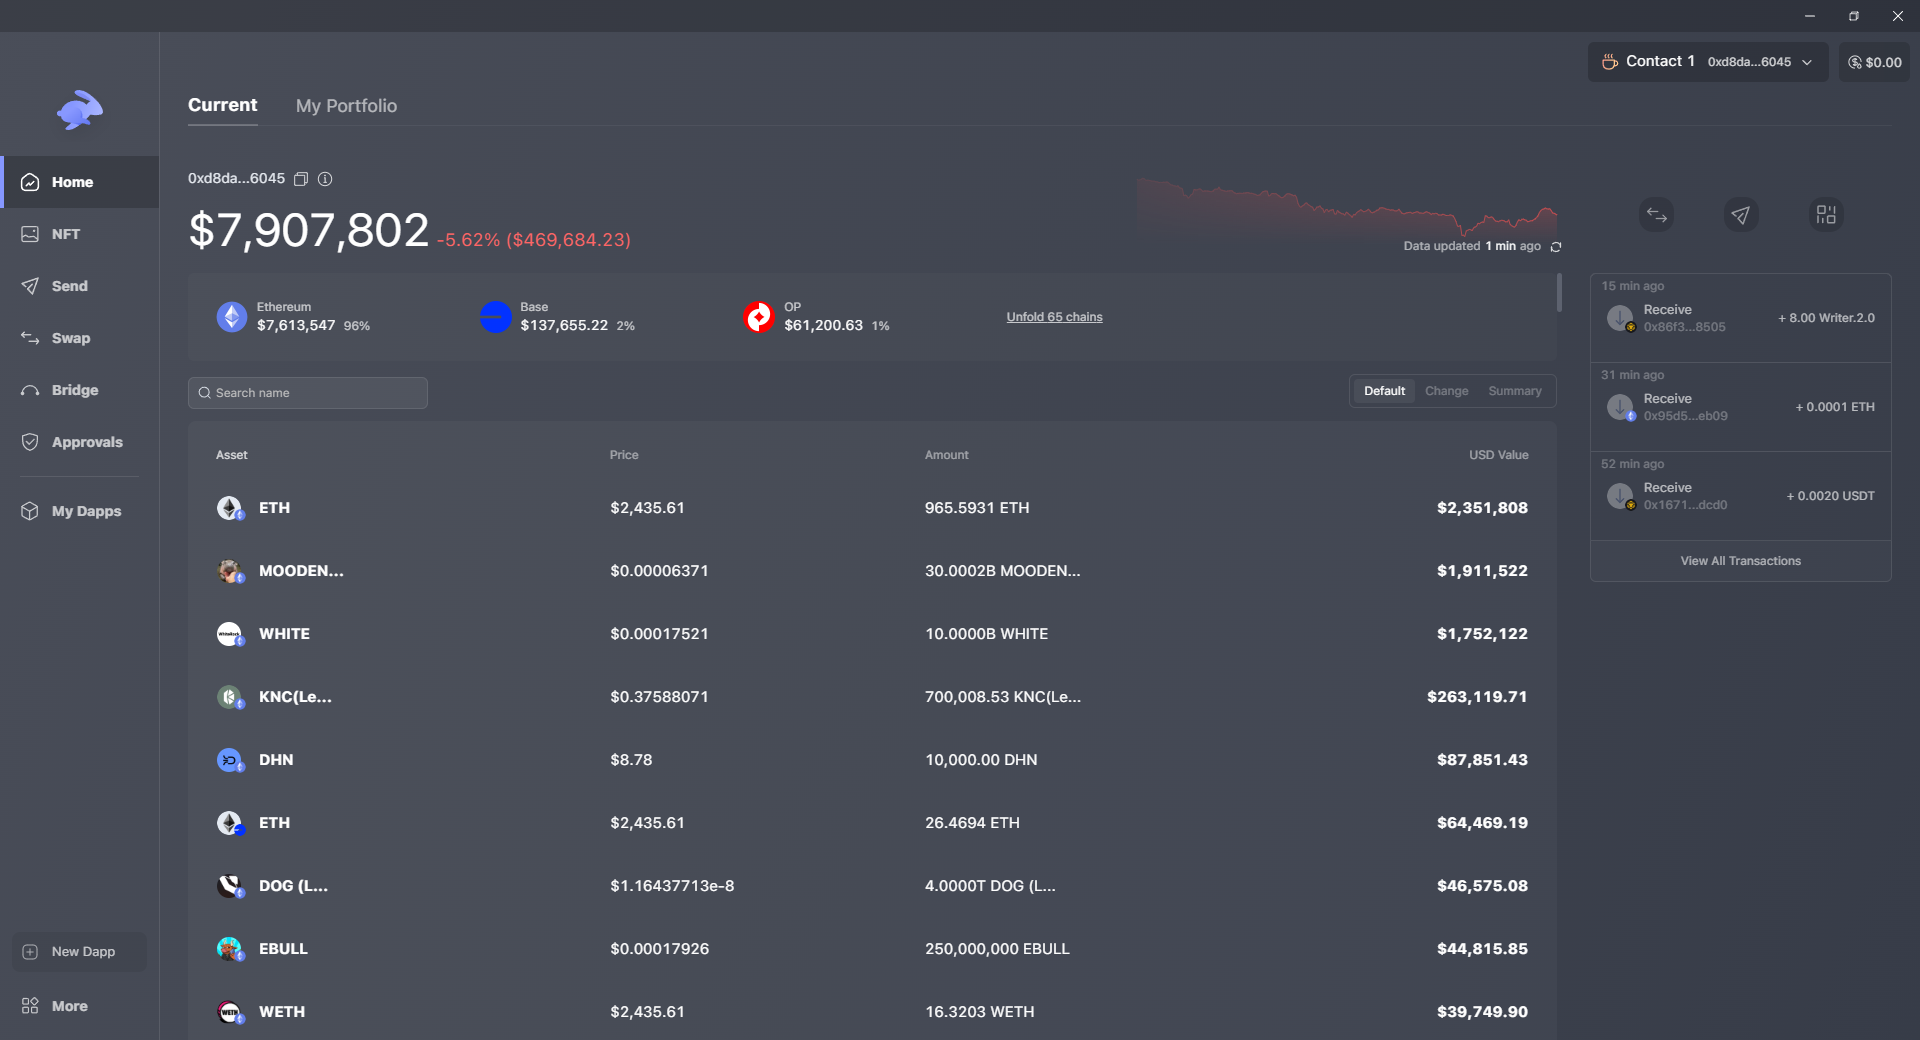
The interface is simple:
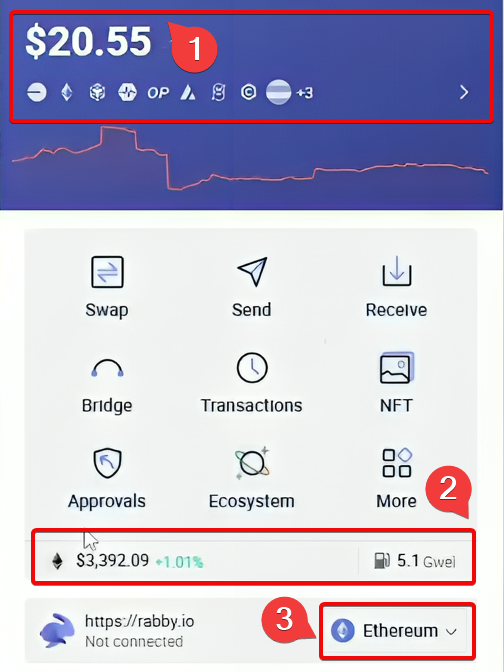
- the balance and the list of assets are displayed at the top (visible once you add funds),
- in the middle — the selected network with the current price for gas,
- and at the very bottom — the list of networks.
Let's move on to management addresses.
How to create an address
The wallet can generate and manage up to 50 unique addresses from a single seed phrase, enhancing organization and privacy. This allows you to better organize transactions and increase anonymity. For example, you can have 1 address for frequent transactions, use the second as a fund for accumulation, and the third as a connection to dApps.
If you use one address, just select it at the very top.
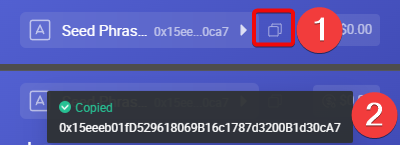
Note that the same address is used in different EVM-compatible blockchains, such as Ethereum, Arbitrum, Avalanche, BNB Chain and others. So you can copy it by clicking on any of the networks!
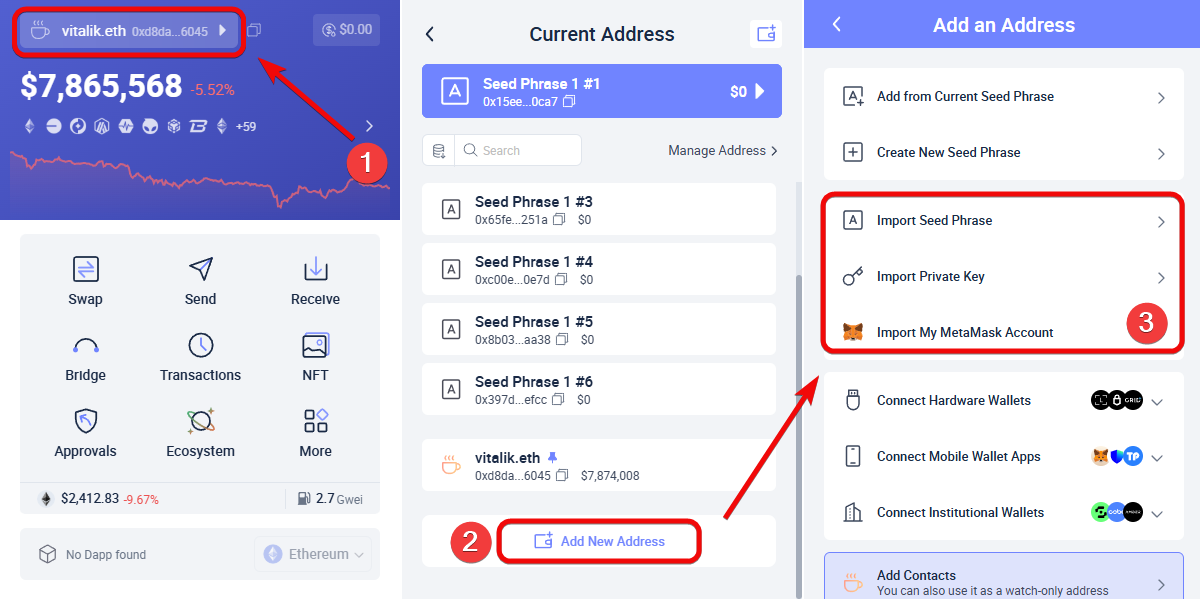
To add new addresses:
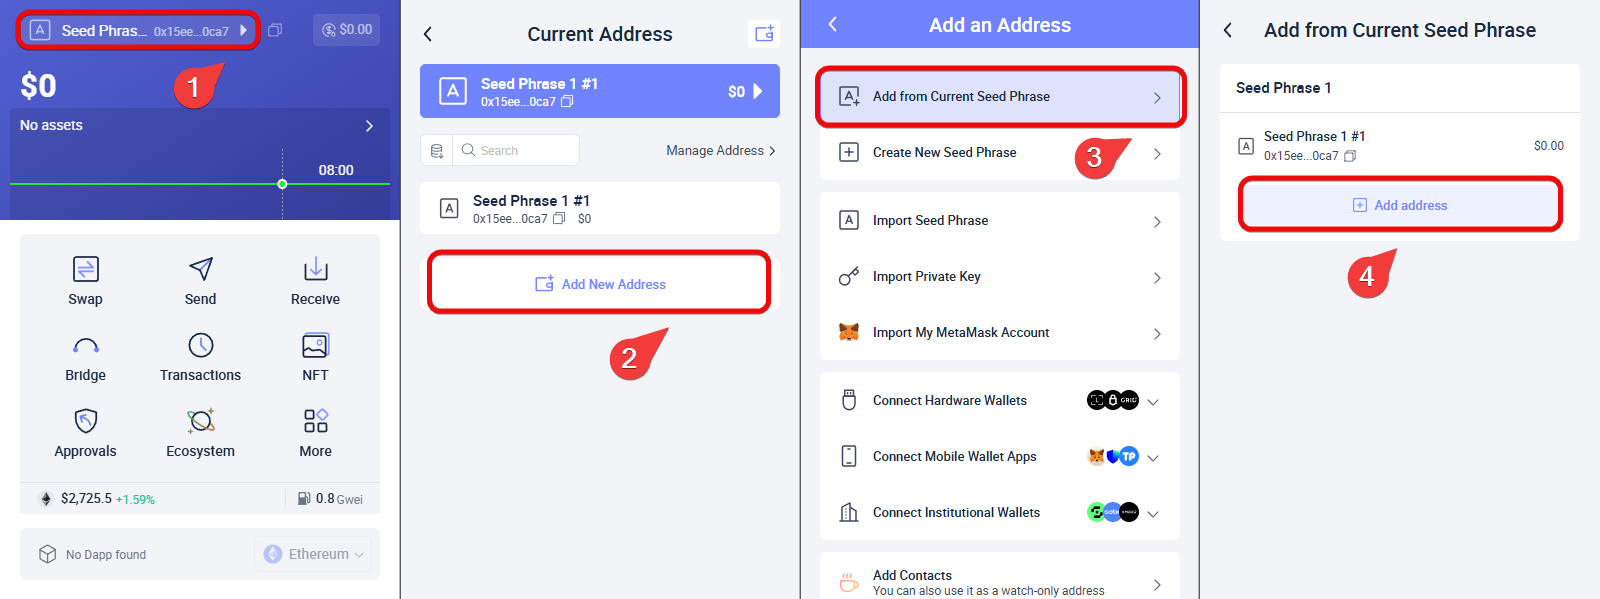
- Click on the address at the top
- Click
Add New Address - Select
Add from Current Seed Phraseto add an address to the current seed phrase - Click
Add address
A window will open to select from 50 generated addresses.
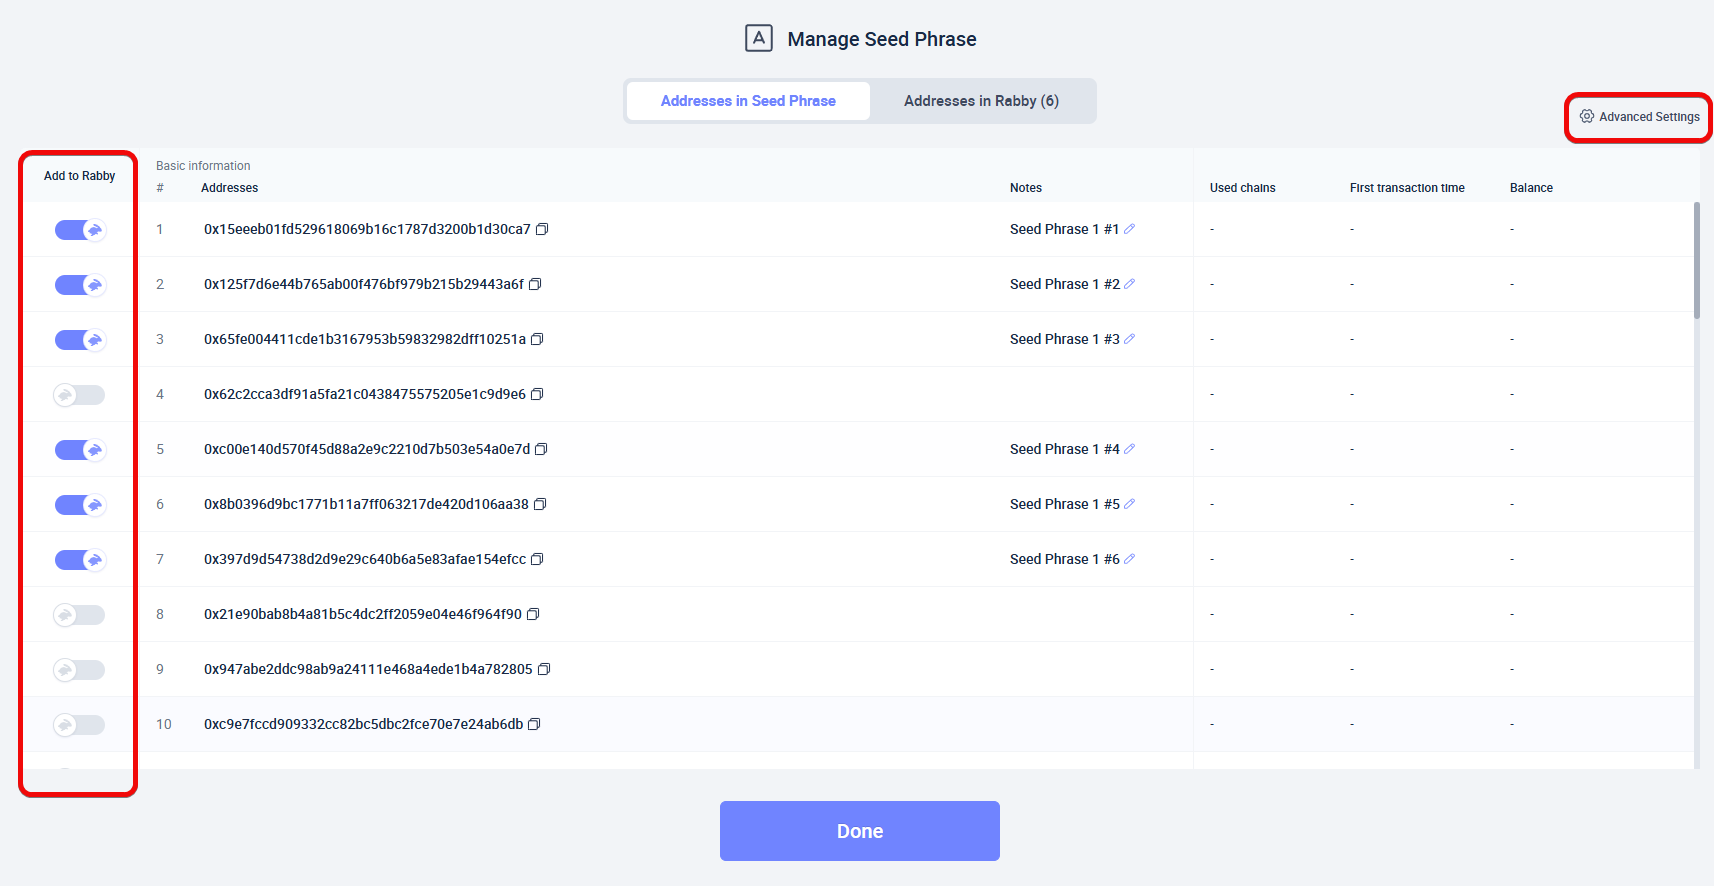
For experts: in the advanced settings there is a switch for selecting the address format - Derivation Path. It is needed for compatibility with wallets such as Ledger, MEW/Mycrypto. By default, addresses in the modern format are used - BIP44.
How to top up
To top up your balance, click Receive, select a coin (for example, Ethereum) and copy the wallet address or QR code.
Send your address to the sender or top up your wallet yourself using a transfer from another service.
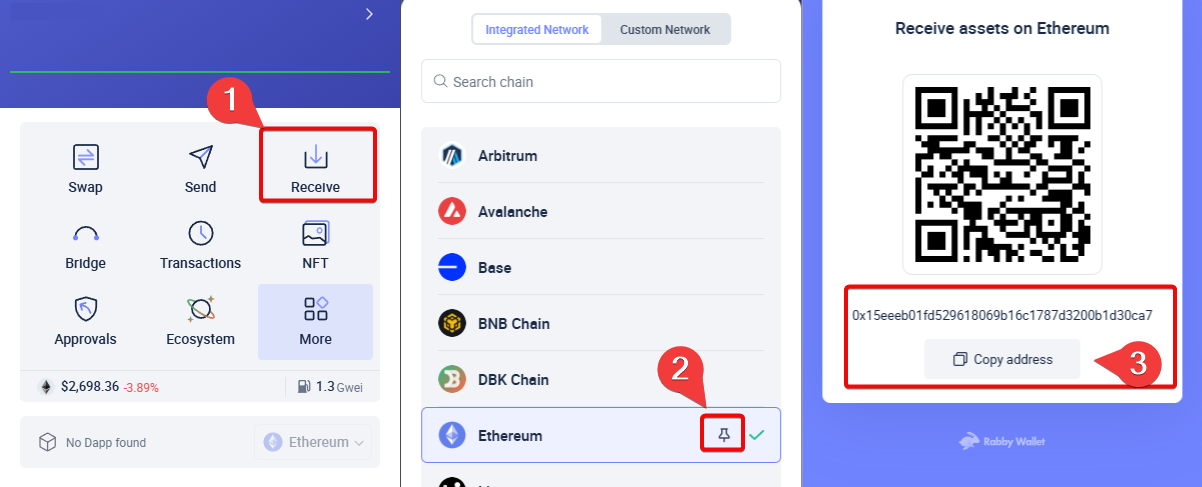
Tip: pin your favorite networks using the pin icon, because L2 networks are cheaper, faster and more profitable.
The asset menu shows the total balance in local currency, and below it, the balance of each coin with the current market value.
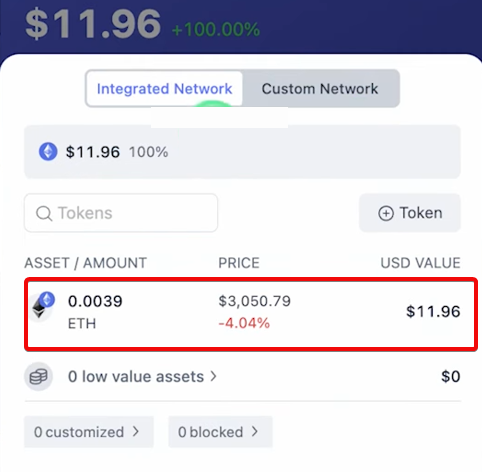
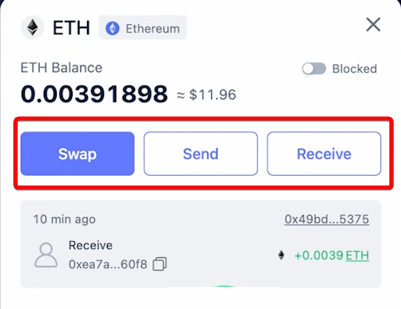
By clicking on a coin, you will see transaction history and access to the Swap, Send and Receive functions.
How to withdraw
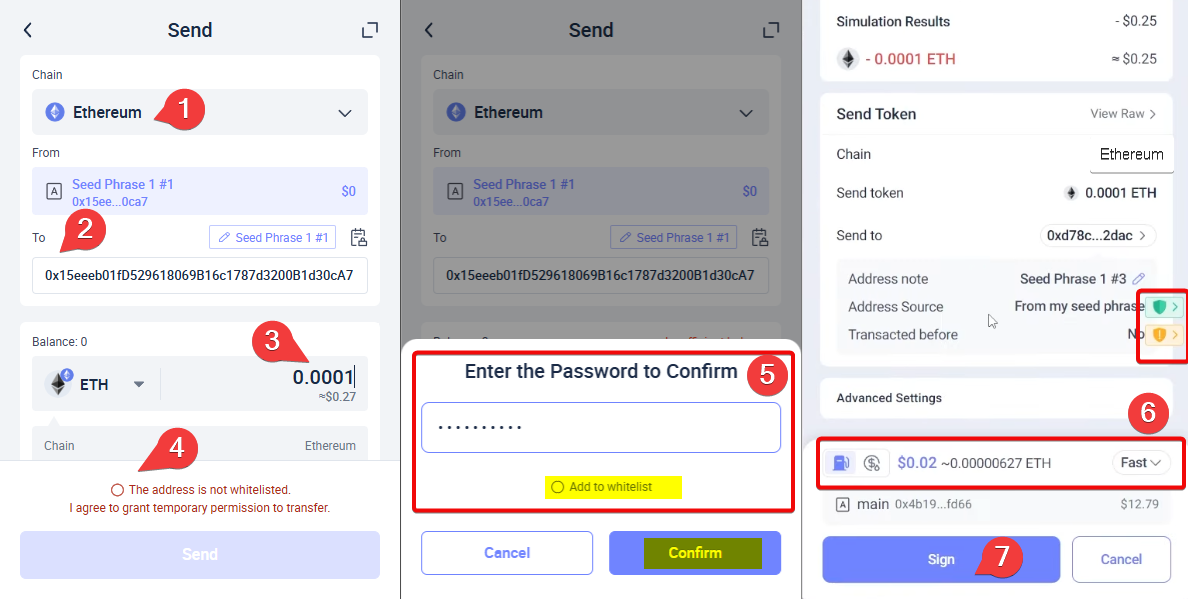
To withdraw cryptocurrency, click Send. A window will open where you need to select:
- Network for sending
- Recipient address
- Amount of coins
- Confirm the address if it is used for the first time
- Enter the password
- Select the fee
- Finally, click
signto send the transaction
Ethereum uses gas to pay fees, which can be adjusted based on your needs. There are preset options: normal, fast and instant, as well as the ability to set the fee value yourself using the Custom parameter.
The second way to customize fees is to use the GasAccount function.
GasAccount
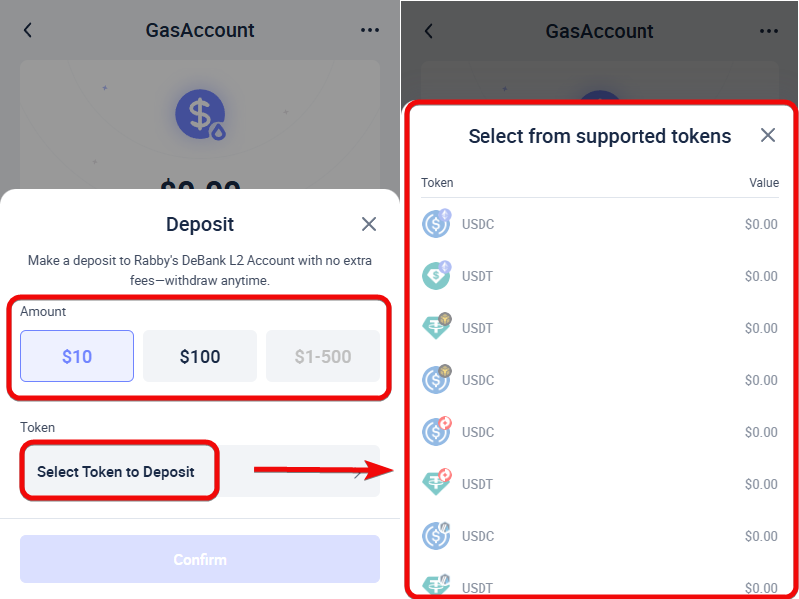
GasAccount allows you to deposit USDT or USDC and use them to pay fees on all supported networks.
This feature is incredibly useful if you use different networks, receive airdrops on Layer 2 networks. For example, you need to claim two NFTs, but you do not have funds in this network yet. Instead of transferring ETH to this network, use a single GasAccount for fees.
Essentially, this feature allows you to interact with multiple Ethereum Layer 2 networks without having funds on each of them.
How to activate GasAccount:
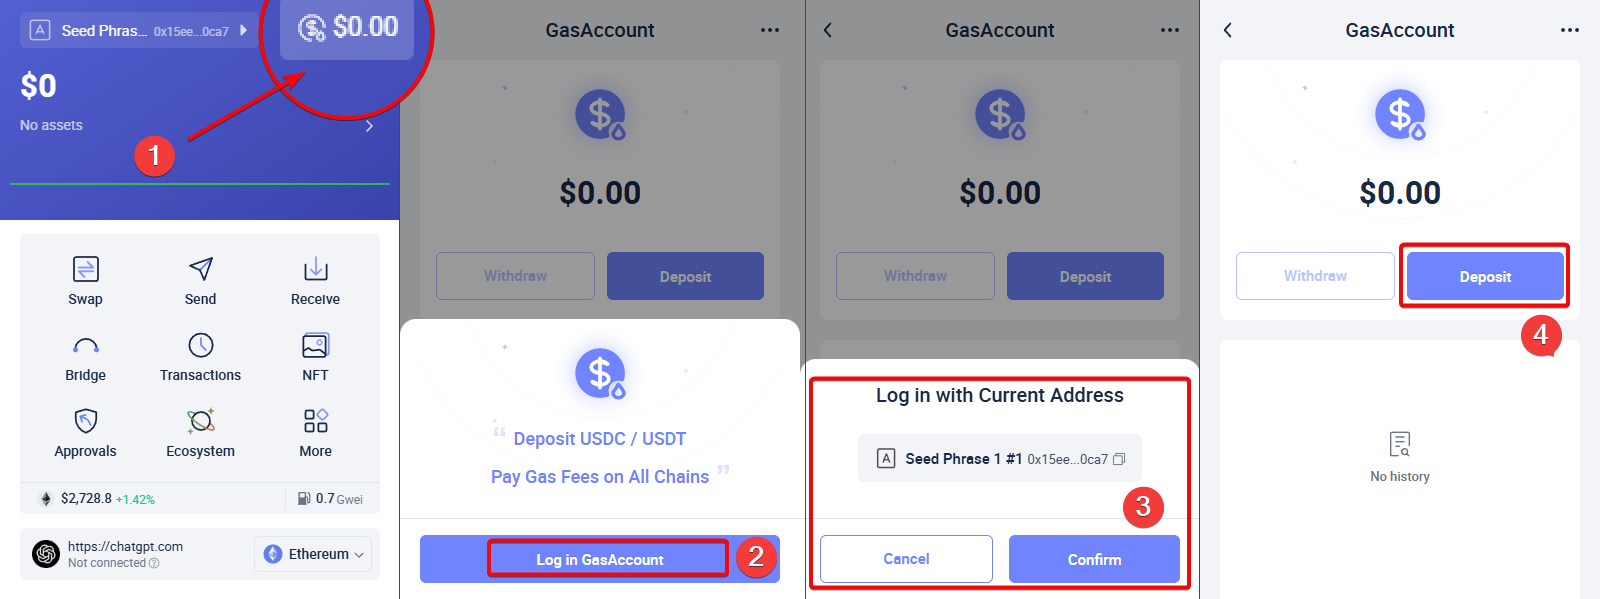
- click on the balance button in the upper right corner,
- click
Log in GasAccount - select the address that will be associated with this account
- Click
Deposit.
In the Deposit window, select the network with the available balance and deposit USDT or USDC.
Now to use GasAccount when sending a transaction, select the dollar sign and click Sign.
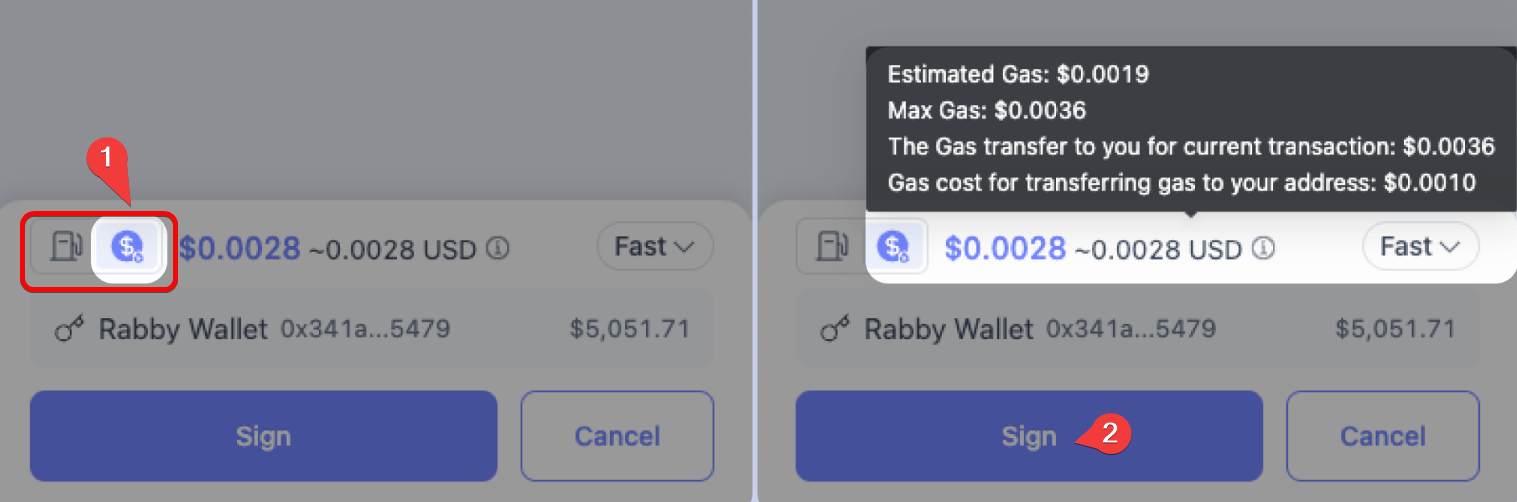
USD is now used to pay fees. This will save you from having to move funds between different networks.
Fees
To change the gas price, you need to get to the transaction preview menu. To do this, start making any transaction.
In the transaction preview window, click the Fast button and select the speed between Normal, Fast or Instant. Or enter your gas price manually in the Custom field.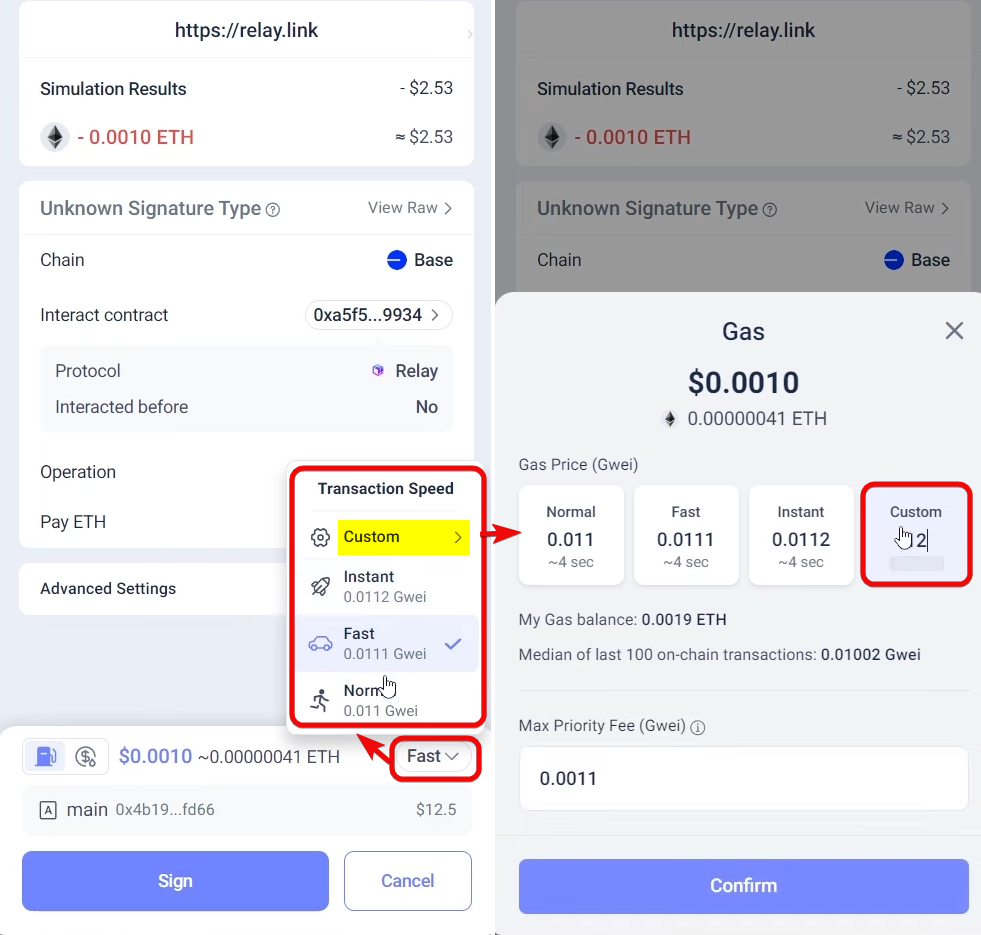
Rabby charges its own fees for some features. For example, Rabby charges a 0.25% fee for swaps, which is competitive with many exchanges.
Transaction History
The Transactions tab displays the transaction history of all networks in one window, which is very convenient.
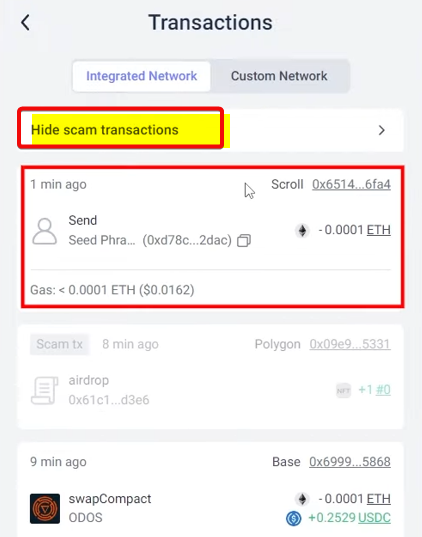
Tip: hide suspicious transactions by clicking the Hide scam transactions button. Scammers send small amounts to lure you to a phishing site.
Swap
To exchange, click the Swap button and select the network you want to exchange on, such as Base. Now select a pair to exchange, for example USDC to ETH, enter the amount and wait for the wallet to find the best rate.
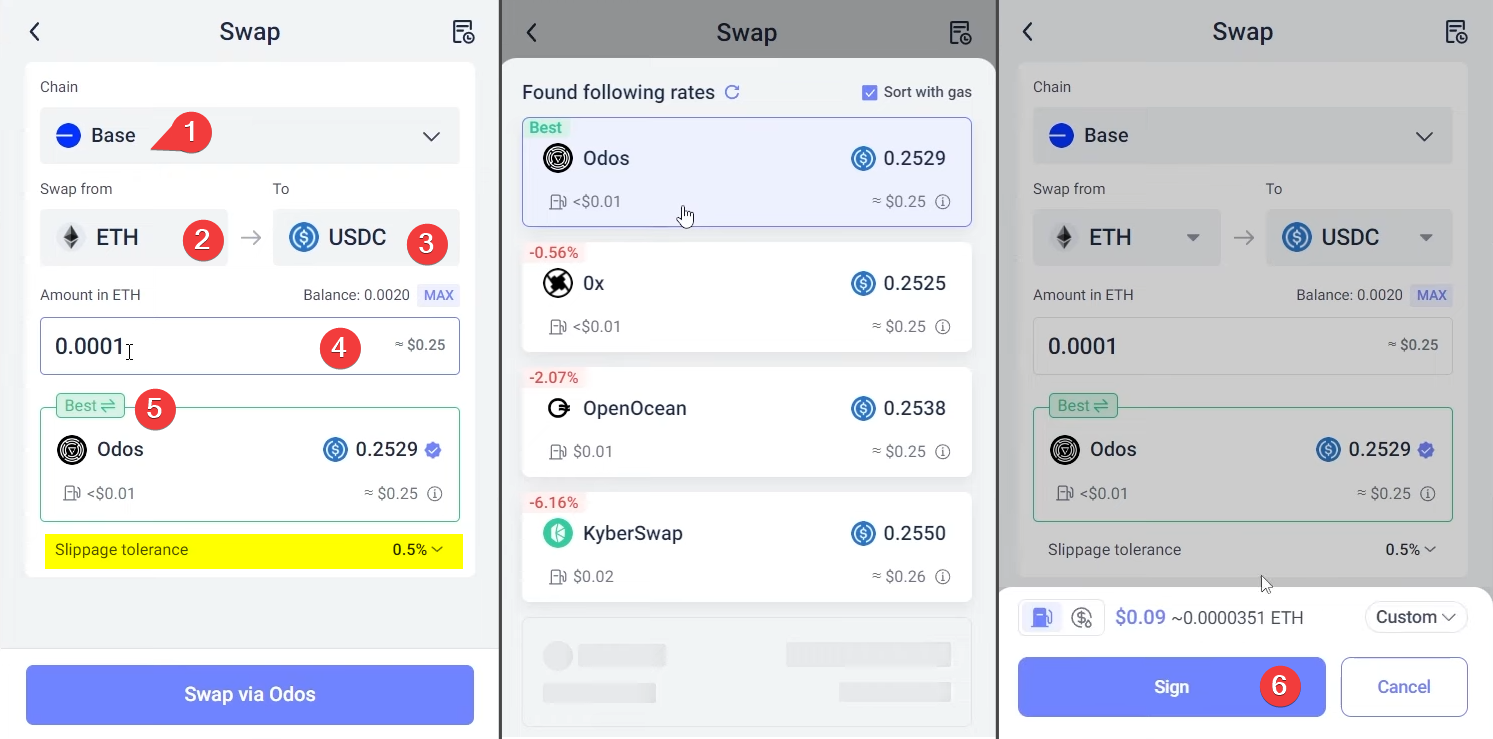
In this case, he chose ODOS, but you can click on it and manually change the exchange provider.
A range of 0.5% is set for Slippage Tolerance - this is how much the price can deviate during the exchange before the deal is canceled.
For experts: you can expand these settings and manually set the percentages and use bot protection - Prefer MEV Guarded.
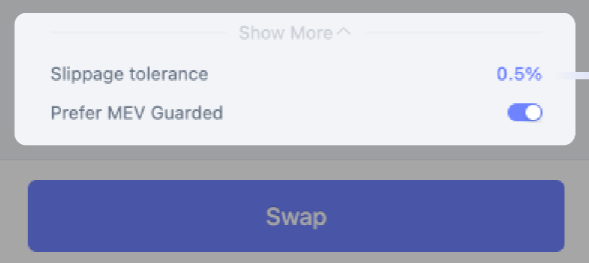
When MEV Guarded is enabled, your trade is sent through a private transaction pool. This hides it from malicious bots that automatically search for profitable deals and insert their transactions at a high fee so that they are processed first.
After all the settings, click Swap and sign the transaction.
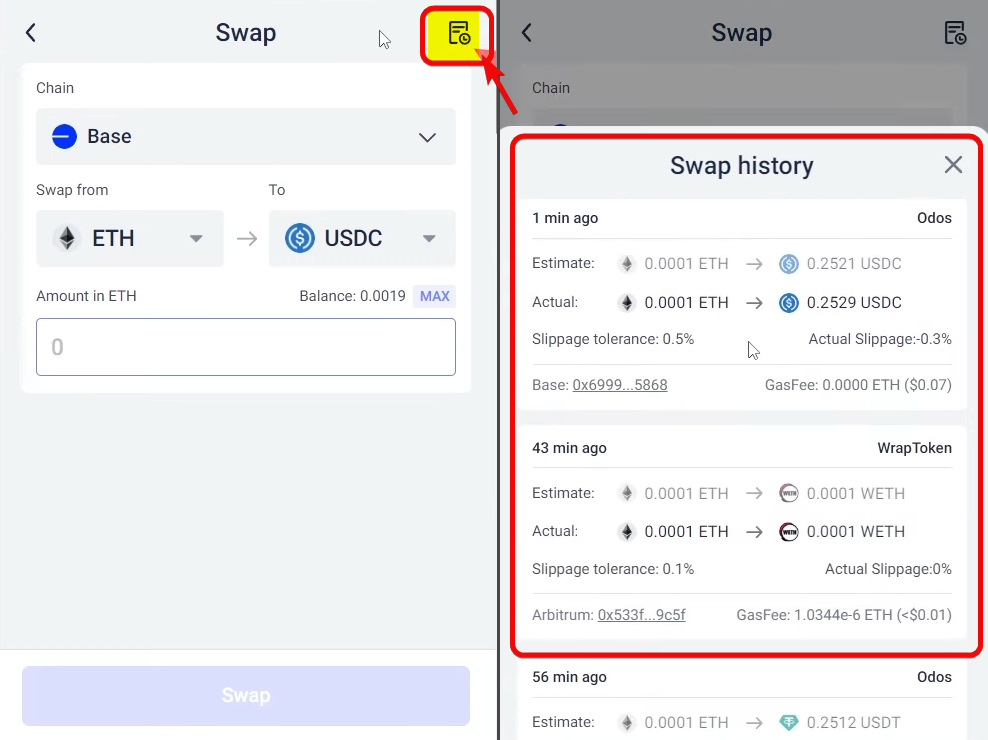
To view the exchange history, click on the calendar icon.
For exchange between networks, you can also use the function Bridge.
Custom Tokens
Many popular EVM networks are already added to the wallet, but if the desired network is not there, you can add it manually.
To add custom tokens, click on the asset balance on the main tab. A window will open where you need to select a network, insert the contract address and click Confirm.
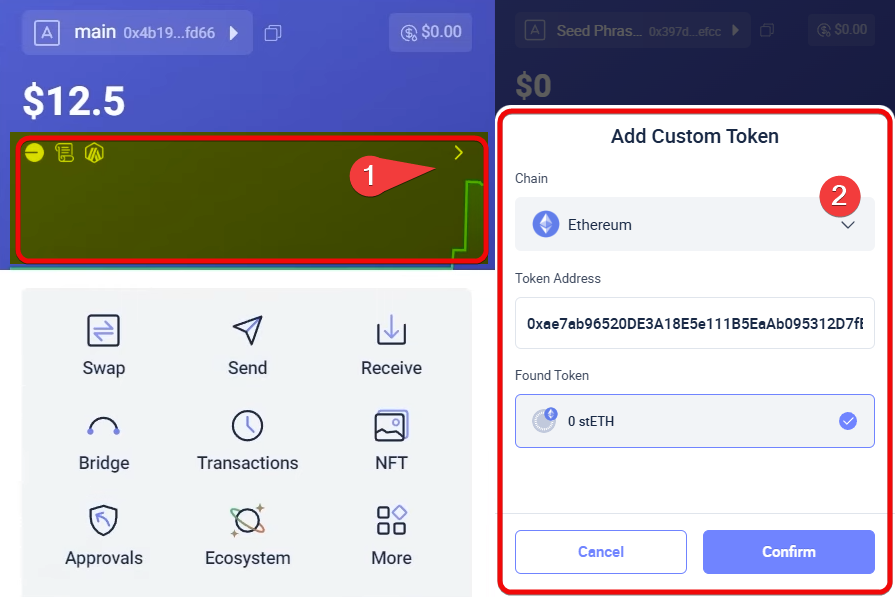
We took the contract address from the Etherscan website for the stETH token.
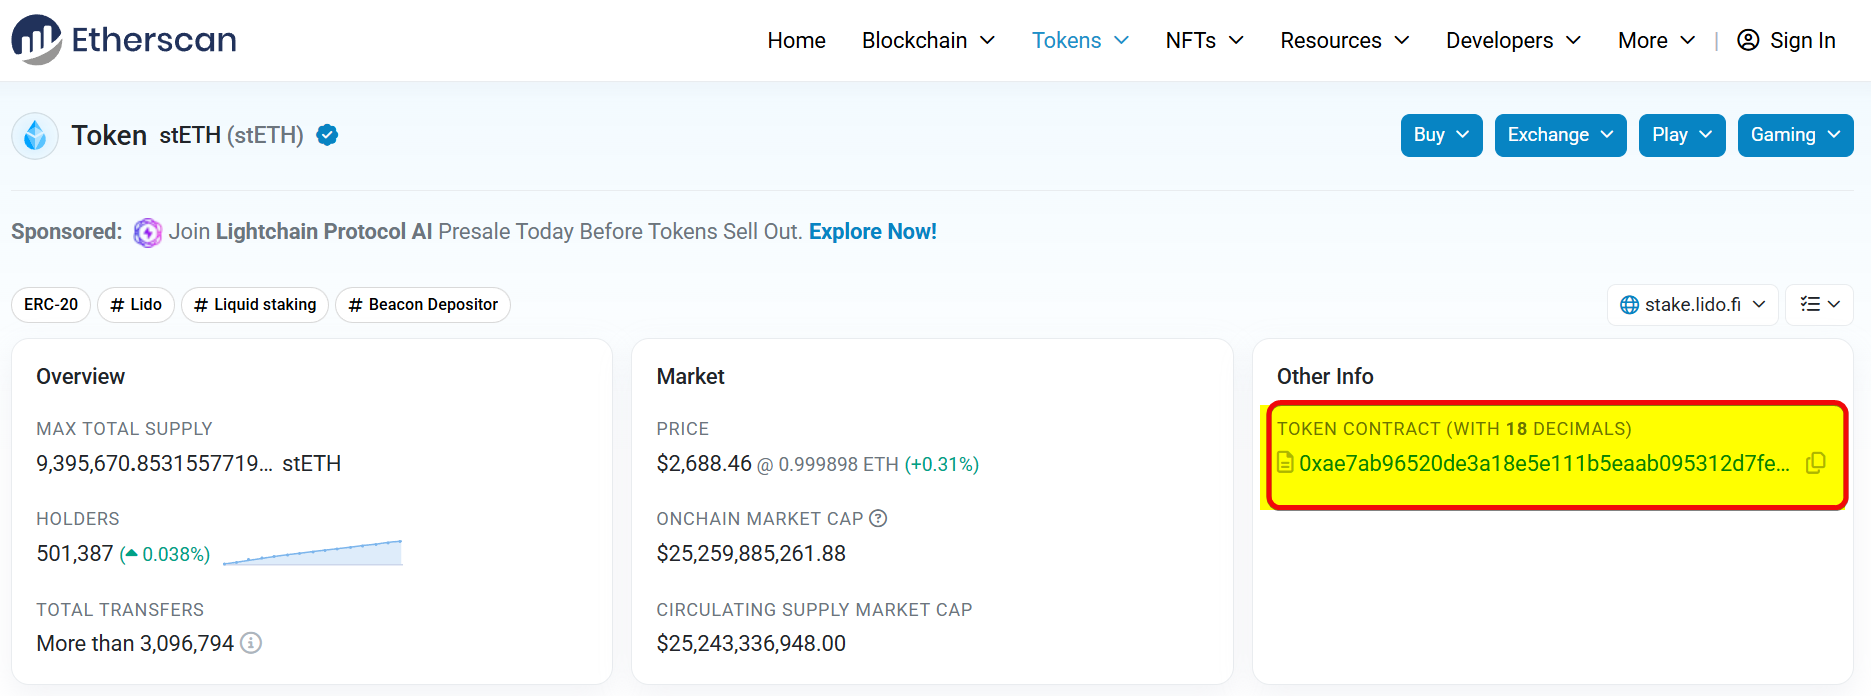
Look for contracts of other tokens in the Tokens section by analogy.
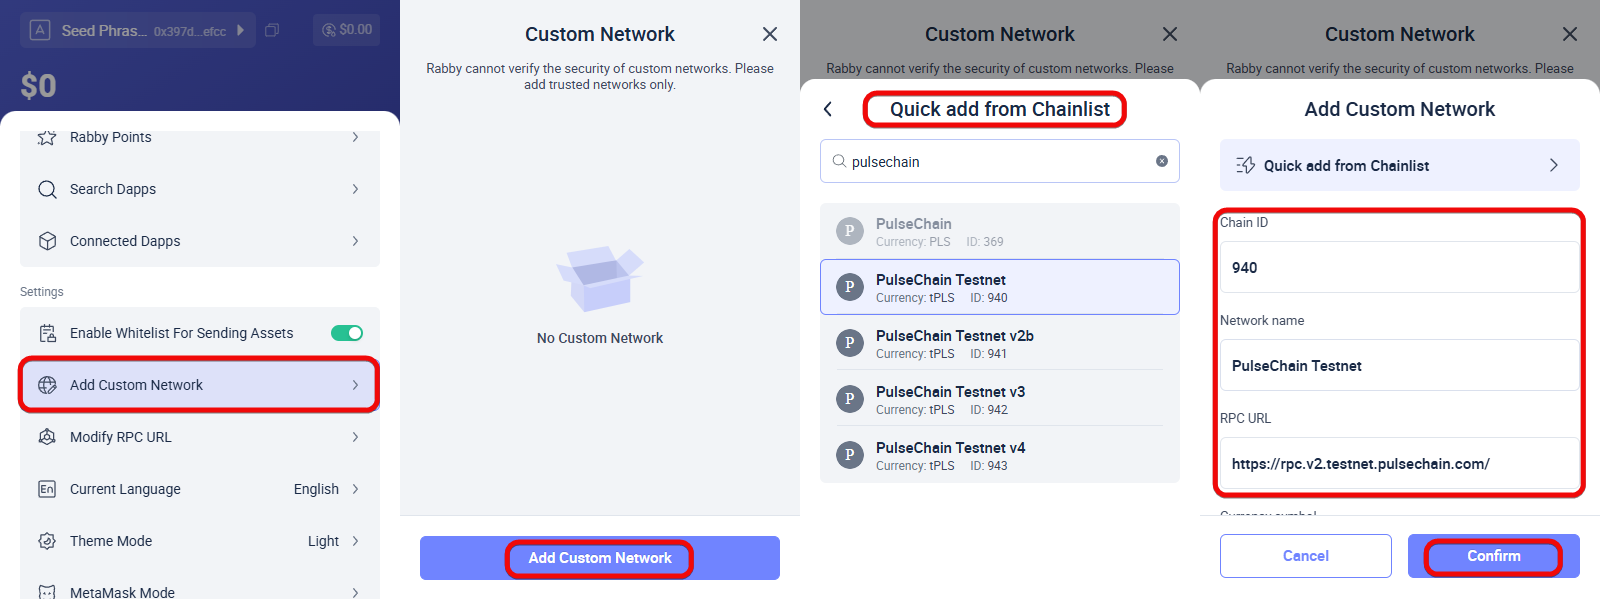
Now let's add a custom network. To do this, open the wallet menu and double-click Add Custom Network.
In the Quick add from Chainlist menu, find the desired network via search, for example Pulsechain. When you select this network, the data will be pulled automatically. Click Confirm, and now Pulsechain will appear in the list of networks.
The second way is to add a network manually. To do this, go to the ChainList website and find the network.
When you open it, you will see all the data you need to add: Chain ID, Network name, RPC URL and Currency symbol – a 3-letter token symbol.
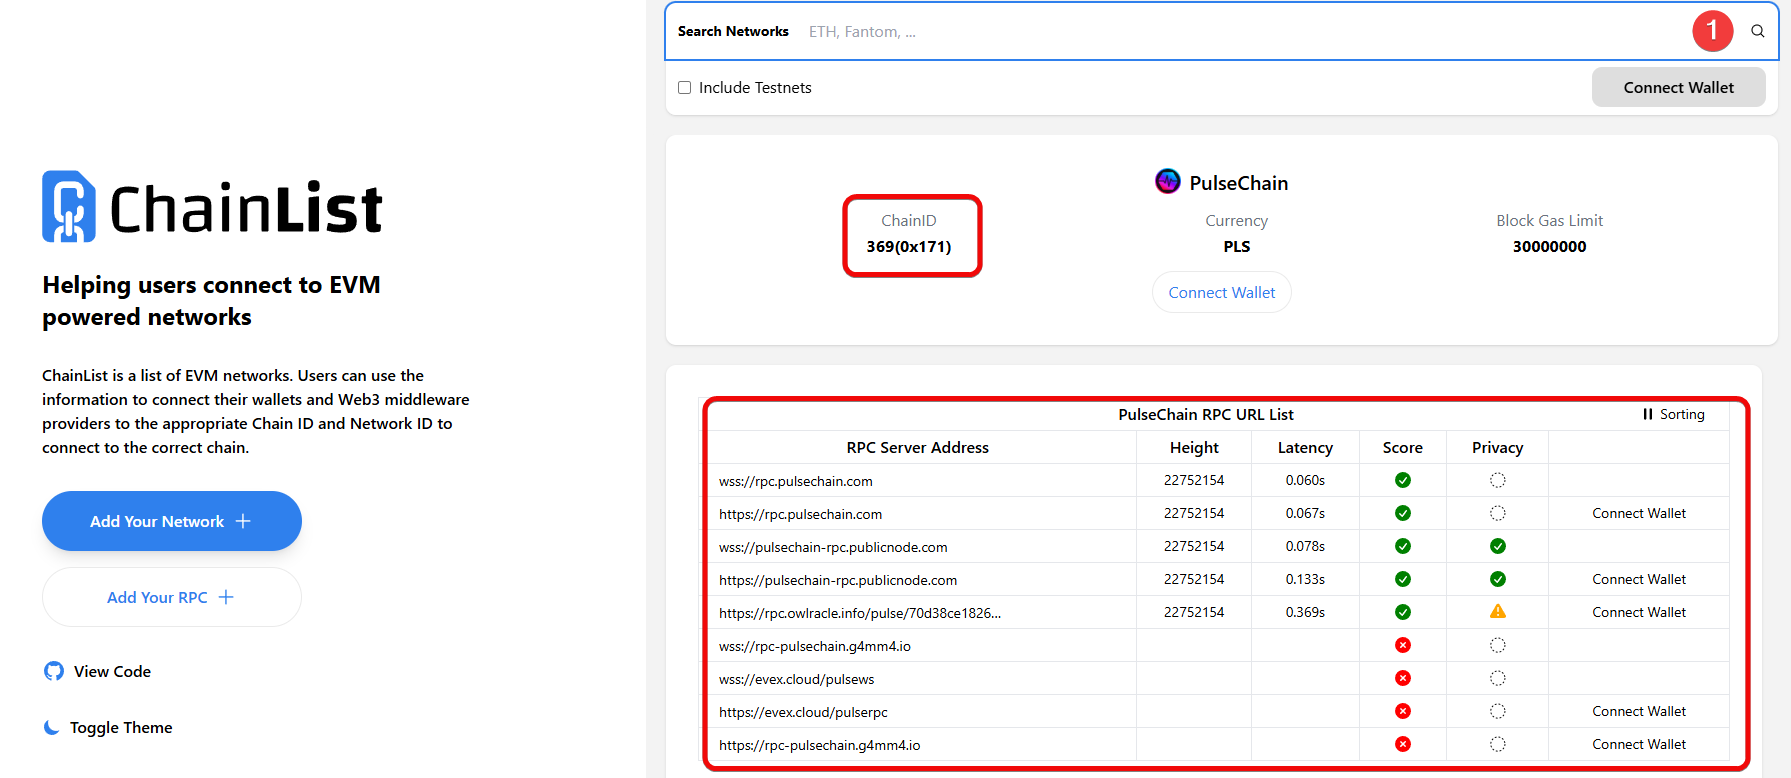
Adding can be simplified by clicking Connect Wallet. This will automatically connect the wallet to ChainList. Click the yellow shield icon to view the third-party application interaction warning and decide whether to connect.

Warning: When you encounter a contract or DApp that you have not interacted with before, the wallet displays a yellow shield as a warning.
This is a warning provides information such as trust value, contract age, and its popularity index. This allows you to check the reliability of a contract before continuing to work.
Adding custom tokens gives advanced users the flexibility to connect to non-standard chains or even run their own nodes to improve performance and reduce fees.
Airdrops
The wallet has a Rabby Points system that awards points in the form of airdrops for activity.
Points are awarded for invited users, integration with the DeBank platform, and other activities. The points system is divided into seasons and is not always available.
To access airdrops, select Rabby Points from the menu and confirm the address using the Sign button.
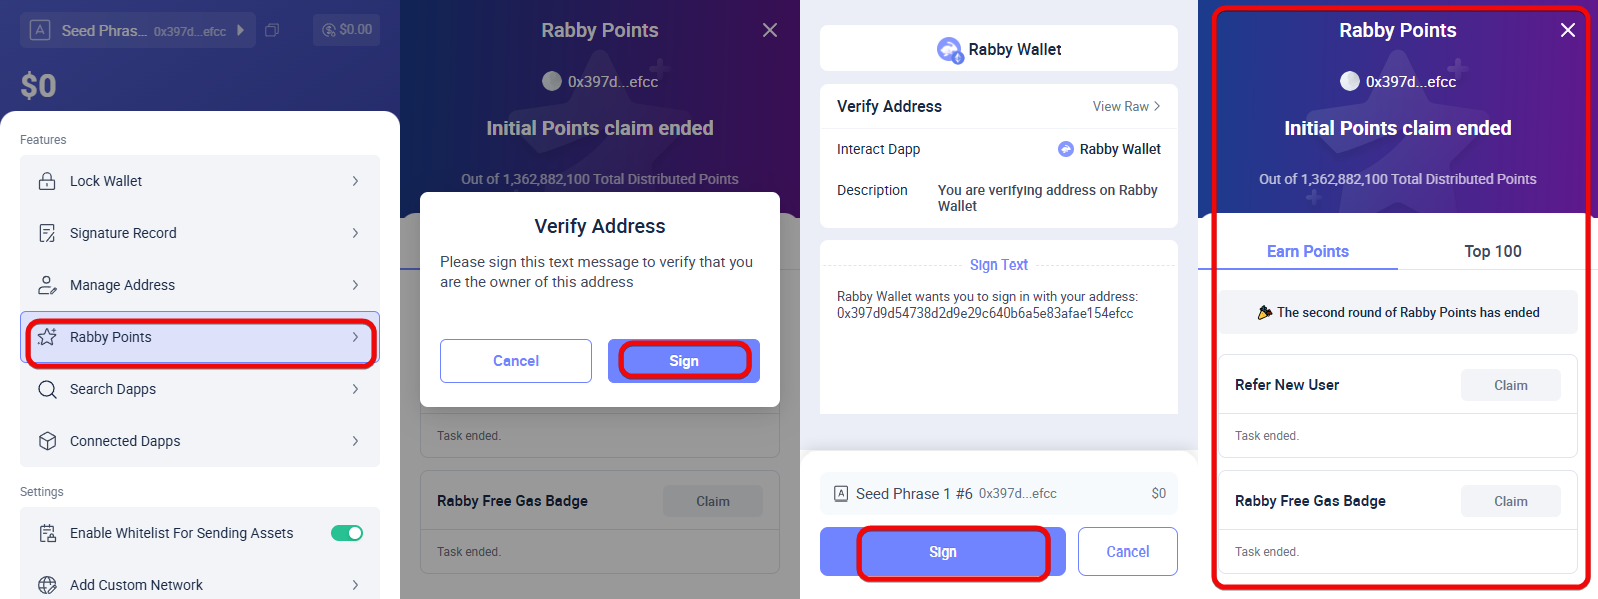
After logging in to the Rabby Points system, you will see whether the rewards are active or not.
NFT
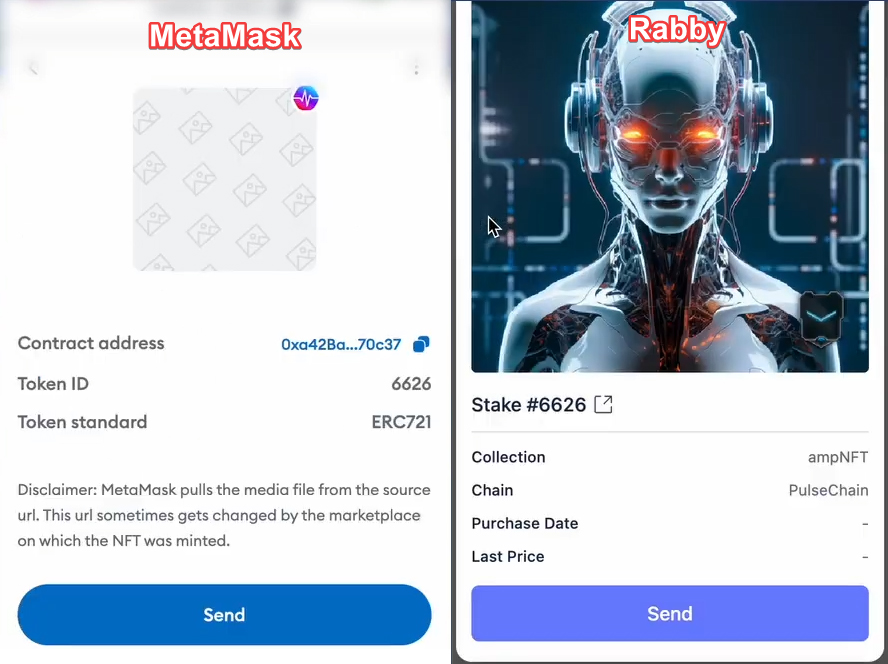
Wallet shows all NFTs on the account. The data is pulled from DeBank, so older accounts will see dozens of JPEGs, including the most valuable ones.
Collections can be marked with stars for sorting, highlighting important assets.
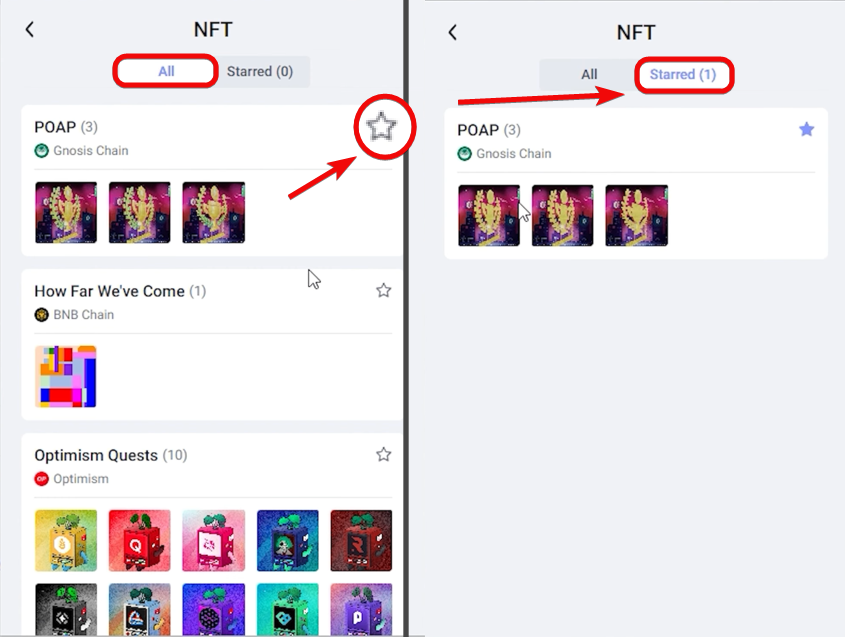
Favoriting specific NFTs helps separate valuable assets from scams that mixed in.
Browse, store and transfer NFTs across multiple EVM networks. NFT collections can be viewed along with other crypto assets in a single wallet interface, making it easier to monitor your entire portfolio.
In contrast, MetaMask has a bug where NFT images cannot load.
You can also connect to NFTs via OpenSea in applications dApps.
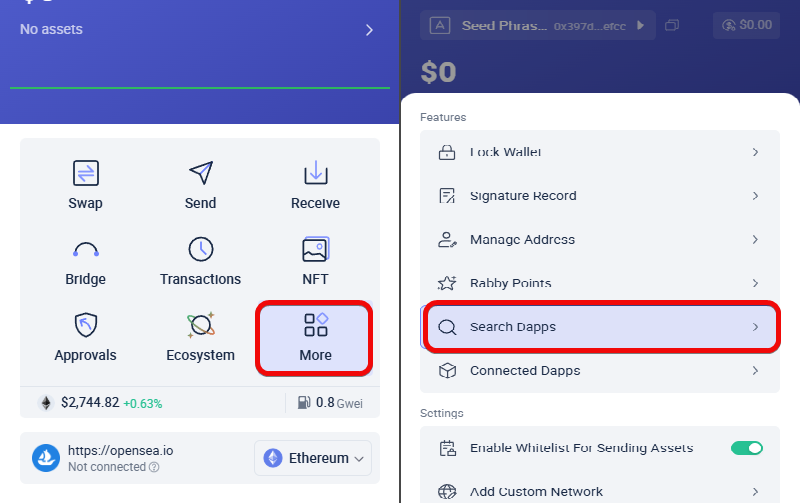
DApps
The wallet has a built-in decentralized application explorer, which contains more than 6,000 DApps. All links in the catalog lead only to official resources, which helps to avoid phishing attacks.
Access to applications is in the menu More → Search DApps.
Using DApps opens up such opportunities as: decentralized exchanges (DEX), NFT trading, cross-chain exchange (Bridge), portfolio management, farming, generating income, lending, restaking and DAO participation.
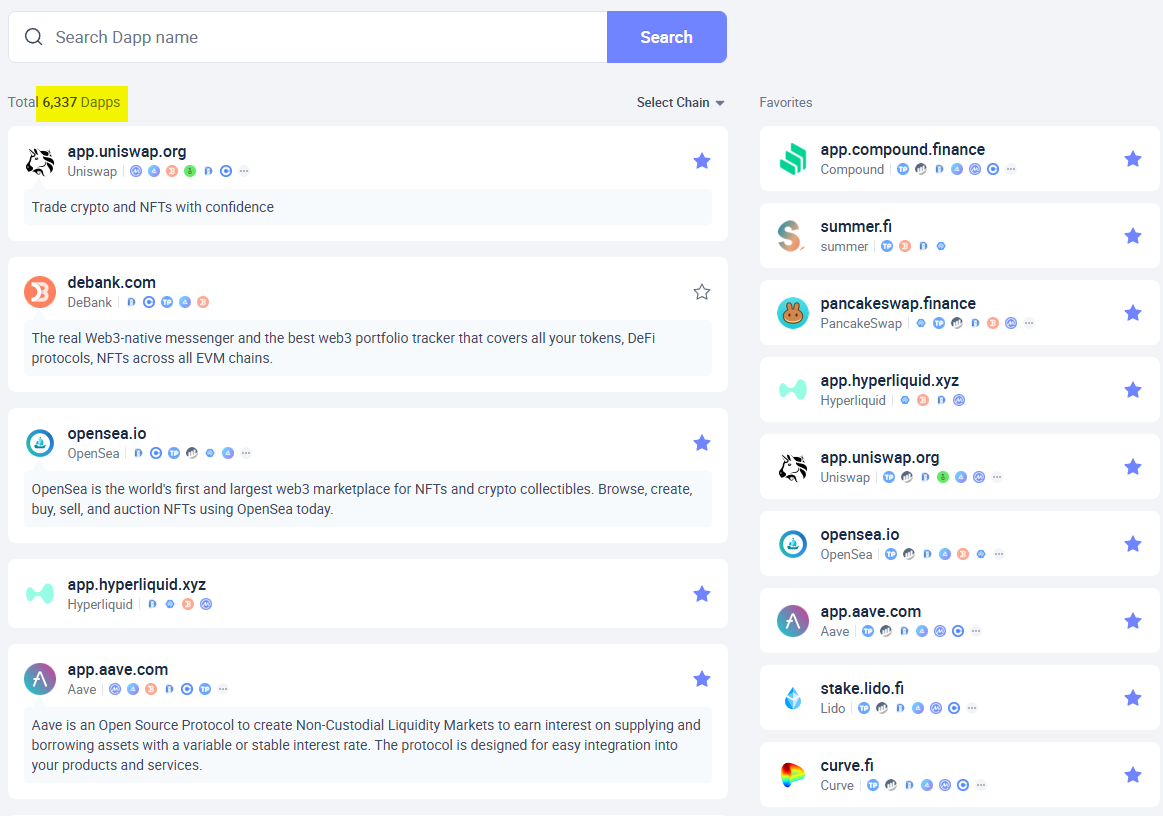
There's search, categories, and adding to favorites. And the cherry on the cake is the ability to revoke permissions from DApps to secure your assets.
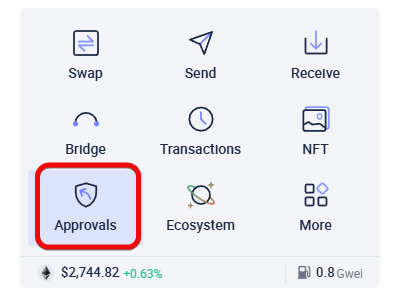
Approvals
The permissions revoke feature protects your funds by disabling access from unwanted apps.
Permissions That Can Bankrupt You
When working with DApps in any wallet, you grant approvals to smart contracts that allow them to spend or manage your tokens. Over time, these approvals accumulate and expose you to risk if any of these contracts are compromised.
Rabby solves this problem by allowing you to revoke approvals even for contracts that you might forget about after years of staking.
The Approvals tab shows the contract address, the service it is granted to, the amount, and the date of the last interaction.
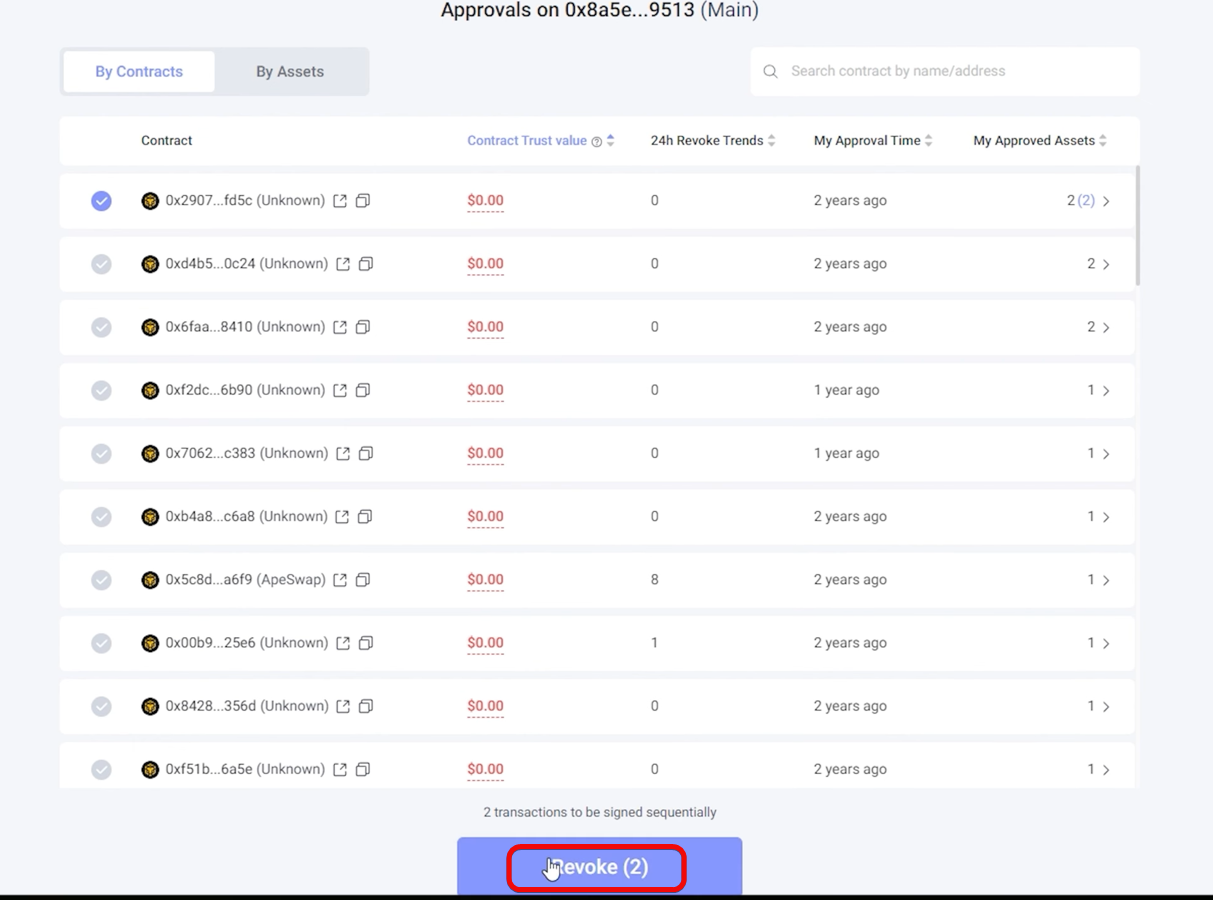
Revoke permissions for contracts that are no longer needed or suspicious.
Warning: if a contract has been hacked, the wallet will mark it with a red circle, requiring urgent permission revocation.
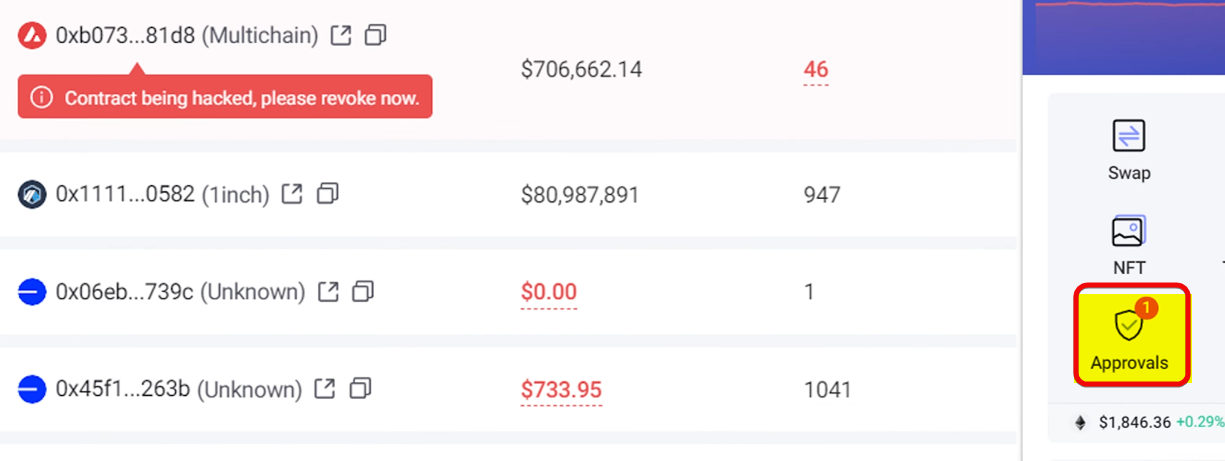
In this case, the wallet will prompt you to revoke permissions in the permissions management window.
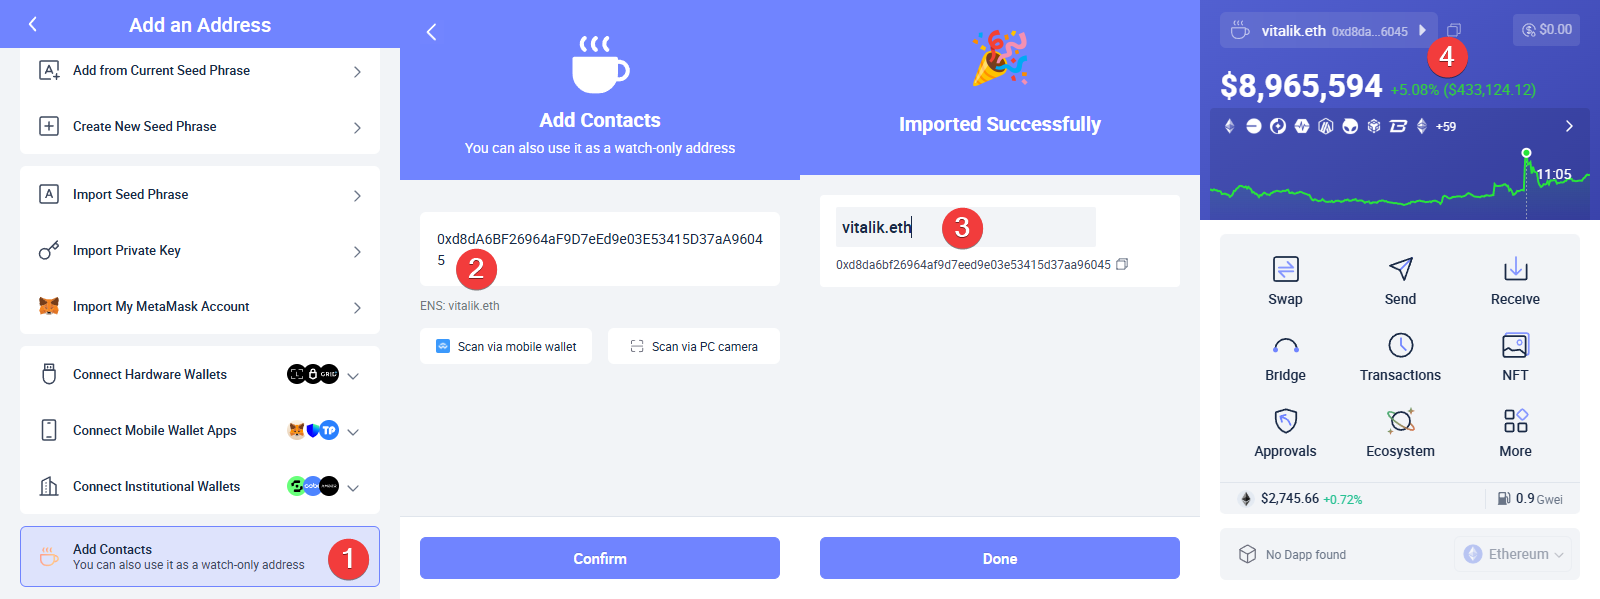
Watch-Only
The Watch-Only function allows you to add addresses for monitoring - for example, you can track the balance of large investors (whales) or exchange addresses.
Add the address of Ethereum creator Vitalik Buterin to see what tokens and NFTs he sells and what DeFi contracts he is a part of. To add, go to the address menu, then:
- At the very bottom, select
Add Contacts. - Enter the address or ENS of the cryptocurrency you want to track.
- Give the wallet a name.
- Now you can see the balance and token portfolio of this wallet.
Of course, you can't spend funds from such addresses: the Send button will be inactive for them. However, this is a useful function for analyzing the market and strategies of large cryptocurrency holders.
Whitelist of addresses
The whitelist is a list of verified addresses to which Rabby allows sending funds by default. If the address is new, it must be confirmed before sending. This is an additional protection against fraudulent transactions.
Here are 2 ways to add an address to the whitelist:
- Click
Add Address→Add Contactsand enter the address, as we did in the Watch-only section. - When sending tokens, click
Add to Whitelist.
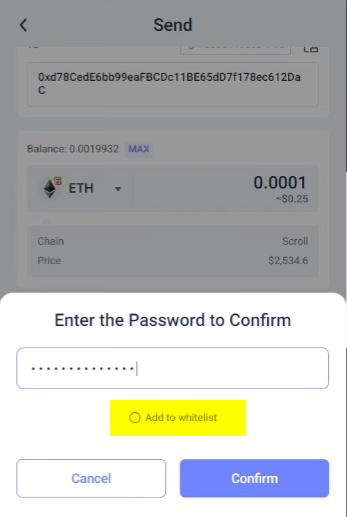
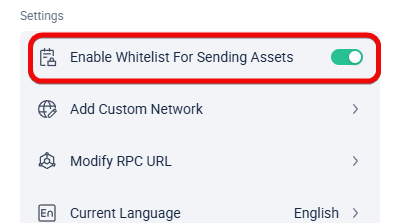
The function is disabled in the settings menu More → Enable Whitelist For Sending Assets.
Staking
Rabby does not have a separate tab for staking, but you can receive interest through DApps. Choose a DeFi protocol with optimal APY conditions and support for the desired token. For example, Lido Finance, PancakeSwap, or SushiSwap.
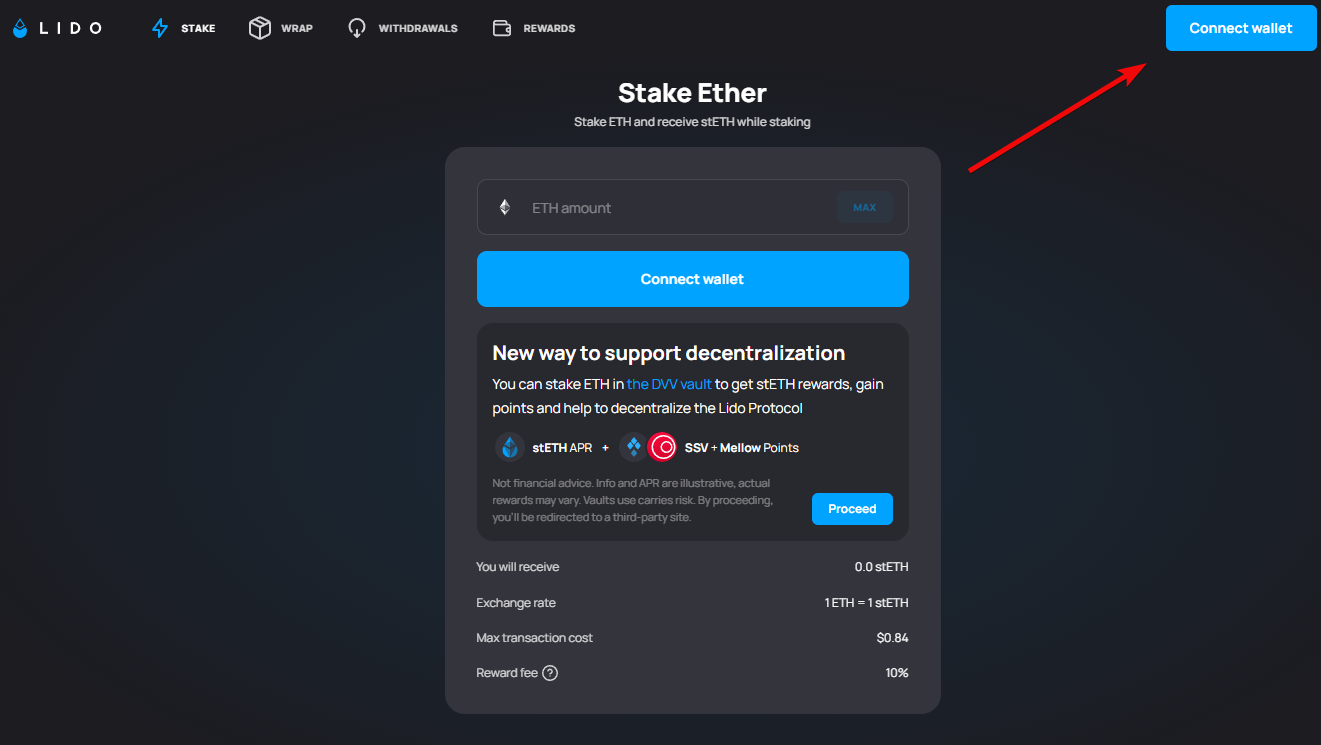
Connect your wallet to the platform by clicking Connect Wallet and select Rabby Wallet, then confirm the request in the extension. Select the token to stake, specify the amount, check the details (APY, terms, reward type) and confirm the transaction.
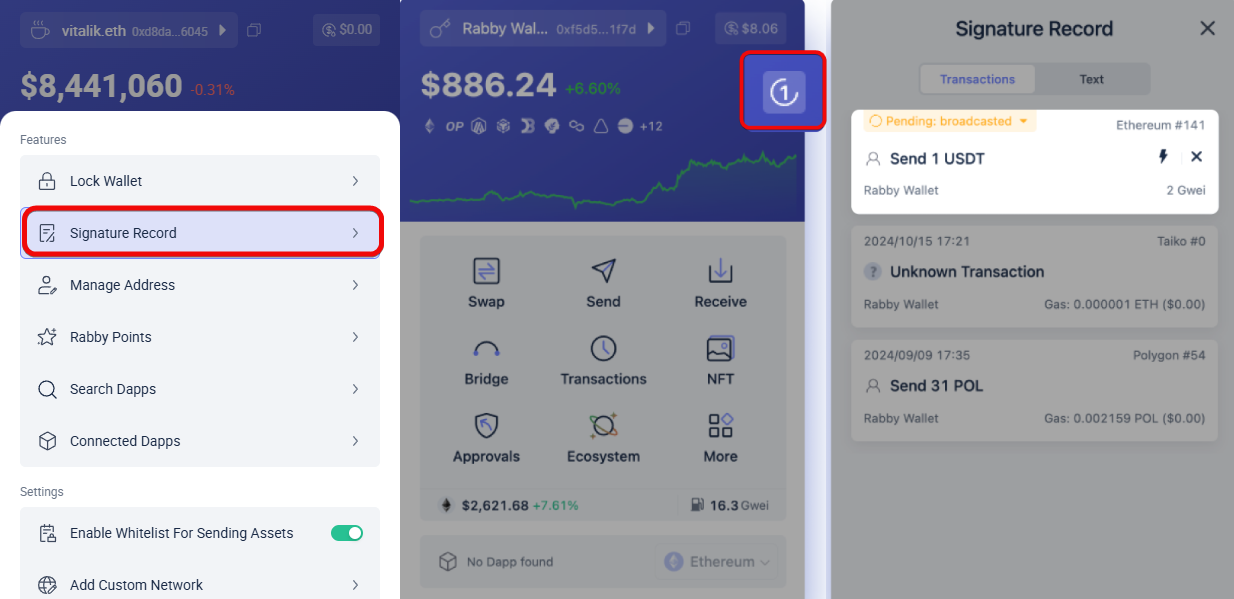
Advanced settings
The wallet offers additional settings. All of them are in the More menu. The following blocks are presented here:
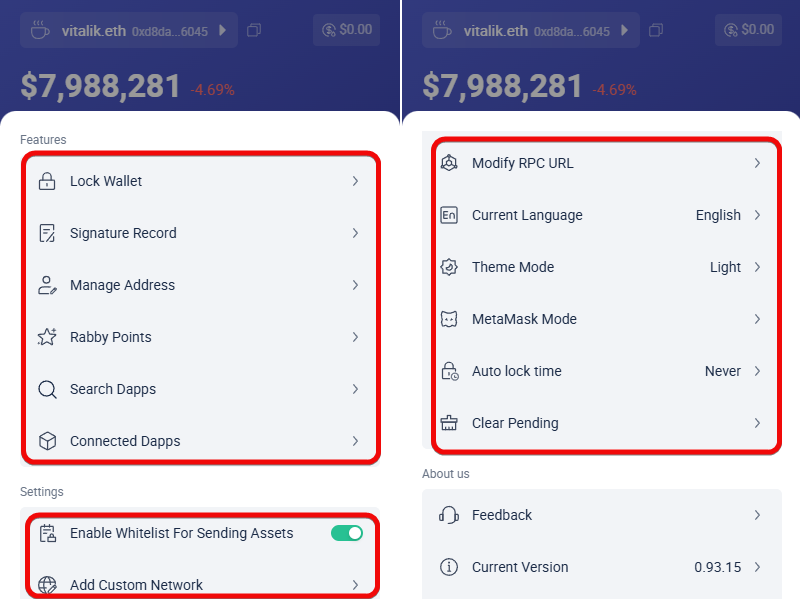
- Lock Wallet – lock your wallet to protect your session when idle.
- Signature Record – view all transaction details.
- Manage Address – add new and manage old addresses.
- Rabby Points – search for airdrops and points.
The following blocks concern DApps settings:
- Search DApps – search for decentralized applications (DApps) directly in the wallet interface.
- Connected Dapps – view and revoke permissions for DApps connected to the wallet.
- Enable Whitelist For Sending Assets – limit transactions to pre-approved addresses only for added security.
Advanced settings:
- Add Custom Network – add custom EVM networks (e.g. Polygon, Arbitrum) via
RPCdata entry. - Modify RPC URL – change the configuration of the
RPC URLnetwork to connect to other nodes or blockchain networks.
Here you can also configure the language and compatibility with MetaMask.
Interface and mode settings:
- Current Language – select a language (supported, for example, English, Russian, Spanish).
- Theme Mode – choose between light and dark interface themes.
- MetaMask Mode – switch between Rabby and MetaMask to work with DApps.
Extra:
- Auto Lock Time – set the time for automatic wallet locking when inactive (for example, 5 minutes, 1 hour).
- Clear Pending – remove unconfirmed or stuck transactions from the queue.
Let's look at some of the advanced settings in more detail.
Integration with hardware wallets
To connect a hardware wallet, click Add New Address, then Connect Hardware Wallets. Then allow Rabby to export the public key.
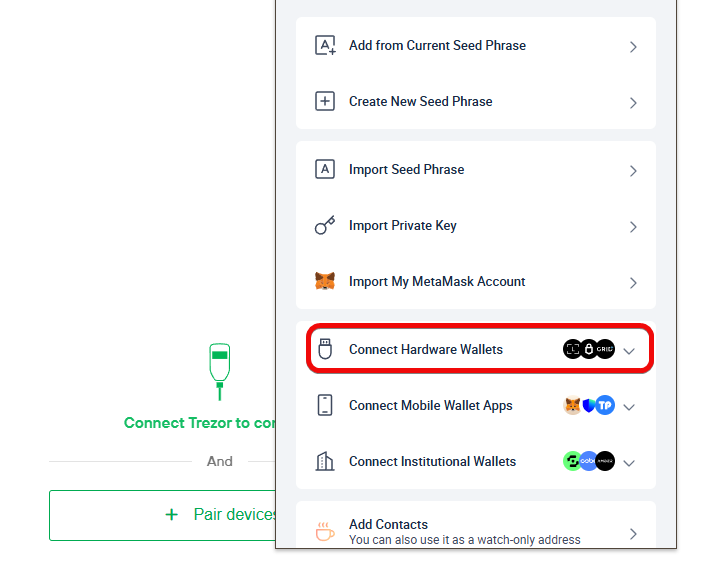
For example, let's connect Trezor and click Allow.
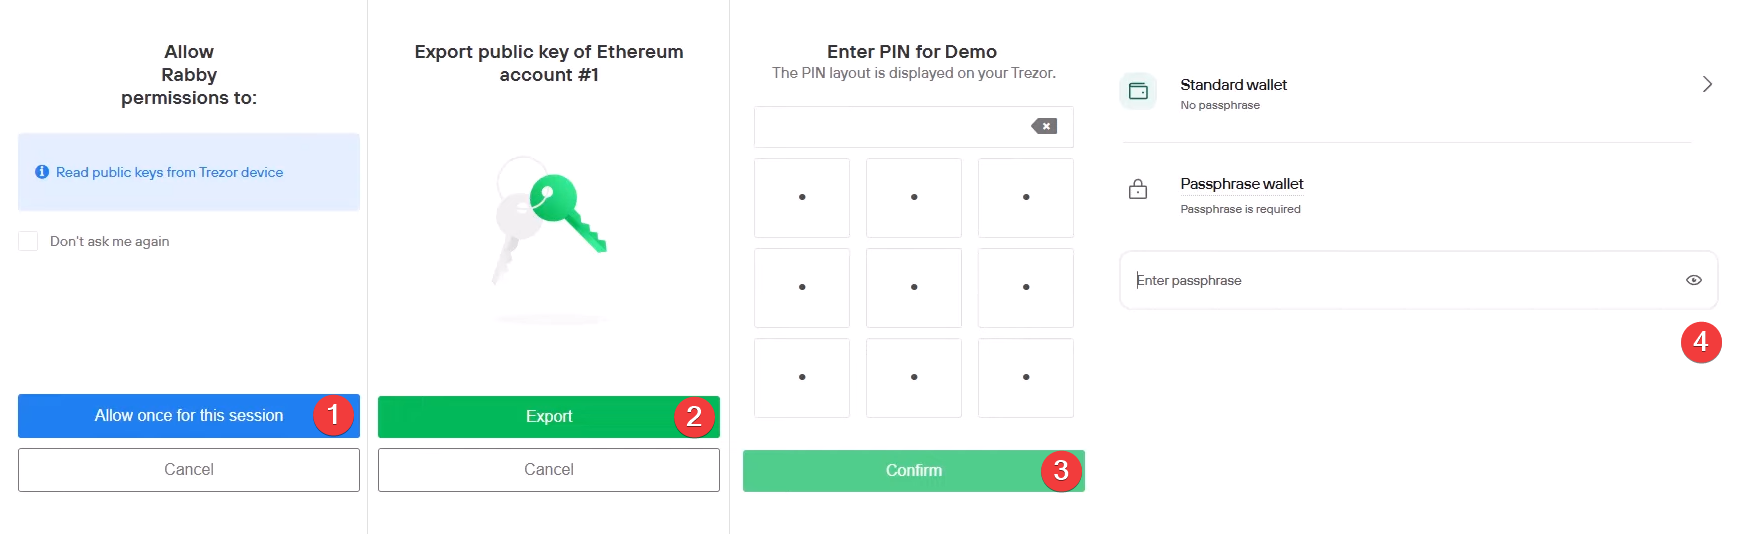
Click Export, then enter your PIN. If you have passphrase enabled (an additional layer of security that acts as an extra word in your seed phrase), enter it. If you don't have a passphrase, simply select Standard Wallet and confirm your choice in Trezor.
After confirming, a list of addresses will appear. By default, the first address will be selected if you haven't selected another one before.
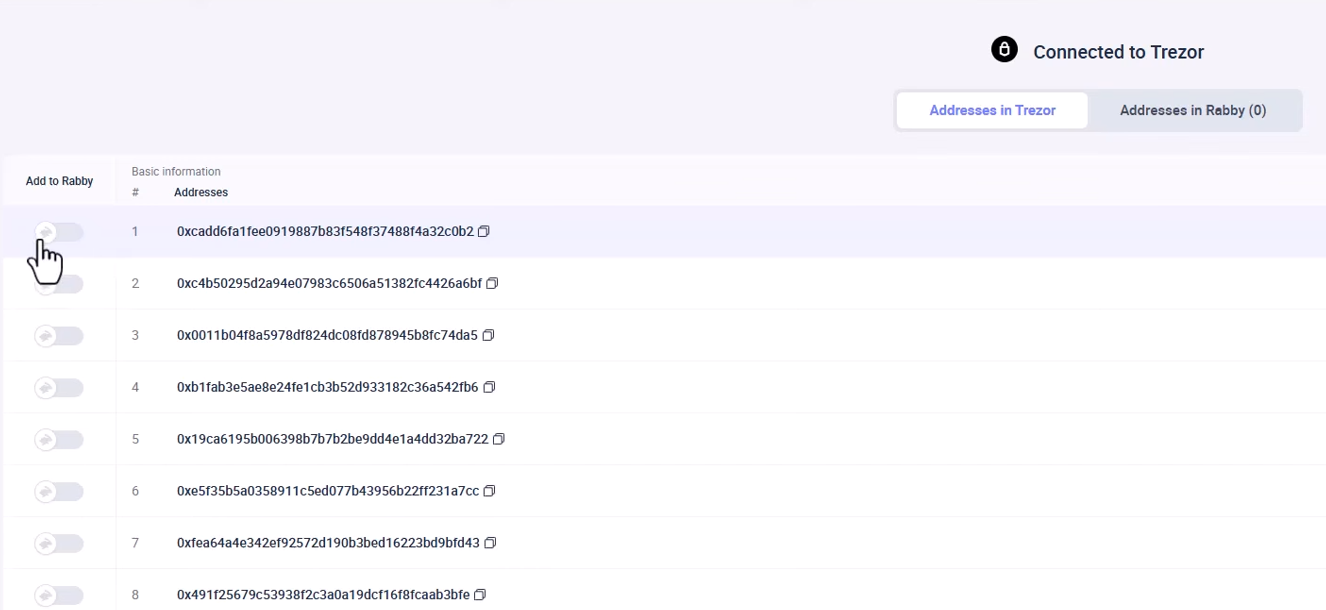
Activate the first address and you're done! Now open Rabby Wallet and you'll see your Trezor is connected. The seed phrase remains offline and protected.
Import and restore
In the import section, there is a button Import My MetaMask Account, however, this is a marketing ploy. The button takes you to instructions, not to the automatic import from MetaMask.
To import an existing wallet:
- Click the address at the top.
- Select
Add New Address. - Choose the import method: seed phrase or private key
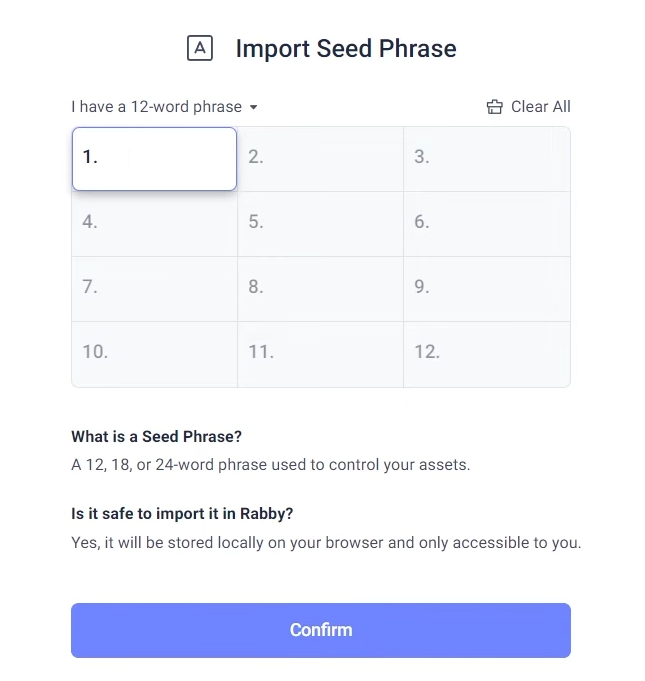
For example, click Import Seed Phrase, paste it and confirm.
To import a private key, click Import Private Key, paste it and click Confirm. This is done in the same address menu. You can also set a name for the imported wallet.
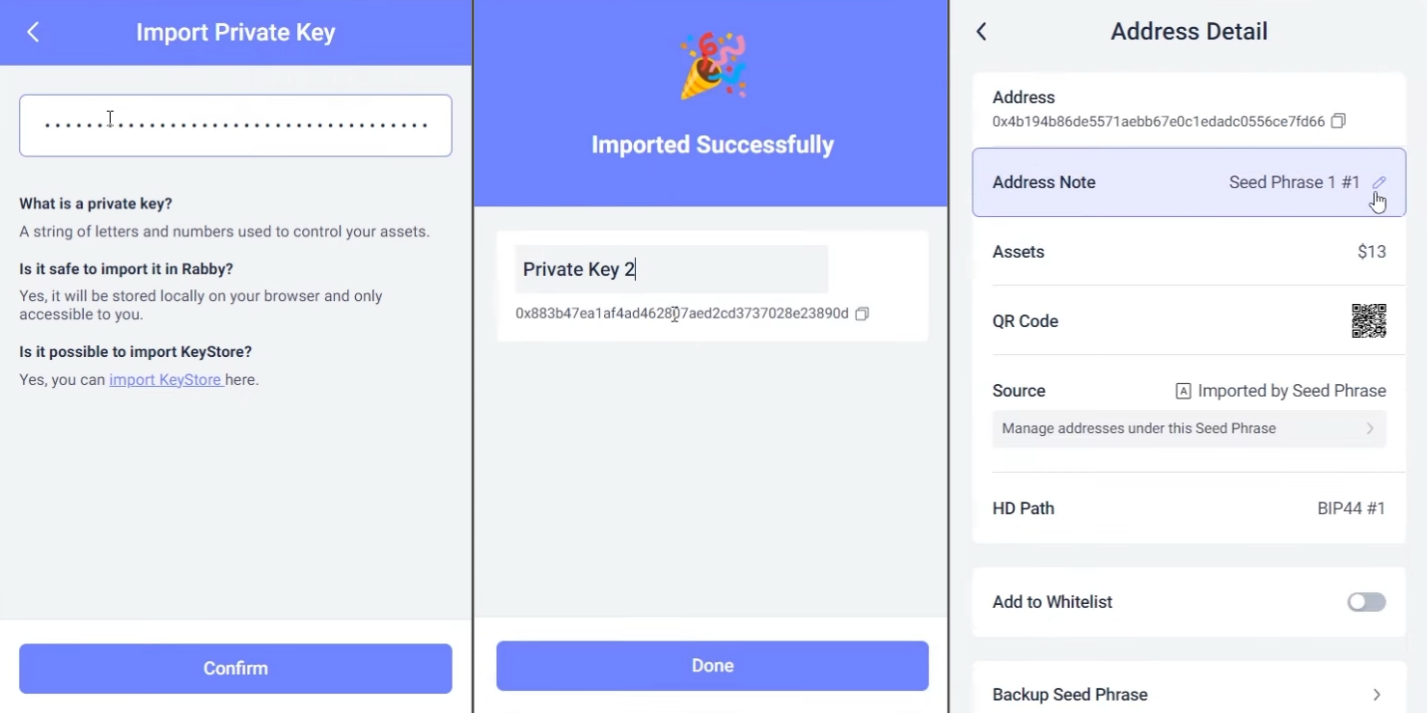
You can rename the wallet by clicking on the pencil icon and entering the desired name.
Private key and seed phrase
Private key and seed phrase are available in the address menu. To get this data, click on the arrow next to the seed phrase. Then scroll down until the backup options appear.
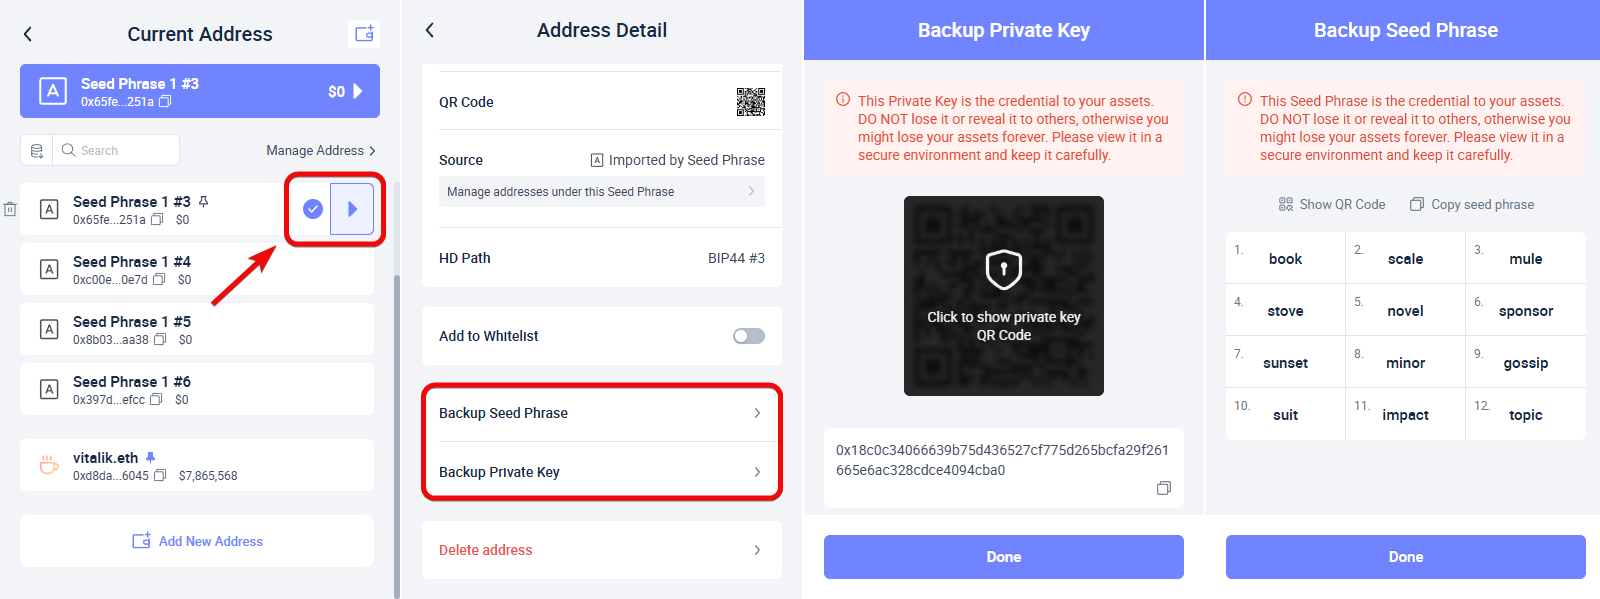
Next, you need to select what information we want to copy and enter the password. We recommend copying and writing down both options on paper - both the key and the seed phrase.
Mobile version
To use Rabby on your phone, you must already have a mobile wallet installed, such as MetaMask or Trust Wallet.
To install Rabby on your phone, open App Store or Google Play and download the application. Android users can also download the APK file directly from rabby.io.
Open the app and click Get Started.
To connect Rabby to your current wallet, select a provider, then Rabby will redirect you to your mobile wallet.
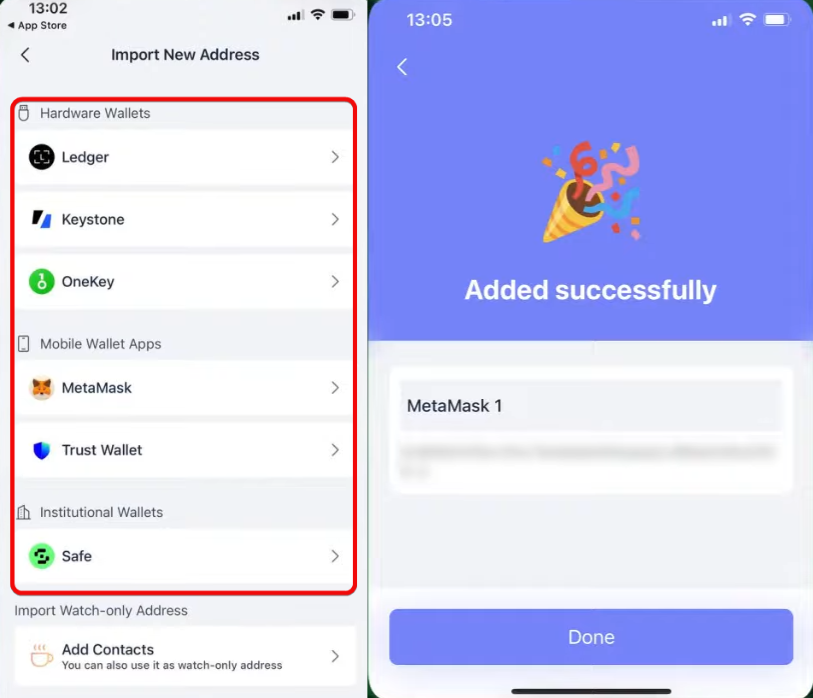
In another wallet app, confirm the connection request to import your existing wallet into Rabby. In addition, Rabby also supports hardware devices such as Ledger, Keystone, and OneKey in the app.
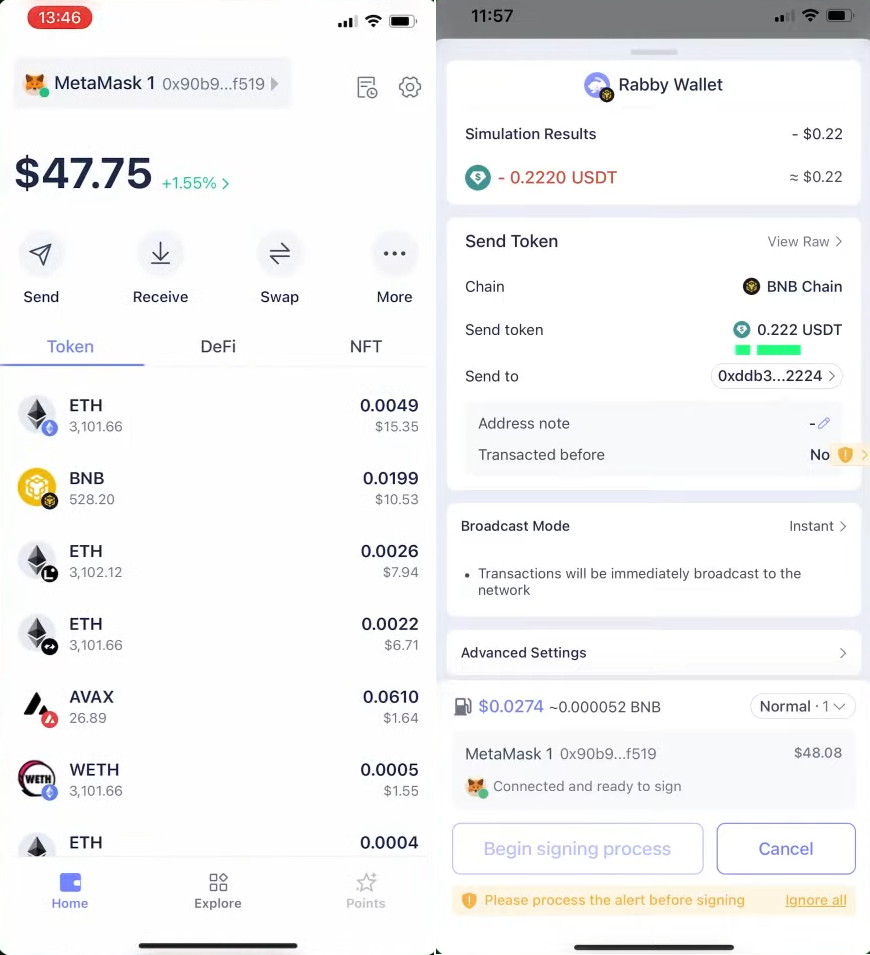
We have connected Rabby to the MetaMask mobile wallet and can now sign and view transaction simulations.
Desktop App
Let's take a quick look at the desktop app.
The PC version offers to add an address either by connecting hardware devices or mobile ones.
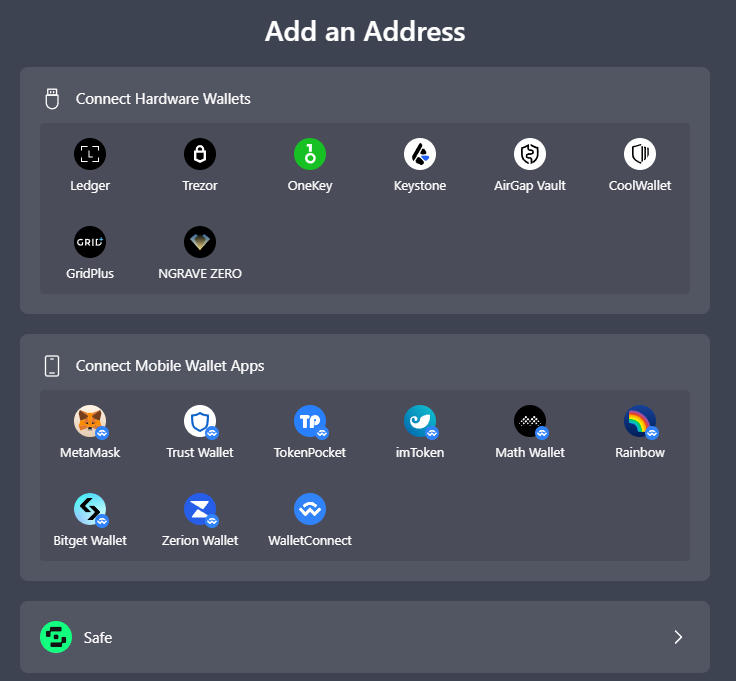
In general, the PC version repeats everything that is in the browser extension. Except for proxy settings.
Troubleshooting
Forgotten password
If you forgot your password, simply restore a new wallet from the seed phrase or private key. The password is used only to lock/unlock the wallet and is not stored in Rabby.
Remember that funds are stored in the blockchain, and access to management is provided by a seed phrase or private key. The wallet with its password is just a shell for access to the blockchain, and you can safely reinstall the wallet to reset the password.
How to cancel or speed up a transaction?
You can check the status on the main page or in More → Signature Record. Here you can wait, speed up or cancel the transaction.
Speed Up
Click Speed Up and Rabby will send the same transaction with a higher fee. This will speed up processing without paying double gas.
Cancel transaction
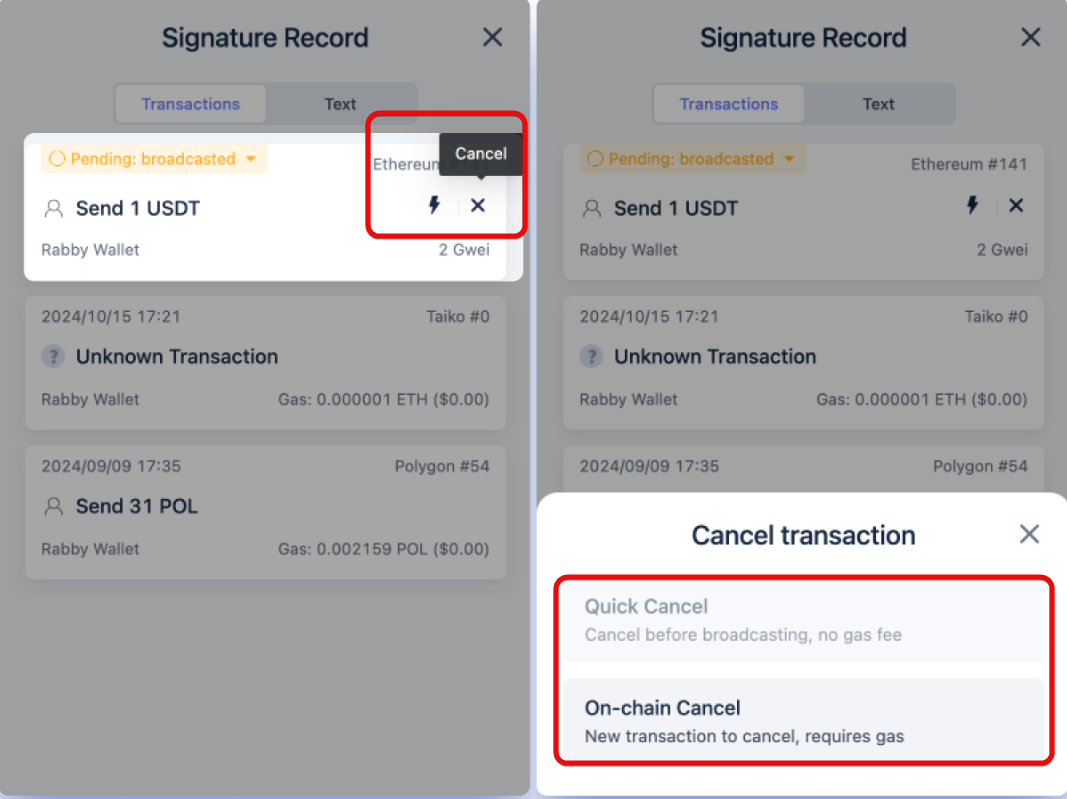
- Quick Cancel: Available if the transaction has not yet been sent to the network. Cancels without gas costs.
- On-chain Cancel: Creates a new transaction with a high fee to replace the stuck one. It will require gas.
Results: is it worth using
Rabby surpasses MetaMask in functionality and convenience: the latter's interface is as impractical as a cup with a handle inside. The only possible competitor is 1inch wallet, but it does not have a browser extension.
Are there any disadvantages? Of the disadvantages, we noted only that the browser wallet does not have a full-screen mode. For those who are used to expanding the extension to full screen, this is unfortunately not the case here. Well, it goes without saying - it is, like MetaMask, a hot wallet.
The owner and lead developer of the wallet is a Chinese startup DeBank. It has already created good products in the past. Rabby has not been involved in any hacks or scams affecting users, so it is one of the best analogues of MetaMask.
To sum up, Rabby is a convenient and secure Web3 wallet, suitable for both beginners and experienced users. It offers a wide range of functionality, including hardware wallet support, easy network navigation, and advanced security settings.
Technical support
- Chat with DeBank support (owner of Rabby wallet)
- Email for communication: support@rabby.io
- Help center


