A comprehensive guide to the exodus mobile app
A straightforward and functional hot wallet.
Discover the advantages of this wallet and explore all of the app’s features, including hidden ones.
The Exodus Mobile Wallet lets you store and manage crypto, swap assets instantly, earn staking rewards, and view your NFT collection right in the app.
Here’s what it looks like:
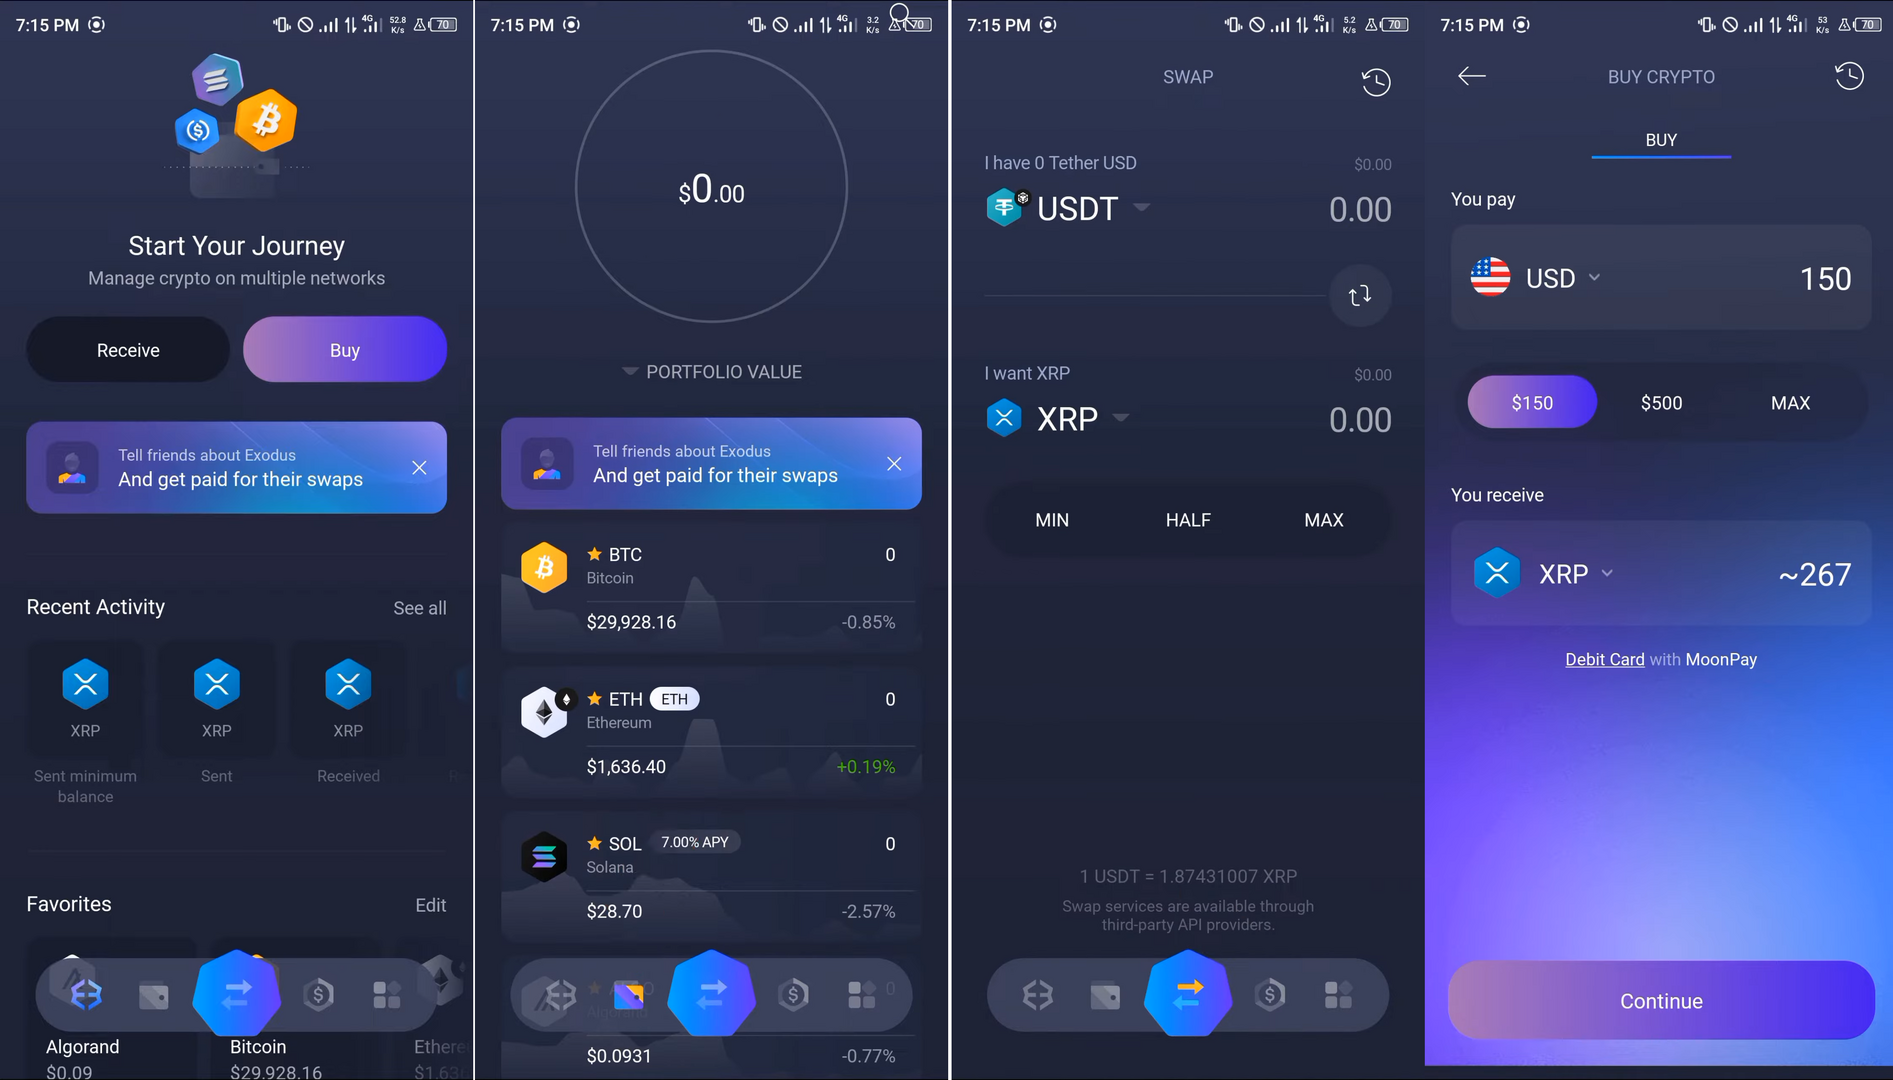
The wallet supports around 16 blockchains and over 1 000 000 assets. Staking is also available for assets such as Solana (SOL), Ethereum (ETH) and others, with returns ranging from 0.94% to 18%.

First, let’s review what this wallet offers in terms of functionality and security, then we’ll dive into staking and other features.
Security and Features
To protect your assets, the wallet provides:
Security:
- Self-custody of your seed phrase – retain full control over your private keys.
- Biometric authentication, such as Face ID or Touch ID.
- Passcode – secure your wallet with a numeric PIN for extra protection.
You can also connect the mobile app to hardware wallets. However, two-factor authentication is not available.
Now, let’s move on to the economics.
Your Benefits:
- Staking – earn up to 18% APY on your tokens.
- Portfolio insights – track promising projects directly in your wallet.
- dApp integration – connect to Web3 apps for NFTs, liquidity farming, exchange rates, and more.
Let’s see these features in action by installing the wallet.
Download, Installation & Setup
First, download the app from the App Store or Google Play.
The wallet has a quick setup. After opening the app, you’ll see two options: if you already have a wallet, import it by scanning a QR code from another device or by entering a 12‑word seed phrase.
If you don’t have a wallet yet, choose Create Wallet.
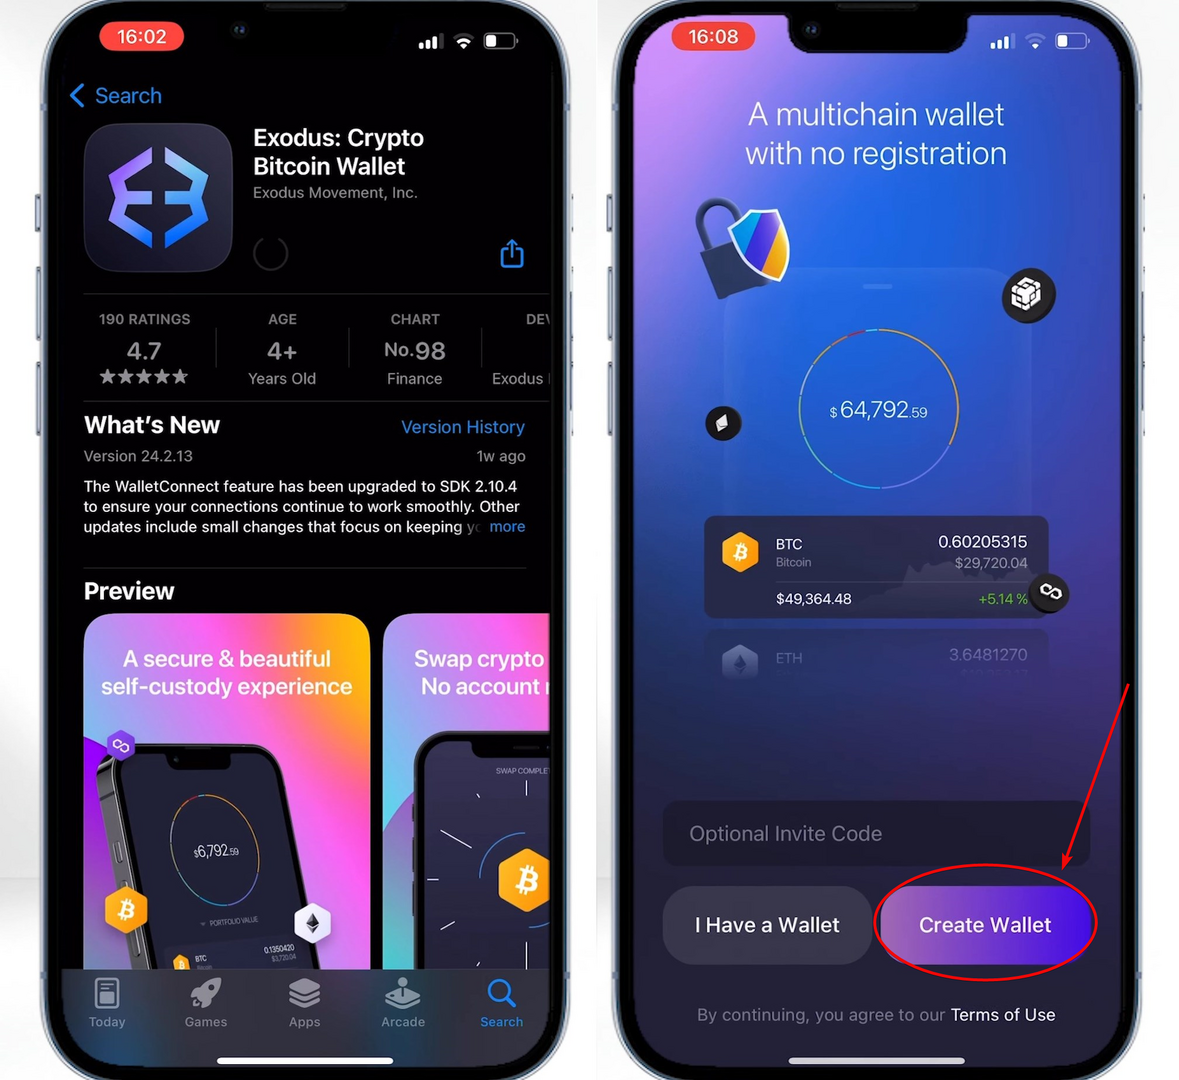
That’s it—congratulations, your wallet is created!
Backup
Before exploring further, it’s crucial to back up your wallet to avoid losing access to your funds.
Tap the profile icon in the bottom right corner, go to Security, and select Backup to begin.
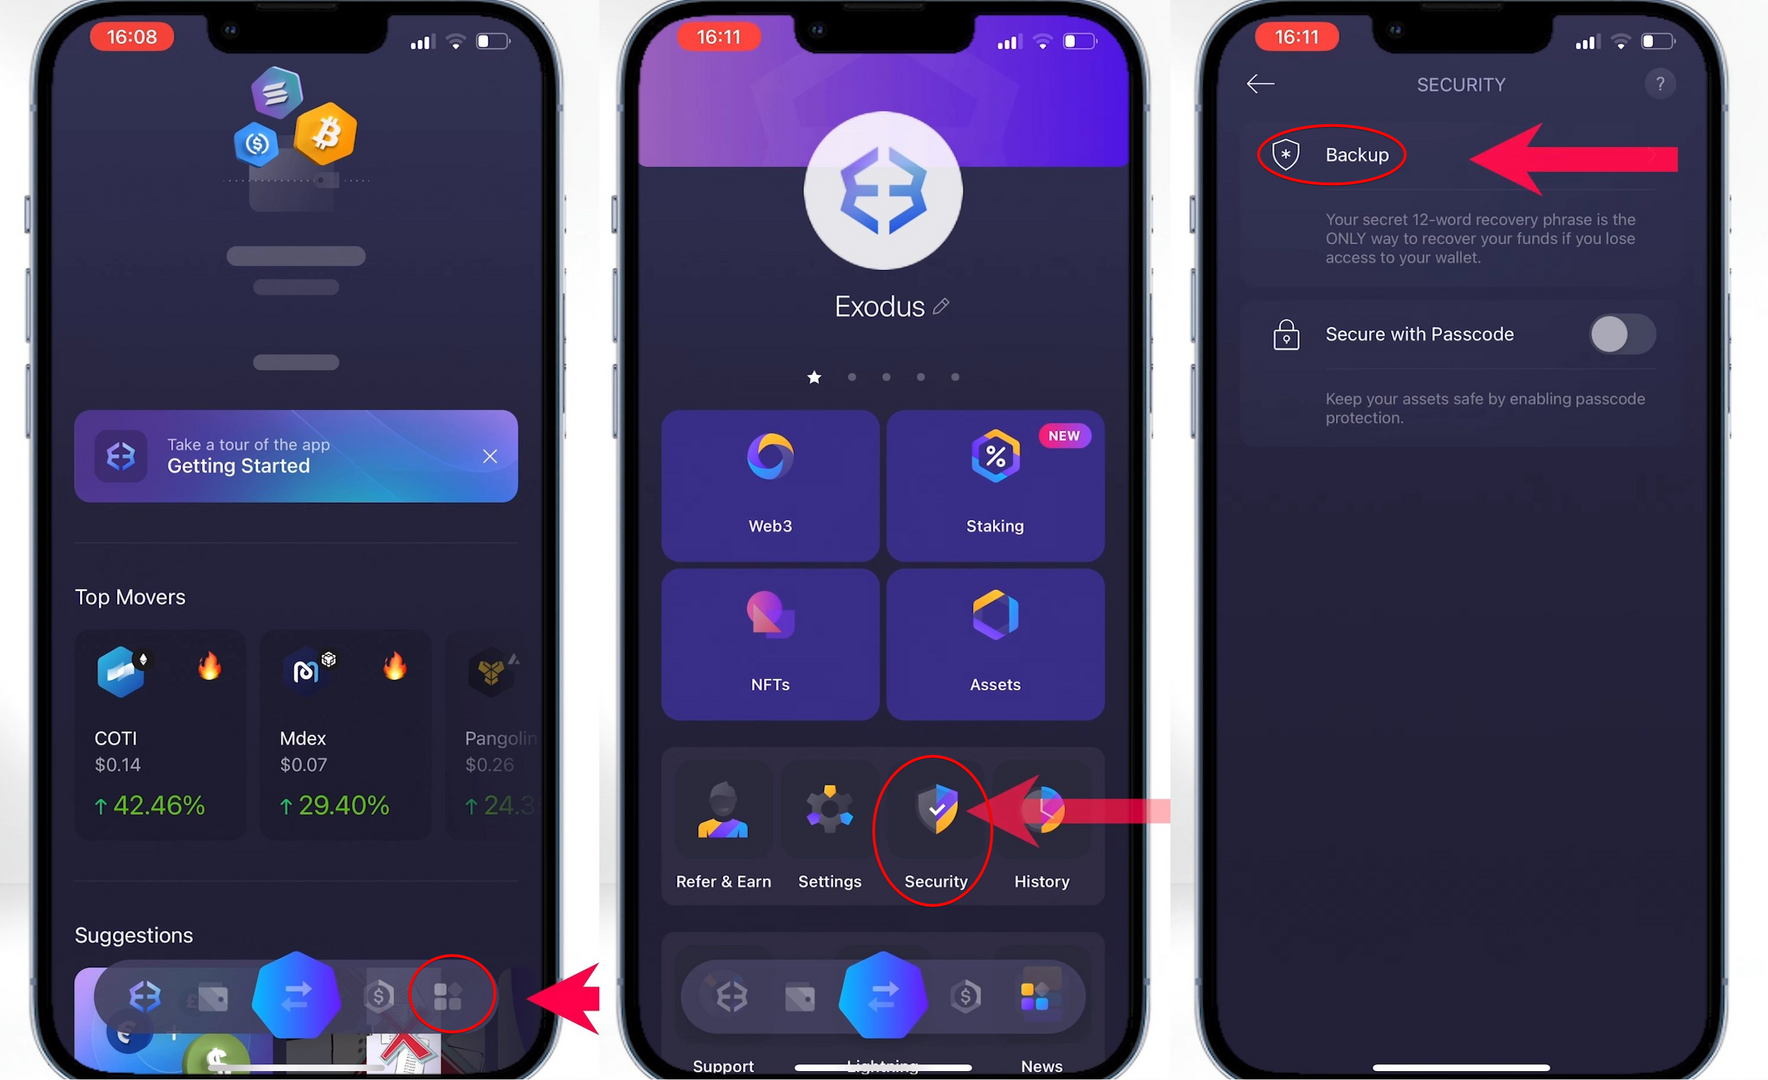
The wallet will generate a 12‑word seed phrase.
Make sure you’re in a private place where only you can see the screen.
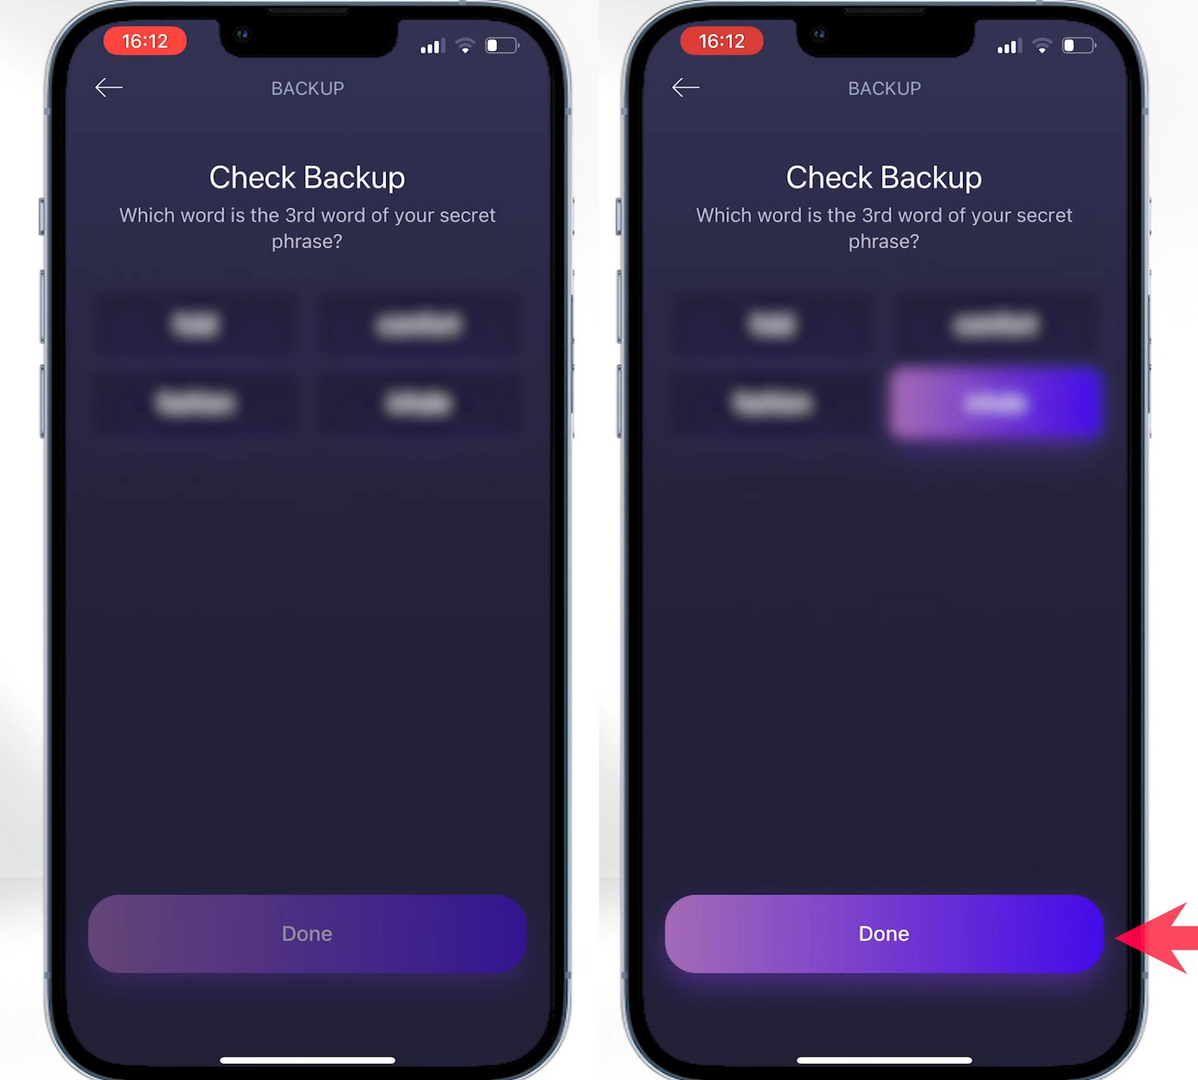
When you’re ready, tap and hold the screen to reveal the words, then write them down in the exact order shown.
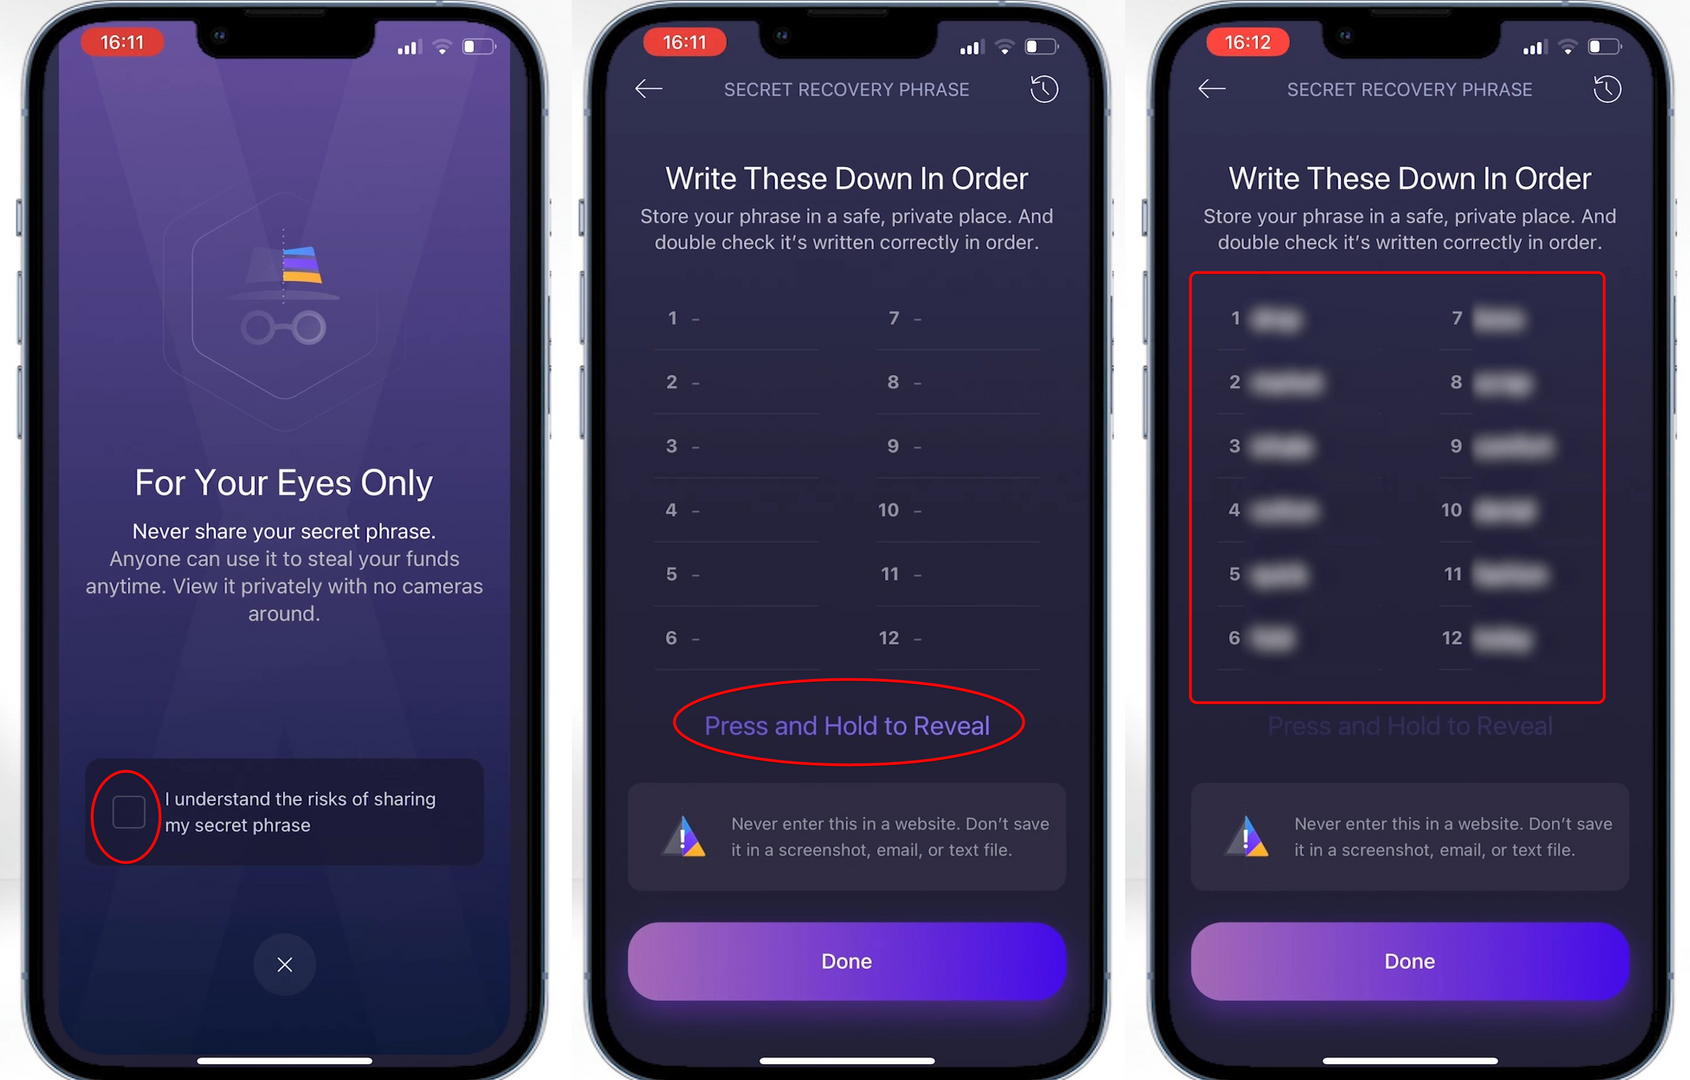
Once done, tap Done to confirm. Select the correct word when prompted, tap Done again, and ensure your seed phrase is stored safely.
Your seed phrase is required to restore access if you ever lose your wallet.
Warning: if you lose your seed phrase, you will permanently lose access to your wallet and funds. Never share it with anyone.
After a successful backup, you can start using the wallet. It’s also wise to add a passcode for extra security.
Passcode
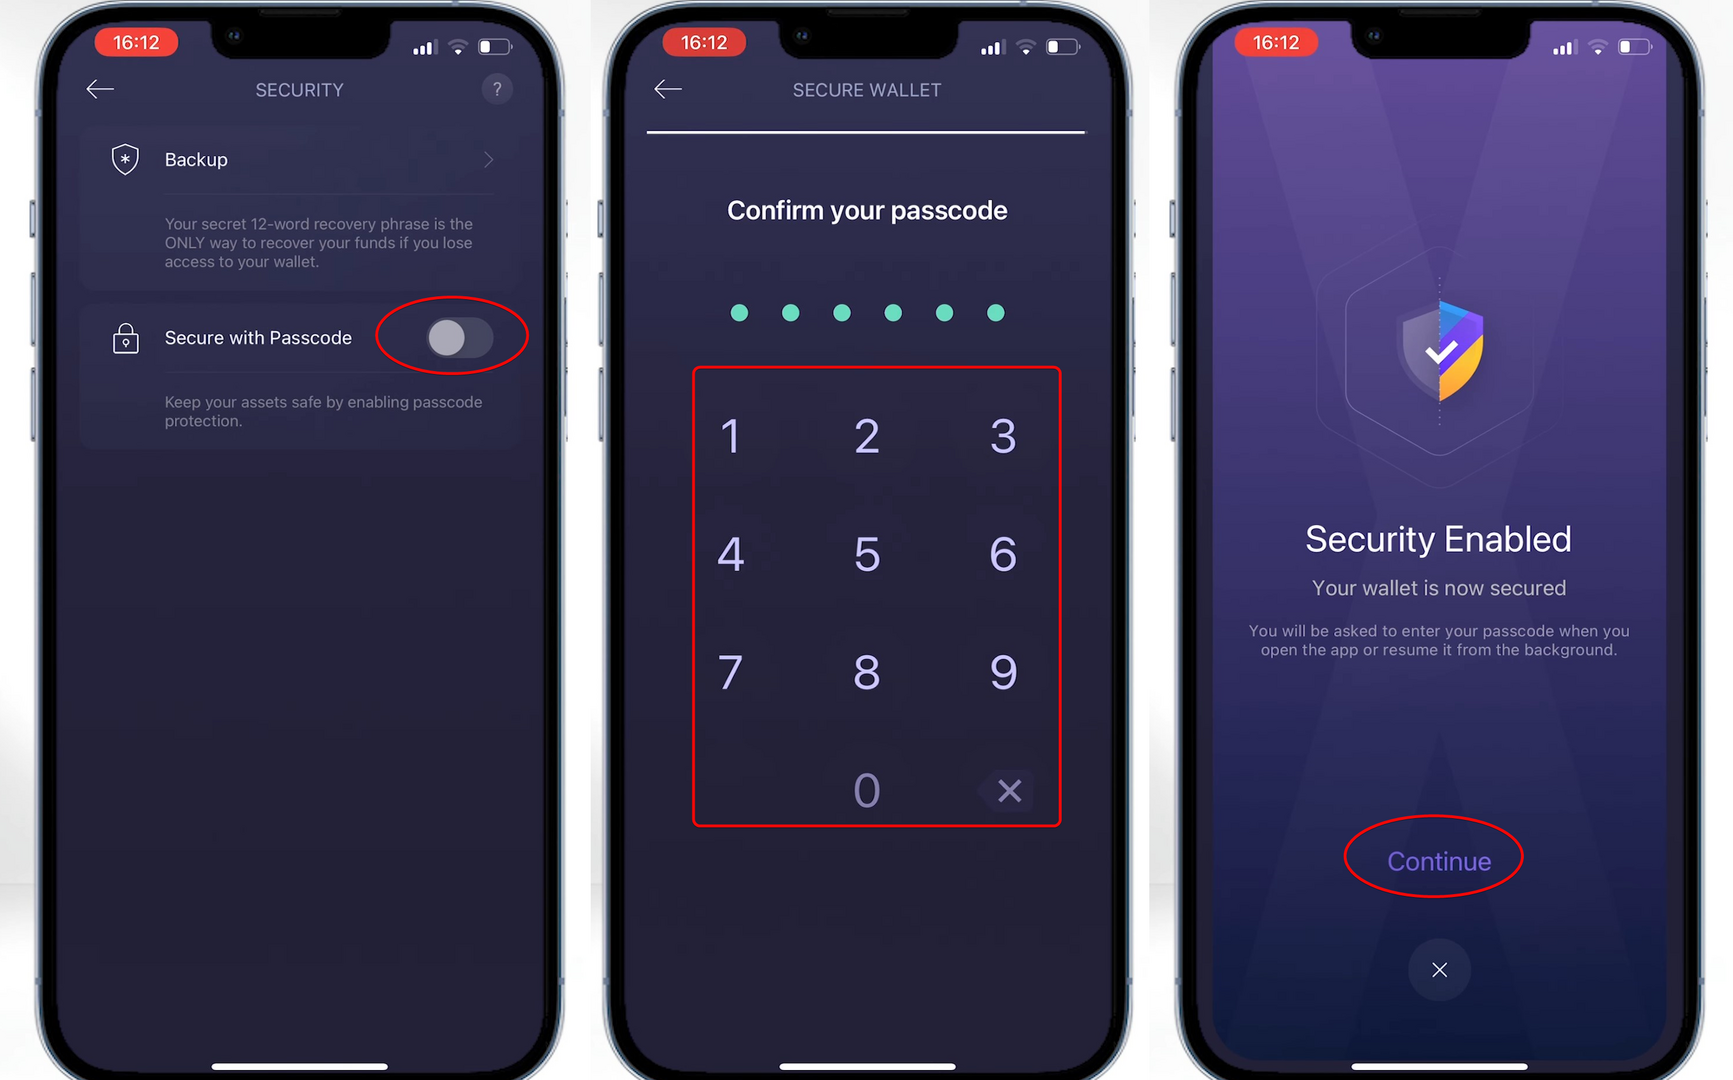
You can set a numeric passcode for access. You can also enable Face ID on iOS or Touch ID on Android.
To set up a passcode, tap Profile → Settings → Secure with Passcode. Enter and confirm your six‑digit PIN. Once complete, your wallet will be securely protected.
How to Use
With your wallet created and secured, let’s explore the core functions.
The bottom navigation bar has four buttons:
- Wallet – manage crypto portfolios and customize tabs to track top gainers and losers.
- Swap – exchange tokens without leaving the app.
- Buy & Sell – purchase crypto via built‑in services.
- Apps – access Web3 tools, NFTs, staking, and asset management.

Before we dive into these features, let’s get an address and fund the wallet.
How to Generate an Address
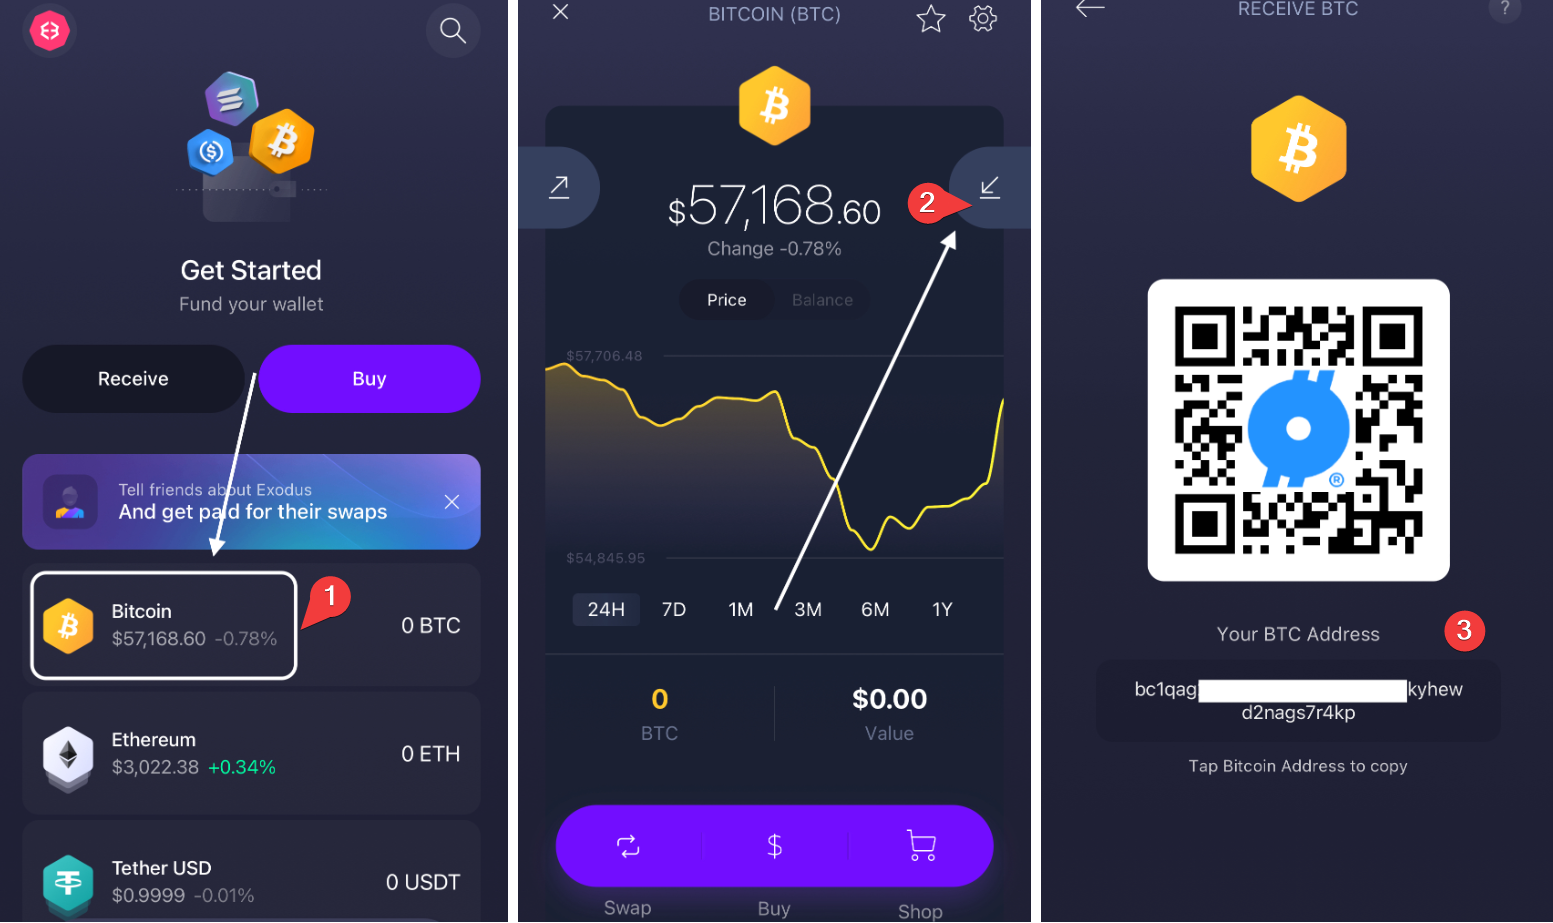
All coin addresses are in the first tab, Wallet. Here you’ll see supported assets like Bitcoin, Ethereum, Solana, and more.
To get an address:
- Select your desired cryptocurrency.
- Tap the down‑arrow icon –
Receive. - Copy the address or scan the QR code.
Now you can fund your wallet.
How to Fund
Share your address with a sender or use exchanges, swap services, or other wallets to transfer funds.
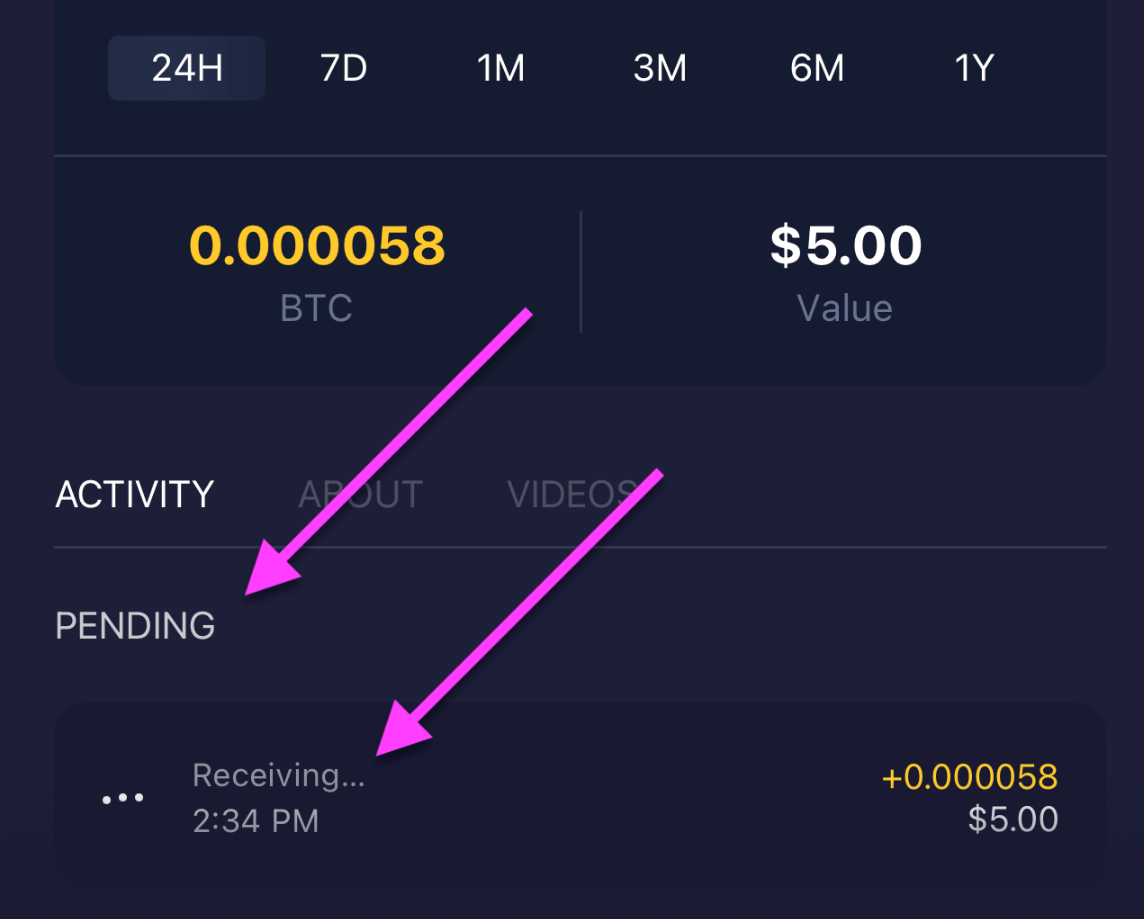
Once funds are sent, you’ll see a Receiving transaction under Pending. After blockchain confirmations, the funds become available in Exodus.
How to Send
To send funds:
- Select the coin.
- Tap the up‑arrow icon –
Send. - Enter the recipient address and amount.
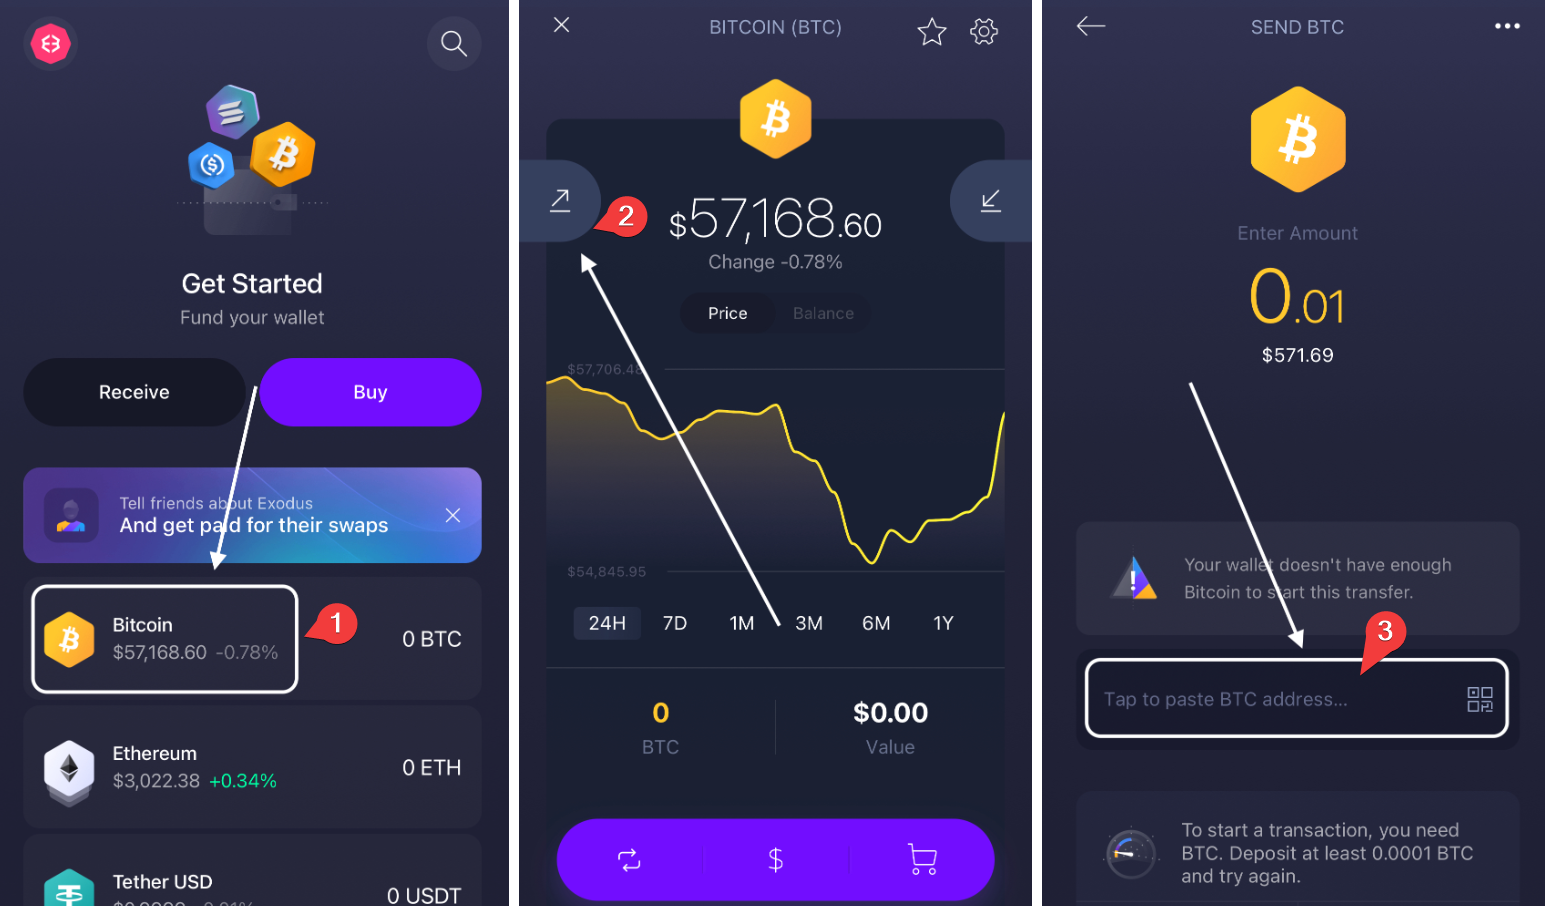
Review the details and confirm. Exodus makes sending crypto fast and simple.
You can also adjust fees when sending.
Fees
If you enable Custom Fees, you can set your own network fee. Otherwise, Exodus selects the network’s average fee.
To customize fees:
- Open the coin.
- Tap the settings gear in the top right.
- Check the
Custom Feesbox.
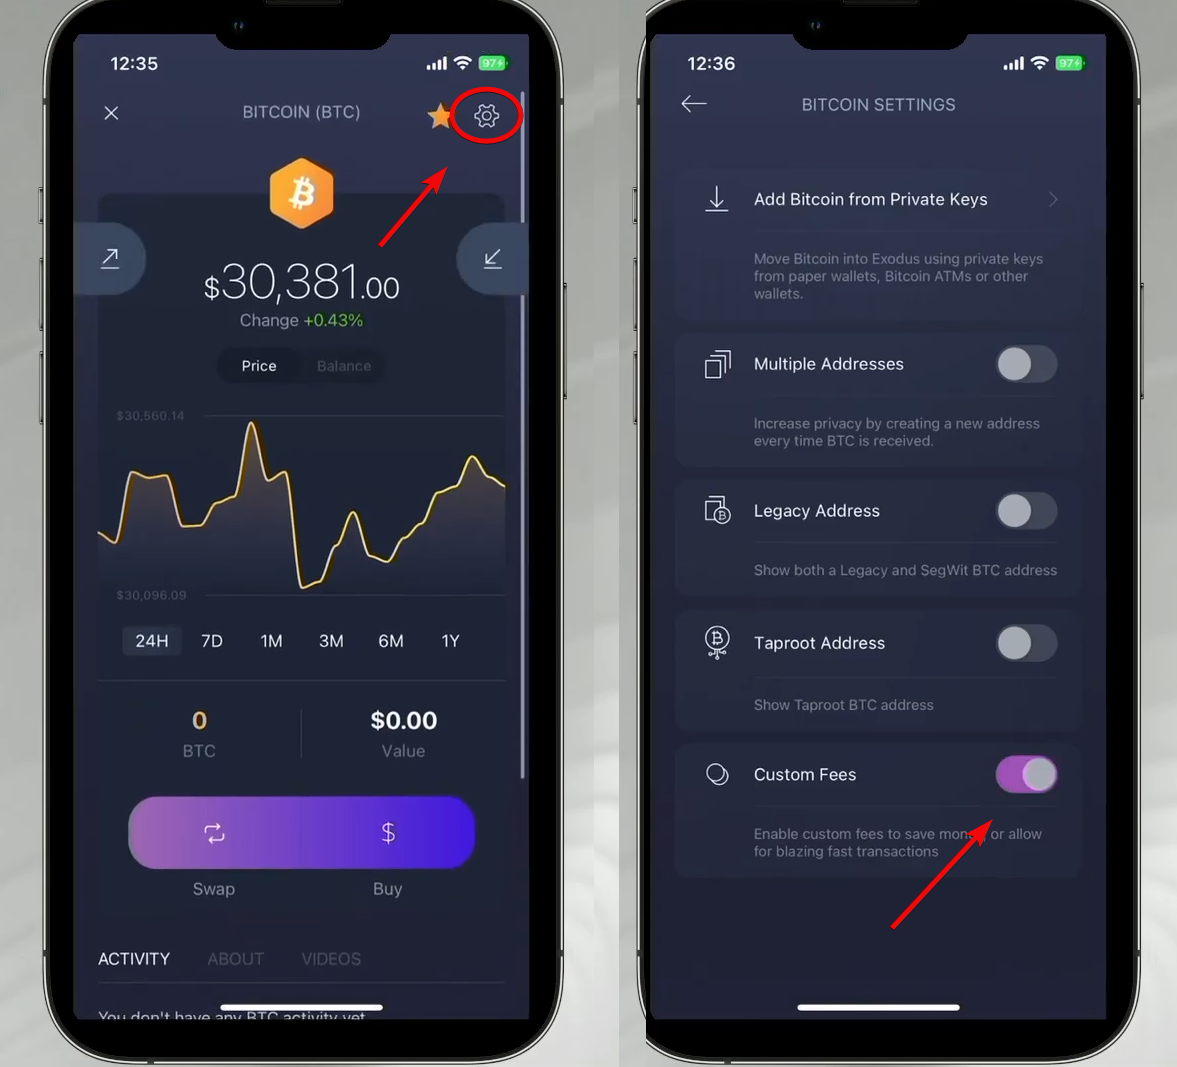
Now you can manually set the fee per transaction. Higher fees speed up confirmations, while lower fees save costs (but may delay your transaction).
In Ethereum and other EVM chains (e.g., Polygon, BNB Chain), fees are auto-calculated, but you can still adjust them manually in settings.
Tap the three‑dot menu when sending and drag the slider to adjust.
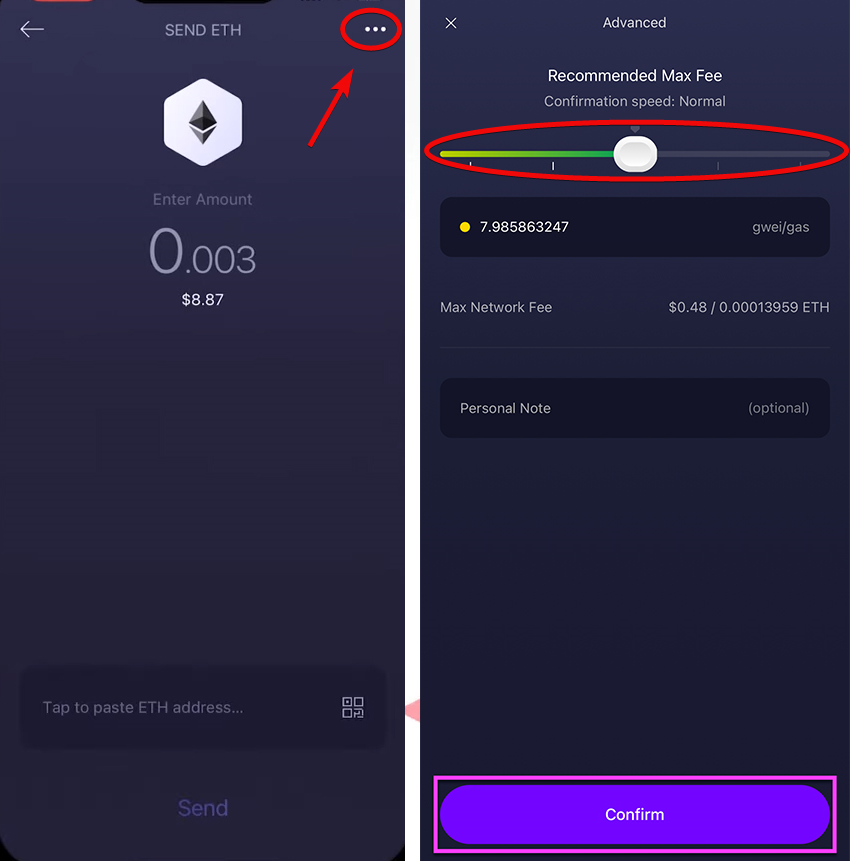
Exodus does not charge extra transaction fees; you only pay the network fee set by the blockchain.
However, Exodus applies a margin on swap and buy rates, making in-app rates less competitive than exchanges.
Swap
The Swap tab lets you exchange one crypto for another.
To swap, tap Swap, select your coins (via list or search), enter an amount (toggle between crypto and fiat, or use MIN, Half, Max). For precise amounts (e.g., 100 ADA), type it in and Exodus will calculate the best rate.
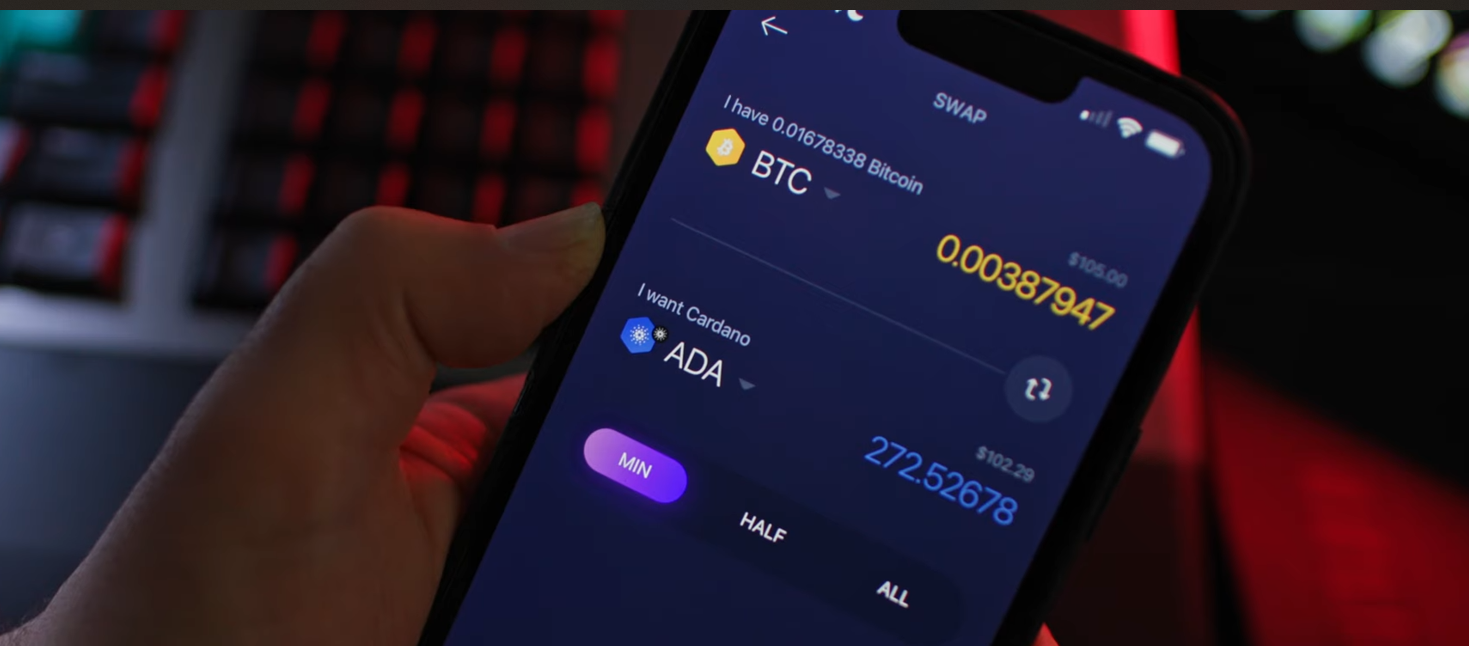
After reviewing, tap Swap Now.
Swap fees typically range from 2% to 5%, depending on the assets, market conditions, and transaction size.
Buy & Sell
The app also supports purchasing crypto via third‑party providers like Moonpay and Sardine.ai. This is usually the most expensive option compared to exchanges such as Binance or Bybit.
Tap Buy & Sell in the bottom right. Select currencies and amounts as needed.
Tap Continue to connect to the provider’s API. You’ll enter personal information (email, address, date of birth, selfie with ID, etc.) for verification and payment setup.
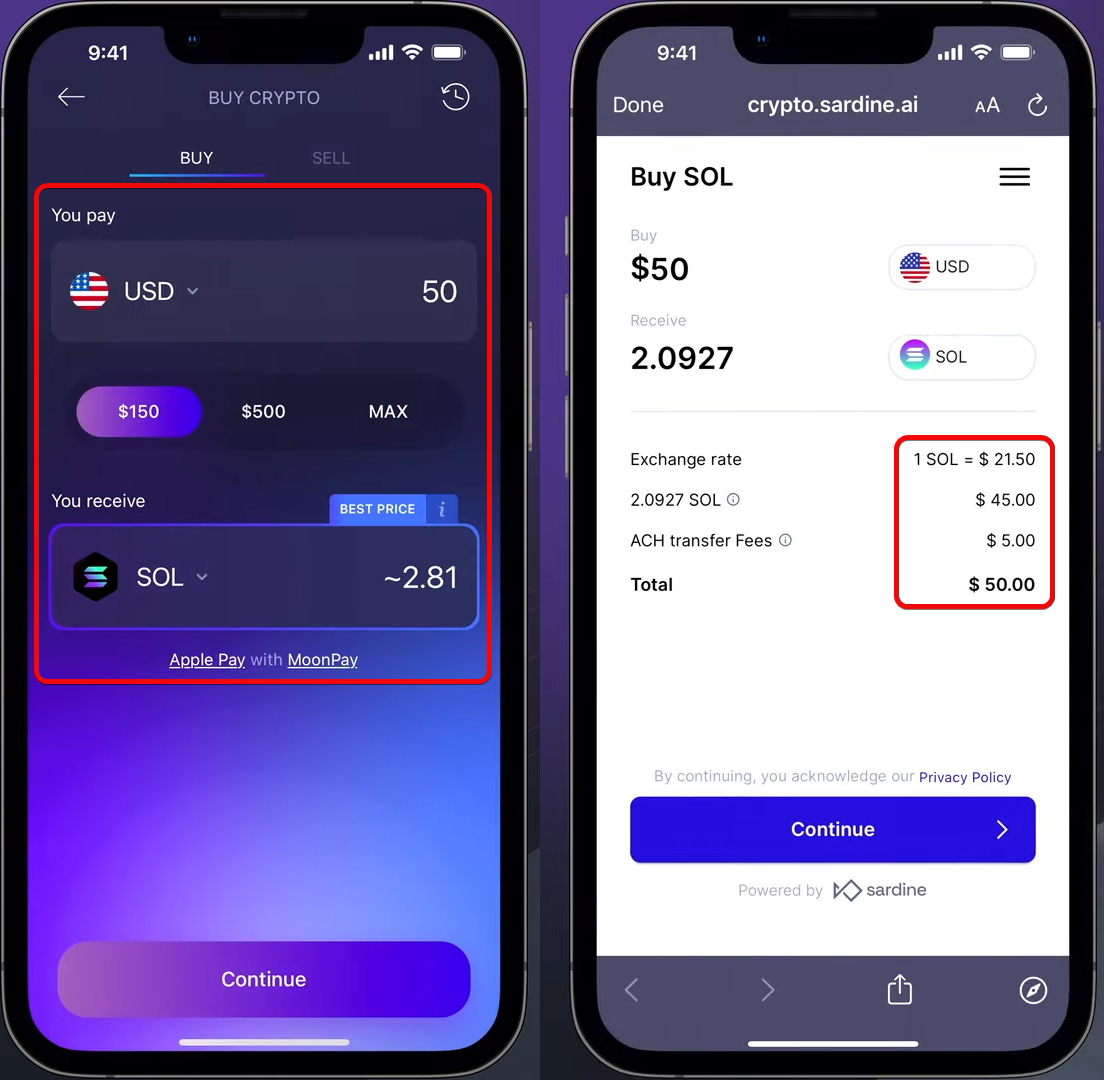
Once approved, complete the purchase. Fees are included in the quote, and crypto typically arrives in under 20 minutes.
Staking
Staking lets you earn rewards on supported assets (e.g., ADA, SOL), though reward timing varies by network.
To start staking, tap the icon in the top right.
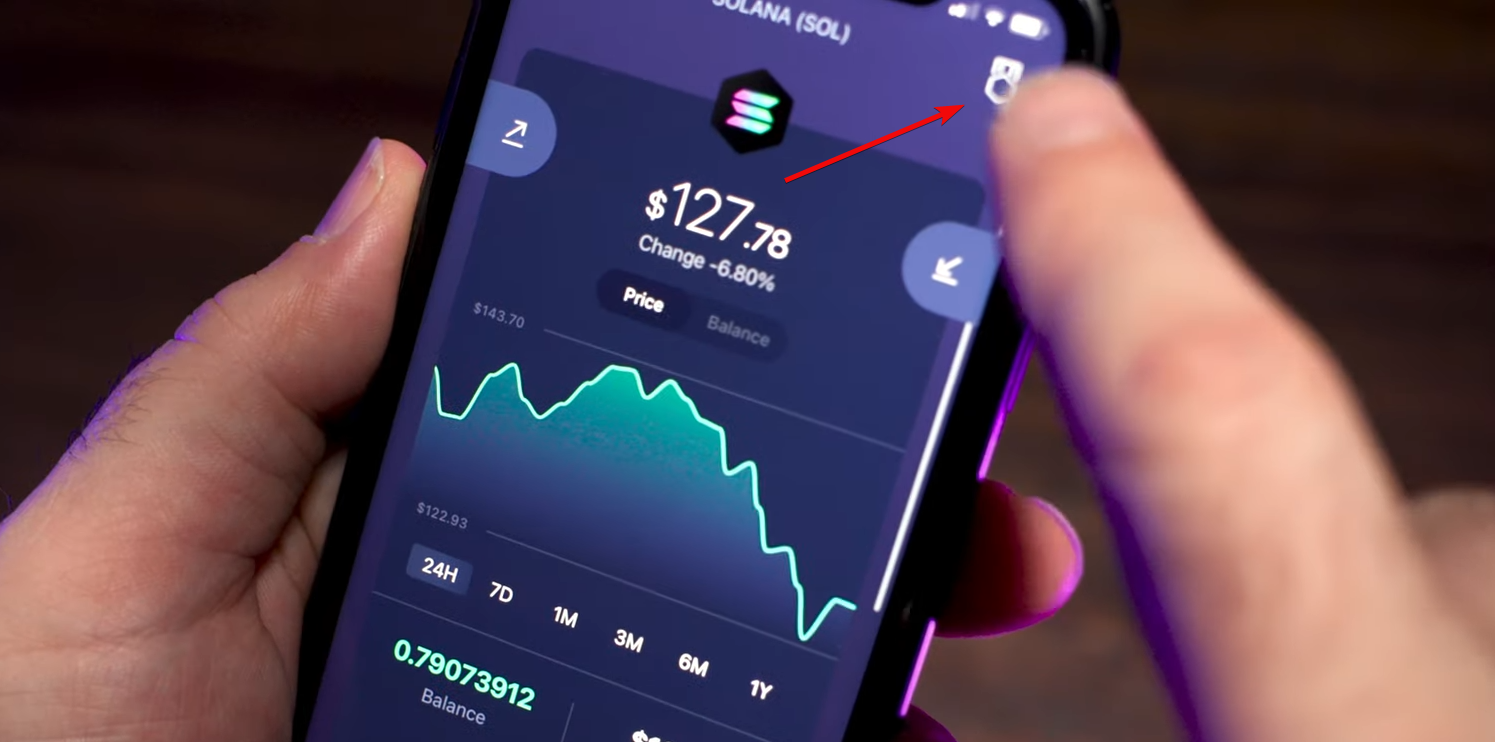
The current APY displays on screen but isn’t fixed—it fluctuates with network activity.
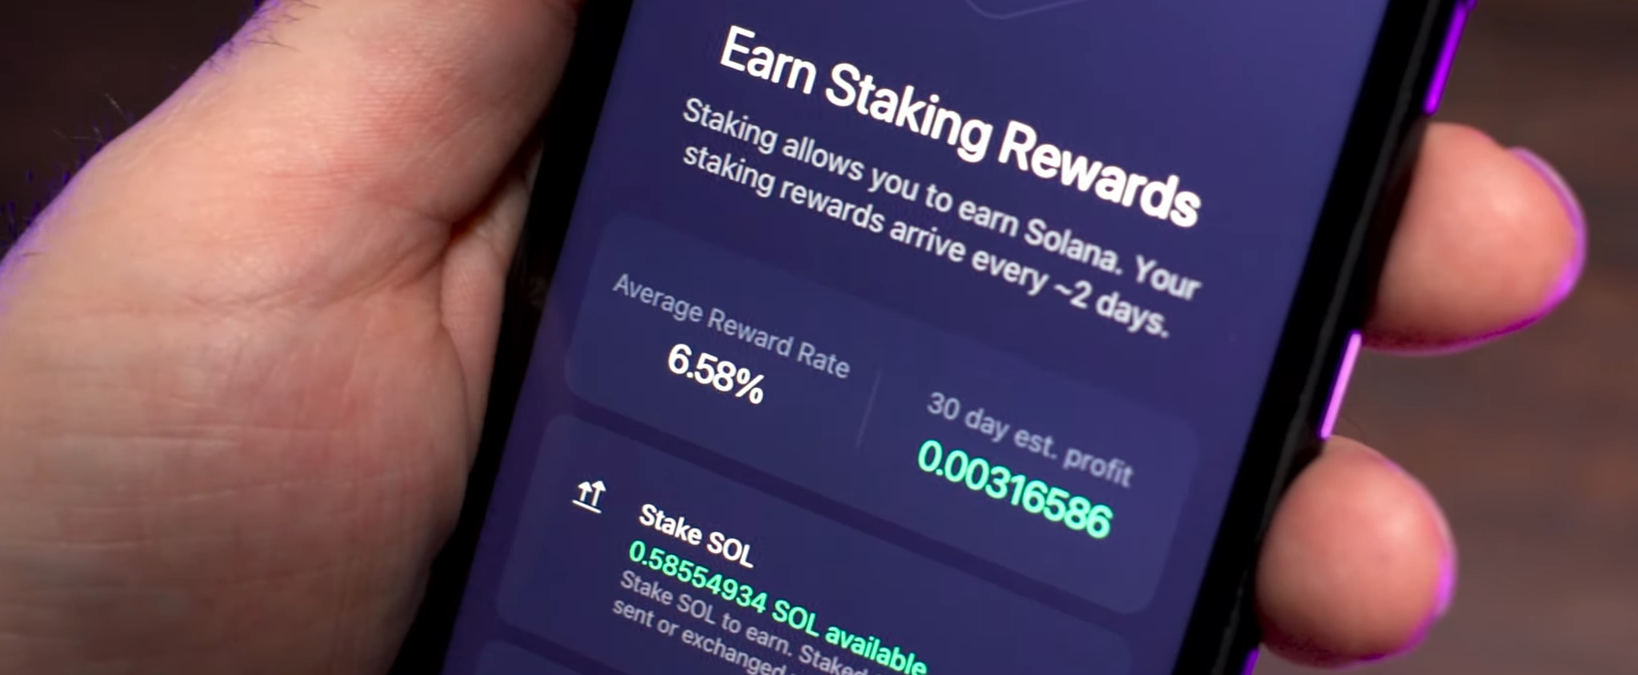
When entering an amount, leave a small balance (e.g., 0.01 SOL) for fees—this covers hundreds of transactions.
You can stake your full balance, but then you’ll need to top up for future unstaking, transfers, or dApp interactions. Confirm with Stake SOL to activate.
Rewards begin after 4–8 days and auto-compound. To unstake, tap Unstake SOL; the process takes about two days.
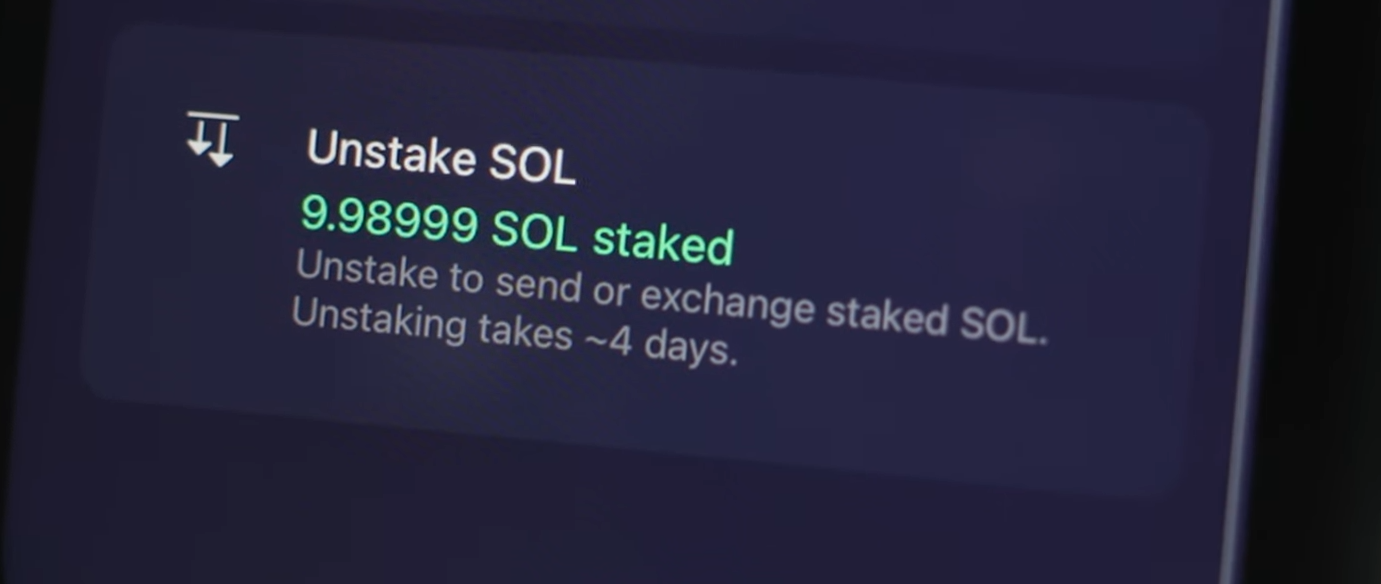
Note: staked SOL is locked until you unstake. Solana’s low fees (under $0.01) mean even 0.01 SOL covers many transactions.
Tip: if you need liquidity, split your balance—stake part and keep some for on‑chain activity.
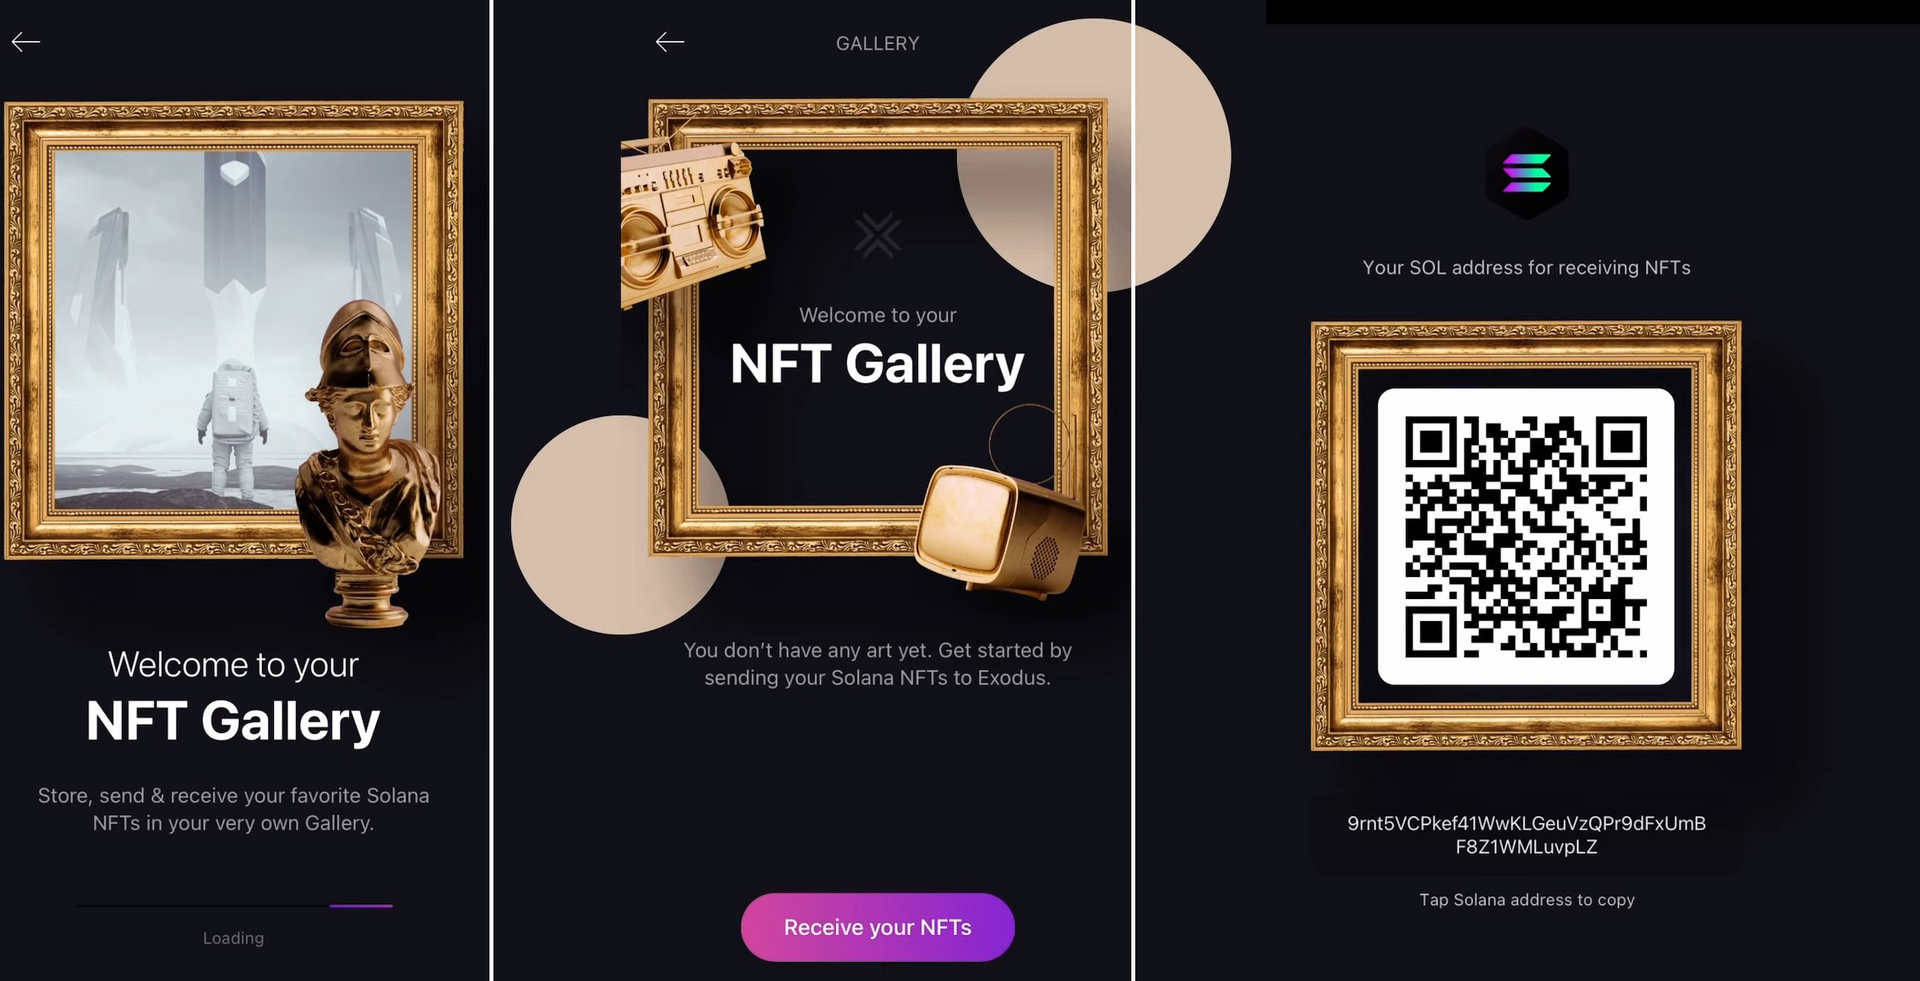
NFT Gallery
The wallet includes an NFT gallery for viewing and managing your multi‑chain collections in a unified interface.
This gallery supports NFTs on Ethereum, Solana, Algorand, and more, so you can browse and interact with all your collectibles in one place.
Advanced Settings
In advanced settings, you can:
- Add custom tokens
- Import wallets
- Connect Exodus to hardware devices or sync with the desktop app
- Bridge to external dApps via
Wallet Connectand more
Wallet Connect
For dApp integration, Exodus offers support via Wallet Connect and Web3.
In the Web3 section, add a connection to display a QR code for scanning. This lets you interact with DeFi platforms without leaving Exodus.
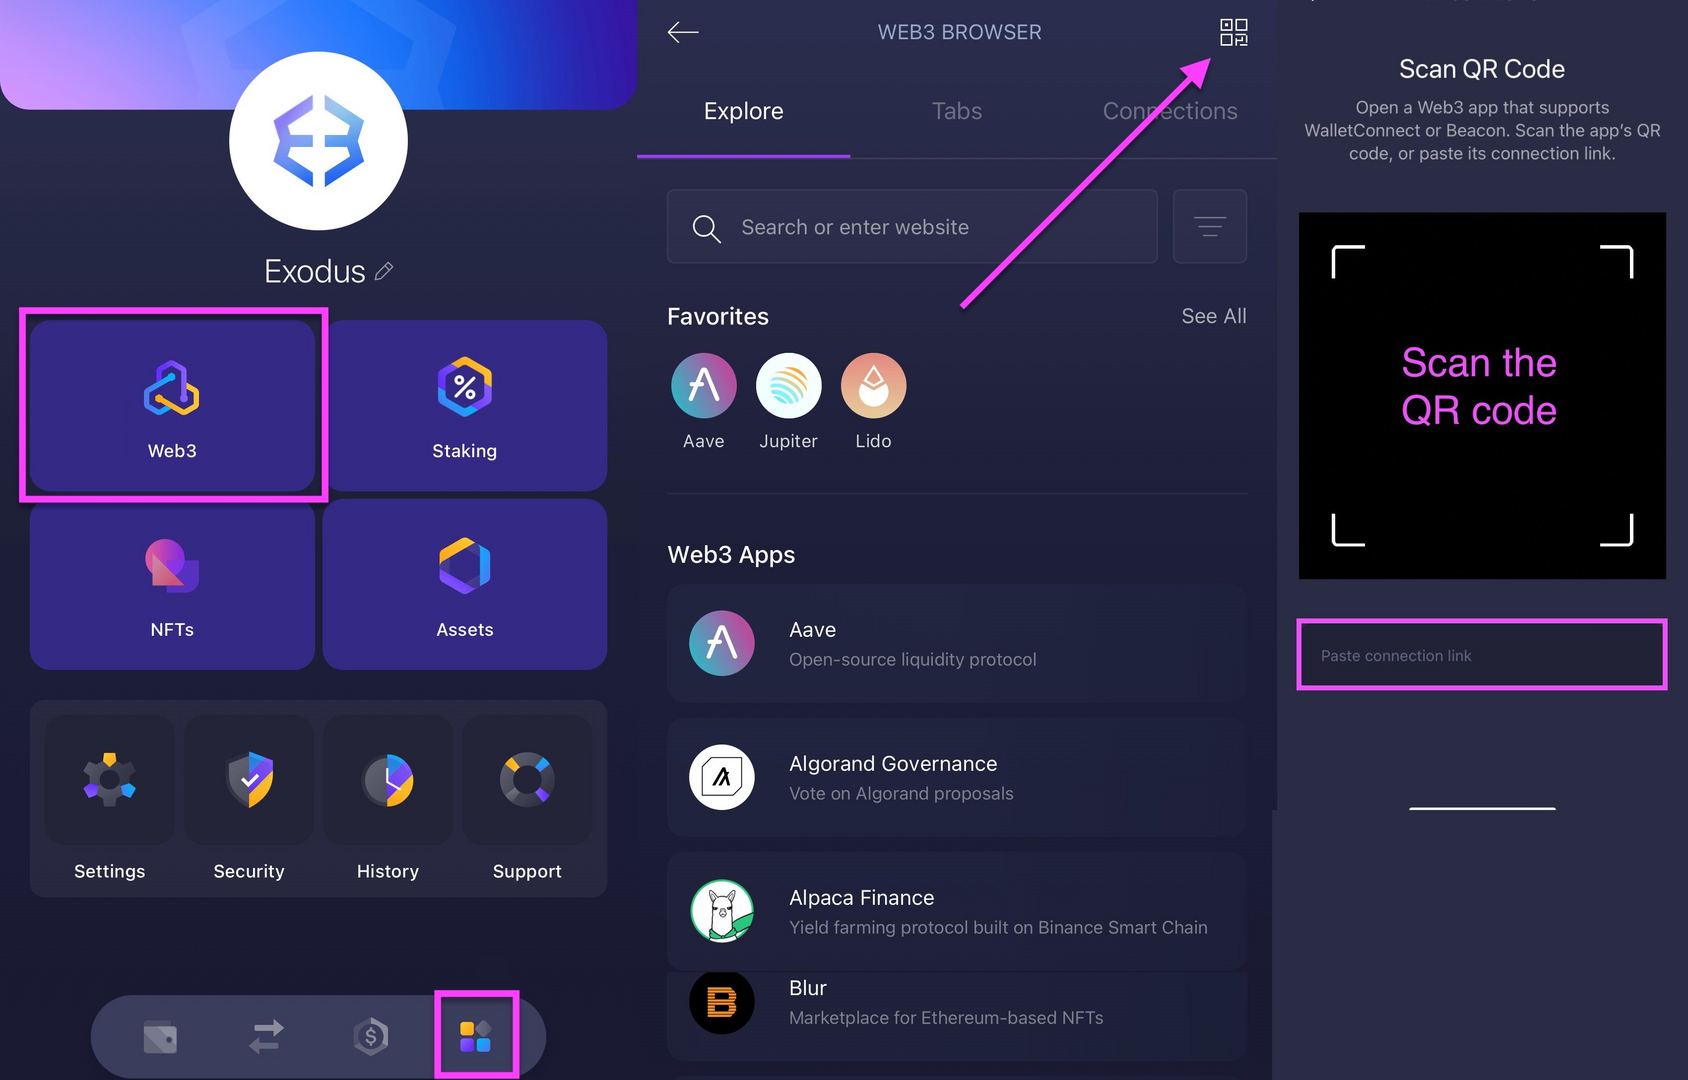
The Web3 feature provides a direct, decentralized link to DeFi apps, expanding the wallet’s capabilities.
Expert Options
Tap any coin for extra settings. For Bitcoin, you can import other wallets via private key or enable generating a new address for each receive.
Using new addresses for every receive enhances privacy, since all addresses link to one seed phrase, making it harder to trace your balances.

You can choose between Legacy for compatibility or SegWit for lower fees.
You can also obtain a Taproot Address for improved privacy, security, and potentially lower fees.
In Settings, manage notifications, sound alerts, display currency, networks, enable portfolio view, and export transaction history.
Adding Tokens
On the main portfolio screen, you’ll see all supported assets like Bitcoin, Ethereum, Solana, etc., with options to star favorites or reorder.
To customize your list, scroll to Add More and disable tokens you don’t use, such as Binance Coin.
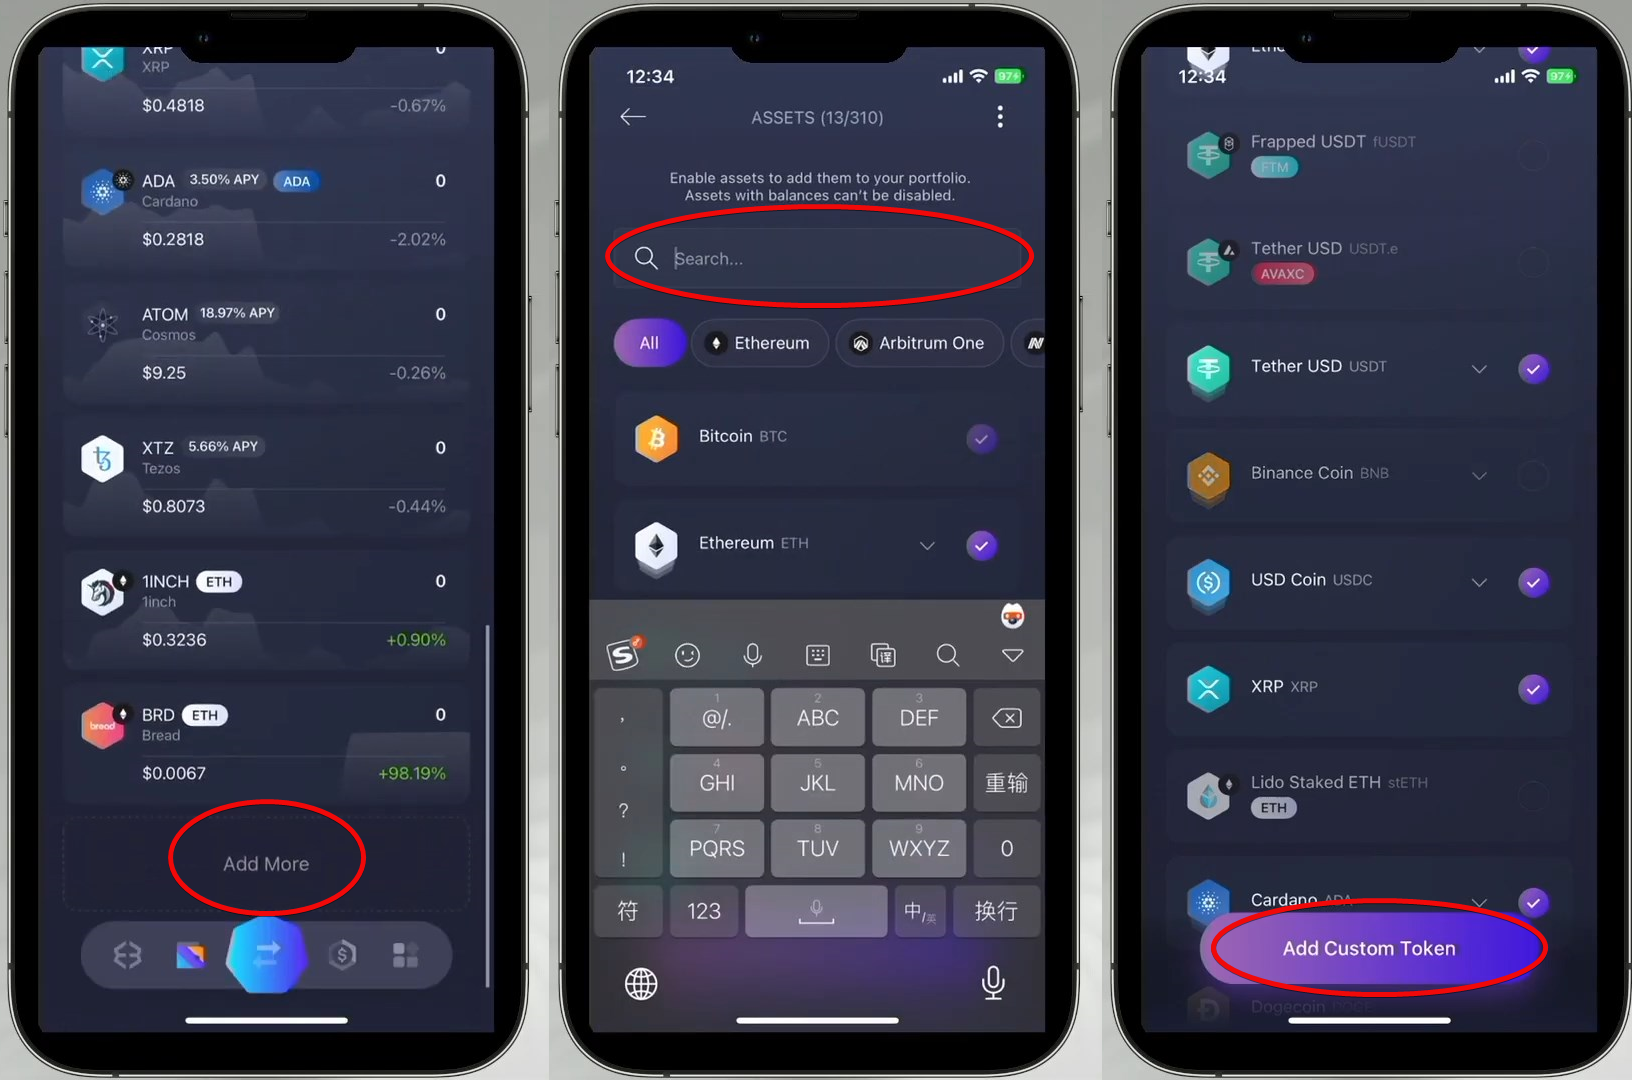
For multi‑chain tokens like Tether, choose your preferred network (Ethereum, Solana, Polygon, etc.).
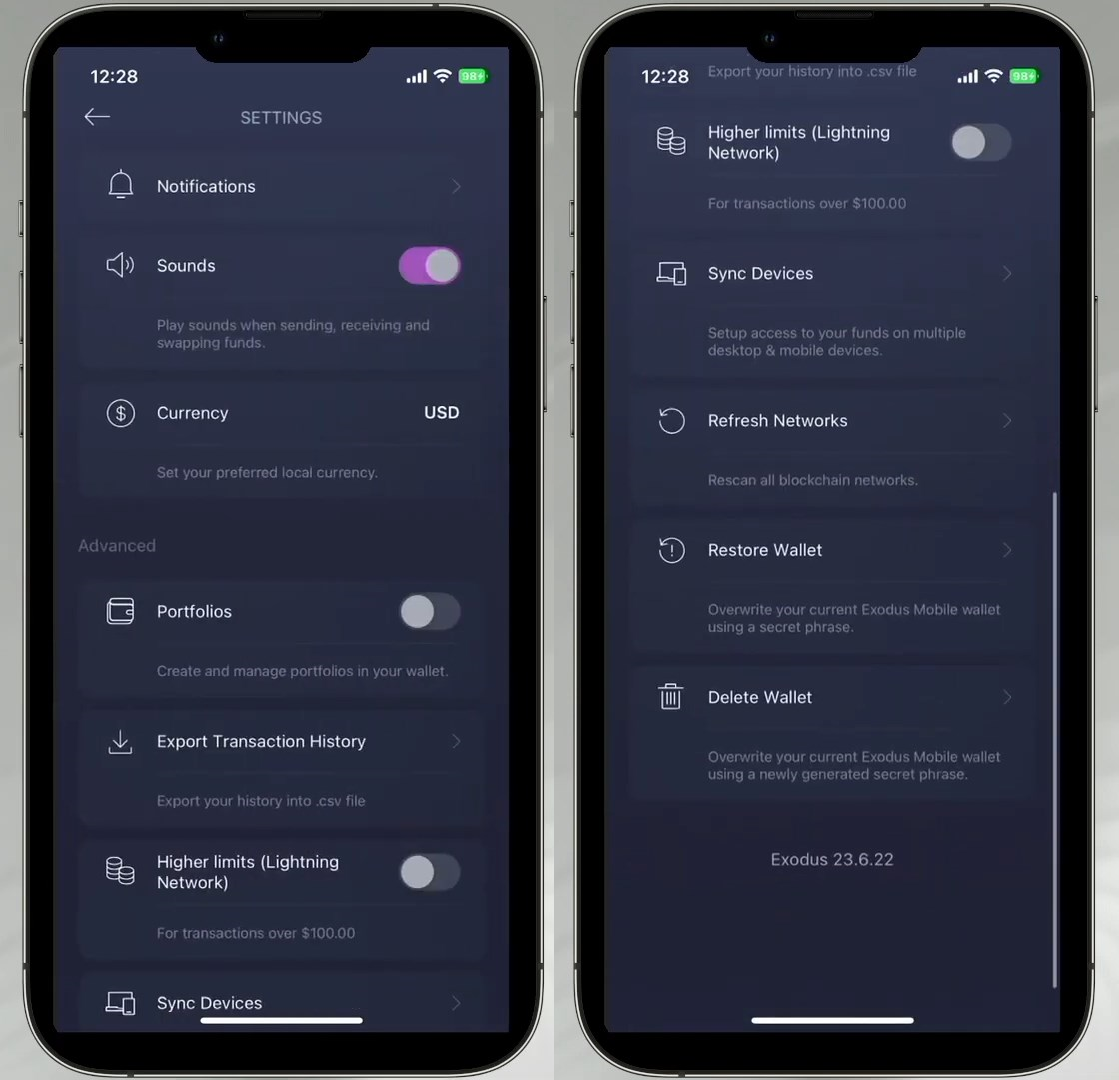
Import & Restore
Warning: back up your current wallet before restoring to avoid losing funds. Restoring will overwrite existing data.
To restore or import:
- Go to Apps (bottom right).
- Tap
Settingsin that section. - Scroll down to
Advanced. - Select
Restore Wallet(second from bottom).
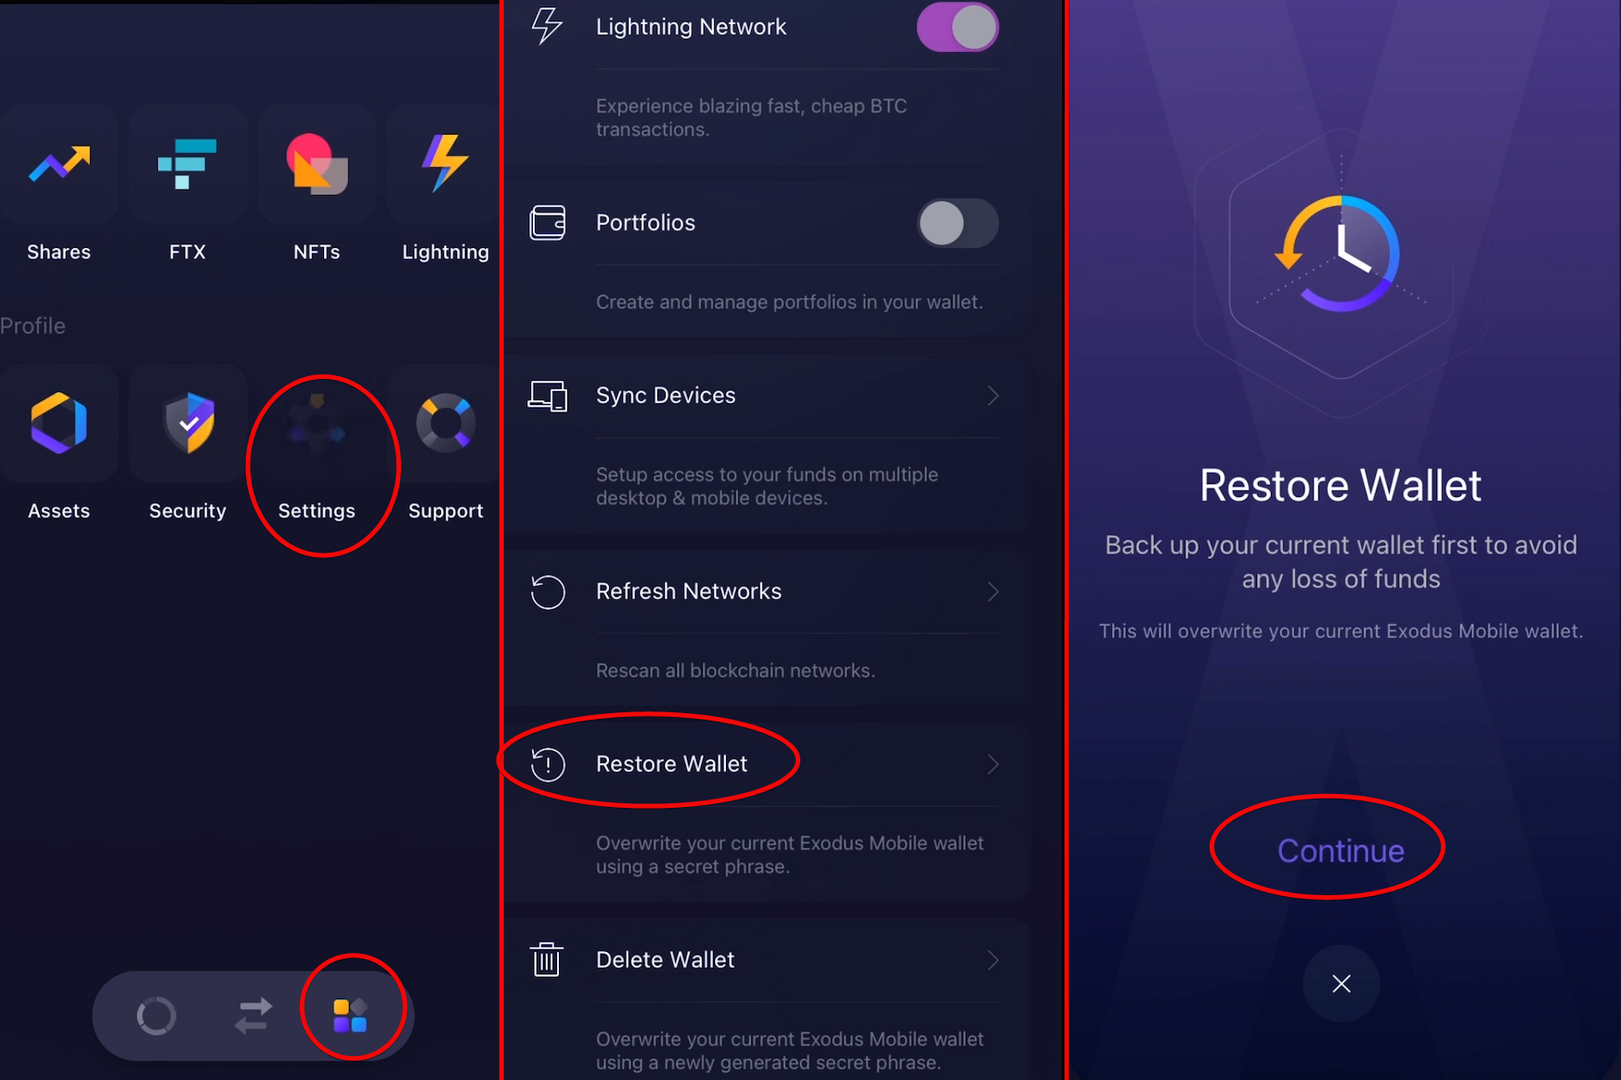
Enter your seed phrase. Once complete, the wallet opens and you regain access to your funds.
The Restore Wallet option also lets you replace the current wallet with another seed phrase, handy for managing multiple wallets.
To fully delete the wallet, use Delete Wallet, which resets the app but keeps previous seed phrases for future restores.
Hardware Wallet Integration
By connecting your Ledger, you get a separate portfolio managed on your device. You can view balances, send, swap, and stake while private keys stay on Ledger. Transactions are signed on the hardware.
Note: Exodus and Ledger use different seed lengths (12 vs. 24 words). Store them separately.
To connect your Ledger, go to Settings → Connect Ledger.
Ensure your Ledger is unlocked and Bluetooth is on. Keep it near your phone and tap Continue in Exodus.

Select your Ledger device from the list. On Ledger, open the app for your crypto (e.g., Bitcoin), then return to Exodus and tap Continue.
Exodus will list available Ledger accounts. Choose one to link. You can then switch between Exodus and Ledger portfolios within the app.
This integration combines cold storage security with the convenience of Exodus.
Sync with Desktop
To sync mobile with desktop, go to Settings, select Sync Devices, and choose the device (computer or another mobile) you want to pair with.
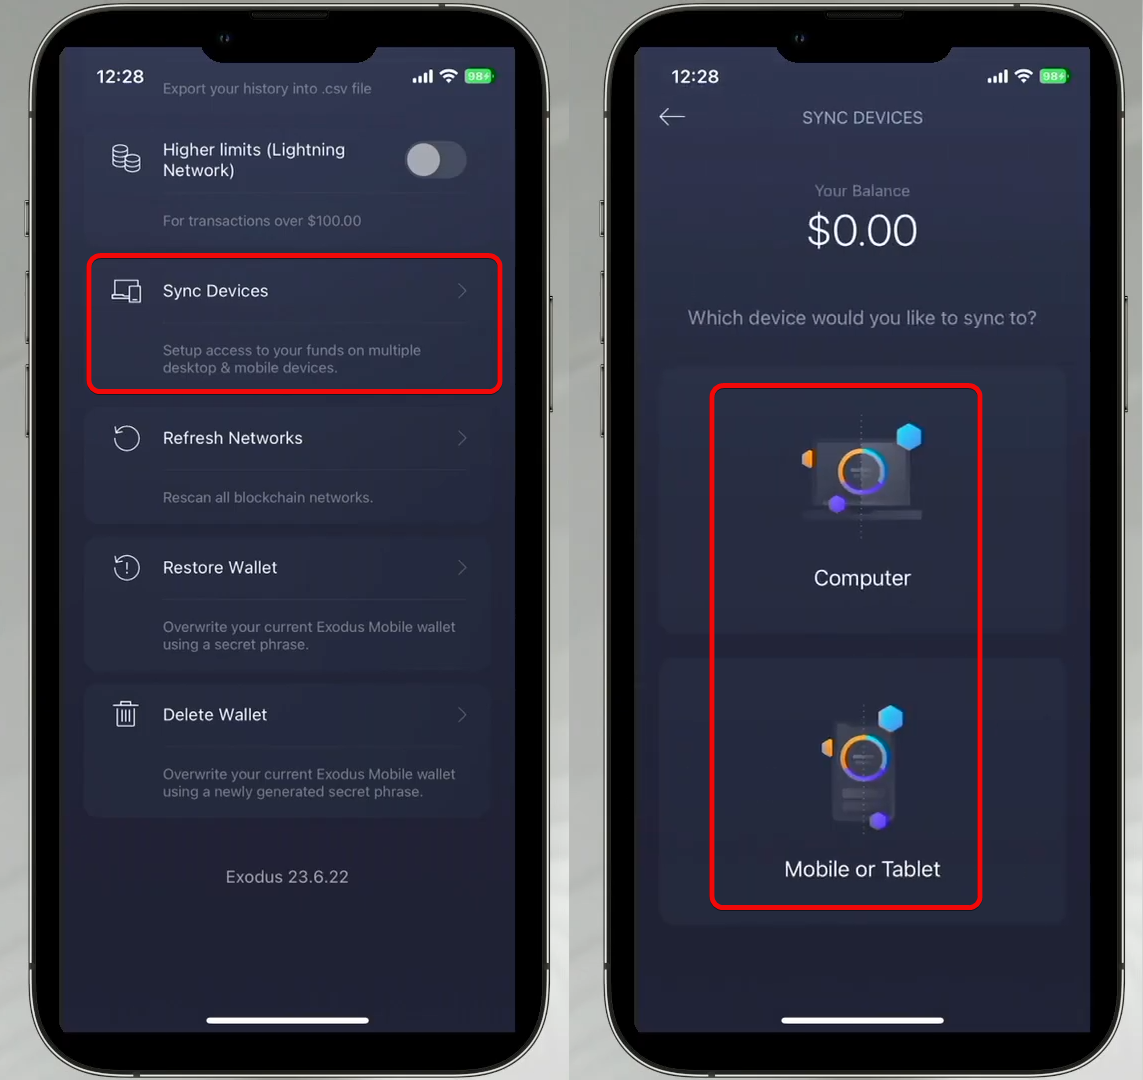
The process uses a QR code scan from the desktop app, importing existing wallets and seed phrases.
Conclusion, Critique, and Is It Worth It?
Overall, Exodus offers user-friendly Web3 connectivity, portfolio management, staking, NFTs, and more. However, higher in-app swap and purchase fees detract from its value.
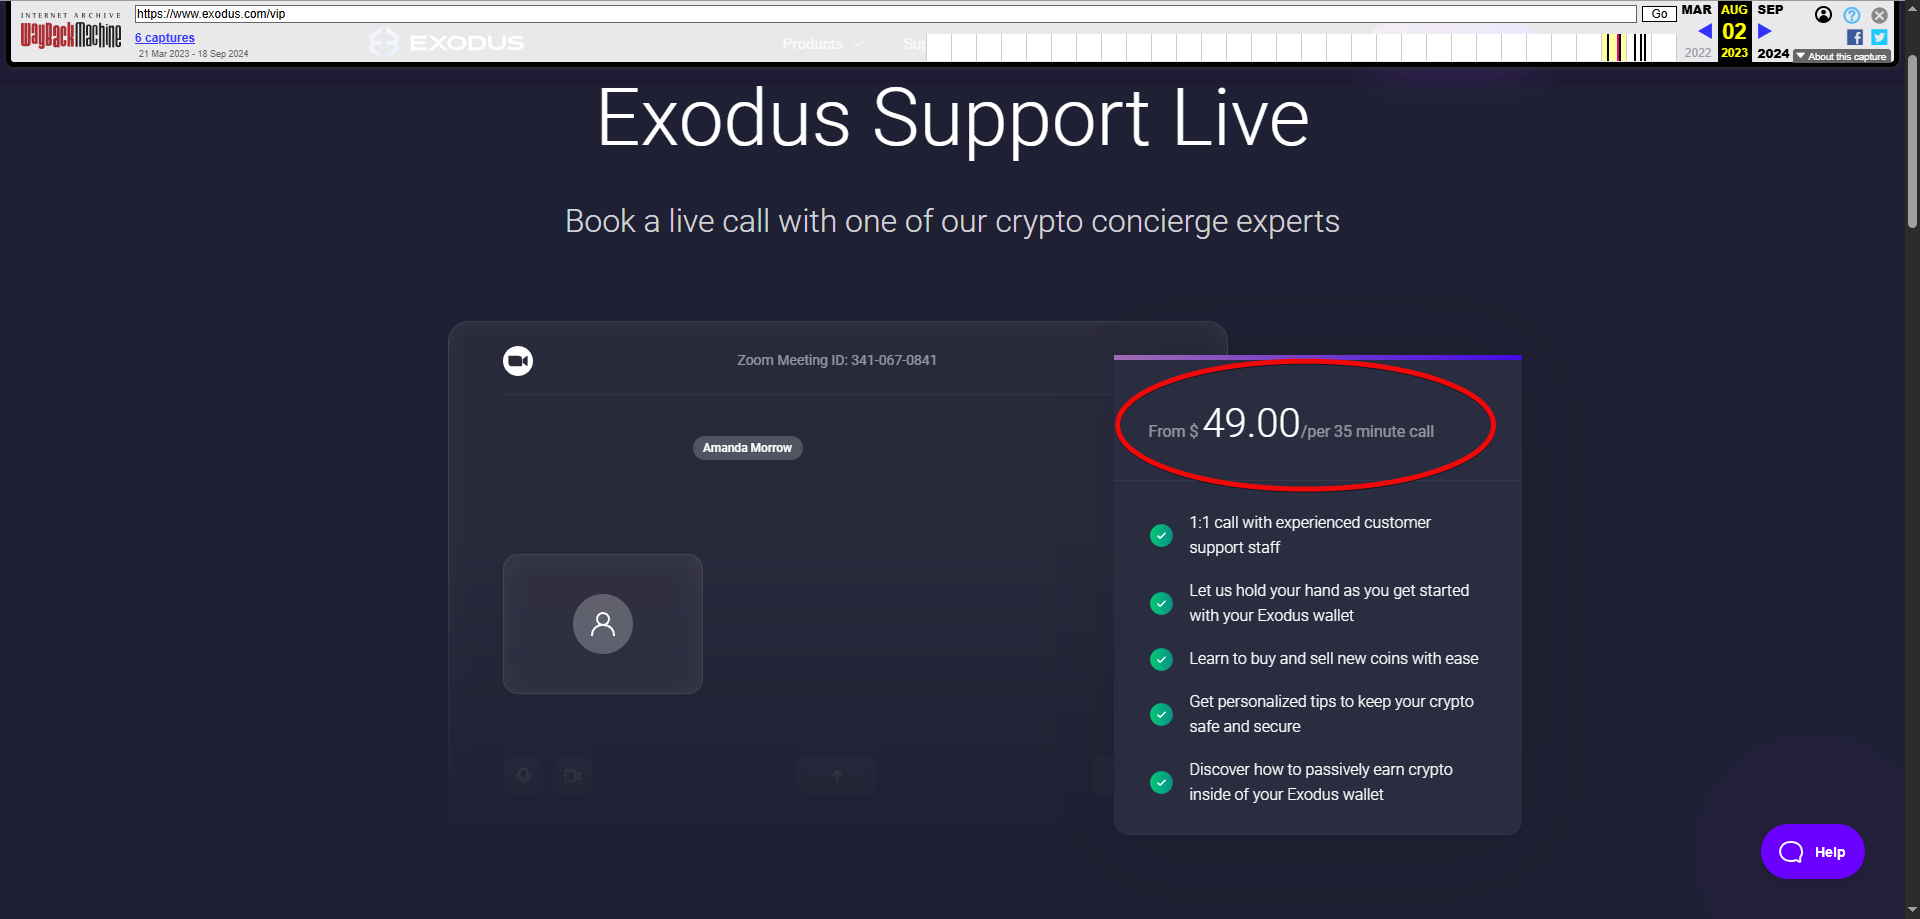
Critique.
Previously, support calls cost $50 for 35 minutes. That fee was later removed, showing that the team listens to users.
Exodus has a 4.1/5 rating on Trustpilot, based on 4,052 reviews. Users praise responsive support for seed‑phrase recovery and software issues.
In summary, Exodus is simple yet feature‑rich. It could benefit from view‑only addresses and lower in‑app fees.
Exodus Movement has announced the acquisition of W3C Corp for $175 million to launch its own crypto cards and expand into the U.S., UK, and EU markets.
The wallet is compatible with Trezor and Ledger hardware devices, offers 24/7 customer support, lets you buy crypto via Apple Pay or debit card (through Ramp Network), and includes a built-in Web3 browser and an NFT gallery.
For MATIC staking, rewards are claimed manually, while for SOL, they are automatically reinvested.
Whether to use Exodus or choose another from our rankings is up to you.
Feel free to ask questions or leave comments—we’ll respond to everyone!
Support:


