A Comprehensive Guide to the Coinbase Extension and App: Security and Comparison with Alternatives
It works fast, has a fullscreen mode, and is backed by a trusted brand.
Do you want your crypto to generate income rather than risks? Discover how Coinbase Wallet will protect your assets, save you up to 95% in fees on L2 networks, and provide access to Web3: DeFi, NFTs, and staking.
Coinbase Wallet is a multi-currency Web3 wallet for self-custody of keys, developed by the Coinbase cryptocurrency exchange. It offers you features such as: buying crypto via bank cards, swapping, bridges, NFTs, and dApps.
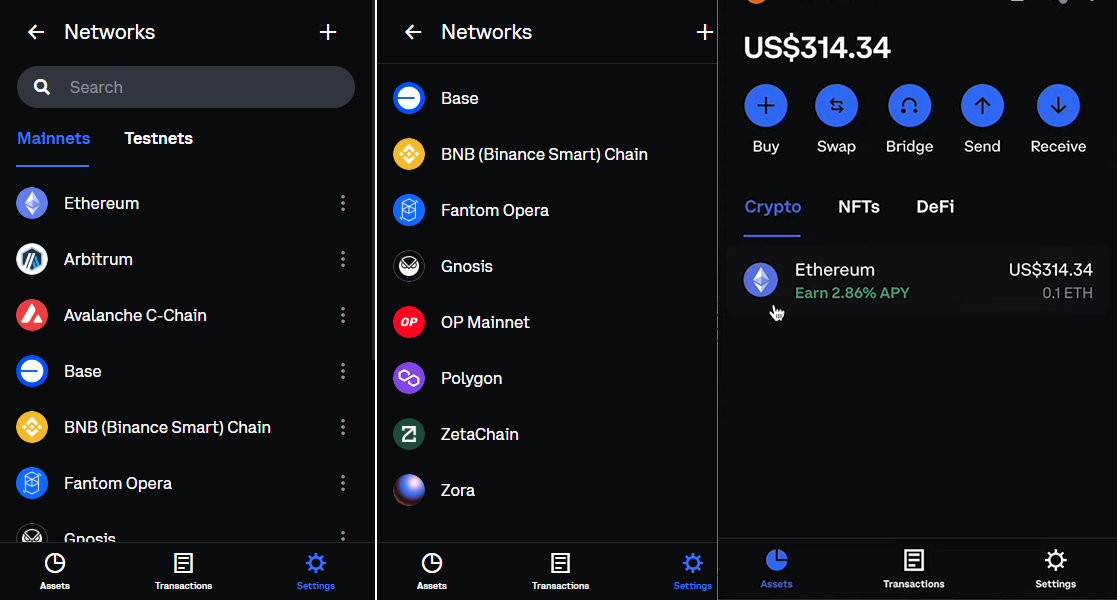
- Ethereum
- Arbitrum
- Avalanche C-Chain
- Base
- BNB (Binance Smart) Chain
- Fantom Opera
- Gnosis
- OP Mainnet
- Polygon
- ZetaChain
- Zora
Bitcoin, Solana, Dogecoin, and Litecoin are also supported. Although the number of networks is not as many as in other wallets, all the major ones are included.
Coinbase also operates an exchange. Let’s examine the differences.
|
Feature |
Coinbase Exchange |
Coinbase Wallet |
|
Main Purpose |
Buying, selling, and trading cryptocurrencies |
Interacting with decentralized applications (dApps) on various blockchains |
|
Type |
Centralized – the exchange holds the keys |
Decentralized – you hold your own keys |
|
Security Features |
Internal exchange security measures (plus 2FA) |
View connected dApps |
The wallet’s keys and login credentials are completely separate from the Coinbase.com exchange. Recovery is performed solely using the 12‑word seed phrase; losing it makes access impossible, even when contacting support. However, you can connect your exchange account through the wallet. But let’s begin the breakdown by examining the core functions and security.
Security and Features
To enhance security, the wallet offers integration with hardware devices, Face ID, PIN codes, or biometric authentication for transactions. In addition, it includes the following modules:
Security:
Smart contract approval monitoring – dApps often request unlimited access to tokens, which can allow malicious smart contracts to steal all available funds. The wallet addresses this by automatically revoking dApp permissions when the app is closed.
Transaction previews – you can see how many coins and fees will be deducted before the transaction is broadcasted to the network. This protects you from fraudulent deals.
Self-custody of keys – manage your wallet independently, without the exchange.
Besides security, economic features are also crucial for a crypto wallet.
Economics:
Free usernames – to simplify receiving funds, use free ENS username.cb.id provided by the wallet. For example, instead of the long address 0x… use username.
DApp Browser – allows you to explore Web3 tools: staking, NFTs, DEX exchanges, cross-chain swaps, and more.
Layer 2 networks and sidechains – L2 networks are used to save on fees, where the gas fee can be around 90–95% lower than on the Ethereum mainnet.
In addition, the wallet offers you several extra features.
Additional Features:
- Link your wallet to the Coinbase exchange – convenient if you trade on the exchange.
- Versatility – access your wallet via a browser extension, mobile app, or web version.
- Coinbase Onramp payment system – offers operations in your local currency, such as USD.
We have reviewed the main features and security, and now it’s time to test them in practice. Let’s install the wallet.
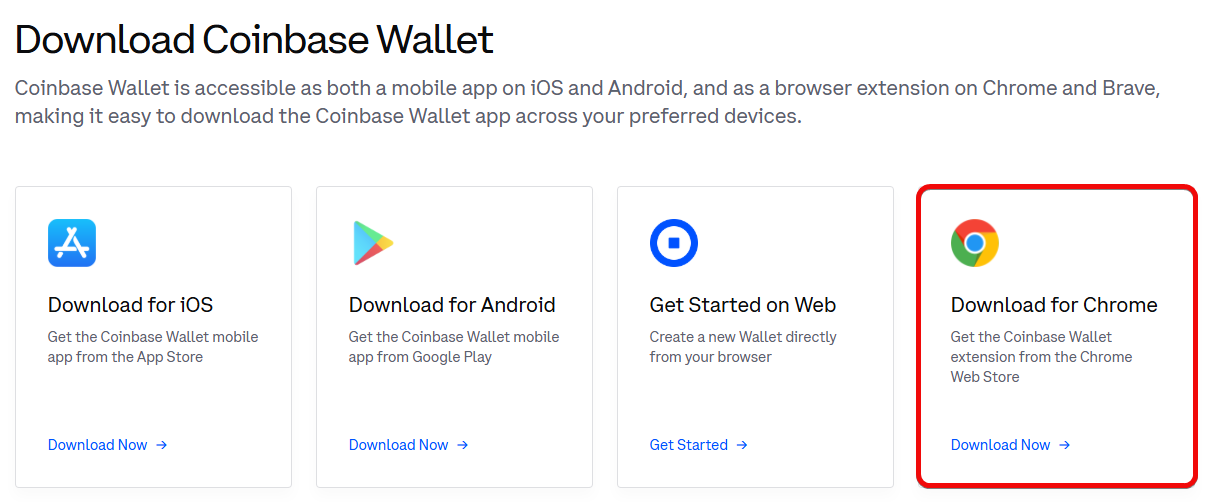
Download and Installation
The wallet is available on mobile devices, PCs, and in browsers. For convenience, we recommend the Chrome extension for its seamless Web3 interaction.
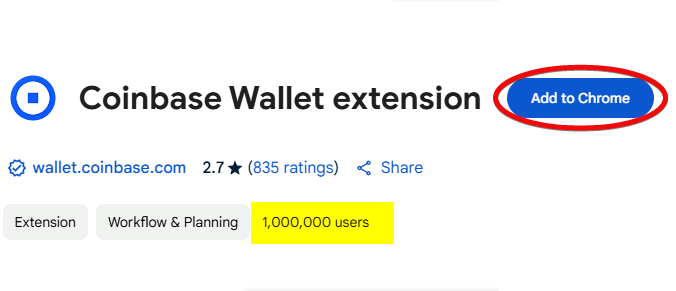
Add the extension from the Chrome Web Store, making sure to check the number of installs to avoid downloading a fake version.
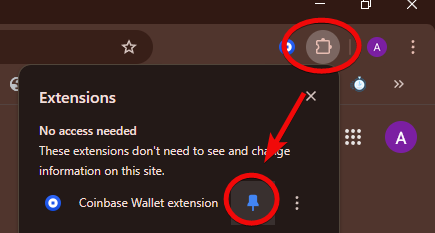
After installation, pin the extension to your toolbar for quick access.
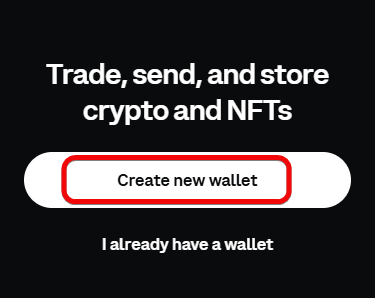
Creating a New Wallet
You can create a new wallet or import an existing one (for example, from MetaMask) by entering your private key or seed phrase. We will create a new wallet. Click on Create New Wallet.
When creating a wallet, you will receive a 12-word seed phrase – the key to recovering access. Now is the time to grab a pen and paper and back it up.
Backup
Creating a backup means writing down the recovery phrase on multiple sheets of paper. It is advisable to laminate them so they don’t deteriorate over time and store them in a secure location.
Coinbase will display the seed phrase and will want to verify that you have recorded it correctly. To do this, you need to select the first and last word from the phrase and click Submit.
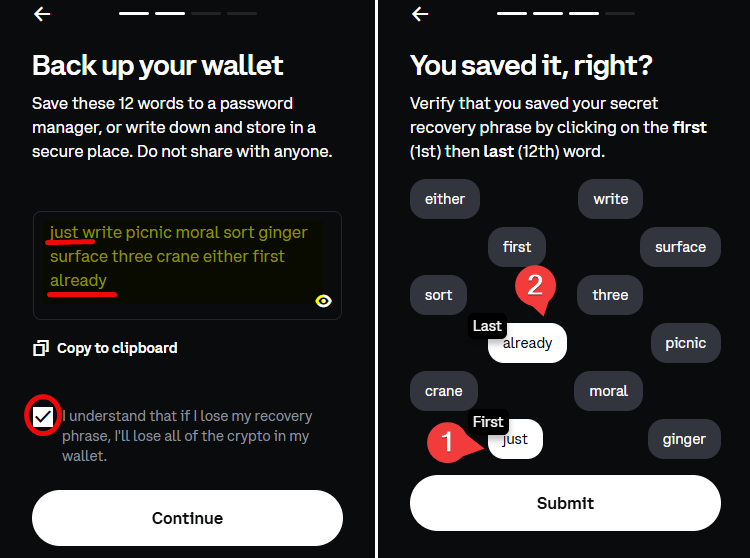
Note: the seed phrase is shown here only for demonstration purposes. Never share your seed phrase with anyone!
Now, set a strong password for accessing the extension.
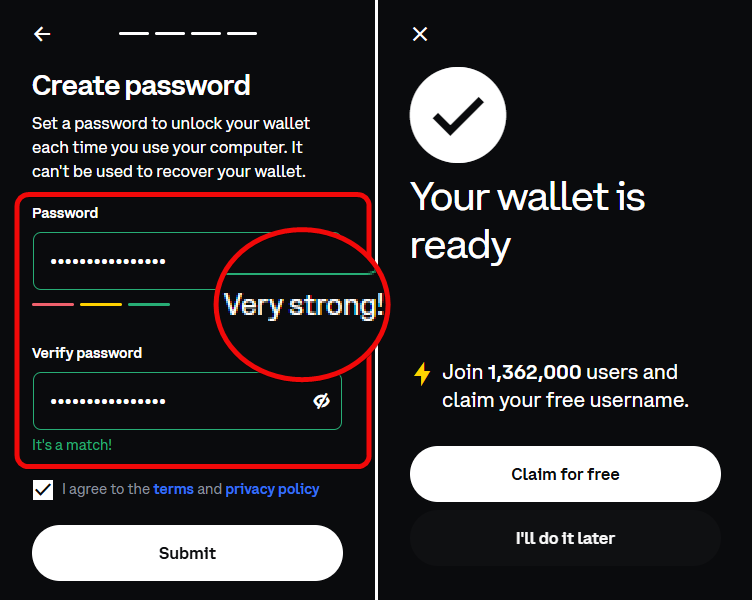
Your wallet is nearly ready. You can start using it immediately, or choose a free username for your wallet.
Why do this? A username allows others to send you funds using the username instead of your ETH wallet address. For example, using maximanisimov.cb.id instead of 0x8gd…
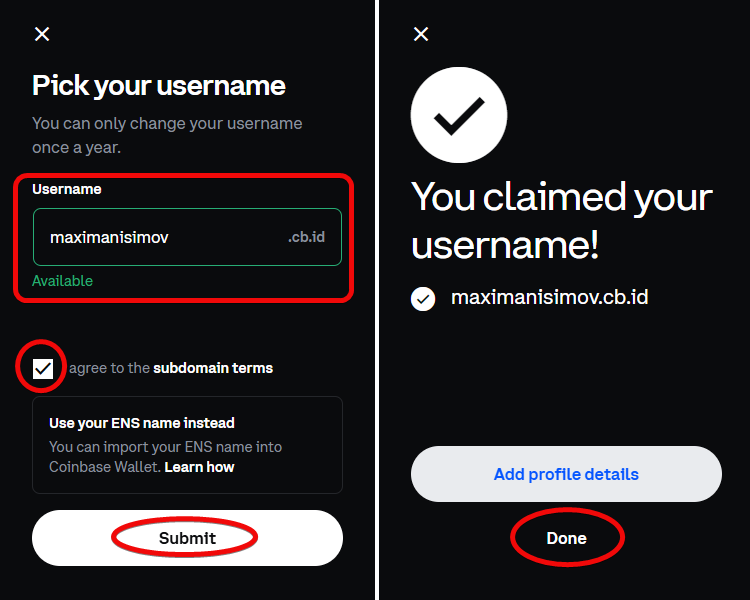
You can decide later whether or not to use ENS names. We’ll opt for the free username.
How to Use It
Within the wallet, you can purchase crypto via Coinbase Pay, transfer funds from other wallets, swap tokens using the built-in DEX, or use bridges to move assets across networks.
Additionally, you can build a portfolio of cryptocurrencies, NFTs, and even engage in DeFi activities like staking.
Let’s begin by obtaining addresses – the foundation of using the wallet.
How to Create an Address
To generate an address:
- Click the
Receivebutton - Select a cryptocurrency from the list
- Click on it to obtain the address or QR code.
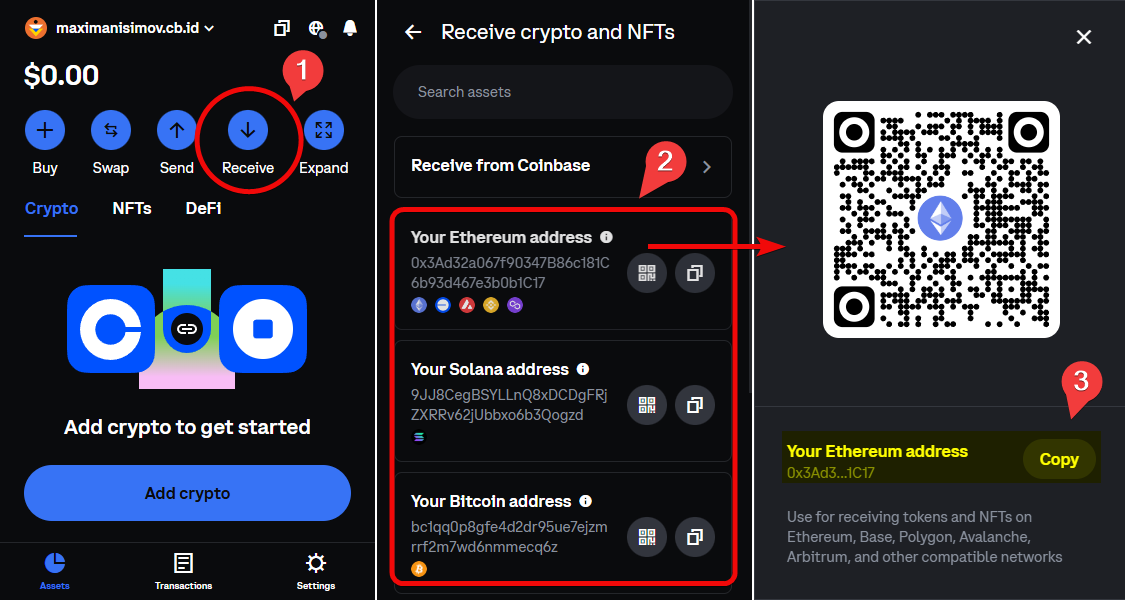
This tab contains addresses for all supported blockchains.
With these addresses, you can fund your wallet with various coins.
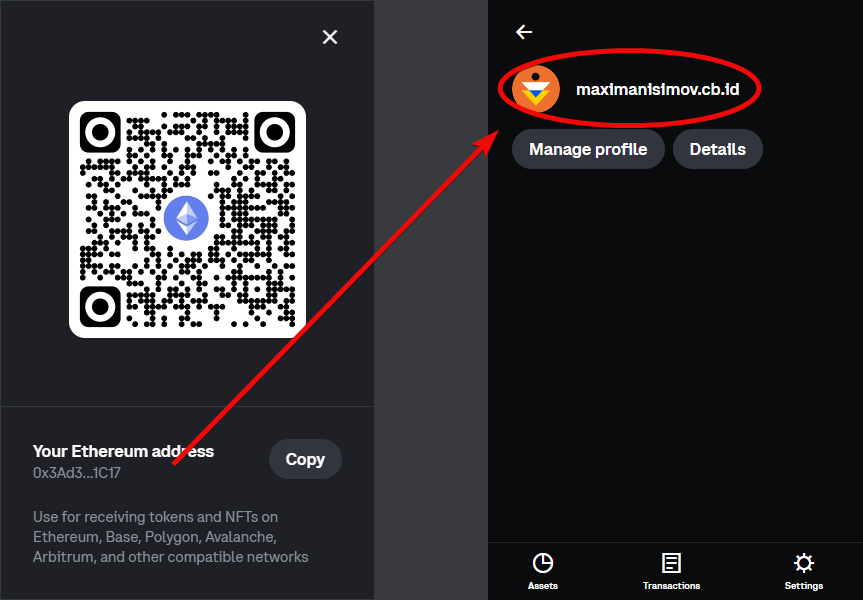
How to Fund
To receive funds, copy your address or share your username if you set one up.
Note: always double-check the address before sending funds.
Let’s transfer ETH from MetaMask. Paste the address, specify the amount, and adjust the fee:
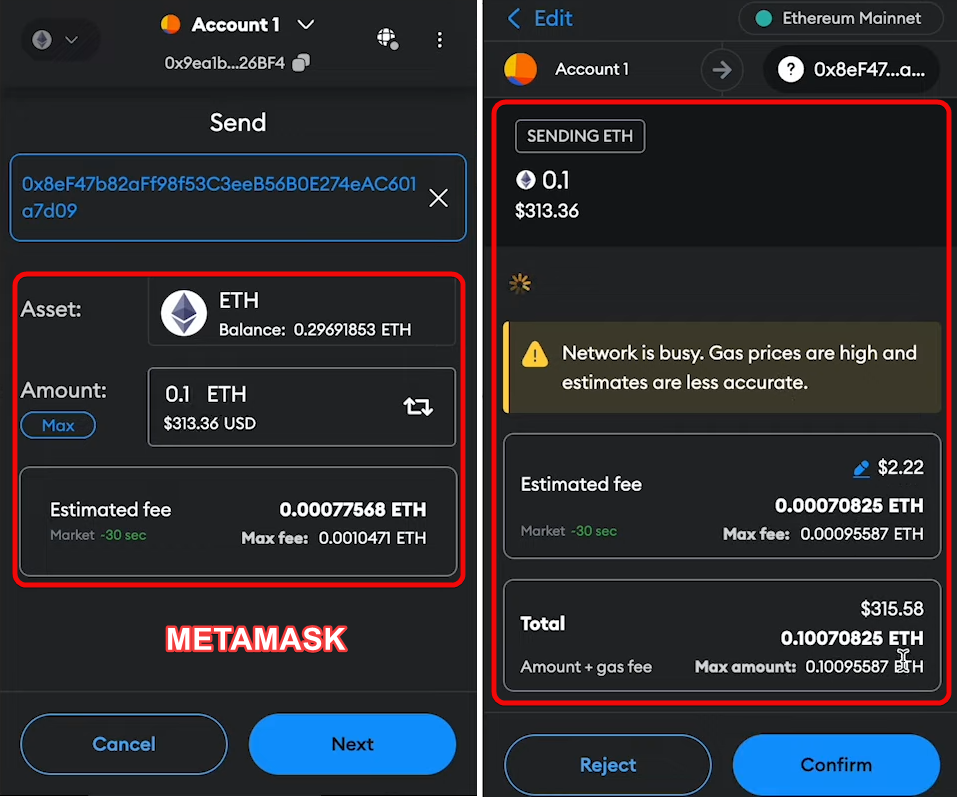
After confirmation, the transaction will appear in your Coinbase Wallet.
Swap
After funding your wallet, you can use the Swap feature to exchange Ethereum for another token, for example, the stablecoin USDT.
Let’s examine the cost-effectiveness of the swap.
- Coinbase Wallet Fee – $1.
- ETH Network Fee – approximately from $4.20 to $8.47
- Slippage Tolerance – 3%: this is the acceptable range of price fluctuation. For example, if the ETH/USDT price changes sharply during the swap, you might receive slightly less (or more, if lucky) USDT by up to 3%. You can adjust this by clicking on the gear icon.
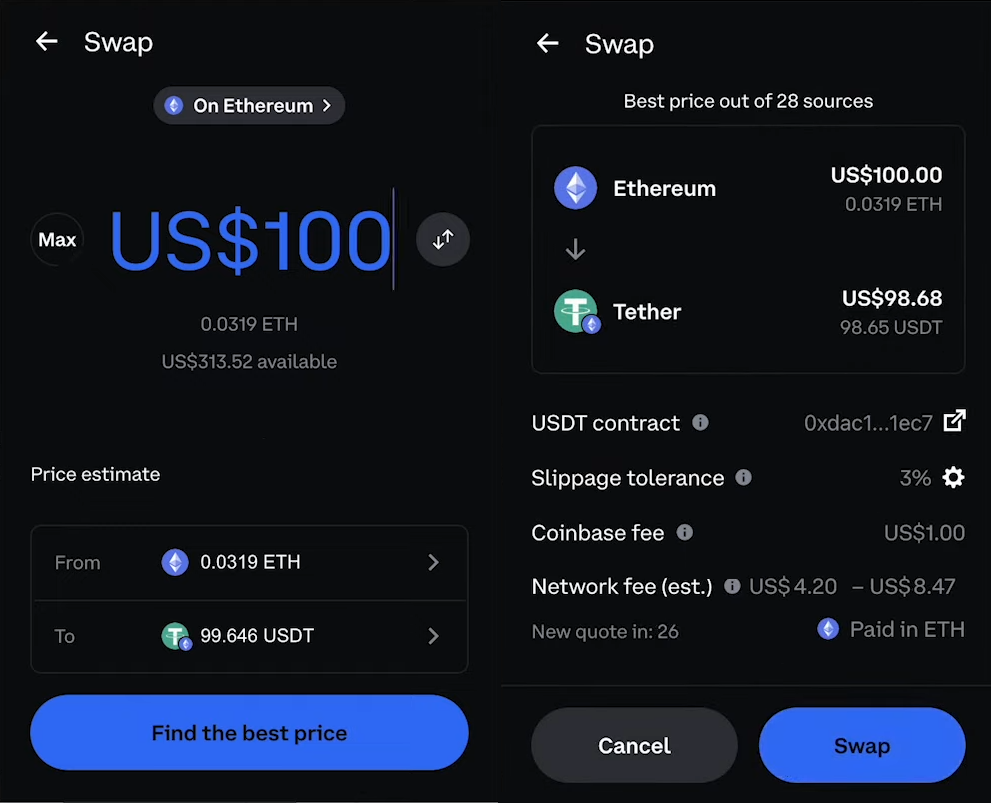
Is it cost-effective? No, in the short term the swap doesn’t yield profit. You spend around $106.00 worth of ETH (including an average network fee of $6.00) and receive USDT worth $98.65. This results in a net loss of approximately $7.35.
However, swapping within the wallet makes sense if you need to quickly acquire USDT, as many staking platforms, farming services, and other DeFi projects operate with USDT.
The swap interface allows you to search for the best price among 28 sources; perhaps the rate will become more favorable later.
Swapping within the wallet is not the only option. You can always connect to dApps and look for better rates there.
Connecting to dApps
dApps serve various purposes: exchanges, NFTs, staking, farming, and much more.
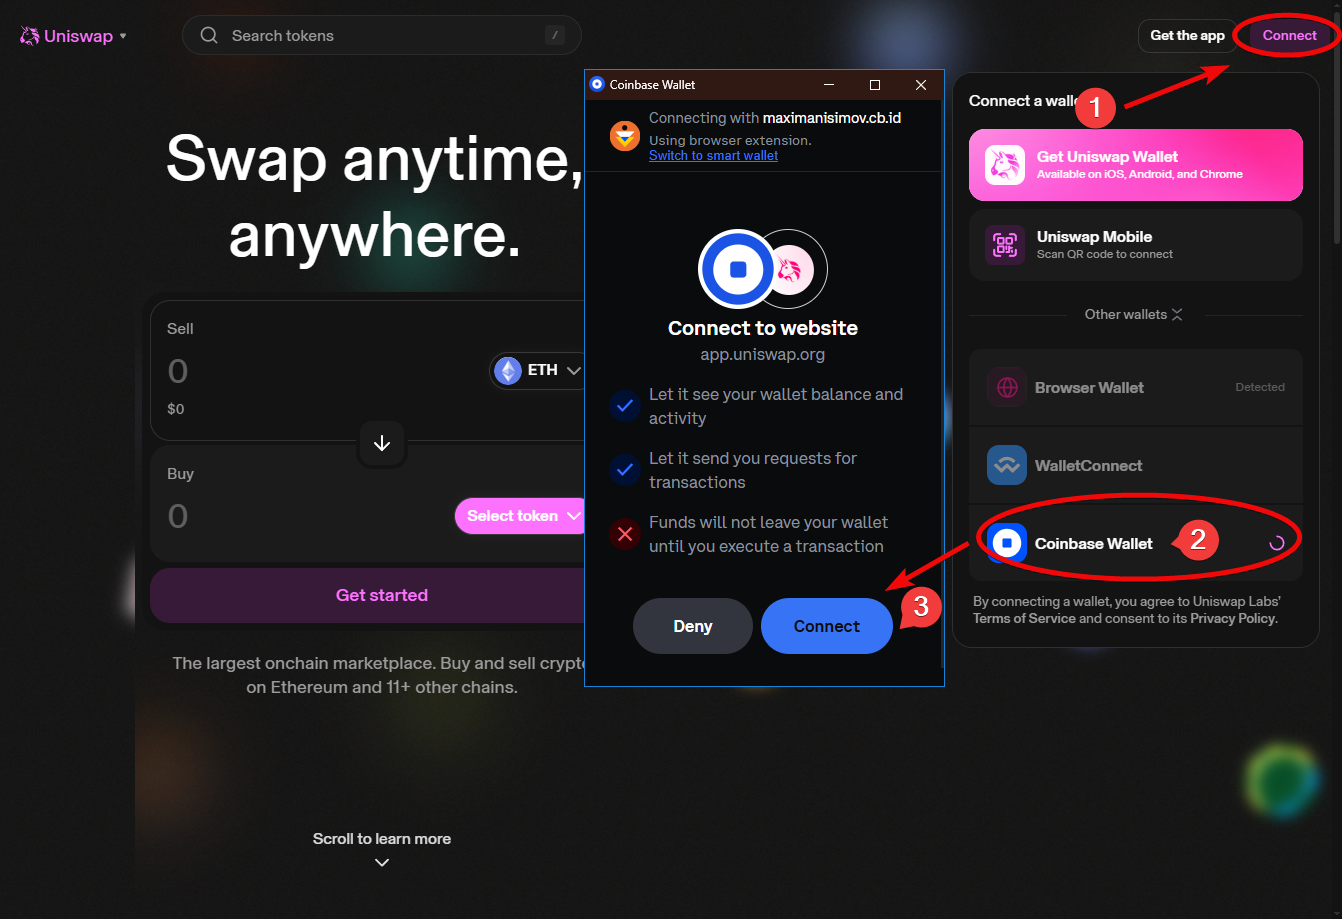
To connect your wallet to a dApp, visit the dApp’s website and look for the Connect button, typically located in the top right corner.
For instance, one popular option is the token exchange platform – Uniswap.
- Click
Connectin the upper right corner of the site. - Select
Coinbase Walletfrom the available options. - Click
Connectin the wallet pop-up.
Within the wallet, you will see the network selection and connection status.
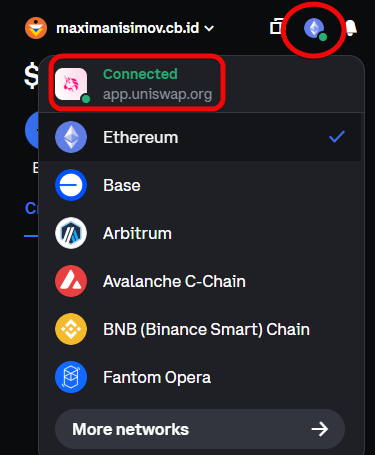
Once connected, you’ll see your wallet address in the dApp, available funds, and portfolio, as well as the option to choose a network for trading.
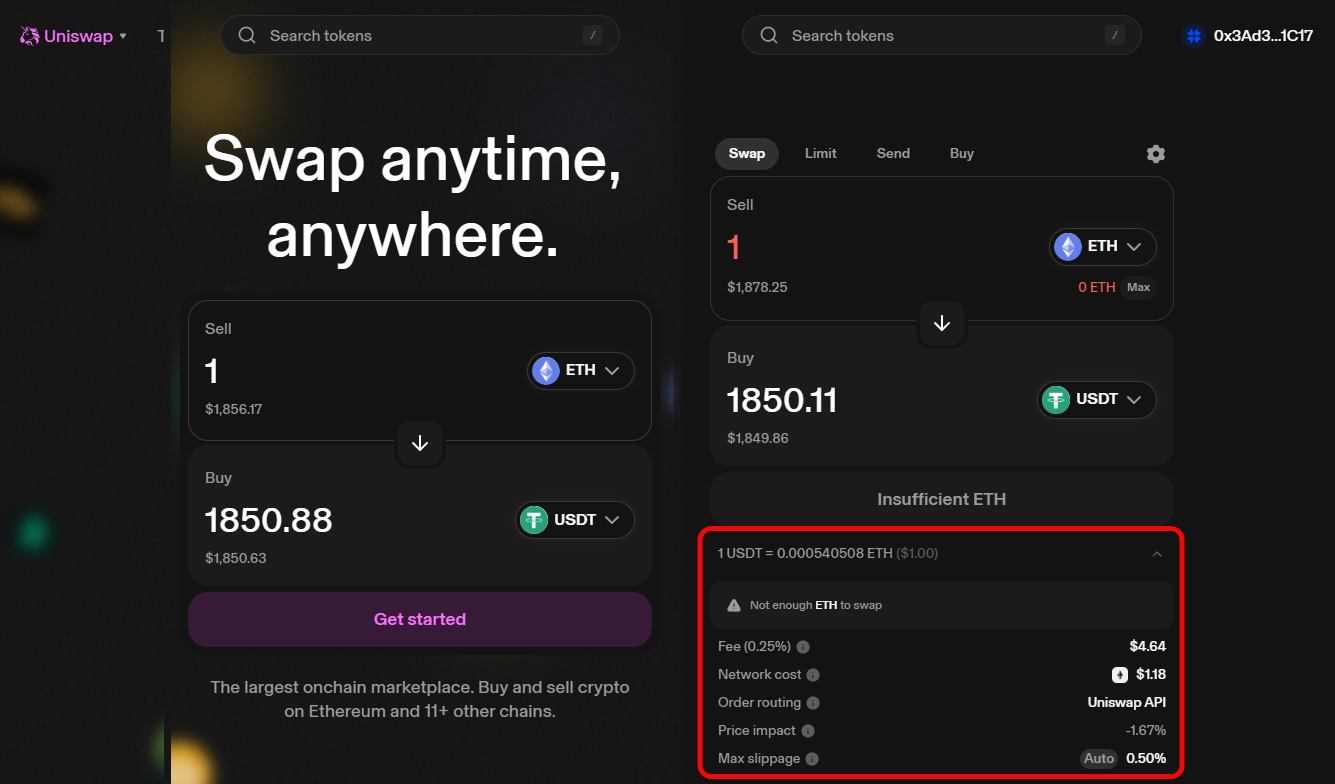
Uniswap provides access to thousands of tokens or allows you to search for them by contract address.
Here, the fee is lower than swapping in the wallet – 0.25%. This is just one of countless examples of using dApps.
If you click Expand in the extension, the full-screen web version of the wallet will open.
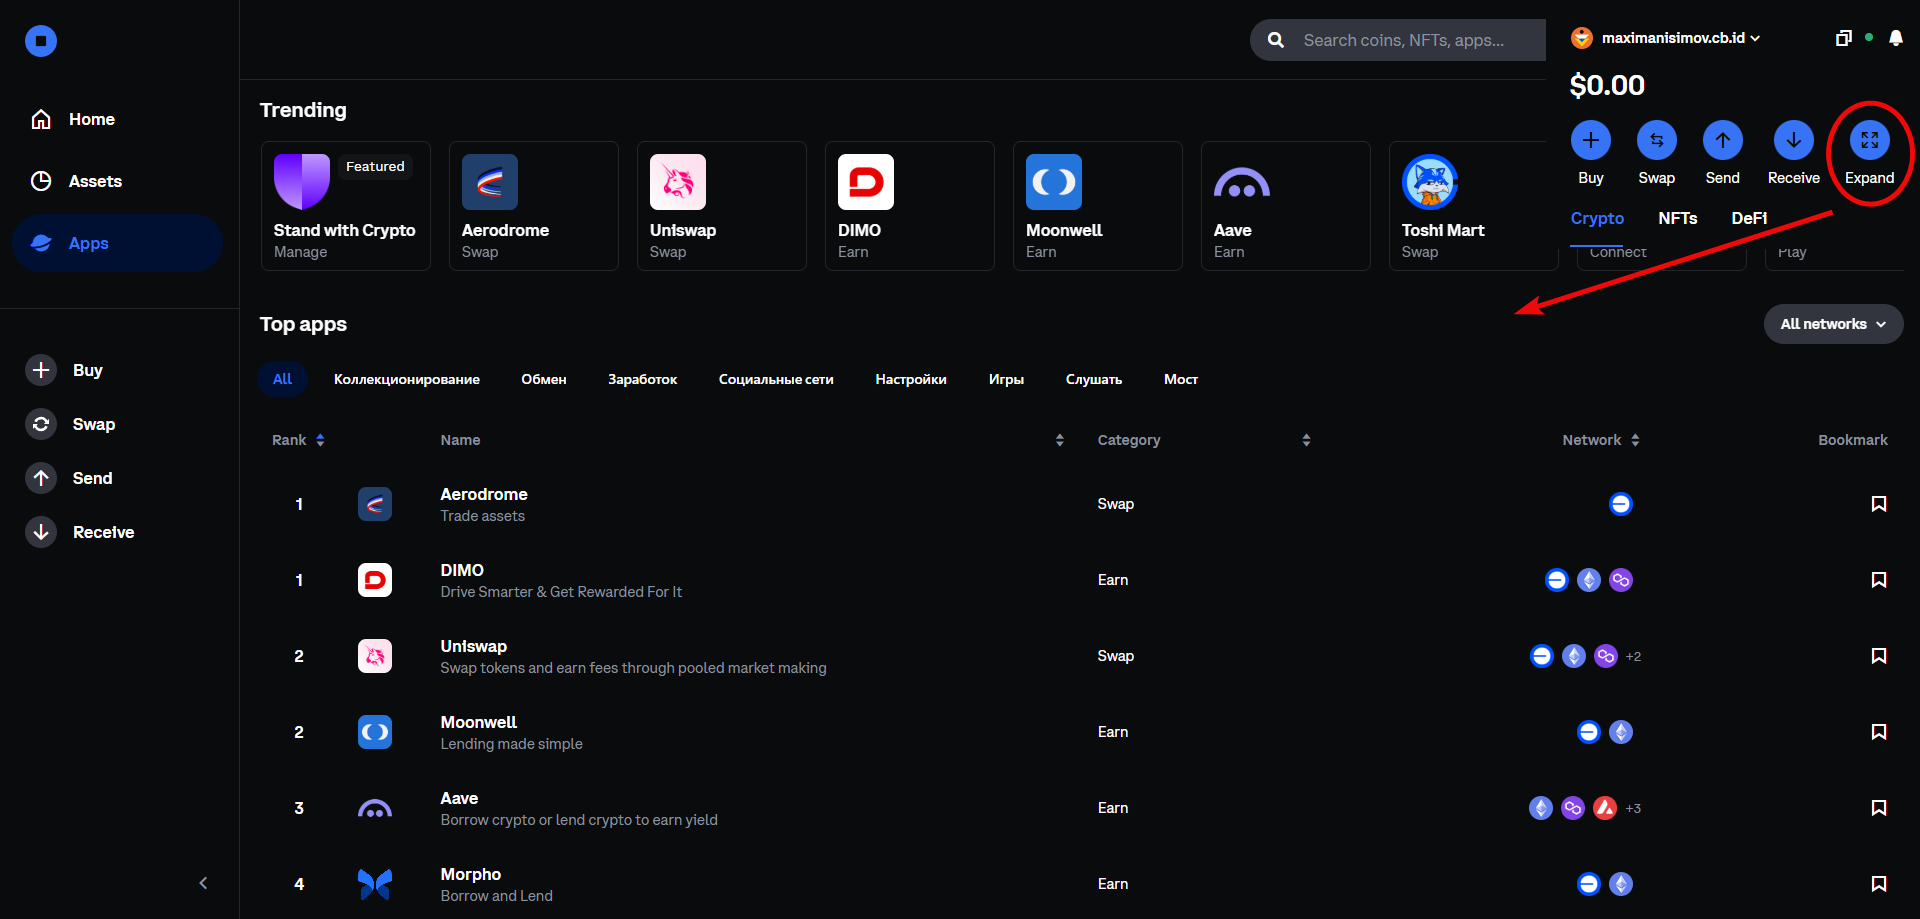
This version presents many more dApps and additional functionalities. For example, NFT features.
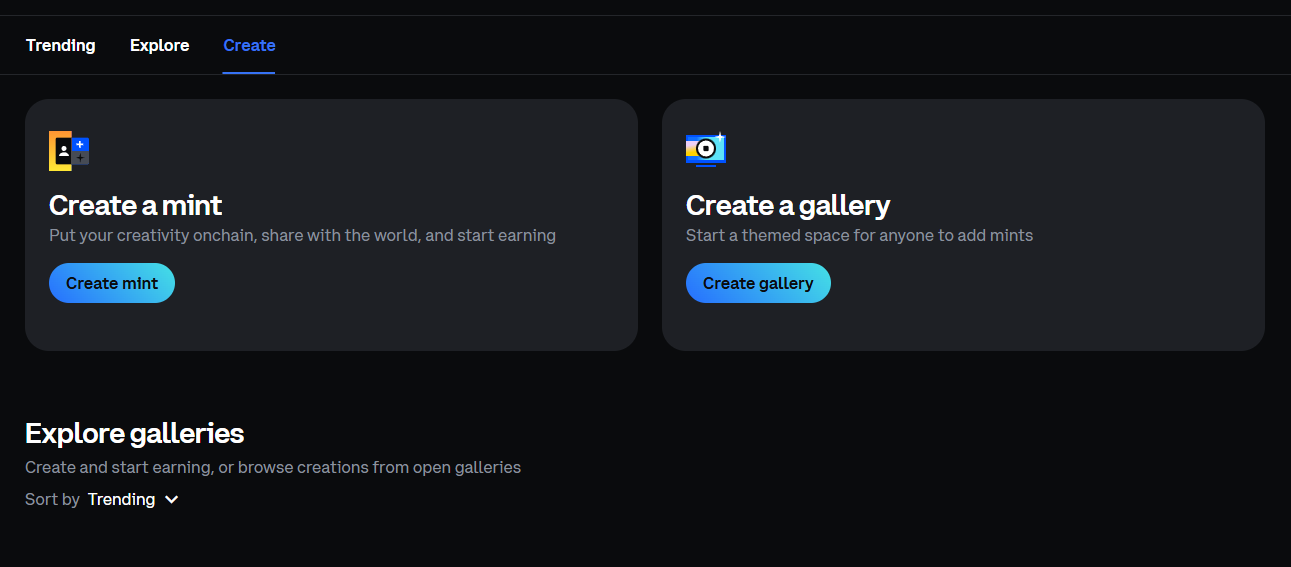
NFTs
The wallet offers tools for creating, storing, and showcasing NFTs.
Create a mint – issue a unique token that establishes your authorship of digital content and provides an opportunity to earn if buyers are found.
Create a gallery – host an exhibition and sell your works, while the Explore galleries section helps you discover other collections, assess the market, and spot promising projects.
All this can be profitable if you can create or choose in-demand digital assets and are willing to take risks.
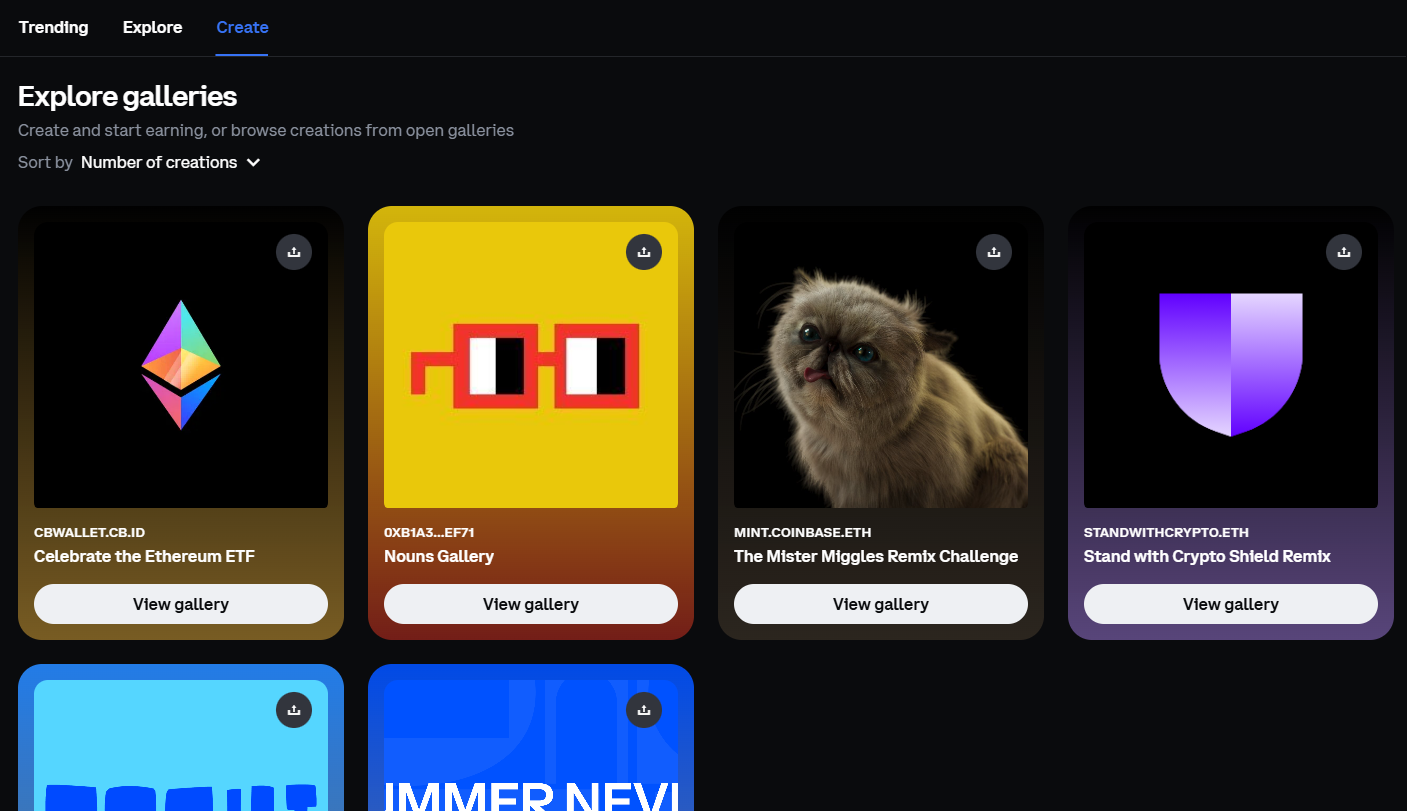
The NFT market is volatile, and profits are not guaranteed. However, if things go well, you gain new ways of monetization, proof of authorship, potential royalties from resales, and the opportunity to make your mark in the NFT community.
You can learn how to create your own NFTs that might capture the world's interest in the Tonkeeper NFT article. Although that’s another wallet, the principle remains the same.
How to Withdraw
To withdraw funds, go to the Send tab.
- Enter the amount and currency, then click
Next. - Paste the recipient’s address
- Review the details and click
Send.
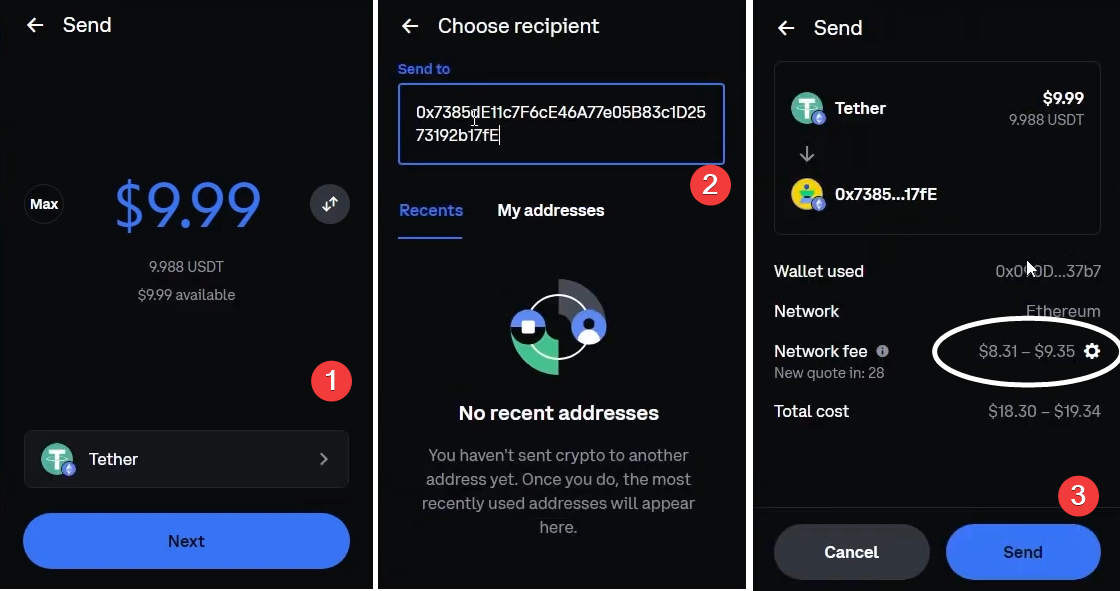
There is also a gear icon for adjusting fee settings.
To withdraw funds to a card, first transfer them to an exchange that supports direct peer-to-peer (P2P) swaps – for example, Bybit or Binance P2P. Then swap the funds to one of the supported cryptocurrencies, such as USDT, BTC, ETH, or USDC.
Next, complete verification on the exchange by uploading one of the required documents – a passport, driver’s license, residency permit, or ID card. After that, you can make the swap, choosing your bank and the conditions.
The wallet also supports cancelling and accelerating transactions. Cancellation works only if the transaction hasn’t been broadcast to the network yet. To speed up a transaction, click on it and choose the button with the blue lightning bolt.
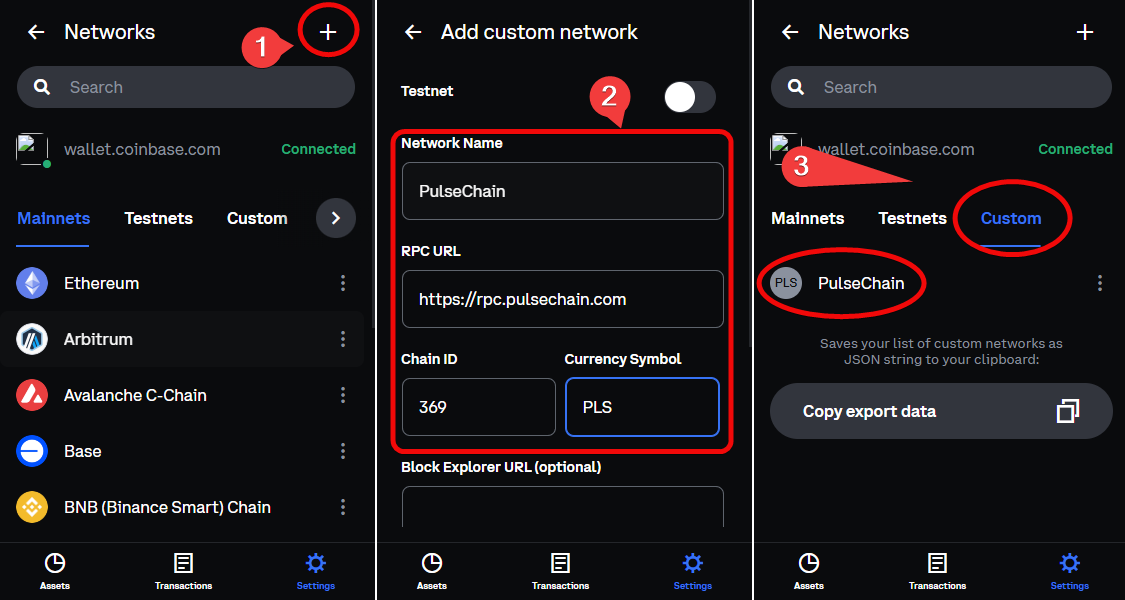
Adding Tokens
To add custom tokens and networks, navigate to the menu Settings → Networks.
- Click the plus icon
- Enter the network details:
RPC URL, ChainId, Name, Symbol. You can find this data using the EVM network search engine. - Scroll down and click
Save. The network will appear under theCustomtab.
Staking
Staking means earning interest for holding certain cryptocurrencies. Let’s take a look at the conditions.
The My Assets tab allows you to start staking.
The staking process is simple:
- Click on
Earn on ETH - Enter the amount
- Review the reward conditions
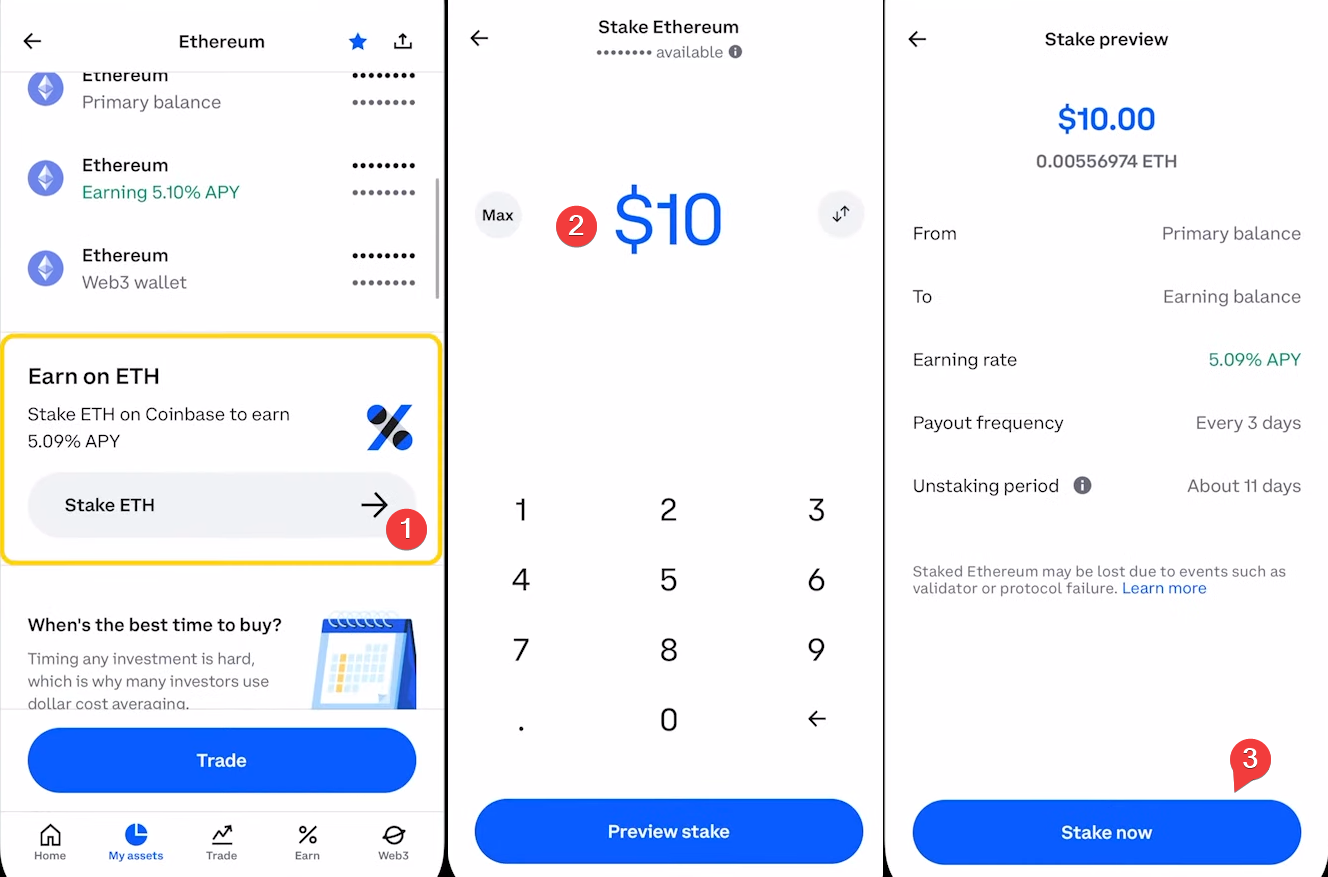
What do you get?
- APY – 5.09% per annum.
- Payout Frequency – every 3 days you receive an “addition” to your balance.
- Unstaking period – approximately 11 days. This means that if you decide to withdraw your ETH, you will have to wait about 11 days for the funds to “unlock”.
5.09% net – this is the figure as shown in the official Coinbase help page:
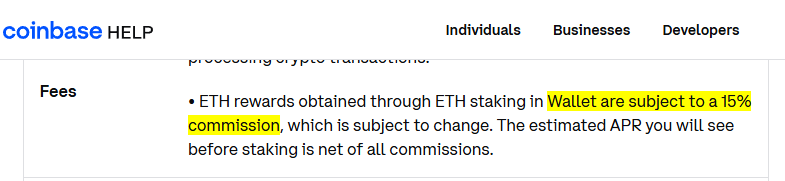
Rewards for ETH earned via staking are subject to a 15% fee. In other words, Coinbase first calculates the total yield (before fees), then deducts its 15% share, and finally displays the net figure – the Earning rate.
Is it worthwhile? For an investment of $10, the annual profit would be $0.50. That’s less than $0.05 per month – a symbolic amount.
For a noticeable income, you need to invest $1000 or more (for example, $1000 yields around ~$50 per year).
If you’re a long-term investor considering staking as a way to preserve your ETH plus earn a small bonus, then even with a 15% fee it can be justified. For short-term speculation or with small amounts, the benefit is minimal.
Note: staking is not available in all regions.
We have now covered all the basic functionalities of the wallet. Let’s move on to the advanced settings.
Advanced Settings
.cb.id Usernames
Coinbase Wallet allows you to use usernames to simplify transactions. Instead of sharing your long hexadecimal wallet address, set up a human-friendly identifier, which greatly reduces errors when others send you crypto.
This works through ENS (or Coinbase’s specific .cb.id system).
You can create this username during wallet setup (as we did) or add it later. The username can be changed once per year.
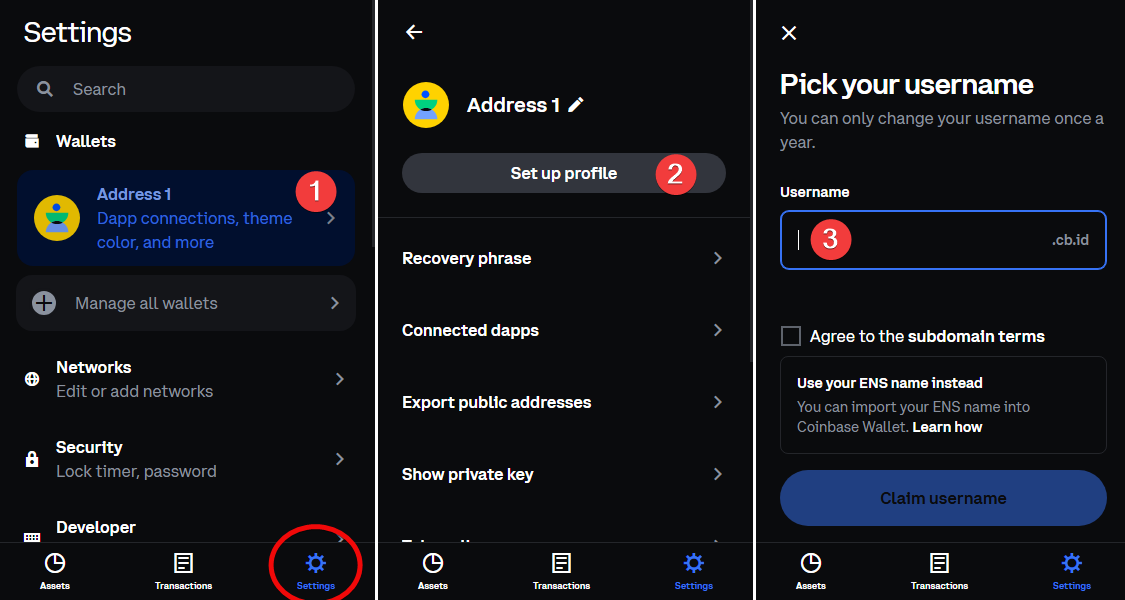
To add a username:
- In the settings menu, click on
Address - Go to
Set up Profile - Enter your desired username or import an existing
ENS. For example,maximanisimov.cb.id
This is an optional but very convenient feature designed to improve user experience and reduce errors during transactions. However, this feature does reduce anonymity.
Private Key and Seed Phrase
To view your seed phrase or private key, open the Settings menu.
- Select your wallet
- Click on
Recovery PhraseorShow Private Key.
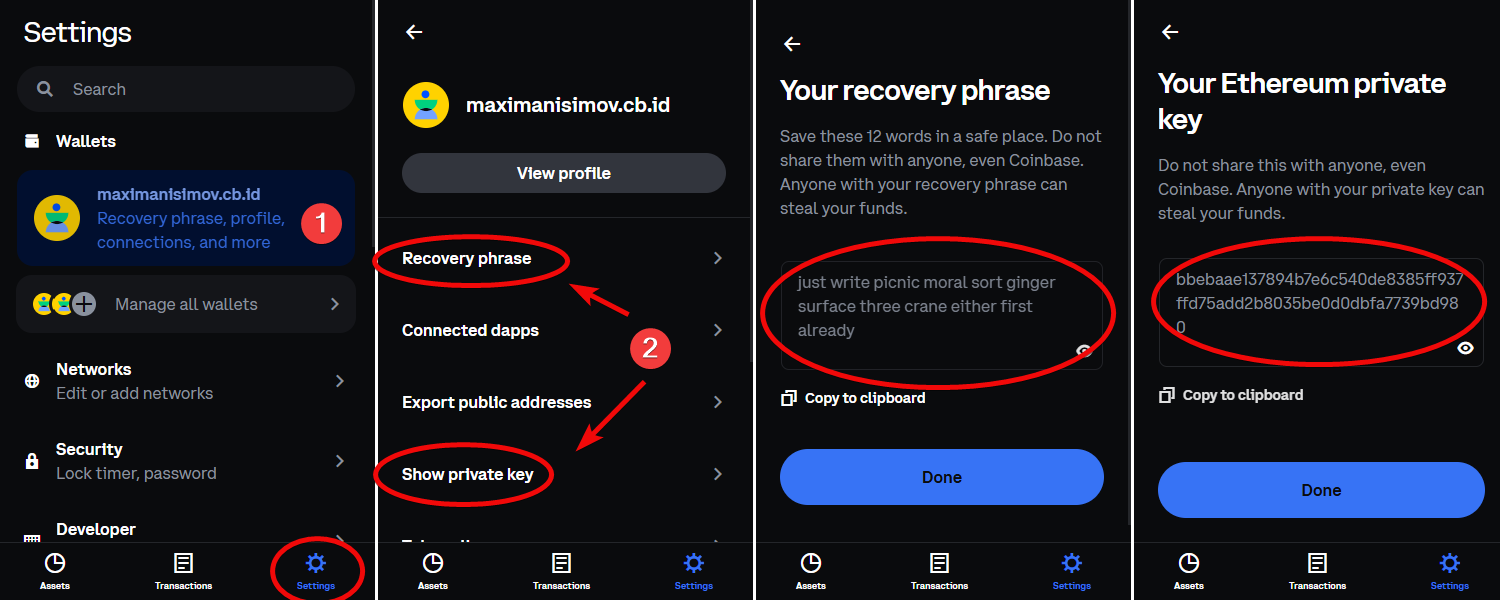
Enter your password, and you will see your keys. It is recommended to save both types of keys.
- With the seed phrase, you can restore all wallet assets across all blockchains.
- With the private key, you can restore funds on the specific blockchain associated with that key, for example, Ethereum.
Import and Recovery
To recover your Coinbase wallet, you will need either your seed phrase or a Passkey (cloud storage), if you set one up. If you want to transfer your assets to another wallet, you can also use the private key.
Let’s demonstrate recovery via seed phrase using the Coinbase mobile app.
To recover:
- Tap
I already have a wallet. - Select
Recovery phrase - Tap
Enter manually - Finally, enter your 12-word recovery phrase.
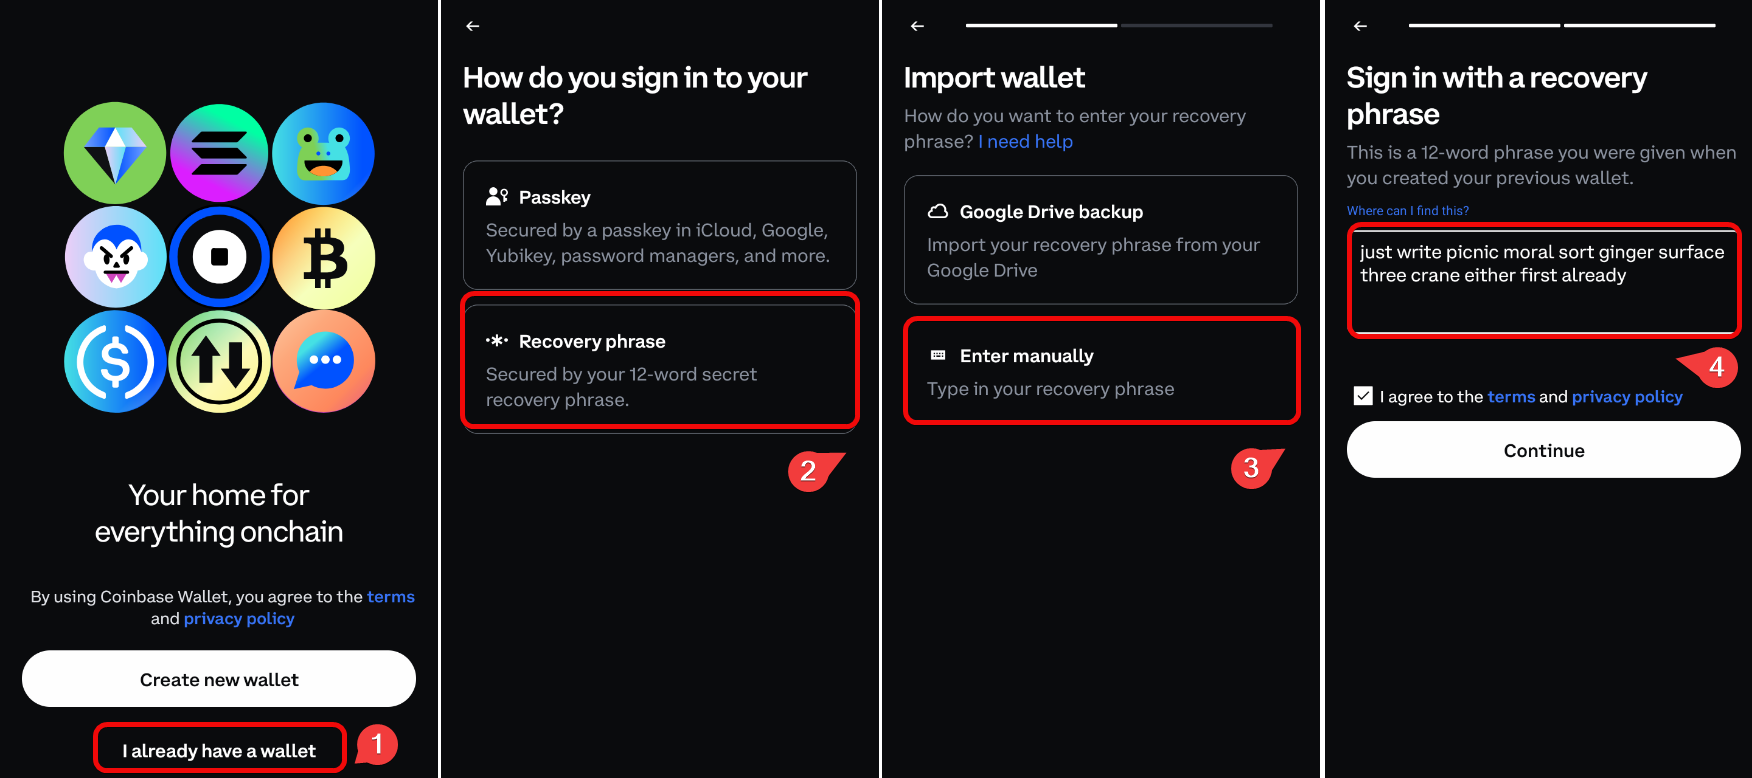
You have successfully recovered your wallet on your mobile device.
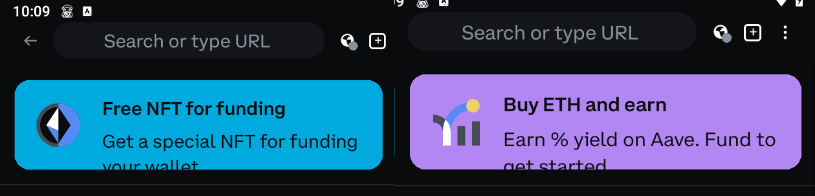
The app features an integrated dApps browser, allowing you to interact directly with various DeFi projects, swap services, NFT marketplaces, games, and more—all without leaving the wallet app.

At the top of the app, current promotions are displayed. For example, an NFT airdrop for funding your wallet and the Aave protocol for earning interest.
In short, the app offers a convenient dApps browser, although it lacks some popular security features such as 2FA and address whitelisting.
Ledger Integration
To connect a Ledger, select I already have a wallet. If you already have an existing Coinbase wallet, you must sign out by going to Settings → Sign out.
- Click
I already have a wallet - Select
Connect a hardware wallet - Click
Connect now.
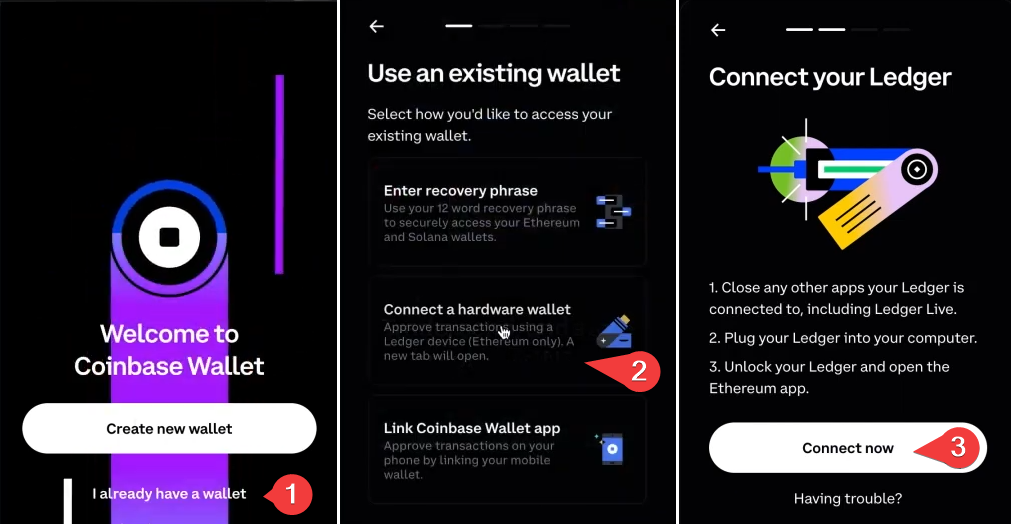
This will open a new tab with instructions: close any Ledger-related applications (like Ledger Live), connect your device to your PC, unlock it, and launch the Ethereum app. After that, you can select addresses for connection.
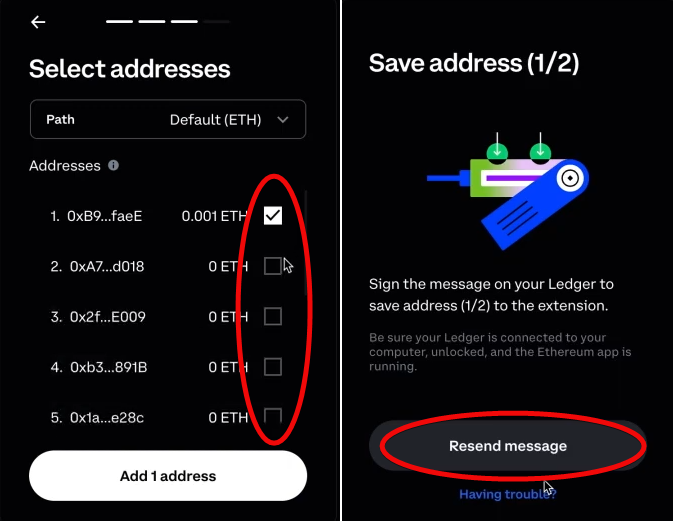
Confirm the connection by signing a message on the Ledger for each address.
If you later wish to add new addresses, go to the main screen of the extension, open the menu in the upper left corner, and choose Manage Wallets → Add Address.
Note: connected addresses cannot be disconnected, so plan your additions carefully.
Messaging
The Messaging feature offers encrypted communication on the blockchain. It also allows you to:
- Send encrypted messages linked to wallet addresses or ENS domains.
- Attach cryptocurrency transactions (such as payments, NFTs) to messages.
- Communicate without disclosing personal information (email/phone number).
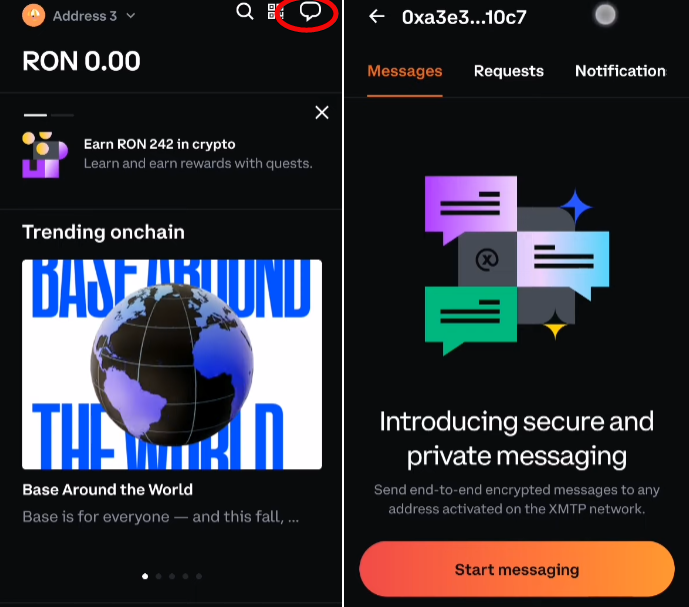
The messaging feature was available in the top right corner of the app, but it has been suspended. Keep an eye on its availability at Coinbase Wallet messaging.
Note: messages linked to wallet addresses are publicly visible on the blockchain, which might expose transaction details.
The final question remains: is it worth using this wallet?
Conclusion: Is It Worth Using?
The answer depends on your goals:
- If you need a wallet for Ethereum and its networks, consider MetaMask or Rabby Wallet because they lead in functionality and ease of use with ETH networks.
- If you need a multi-chain wallet that supports not only ETH but also BTC, Solana, Doge, etc., then Coinbase Wallet can compete with OKX and 1inch.
OKX offers 2FA protection and is integrated with an exchange. And 1inch is used for finding the best swap rates, though it is available only as a mobile app.
The Phantom Solana wallet has a detector for suspicious transactions. Meanwhile, Trust Wallet and MyEtherWallet are time-tested and have a large user base.
But are there any drawbacks? Although the wallet has never been associated with scams or hacks, it does have some shortcomings. For example, the balance sometimes freezes and displays 0.
Other drawbacks include a relatively modest set of features for such a large platform as Coinbase. For instance, there is no option to add watch-only addresses. And there are other minor issues as well.
Main disadvantages:
- High fees – “instant buy/sell” charges up to a 1.5% fee. Swaps incur a 1% fee. In comparison, other wallets charge as little as 0.2%.
- Lack of dApp security analytics and smart contract vulnerability assessments.
- Purchasing via local currency requires linking your wallet to Coinbase.com, which exposes you to regulatory risks such as account freezes and other interventions.
|
Wallet |
Supported Networks |
Features |
|
MetaMask |
ETH and related networks |
One of the most popular wallets |
|
ETH and related networks |
Leader in functionality |
|
|
Coinbase Wallet |
Multi-chain (ETH, BTC, Solana, etc.) |
Supports many networks; competes with OKX and 1inch |
|
Multi-chain |
2FA, exchange integration |
|
|
Multi-chain |
Finds best swap rates; available only as a mobile app |
|
|
Phantom |
Multi-chain |
Detects suspicious transactions; very user-friendly |
Overall, it is a reliable and convenient wallet, though advanced users might crave more features.
Any questions? Leave them in the comments. We’ll answer everyone!
Support:
The quickest way to get support is via chat. However, be sure to ask for a human operator; otherwise, you might get a bot.


