Bitcoin Core: Download and how to use (updated v30.0)
- Slow synchronization
- High system requirements
- Complex settings for beginners
- You connect directly to your node, without intermediaries.
- No need to worry about failures or downtime of third-party storage services.
- Wallet addresses are not transmitted through external services. This increases privacy.
- Network attacks are impossible, since Core does not rely on external services.
Bitcoin Core is a free official wallet for storing, sending and receiving Bitcoin. It is an open-source program that verifies transactions and maintains the security of the network - that is, it works as a full node in the blockchain.
This guide explains how to store and manage your Bitcoins using your own node. By the end of the guide, you will be using BTC the way it was originally intended.
Why is Core a native Bitcoin node? Because with the wallet built into the program, you connect directly to the network, without intermediaries.
- All your transactions are verified by your hardware, not by any company's servers.
- When you check your balance, the data comes directly from the blockchain that you store locally.
- Your wallet will work even when popular Bitcoin services or exchanges are unavailable.
Key features of bitcoin core you should know
Bitcoin Core is the official BTC wallet because the source code was written by Bitcoin's creator, Satoshi Nakamoto. This happened in 2008–2009, when he developed the first BTC client and launched the network.
Further development is carried out by a decentralized community of programmers so the wallet is not owned or controlled by any individual, company or organization.
The Core wallet operates as a full Bitcoin node. All your funds are stored directly in the blockchain, which guarantees stability and reliability.
Bitcoin Core is accessed via a graphical user interface (GUI) or command line interface (CLI). Each transaction is executed quickly and frequently with low fees thanks to SegWit technology (more on that below).
- SegWit: Reduce fees and process transactions faster.
- Lightning Network: Make instant payments and micropayments through channels.
- Watch-only addresses: Check your balance securely without using your private key.
- Backup: Create a backup copy of wallet.dat to quickly restore access to your funds.
- Address Book: Quickly Find the Contacts You Need and Simplify the Exchange Process.
- Reliability and functionality: high security thanks to 15+ years of work, support from thousands of developers and regular updates.
- QR code payments: pay and receive funds in seconds.
- Coin Control and Reporting: Easily track who sent you coins.
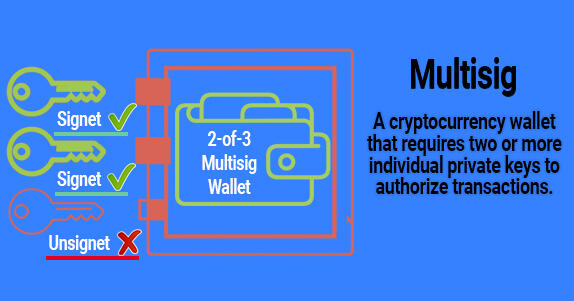
- Multisig: confirm transactions with multiple keys for extra security.
Download and System Requirements
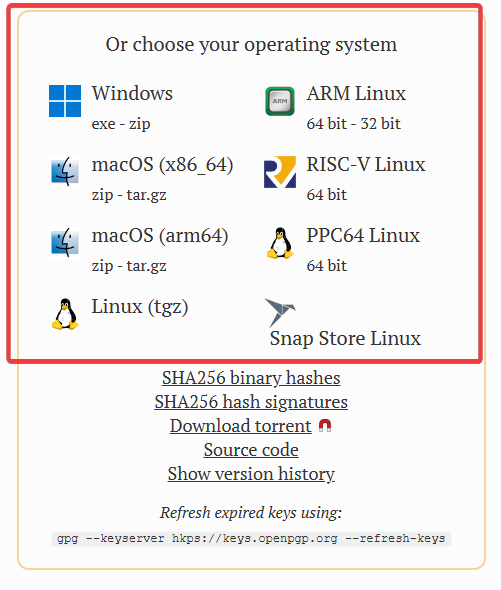
BTC Core is available for download from the following sources:
Available platforms: Windows, Mac, Linux, RISC-V and other operating systems.
Bitcoin Core full nodes have special requirements. Running a node on low-end hardware works, but you'll likely run into problems.
System requirements:
- A desktop or laptop computer running the latest versions of Windows, Mac OS, or Linux
- 10 GB of free disk space
- 2 gigabytes of memory (RAM)
Installation and launch
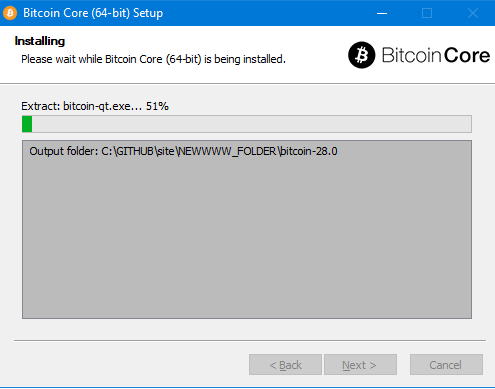
Double-click the downloaded file and follow the instructions of the standard installation wizard.
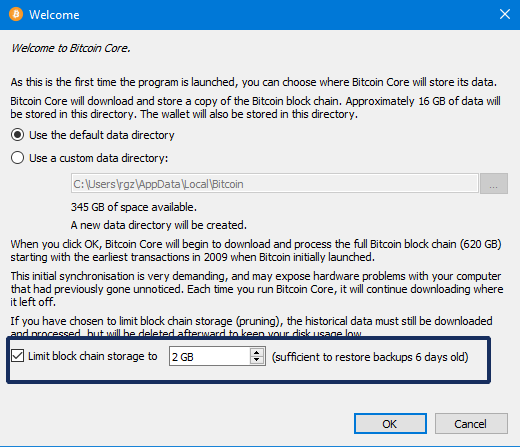
After installation, the first time you run it, you will be asked to select a location to store the blockchain data or specify an external drive. If you plan to use the internal drive of your computer, we recommend leaving this by default (click OK). This will simplify the setup when installing other software for interaction with Bitcoin Core.
Running a full node requires downloading about 700 GB (transaction data for the entire history) and an additional 5-10 GB per month. By default, you will need to store all this data, but if you enable the Prune feature, only 2 GB of data is stored without compromising security.
Tip: check the option Discard blocks after verification, except most recent 2 GB (prune) and the program will download blocks and store only the last 2 GB.
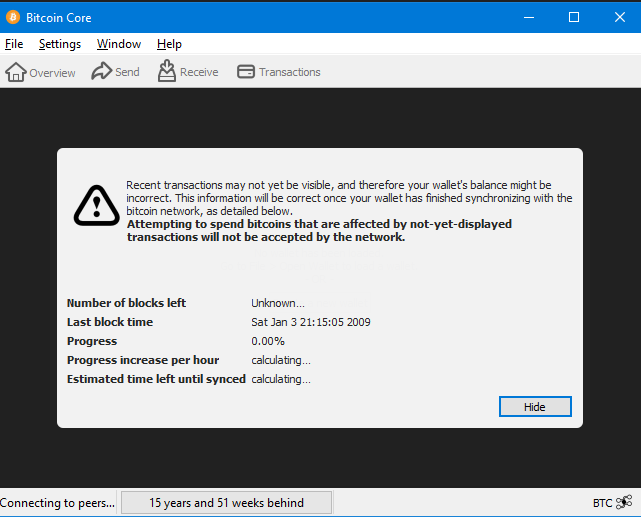
Once the installation is complete, launch Core and begin the synchronization process with the Bitcoin network.
Synchronization with the network
For the wallet to work correctly, your node must be fully synchronized with the latest block in the blockchain.
When synchronizing with the network, your computer downloads blocks of transaction data and checks them for validity. This is an important step for running a Bitcoin node: it maintains the integrity of the network and ensures the security of payments.
Depending on the speed of your internet connection, the process may take from a couple of hours to several days.
To understand this more deeply, let's look at what's happening at a technical level. This process is called IBD (Initial Block Download) - a one-time initial download of blocks. The program checks every transaction, starting with Genesis block in 2009. Size Bitcoin blockchain is about 700 GB .
The faster your internet connection, processor and SSD, the faster the sync will be.
Example :
- Processor : Intel Core i5/i7 8th generations or AMD Ryzen 5/7.
- RAM: 8–16 GB .
- SSD: 500 GB.
- Internet: 300 Mbit/s and higher.
Sync time: 6-24 hours. And an old laptop or desktop with an SSD should sync in 30 hours.
Creating a new wallet
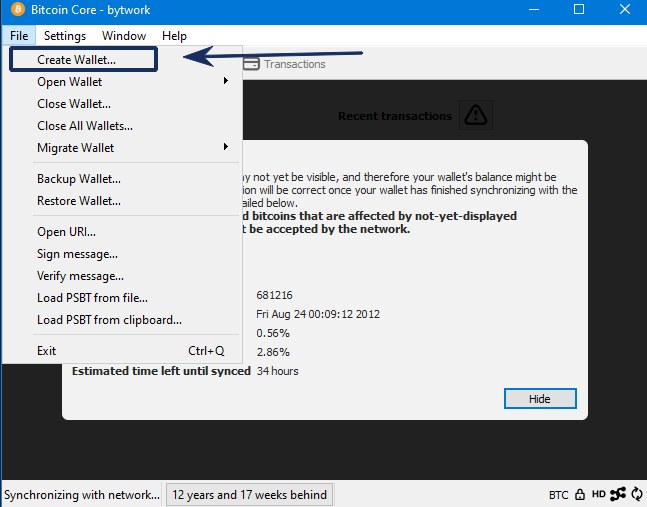
To create a wallet, click File → Create wallet:
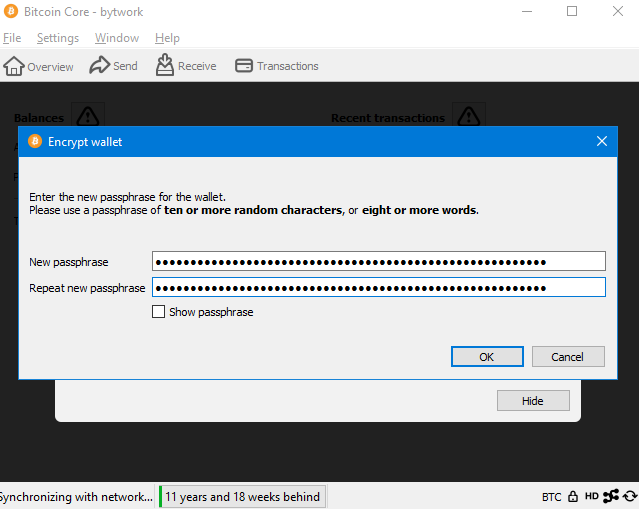
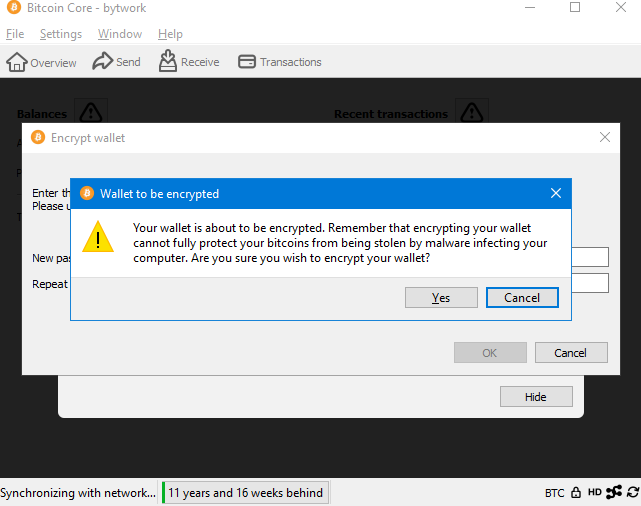
Come up with a name and be sure to select the Encrypt Wallet option. This feature will allow you to set a strong password for encrypting the Bitcoin client. 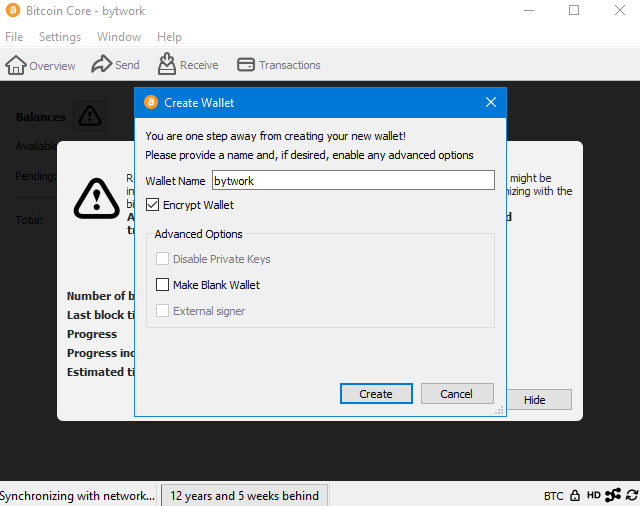
Best practices for wallet encryption:
- Choose a strong password that contains uppercase and lowercase letters, numbers, and special characters.
- Don't use common words or sentences, even if they seem unique (they are easy to guess).
- Don't store your password digitally on your computer or phone.
- Write down the password on paper and keep it in a secure place.
- Ensure your password is secure against water damage, fire, or theft.
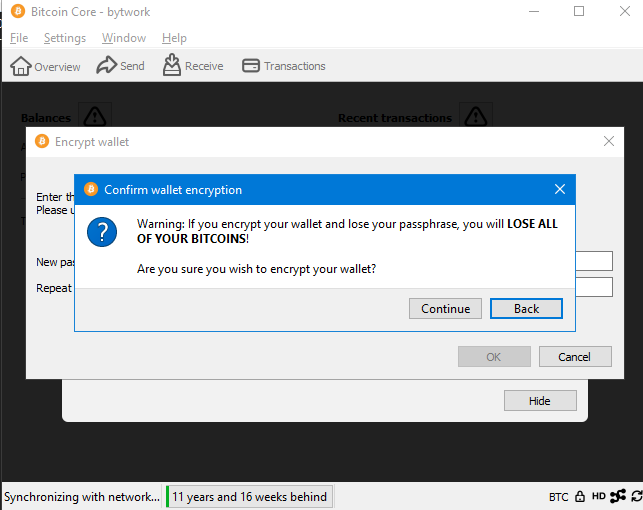
Core-Client will warn you that without a password, access to your bitcoins will be lost forever.
Ensure you have securely written down the password and click Continue. The wallet is encrypted and you will only be able to access your coins with this password.
After encryption, you will automatically log in to the wallet and have access to use it. However, before using it, we recommend making a backup.
Backups are necessary to protect your private keys and maintain access to your bitcoins in the event of a crash or data loss.
Backup
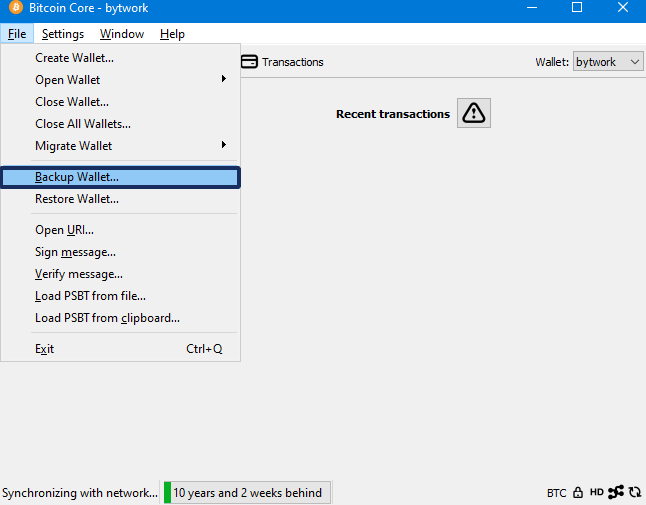
Go to File → Backup Wallet.
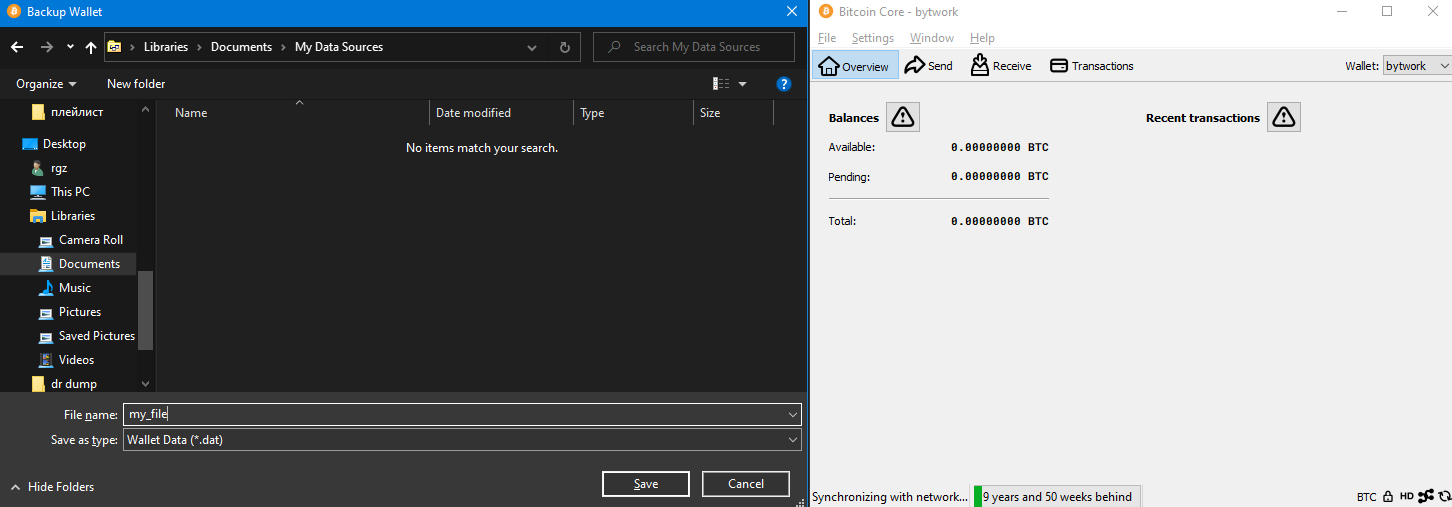
Select a location to save your wallet backup (wallet.dat).
You can save a copy on multiple USB drives.
Backing up your wallet is extremely important and should not be postponed. Take the time to do it now.
For a deeper understanding, let's look at what happens at a technical level during a backup.
The exported wallet.dat file contains the Bitcoin address and private key. This key is unique, provides access to funds, and remains unhackable unless hackers steal it. Keep the private key secret, as a leak could lead to the theft of your bitcoins.
The backup copy of the wallet.dat file should be password protected and stored separately from the computer where Bitcoin Core is installed. Create backups regularly when using the wallet. Save them on multiple USB drives, using multiple versions for reliability.
Tip: After each transaction, create a new address and send funds to a new wallet. Using new addresses and wallets is a common practice to ensure security and anonymity on the Bitcoin network.
How to use
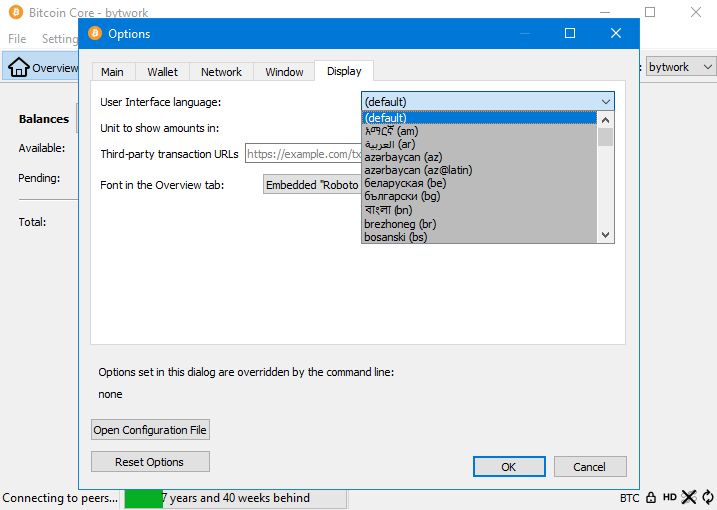
You can customize the interface by selecting the desired language in the Settings → Options → Display → User Interface Language tab.
Create address
You can find out your wallet address or get a new one in two ways:
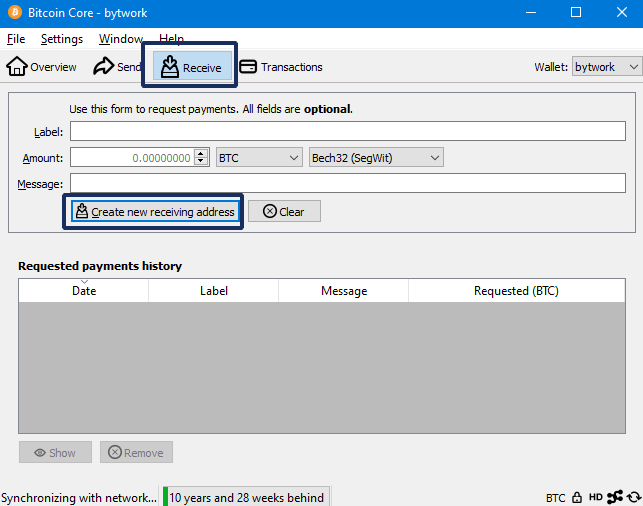
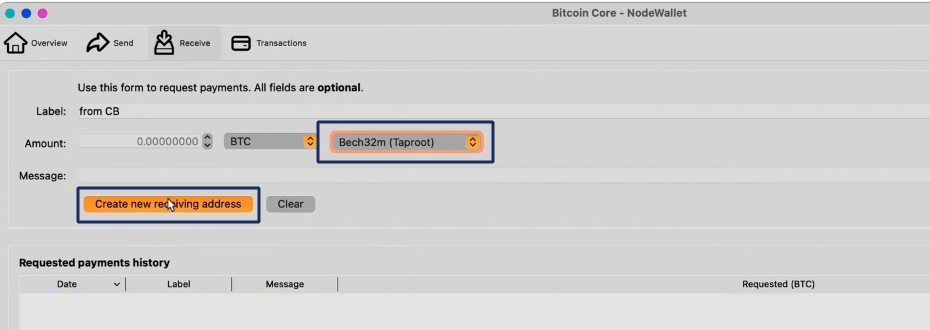
Method 1: Using the Receivetab
- Go to the
Receivetab.
- Click
Create new receiving address. This will create a new receiving address. - Add a label to the address if needed, and specify an amount if you want to request payment from another user.
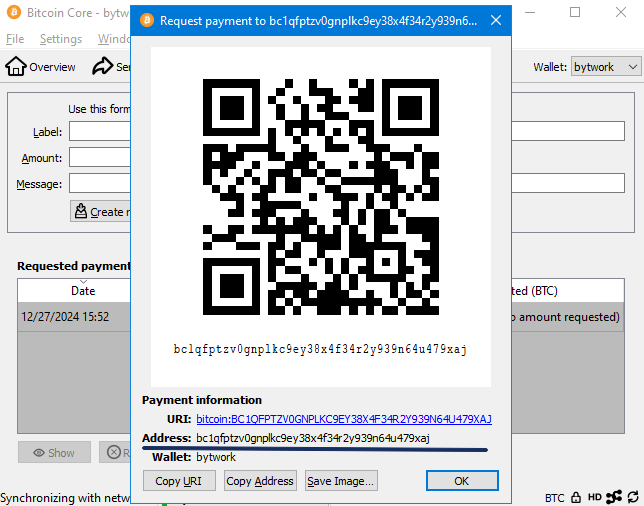
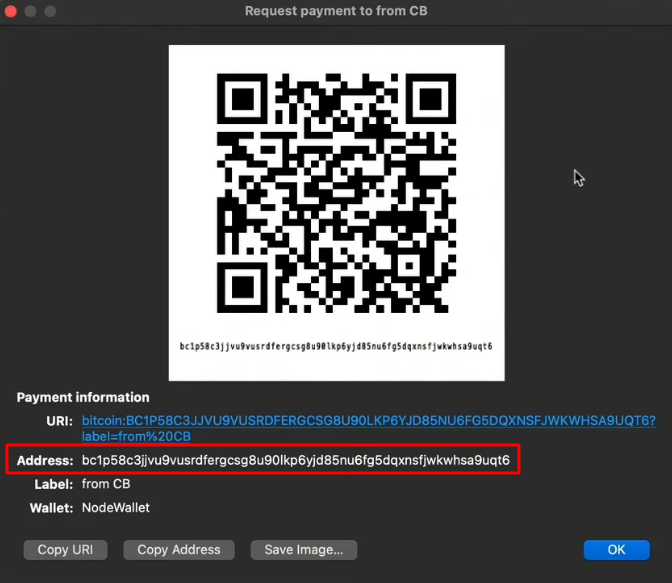
After clicking Create new receiving address, a pop-up window will open with payment information. The Address field will display your new address for receiving funds. A QR code will also be available to simplify data transfer.
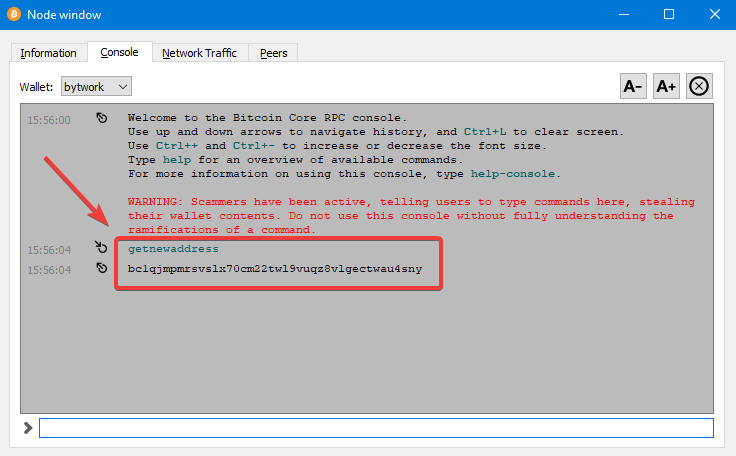
Method 2: Creating a new address via console:
- Go to
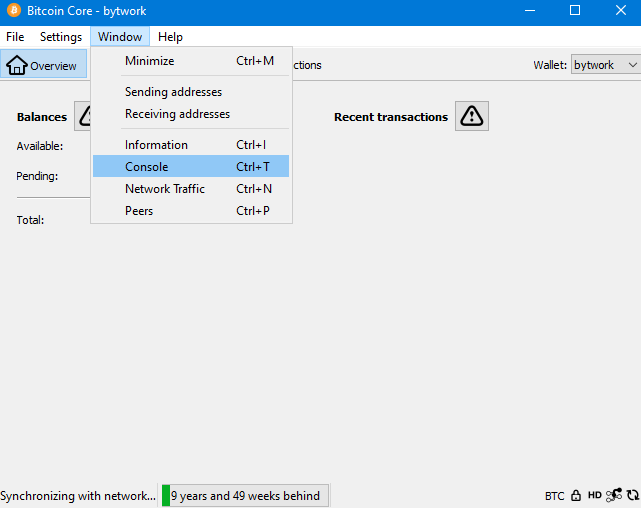
Window→Console. - Enter the
getnewaddresscommand and press Enter.
After this, a new address for receiving funds will be generated. It will remain linked to your wallet, and you will be able to create several such addresses. All created addresses can be found in the Window → Receiving Addresses section.
How to top up
If you bought Bitcoins from an exchange or from a private person, you can send the coins to your wallet as follows:
- Go to in
Receivetab . - Copy the address.
- Paste this address into the submission form on the exchange or give it to the person you are buying crypto from.
You can also choose the address format Bech32m (Taproot) to reduce the network commission.
Please note that in this case you need to get the address in the format Bech32m. It starts with the characters bc1p...
Click Create new receiving address.
Give this address to the sender or paste it into the exchange app to transfer bitcoins to the wallet.
Checking transaction balance
Go to the Overview tab. This displays the total balance of your wallet.
To see detailed transactions, open the Transactions.
How to withdraw
To send your first Bitcoin transaction:
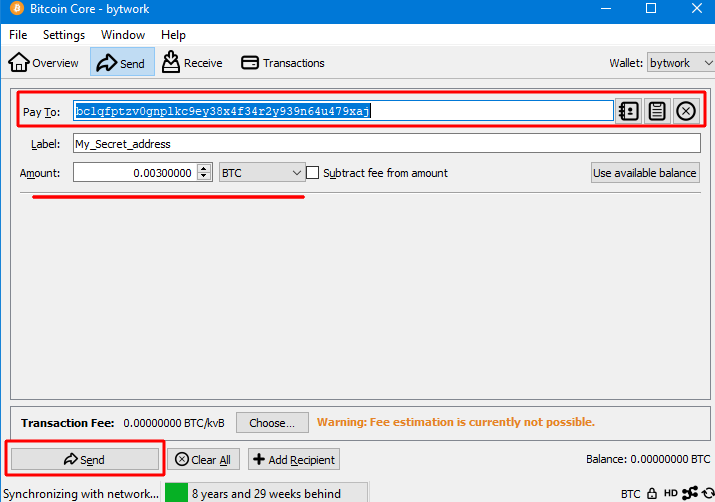
- Go to the
Sendsection and fill out the form. - In the
Pay tofield, enter the recipient's address.
Click the contacts button on the right to select saved addresses. If the address is not in your contacts, enter a description in the Label field and it will be added after the transaction.
If you are ready to send cryptocurrency, click the Send button. However, the wallet has the ability to set up fees. Therefore, the next step will be to set the fee for withdrawing Bitcoin.
Fees
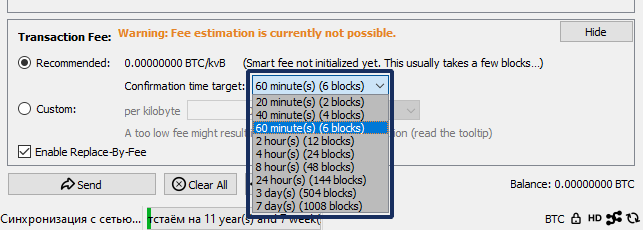
The wallet automatically calculates fees based on average values from previous blocks. This value is specified in the Recommended selection option. However, you can manually change the fee using the drop-down list:
To be able to choose the commission, click the Choose button. You will see the estimated number of minutes and blocks before the transaction is executed. You can also specify the amount manually.
Attention! By setting a very low fees, you risk that the transaction will not get into the block and the BTC will be returned to you. This will not happen immediately and may even take several days. Be careful and do not reduce the commission too much.
Once sent, the transaction will appear in the mempool (more on that below) and will wait for confirmation by miners.
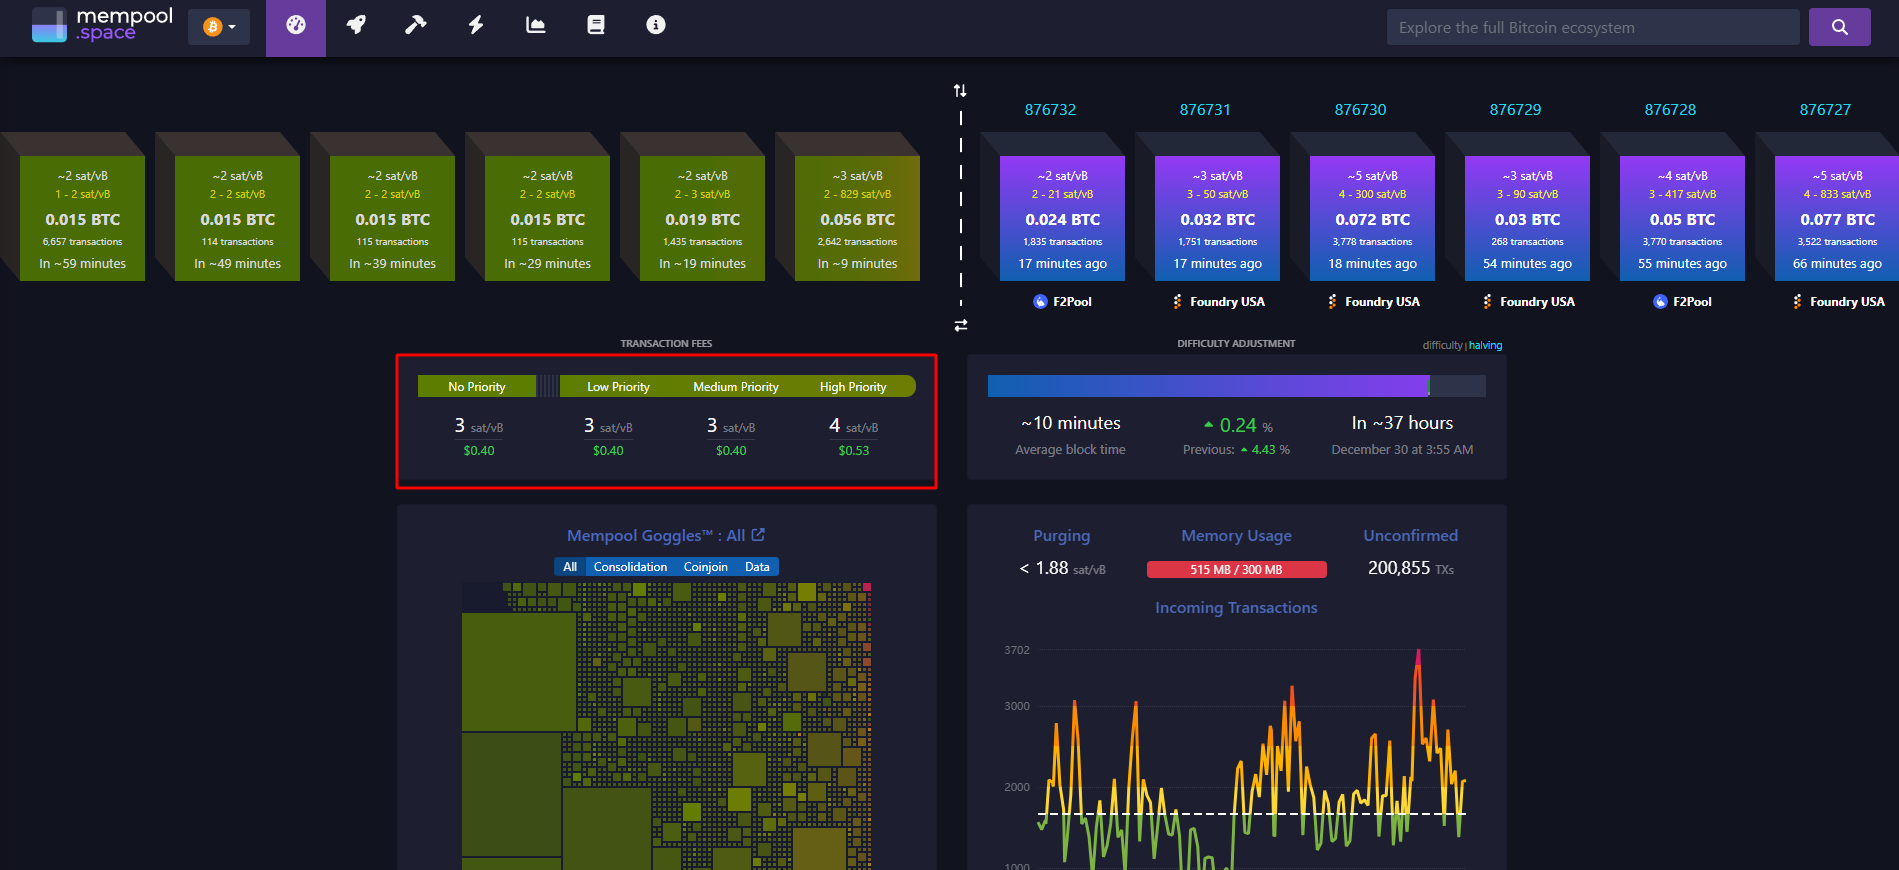
Advice: How to determine the optimal commission via Mempool?
Visit Mempool.space.
On the main page you will see three levels of commissions and the price:
- High Priority (~10 minutes): For urgent transactions, set the fee to the one recommended to be included in the first block. This ensures inclusion in the next block.
- Medium priority (~20-30 minutes): set the fee to match the recommended values for 2-3 blocks.
- Low priority (>1 hour): if time is not critical, set the fee lower than the current average. The transaction will be processed with a delay.
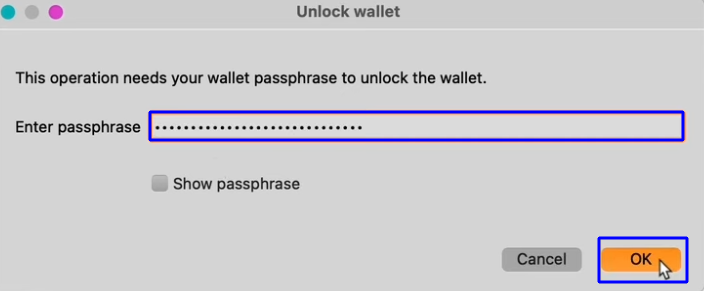
After you click the Send button, the Core Client will ask for your passphrase. Enter it:
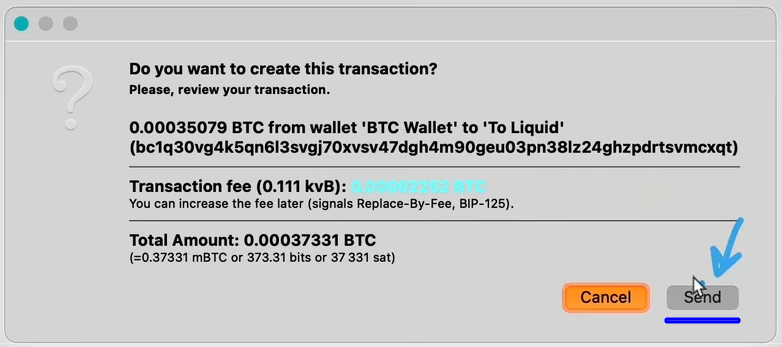
Now you need to check your transaction before sending. Here we will be shown from which wallet the transfer is coming and the fees. The amount of the transfer will be shown. If everything is correct, then click Send.
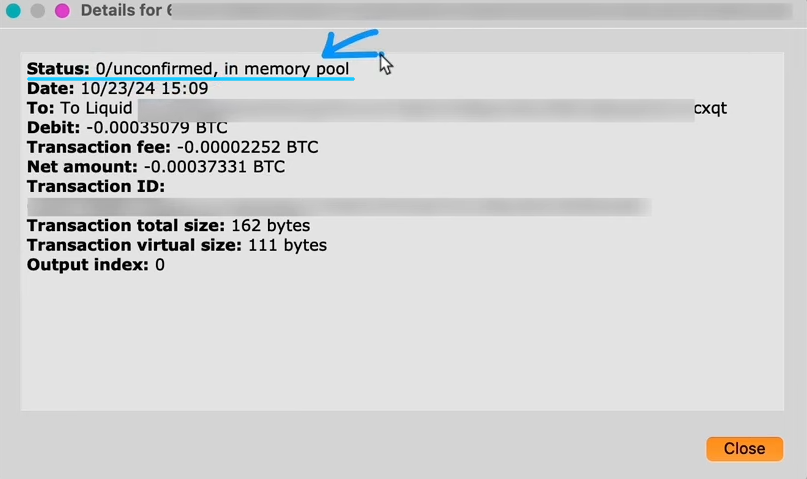
All your transactions can be viewed in the Transactions tab:
Once sent, the transaction will go into the mempool and wait for confirmation from miners. Each node in the network keeps a copy of the mempool, where unconfirmed payments are recorded.
On the mempool.space website you can track the status of your transaction by identifier (Transaction ID).
Remember that after six network confirmations, the transaction is considered final and irreversible.
Configuration, console and API
The official Bitcoin client supports working with configuration files and a console. These features are useful for advanced users, as you can speed up synchronization, cancel a stuck transaction, restore a wallet, and much more.
Commands have priority from highest to lowest:
- Command line options (
CLI) - override all other settings. - Commands from the configuration file - override the settings of the wallet graphical interface.
- Commands directly from the wallet itself.
Caution! Do not change settings that you do not understand, and be careful with parameters obtained from third-party sources.
Wallet console
What you can do in the console:
- Add additional nodes for fast synchronization.
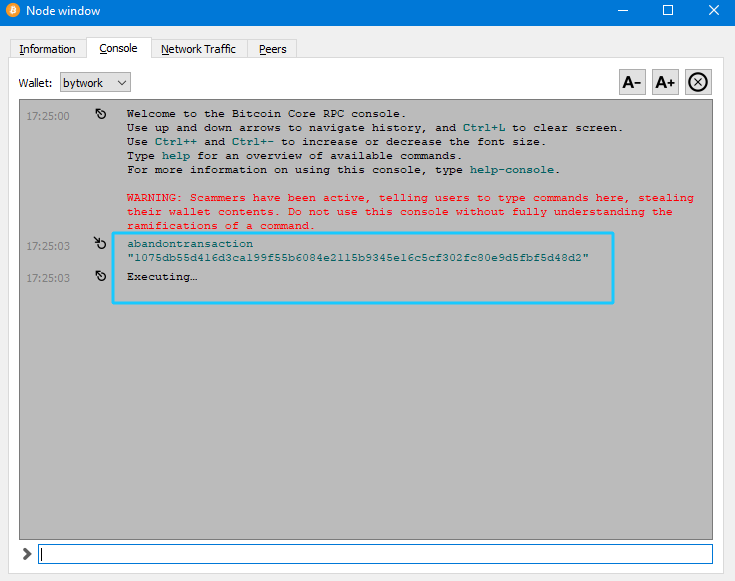
- Cancel stuck transactions with
abandontransaction. - Import the private key with the command
importprivkey "privkey" ("label" rescan) - Restore your wallet if it doesn't show balance (
rescanblockchain). - Type
helpto see a list of all commands with the required arguments for each.
Example abandontransaction command for cancellations transactions .
You can see the full list of available commands on the website RPC API Reference.
Bitcoin.conf file
Bitcoin.conf is a simple text file containing options in the form option=value, one per line. Extra spaces are removed.
Changes to the file will only take effect after restarting the Core client. Create a config file if you don't have one yet.
Examples of useful commands to speed up synchronization:
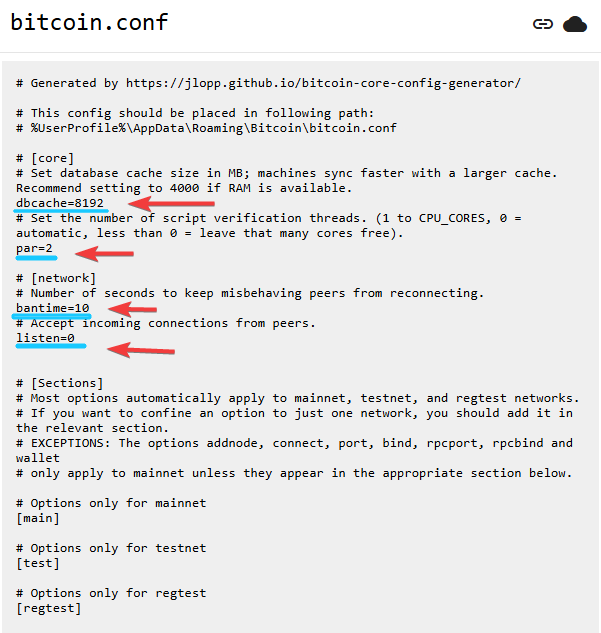
dbcache=8192increase the cache size. The default value is 450. If you have 16 GB of RAM, you can set it to 8192.par=0- try setting it to 2. This forces the client to use 2 threads. Setting it to0is automatic.banscore=10- try setting the value to 10 to quickly disable incorrectly working nodes.listen=0- Try setting this to 0 temporarily to disable incoming connections while you do your initial sync. Your busy node doesn't need the extra work.
In the file bitcoin.conf, empty lines are not counted. Comments start with # sign and are ignored. They can be on a separate line or after option=value. Comments are provided for your convenience.
Example configuration file:
# This config should be placed in the following path:
# %UserProfile%\AppData\Roaming\Bitcoin\bitcoin.conf
# [core]
# Set database cache size in MB; machines sync faster with a larger cache. Recommend setting to 4000 if RAM is available.
dbcache=8192
# Set the number of script verification threads. (1 to CPU_CORES, 0 = automatic, less than 0 = leave that many cores free).
par=2
# [network]
# Number of seconds to keep misbehaving peers from reconnecting.
bantime=10
# Accept incoming connections from peers.
listen=0
# [Sections]
# Most options automatically apply to mainnet, testnet, and regtest networks.
# If you want to confine an option to just one network, you should add it in the relevant section.
# EXCEPTIONS: The options addnode, connect, port, bind, rpcport, rpcbind and wallet
# only apply to mainnet unless they appear in the appropriate section below.
# Options only for mainnet
[main]
# Options only for testnet
[test]
# Options only for regtest
[regtest]
Tip: You can customize the config file using the Bitcoin Core Config Generator.
Recovery
There are two understandings of the recovery process.
- restoring a wallet from a backup and
- forgotten password recovery.
From backup
To restore a backup copy (when you remember your password), you must first terminate the Core program. Next, you need to go to the folder with the installed blockchain. Usually it is located in %APPDATA%\Bitcoin.
For Mac OS X:
~/Library/Application Support/Bitcoin
Linux:
~/.bitcoin/
Find the wallet.dat file in the blockchain folder. Rename it, for example, to wallet.dat_old. Do not delete it.
Now copy your backup wallet.dat from your flash drive or wherever it was saved. The file must be named wallet.dat for the program to recognize it.
Use the "Rescan Blockchain File" feature to search for transactions on the blockchain if the restored balance is not displayed.
You can also import the wallet.dat file into another wallet, such as Electrum.
Password recovery
It is almost impossible to recover the password. The only chance is to search your folder for the backup copy that was there before you added the password.
Check out a review of programs for recovering lost Bitcoins. Some programs try to recover information if you know at least part of your password or other data. The more source data you have, the faster and more accurate the recovery will be.
Private Key
A private key allows you to manage funds in your Bitcoin address from any wallet. It should be written down on paper and stored as securely as the password phrase to the wallet.
Previously, people used the dumpprivkey <address> command. However, since version 21.0, Bitcoin Core has disabled the export of private keys in "descriptor wallets" due to a vulnerability: knowing the child private key and the parent public key, you can restore the main private key. To avoid risks for users, the developers removed this function.
Instead, Bitcoin Core's descriptor mode is a new approach to creating and managing addresses. It uses strings called descriptors that describe how keys and addresses for transactions are generated. This method increases both flexibility and security.
How do I get a private key?
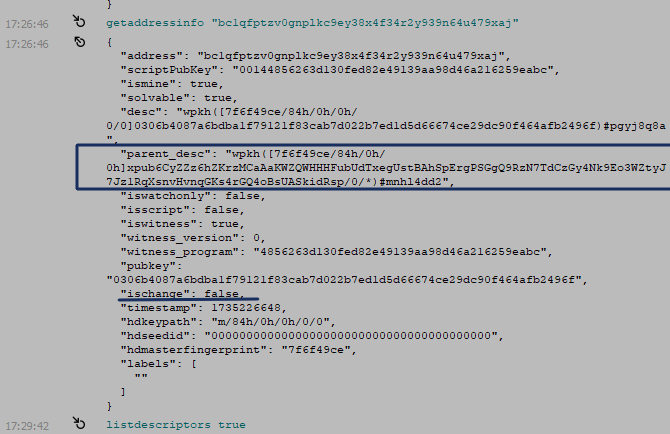
To do this, you need to export the parent address descriptor and use a tool that can extract the private key from the master key.
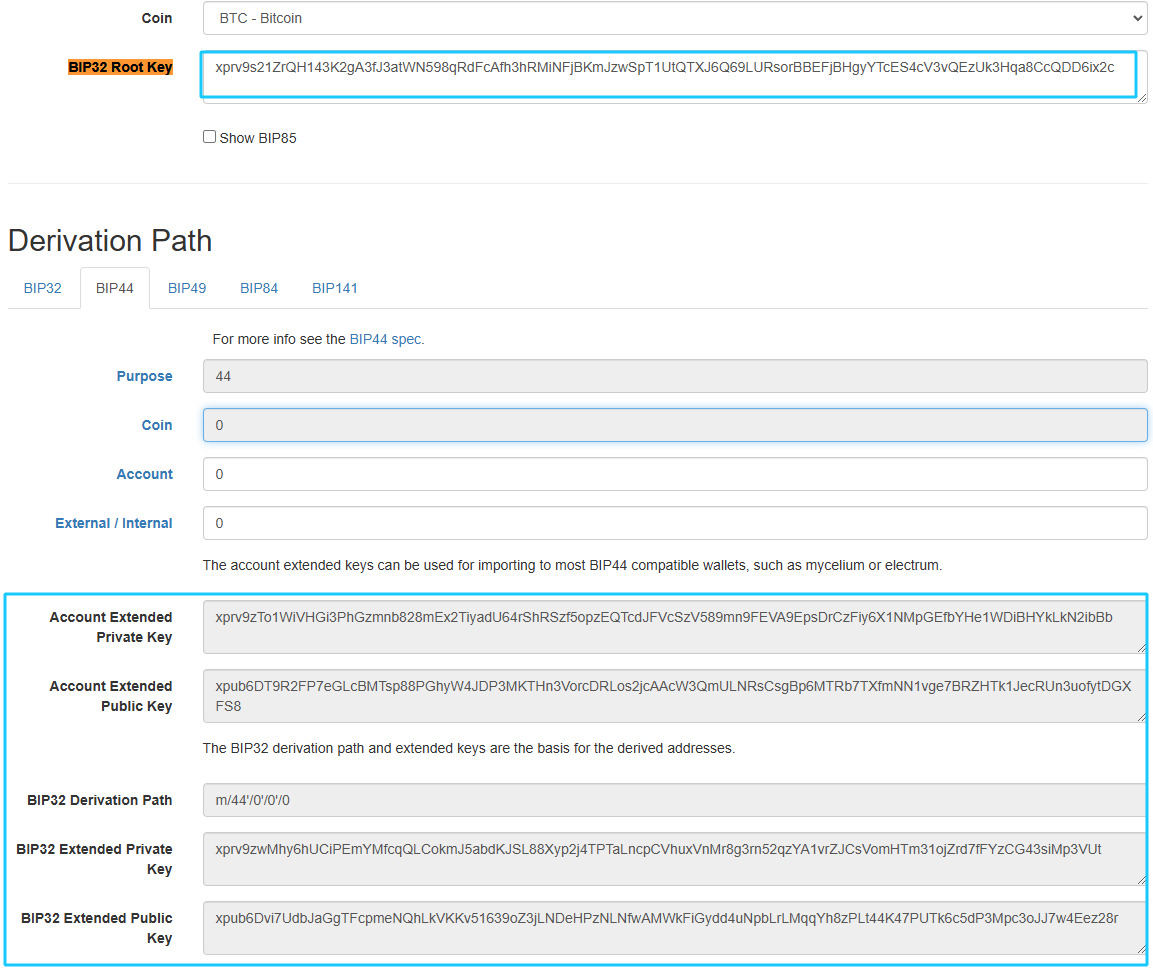
Here is the procedure (requires https://github.com/iancoleman/bip39):
First you need to unlock your wallet using the command walletpassphrase "your_pass" 600.
- Run Bitcoin Core, preferably on an offline device, and enter the command
getaddressinfo "your_bc1address", writing down the values ofparent_descandischange. For examplegetaddressinfo bc1qy3endwwjp5z95rsapmxug2ekzmhstpanaa4yau
- Enter the command
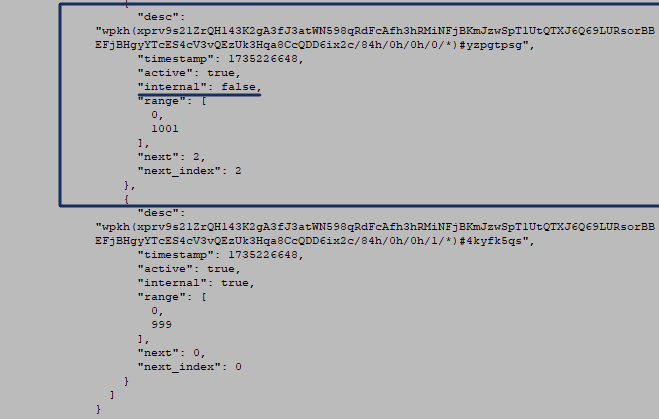
listdescriptors trueand find the private descriptor with the script type that matches the parent descriptor of your address (this will bewpkh). - Since there will be at least two such descriptors, choose the one whose
internalvalue matches yourischange(trueorfalse).
- From the correct descriptor, copy its master private key, which begins with the long
xprv. Do not include the'('characters before and'/'after the key. Example key:xprv9s21ZrQH143K2gA3fJ3atWN598qRdFcAfh3hRMiNFjBKmJzwSpT1UtQTXJ6Q69LURsorBBEFjBHgyYTcES4cV3vQEzUk3Hqa8CcQDD6ix2c - Now open iancoleman's BIP39 tool and paste your xprv key into the
BIP32 Root Keyfield. - Scroll down a bit and select the script type you want:
BIP44for legacy addresses,BIP49forNested-SegWit, andBIP84forNative SegWit. - By default, incoming addresses should already have the correct type (
internal: false), if not, change the path from'0'to '1'. - Scroll down to the list of addresses - your address with the private key should be there.
If your address index is greater than 20, use the Show ___ more rows button to see additional addresses.
Update
To update the client, follow these steps:
- Download the new version from the official website.
- Unzip the archive.
- Copy the files to the required directories:
- Copy the /bin folder to the
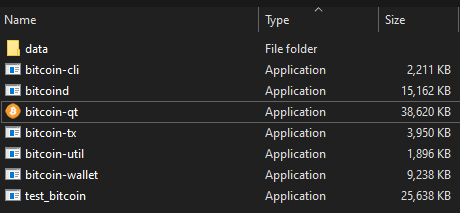
%APPDATA%\Bitcoindirectory for Windows or to/usrfor Linux. It contains the main executable files:bitcoind.exeandbitcoin-qt.exe.If you are using the command line, also copybitcoin-cli.exe, since this binary file may be different in different versions. - The
/includeand/libfolders contain files for thelibbitcoinconsensuslibrary. If you are not sure you need them, you can skip them. - The
/sharefolder contains man pages and scripts for generatingRPCcredentials. These files are usually not necessary for most users.
- Copy the /bin folder to the
- Reboot: Once all files have been copied to the appropriate directories, restart Bitcoin Core to apply the updates.
bitcoin-qt — graphical interface (GUI) for running the client.
bitcoind — Bitcoin Core server. Runs in the background to sync with the network and process transactions.
bitcoin-cli — command interface for working with bitcoind. Allows you to execute commands via the terminal.
You can repeat these steps each time you update to replace old .exe files with new versions.
Questions, Security, and Recommendations
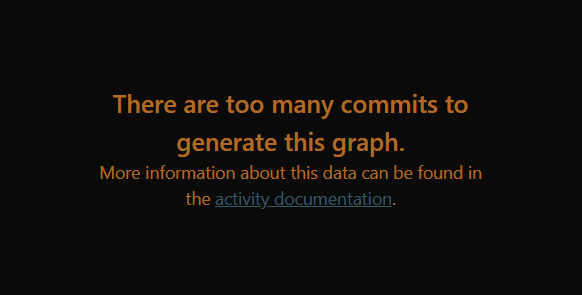
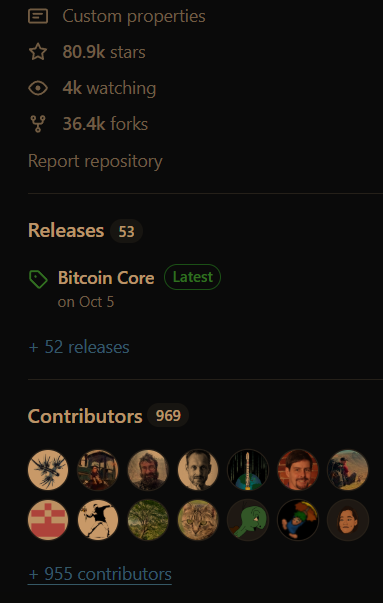
A Bitcoin full node is a complex and cumbersome tool, but that’s the way it’s designed. Where there’s convenience, there’s always risk. You can trust crypto exchanges, hardware wallets, or browser extensions like Metamask to store your cryptocurrency. But from a security standpoint, a BTC full node beats all the alternatives. Its code, created in 2009, has been reviewed by thousands of developers, including over 900 active contributors. There are over 44,000 commits (code changes) on GitHub. GitHub’s tools can’t even visualize the development due to its scale.
That is why the full node is considered one of the most secure wallets in the world. For 15 years, nothing has been created that could compare with it in terms of reliability and verification.
Transfers and exchanges with multi-signature
You can use multi-signature to transfer funds. This allows you to create a wallet that requires multiple private keys to conduct a transaction, instead of relying on just one. Even if one of your private keys is compromised, attackers will not be able to conduct the transaction until they have the others.
Example of creating a multi-signature address:
bitcoin-cli addmultisigaddress 2 "[\"bc1q09vm5lfy0j5reeulh4x5752q25uqqvz34hufdl\",\"bc1q02ad21edsxd23d32dfgqqsz4vv4nmtfzuklhy3\"]"
This CLI command will create a multi-signature address that will require 2 of 3 signatures to complete a transaction.
Slow sync
To speed up synchronization, use the -dbcache parameter. It is used to control the amount of RAM allocated for database caching.
Attention! Always wait until core is completely closed to avoid damaging files. Never stop the process via the task manager.
Prune function
Running the Prune function is a way to reduce the disk space required by Bitcoin Core. If you are running low on space, you can add this parameter to the configuration, and the wallet will delete old blocks to stay within the specified limit. For example, you can add the following parameter to the top of your bitcoin.conf file to reduce disk usage to 1000 MB (1 GB):
prune=1000
There are two caveats, however:
First, you won't be able to see transactions that are in deleted (truncated) blocks. If your wallet shows all the necessary transactions or you created it recently, everything will work fine.
Secondly, to return the deleted blocks, you will have to completely re-synchronize the blockchain.
Application freezing or unresponsiveness
When running the full BTC client, it is busy checking all the transactions and blocks. Many calls are not "async" so sometimes this causes problems with the UI and it freezes.
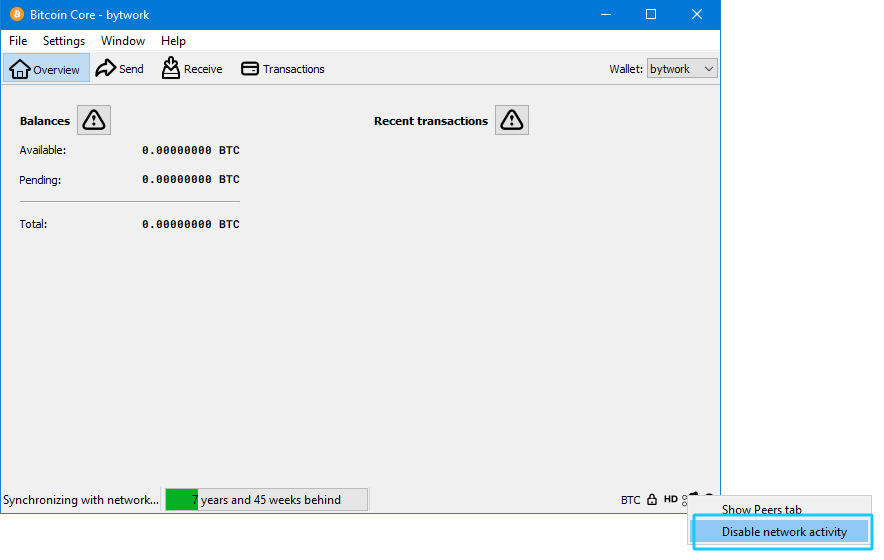
You can temporarily disable synchronization by clicking the Network icon in the lower right corner → Disable network activity
Mining
CPU wallet mining is no longer supported.
Use specialized mining hardware and corresponding software that supports ASIC miners.
Tech support
You can ask your questions about the wallet
- On the forum “Bitcoin Technical Support”
- Create an issue on GitHub
Release Notes
- Versions 27.x and older no longer receive security updates; users must upgrade to version 28 or newer.
- Upgrade to Qt6, support for native dark theme on Windows, and performance improvements on macOS.
- Removal of several deprecated wallet RPC commands (e.g.,
dumpprivkey,importprivkey).
Ask your questions in the comments!
