Heikin Ashi Guide: Strategies, patterns, and how it works

You will learn everything you need to know about Heikin Ashi candlesticks. By the end of this guide, you will be able to identify high-probability trading strategies using them.
To understand how these candlesticks work and how to read them, refer to our complete guide on Japanese candlesticks. Once you understand classic candlestick patterns, you will be able to master Heikin Ashi candles and gain an edge over other traders.
What are Heikin Ashi Candlesticks?
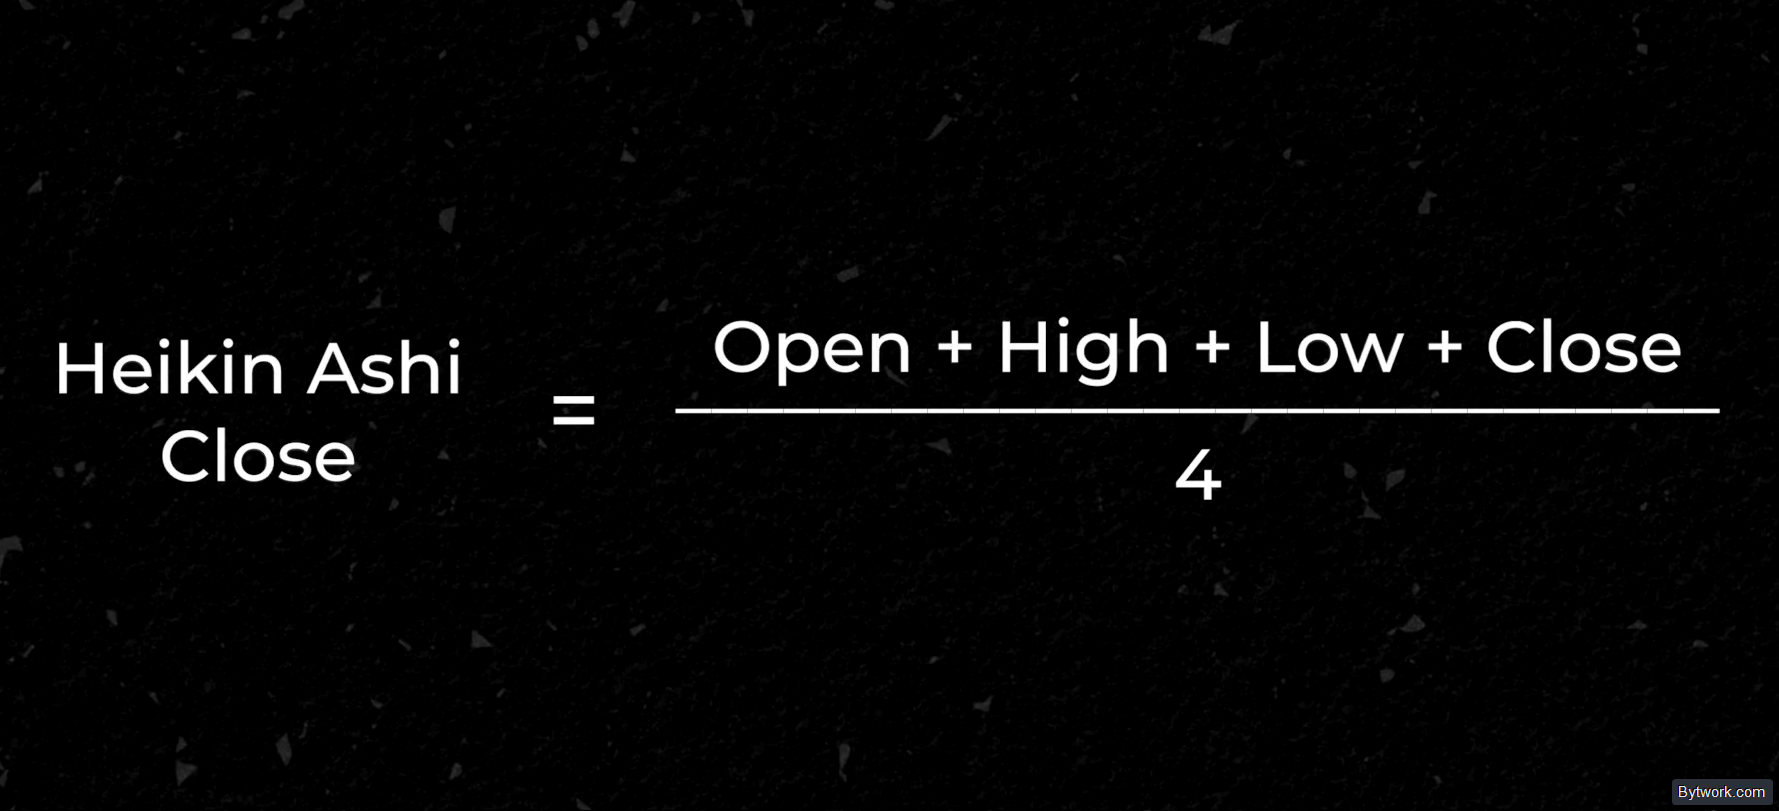
The word Heikin Ashi means "average bar". Heikin Ashi candlesticks use an averaging principle to smooth out price action and give us a better understanding of the market trend. The formula is simple. The closing price of a Heikin Ashi candle is calculated by adding the open, high, low, and close of the current candle and then dividing by 4.
The opening price of a Heikin Ashi candle is located at the midpoint of the previous candle's body. Applying these two averaging methods provides a clearer and cleaner picture of price movement.
What is the Difference Between Heikin Ashi and Japanese Candlesticks?
Japanese candlesticks are constructed using the actual period data: open, high, low, close. Heikin Ashi uses averaged values of these prices, where the open is taken as the midpoint of the previous candle's body. Japanese candlesticks show real volatility, while Heikin Ashi smooths out the noise but distorts actual price levels. This gives you a clear picture of the trend.
Here is an example: on the left, with Japanese candlesticks, we see that the candles are quite chaotic – red and green candles everywhere.

On the right, the same chart with Heikin Ashi candlesticks: here we see cleaner price action – during upward movements, green candles dominate; during downward movements, red candles dominate. This is the advantage of using Heikin Ashi.
How to Read Heikin Ashi Candlesticks?
The most important rule when reading Heikin Ashi is the presence or absence of shadows (wicks) on one side of the candle. Due to the averaging formula, Heikin Ashi signals come with a delay, which is why they are often referred to as a lagging indicator. Heikin Ashi is most effective on timeframes from 1 hour and above. On minute charts, the lag effect can be critical and lead to losses.
On Heikin Ashi charts, 3 types of candles are distinguished.
3 Types of Candles: Bullish, Bearish, and Doji
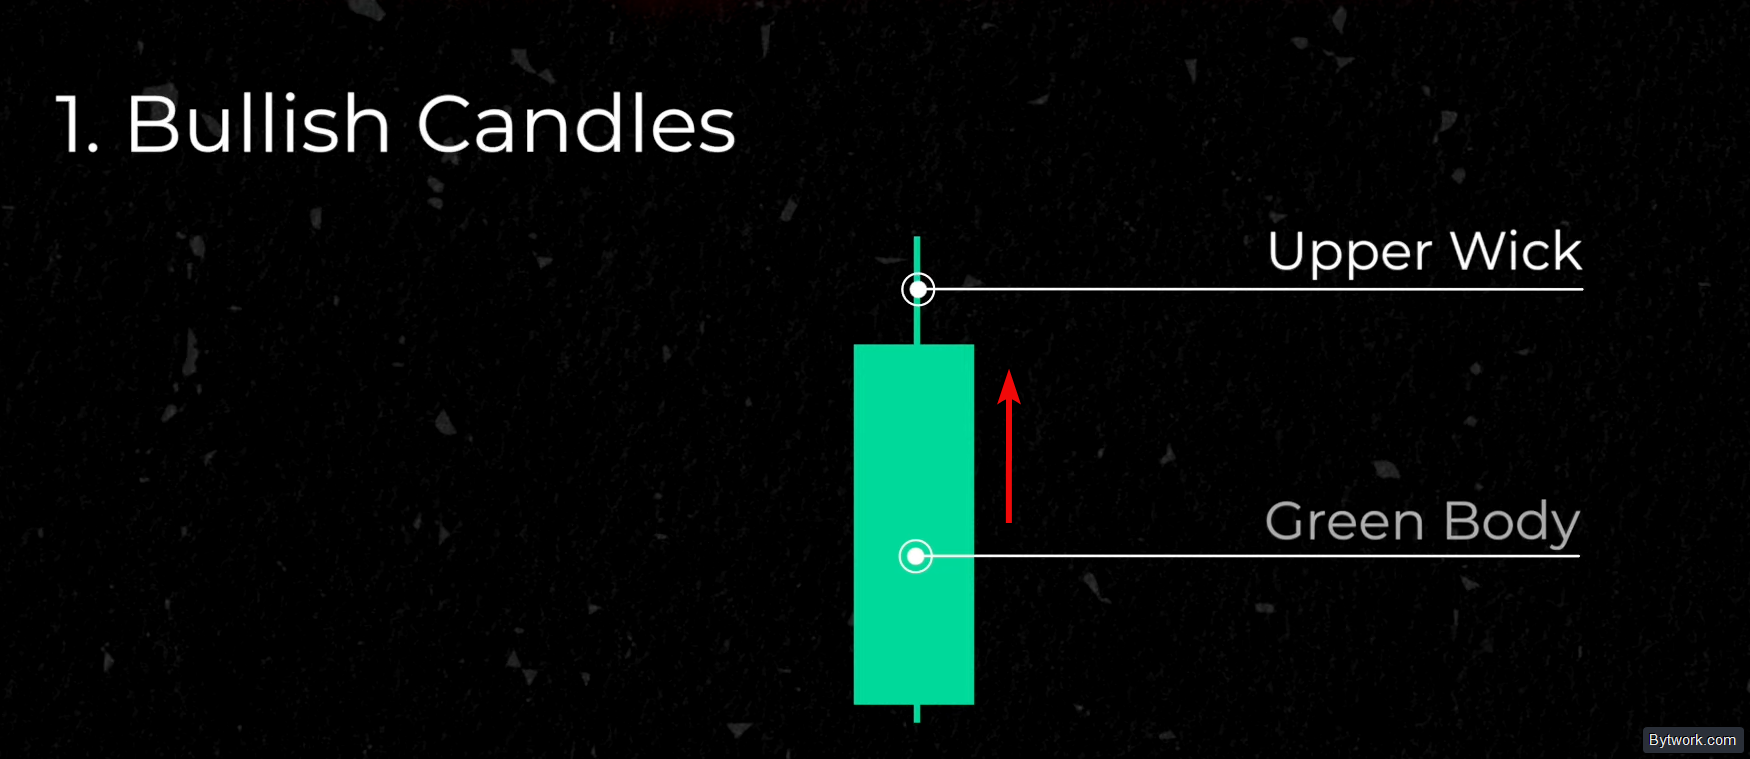
Bullish Candle – is a green candle with a green body and an upper wick. The lower wick is very small or absent. Such candles indicate an uptrend. By the way, the TSI indicator will help to identify the strength of the trend.
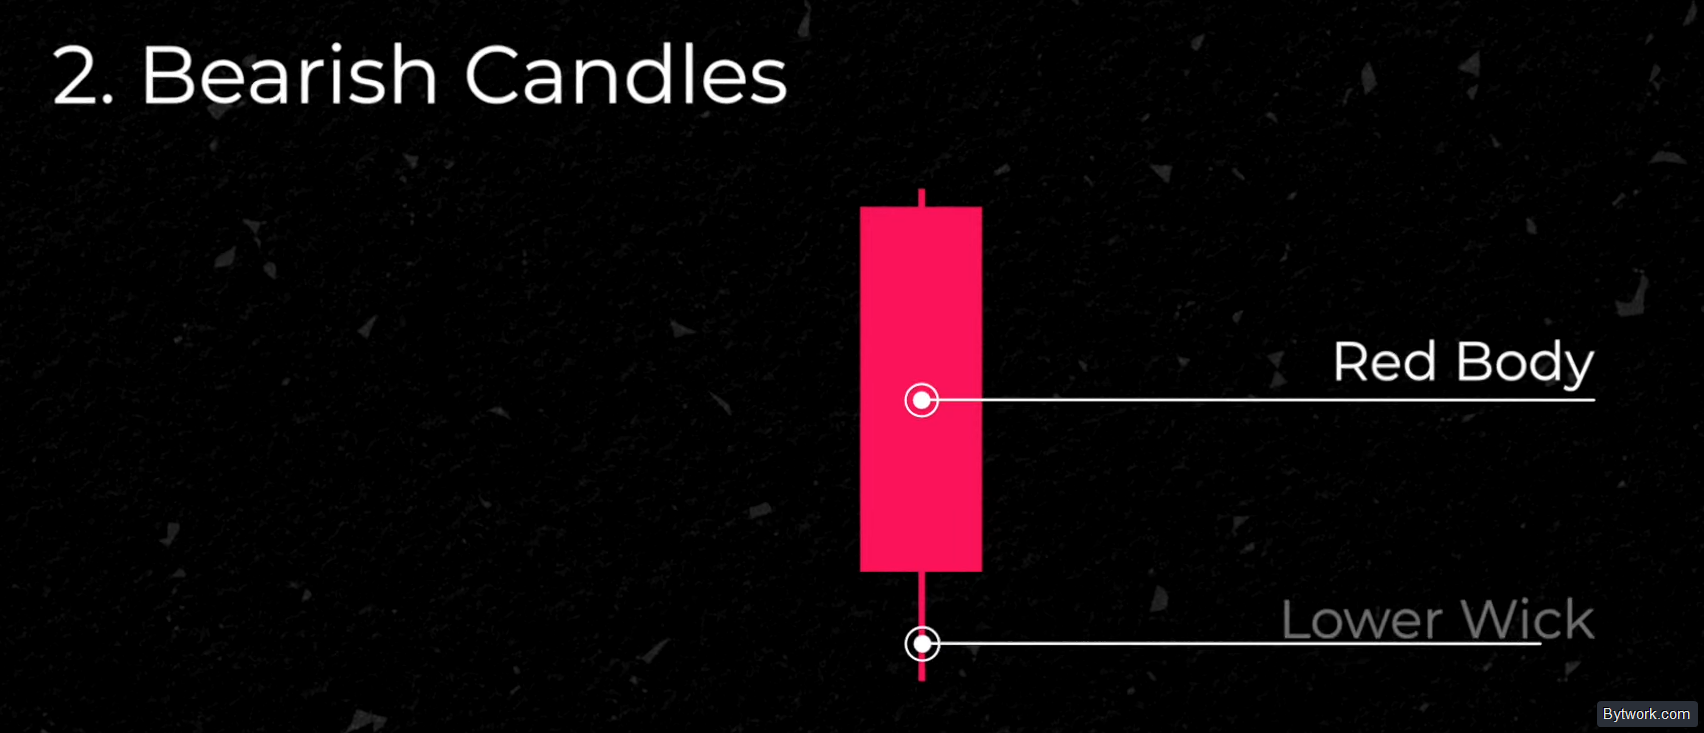
Bearish Candle – consists of a red body and a lower wick; the upper wick is small or absent. Such candles indicate a downtrend.
Finally, Doji candles can be green or red. A Doji candle has a small body and long wicks on both sides – the upper and lower wicks are almost equal in size. This signals that the current trend is exhausted and price movement has paused.
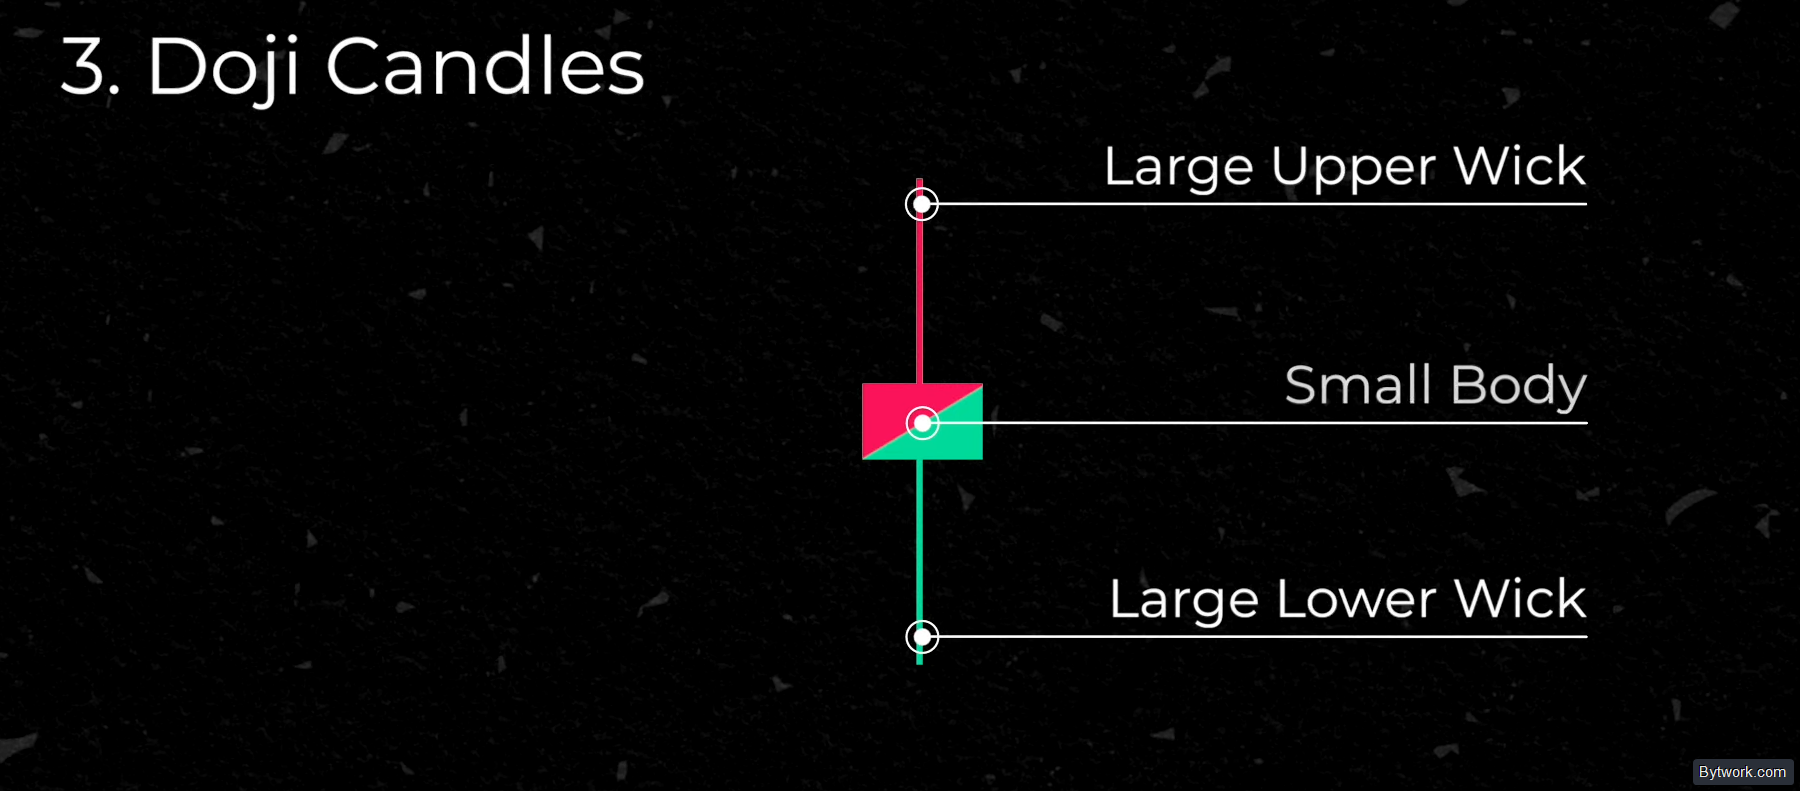
Practical experience shows that Doji analysis in Heikin Ashi becomes reliable only on timeframes from 10 minutes to 1 hour and above.
5 Patterns with Heikin Ashi Candles
Using these 3 types of candles, we have formulated 5 patterns based on Heikin Ashi candlesticks.
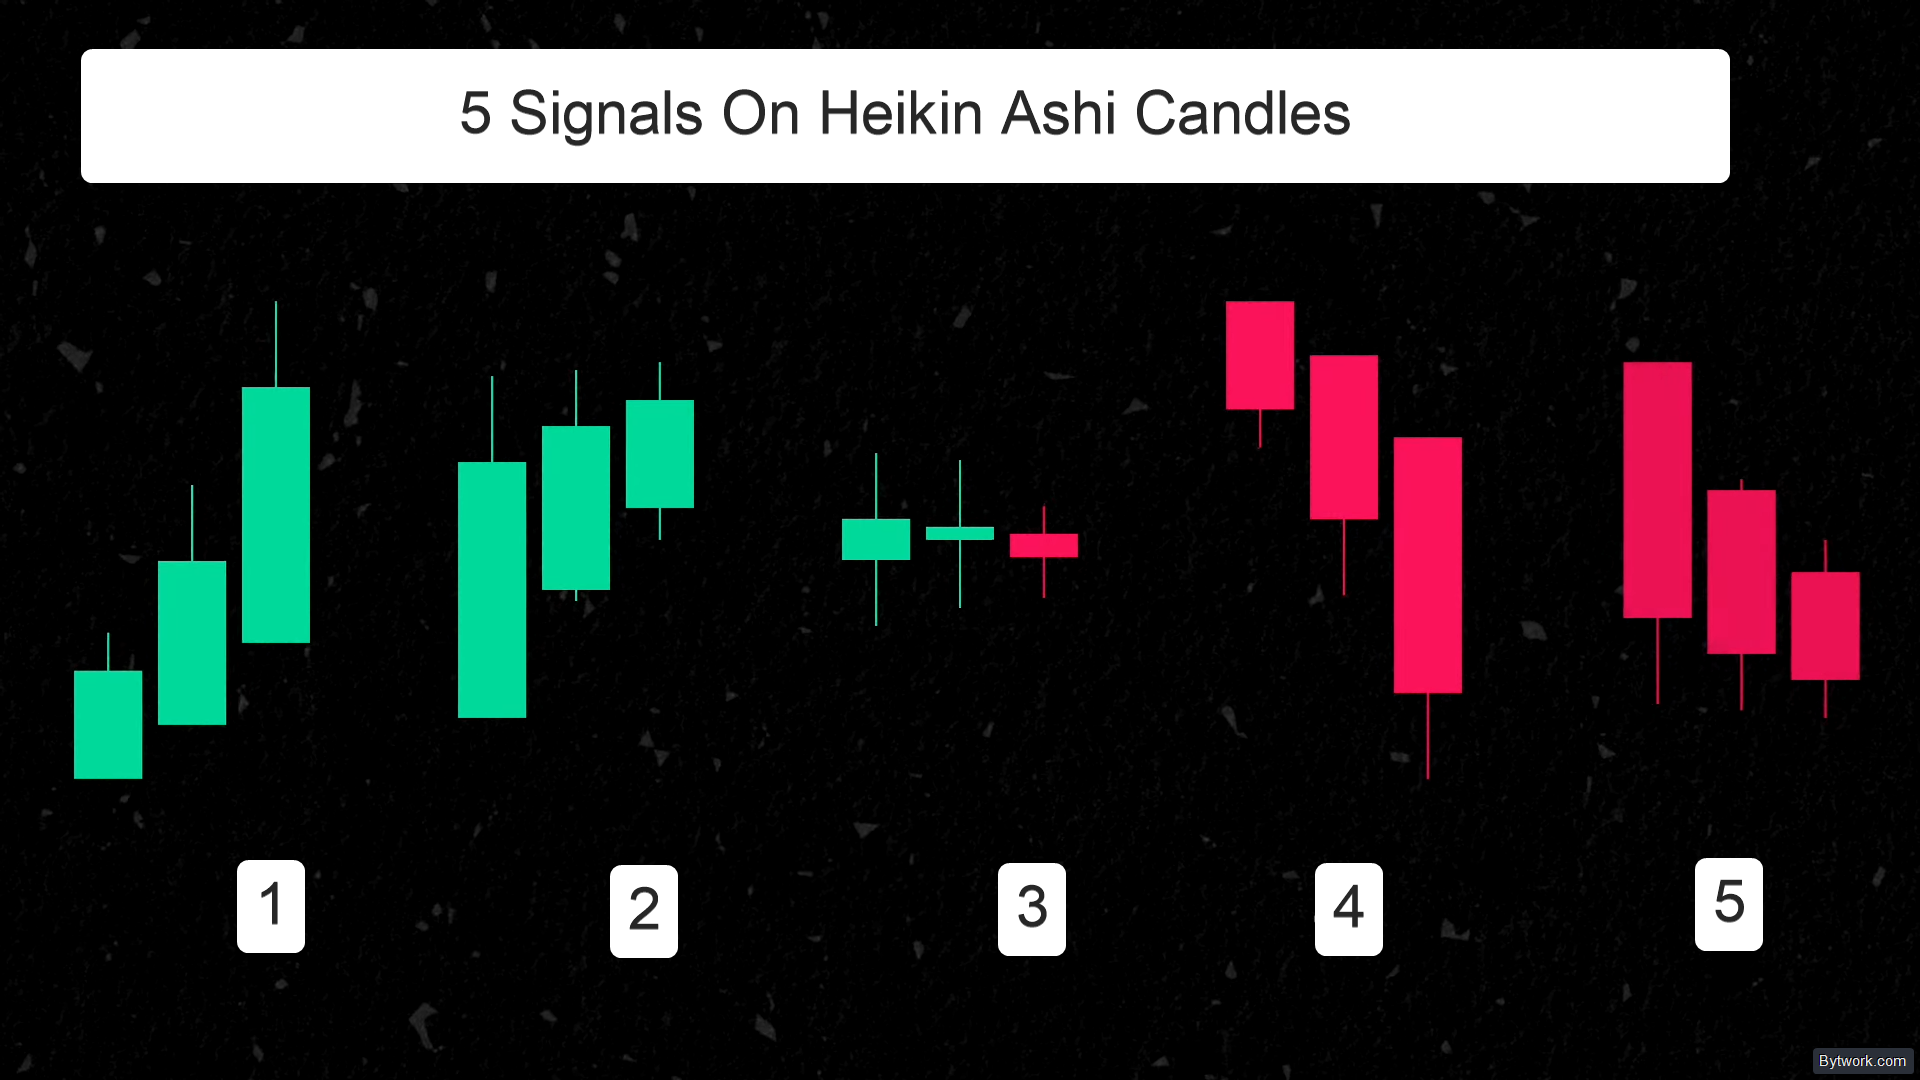
First: Strong Uptrend. In a strong uptrend, we see a series of bullish green candles with no lower wick, and the body of each subsequent candle becomes larger and larger.
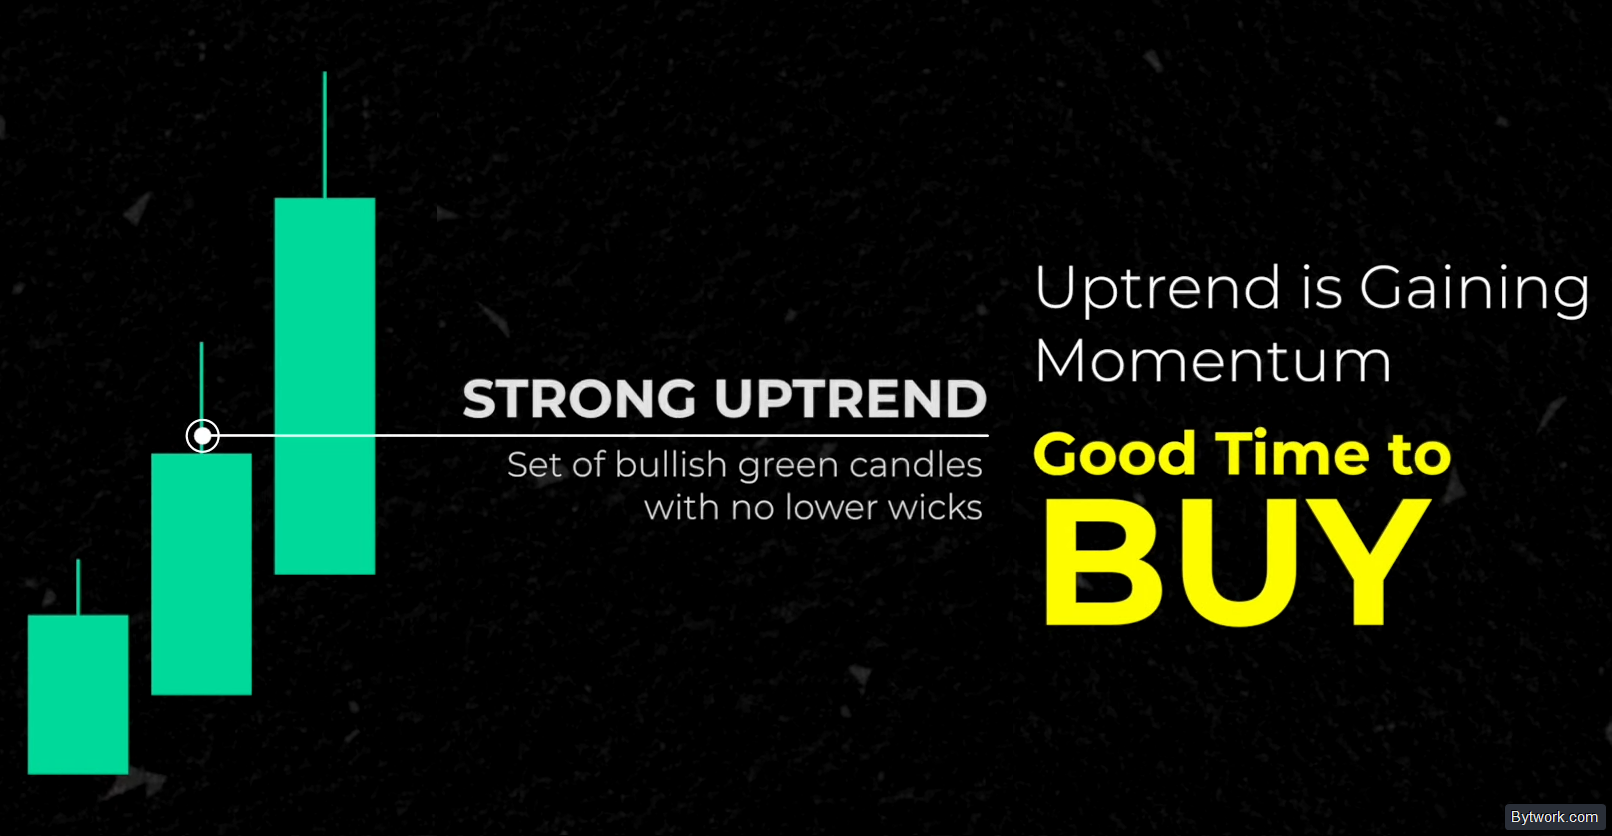
This pattern indicates that the uptrend is gaining strength, making it a suitable time to enter buy positions.
Second: Weak Uptrend. When the uptrend begins to weaken, the bodies of the green candles become smaller with each subsequent candle. Sometimes, lower wicks also start to appear.
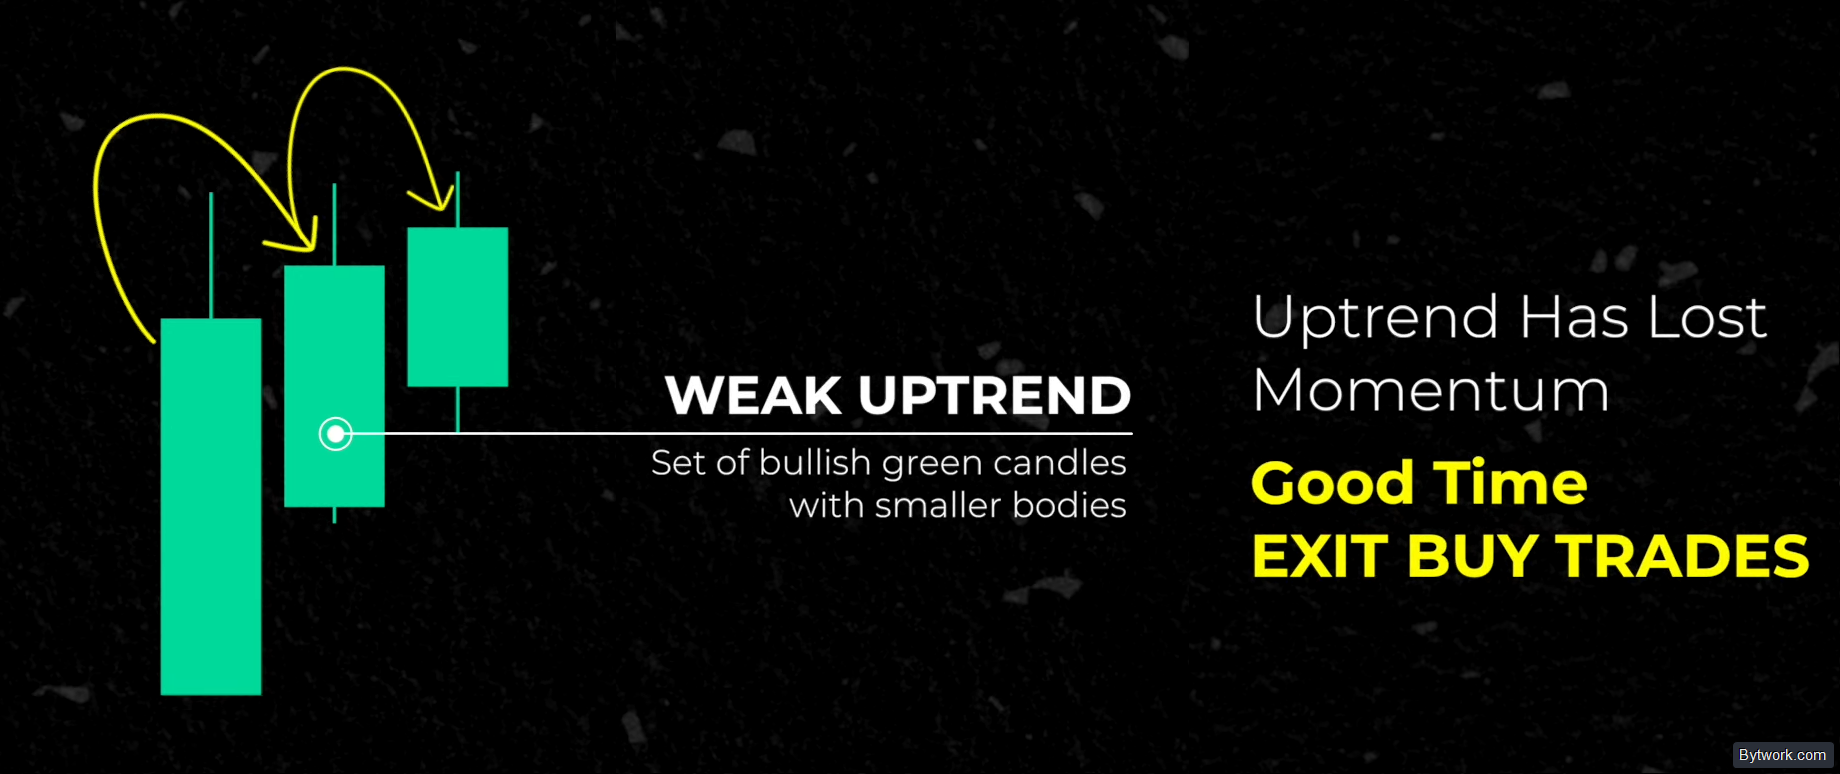
This is a sign that the uptrend has lost momentum, and a pause or reversal may occur soon. In such moments, a trader should consider exiting buy positions!
Third: Sideways Trend (Range). After a trend, we may see a series of Doji candles. A single Doji candle can signal a loss of momentum, but if we see several Doji candles in a row, it indicates that the price is in a range (flat).
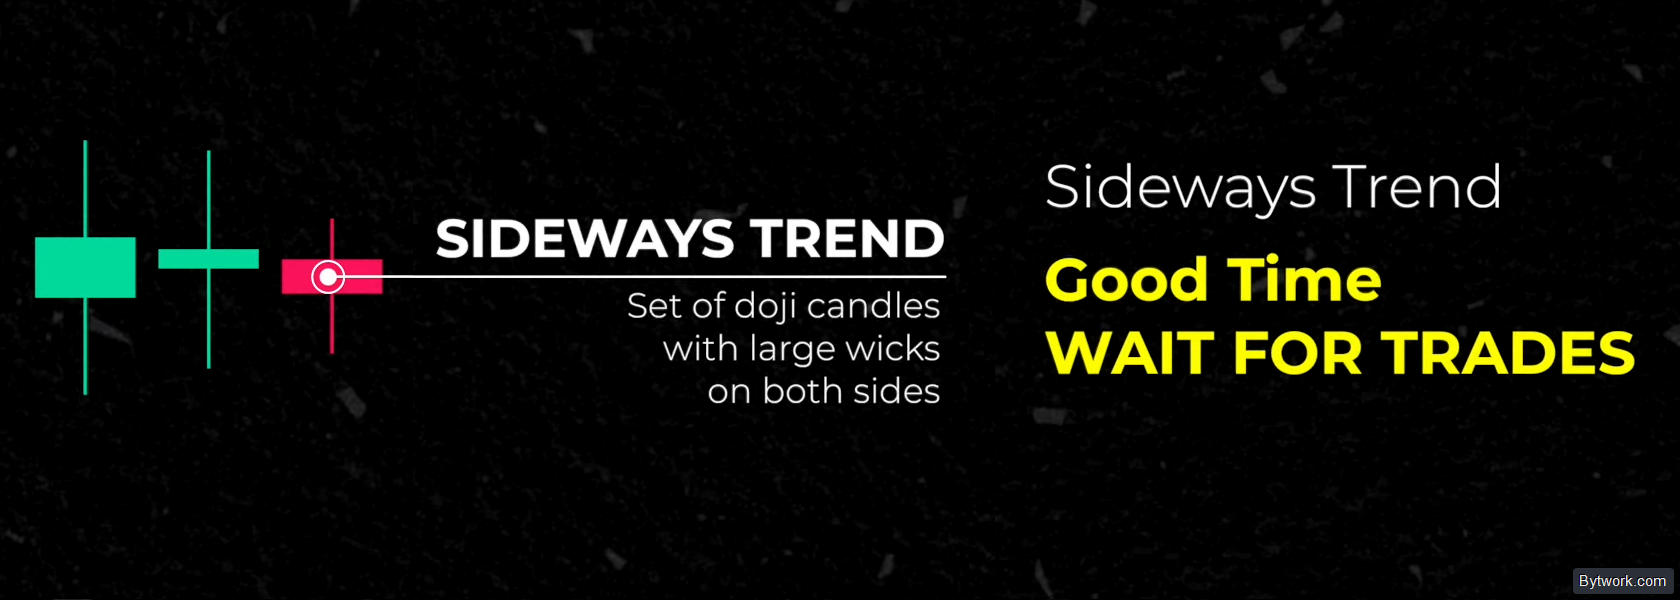
In a sideways market, oscillators often enter overbought/oversold zones and get stuck there. Practical experience shows that if RSI exits a zone, but the Heikin Ashi candles haven't changed color or increased in body size, the movement is likely to continue in the range, and the oscillator signal will be false.
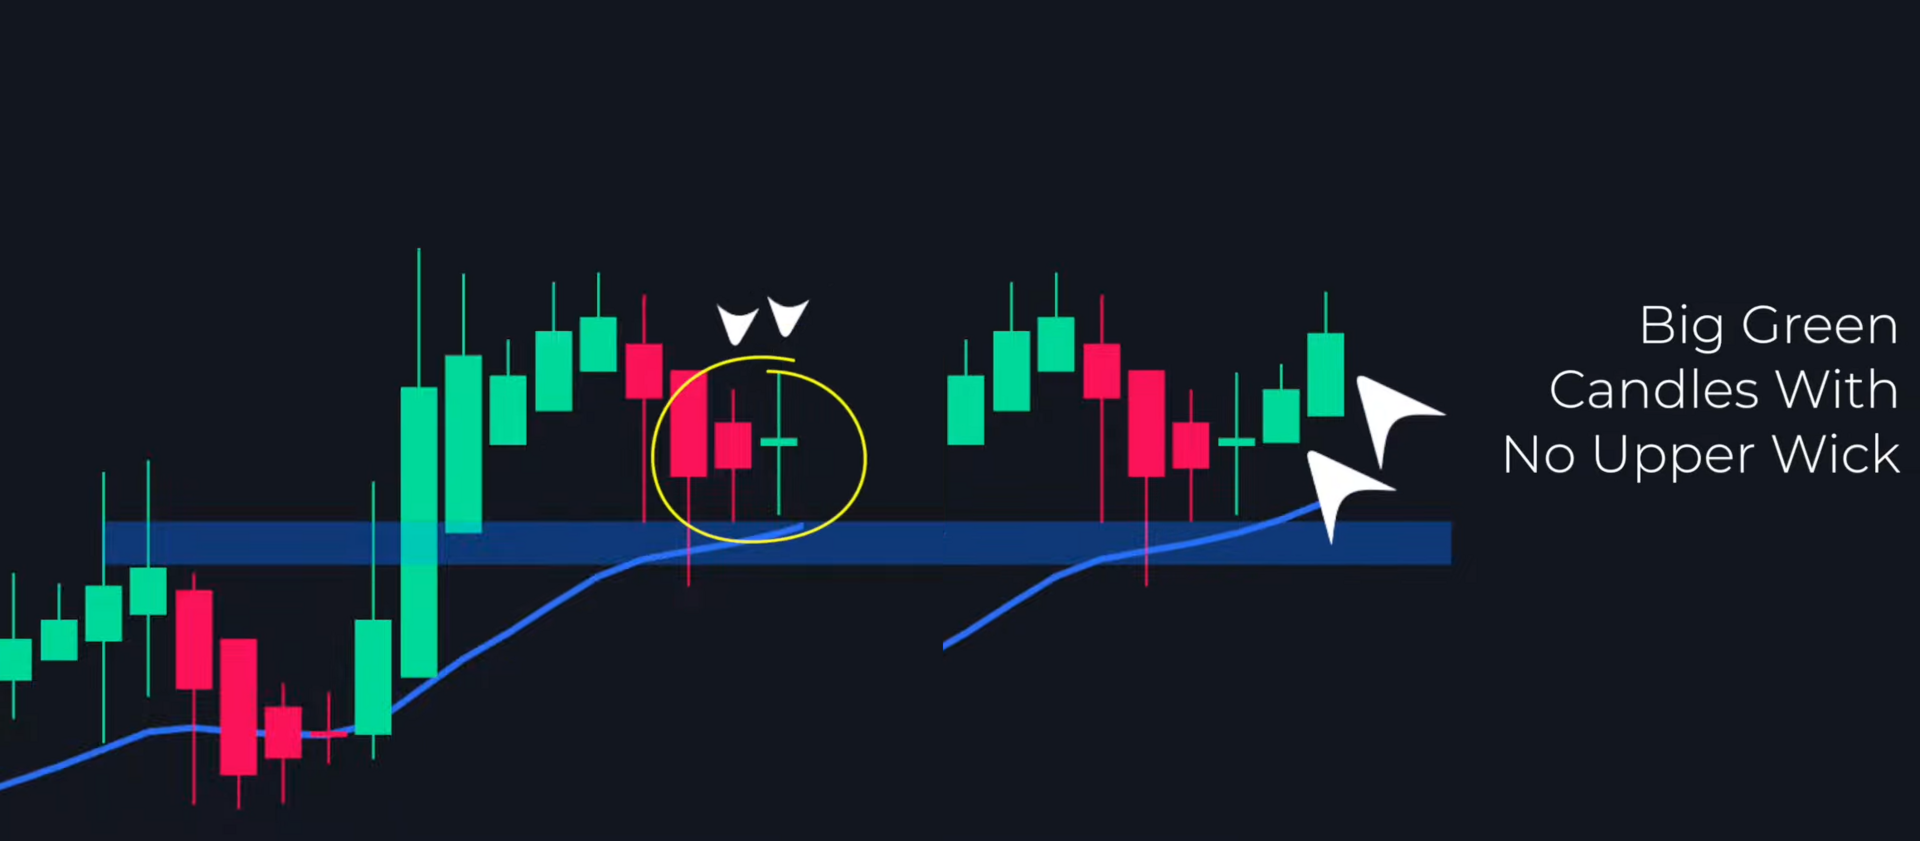
Fourth: Strong Downtrend. It can be identified by a series of bearish red candles with no upper wick, where the body of each subsequent candle becomes larger and larger.

This pattern shows that the downtrend is gaining strength, and it's an excellent opportunity to enter sell positions. However, it is not recommended to enter immediately after the first red candle. Experienced traders wait for 2 consecutive large red candles without upper wicks to confirm the validity of a breakout or reversal.
Fifth: Weak Downtrend. When the downtrend weakens, we see a series of red candles where an upper wick starts to appear, and the candle bodies shrink.
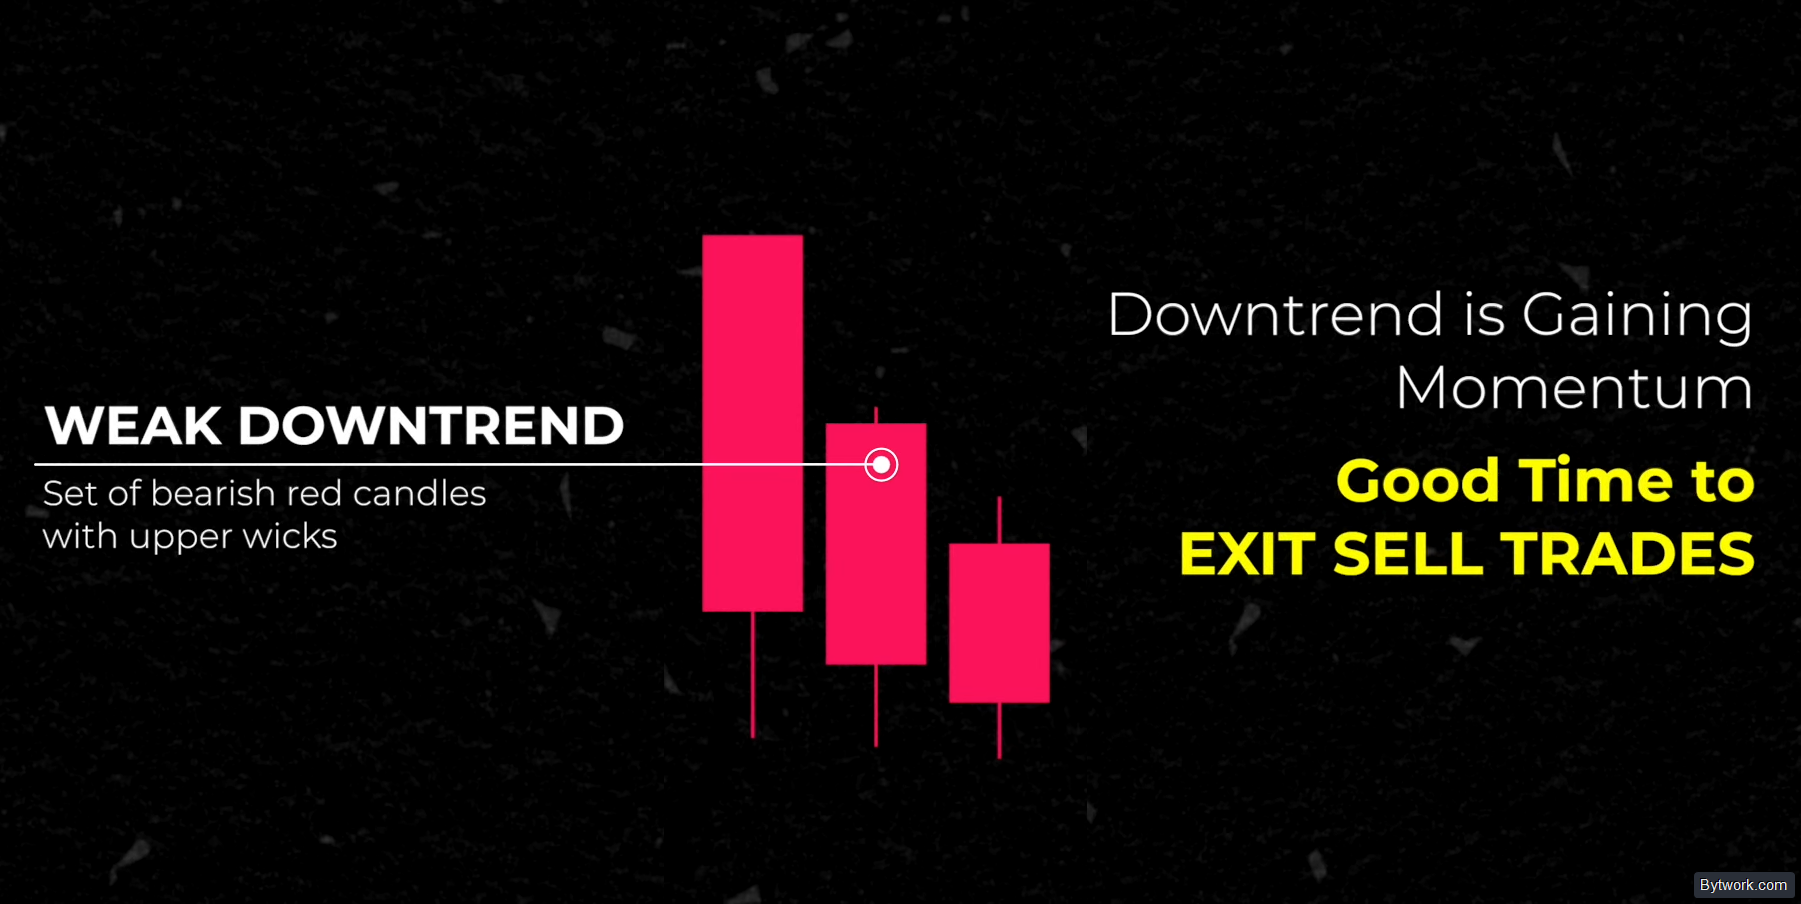
This is a sign that the trend is losing momentum, and a temporary pause or reversal is possible soon. The appearance of signs of a weak downtrend (shrinking bodies, upper wicks) is primarily a signal to close short positions or tighten stop-losses, rather than immediately opening a buy trade.
It is important to understand that Heiken Ashi can show a series of red candles with small bodies and upper wicks, while on a regular candlestick chart, the price might actually be ranging or even slowly rising. This occurs due to the mathematical averaging of the previous candle's data.
Now let's look at a few examples where these signals are combined with other price action factors to form trading ideas.
Strategy Examples
Strategy 1: Buying at Support
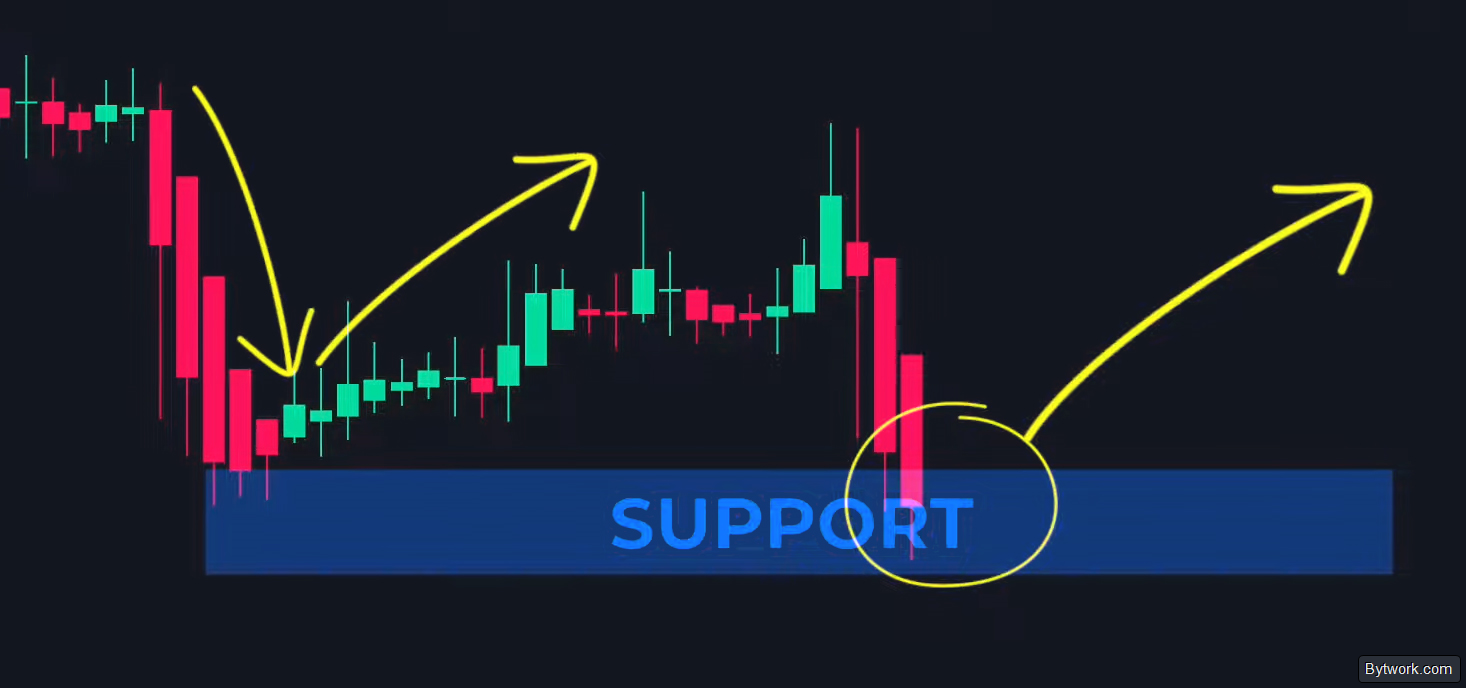
In the chart below, we see that the price reversed from a certain area, so we mark it as a support level. The next time the price approaches this level, we expect it to reverse again and go up.

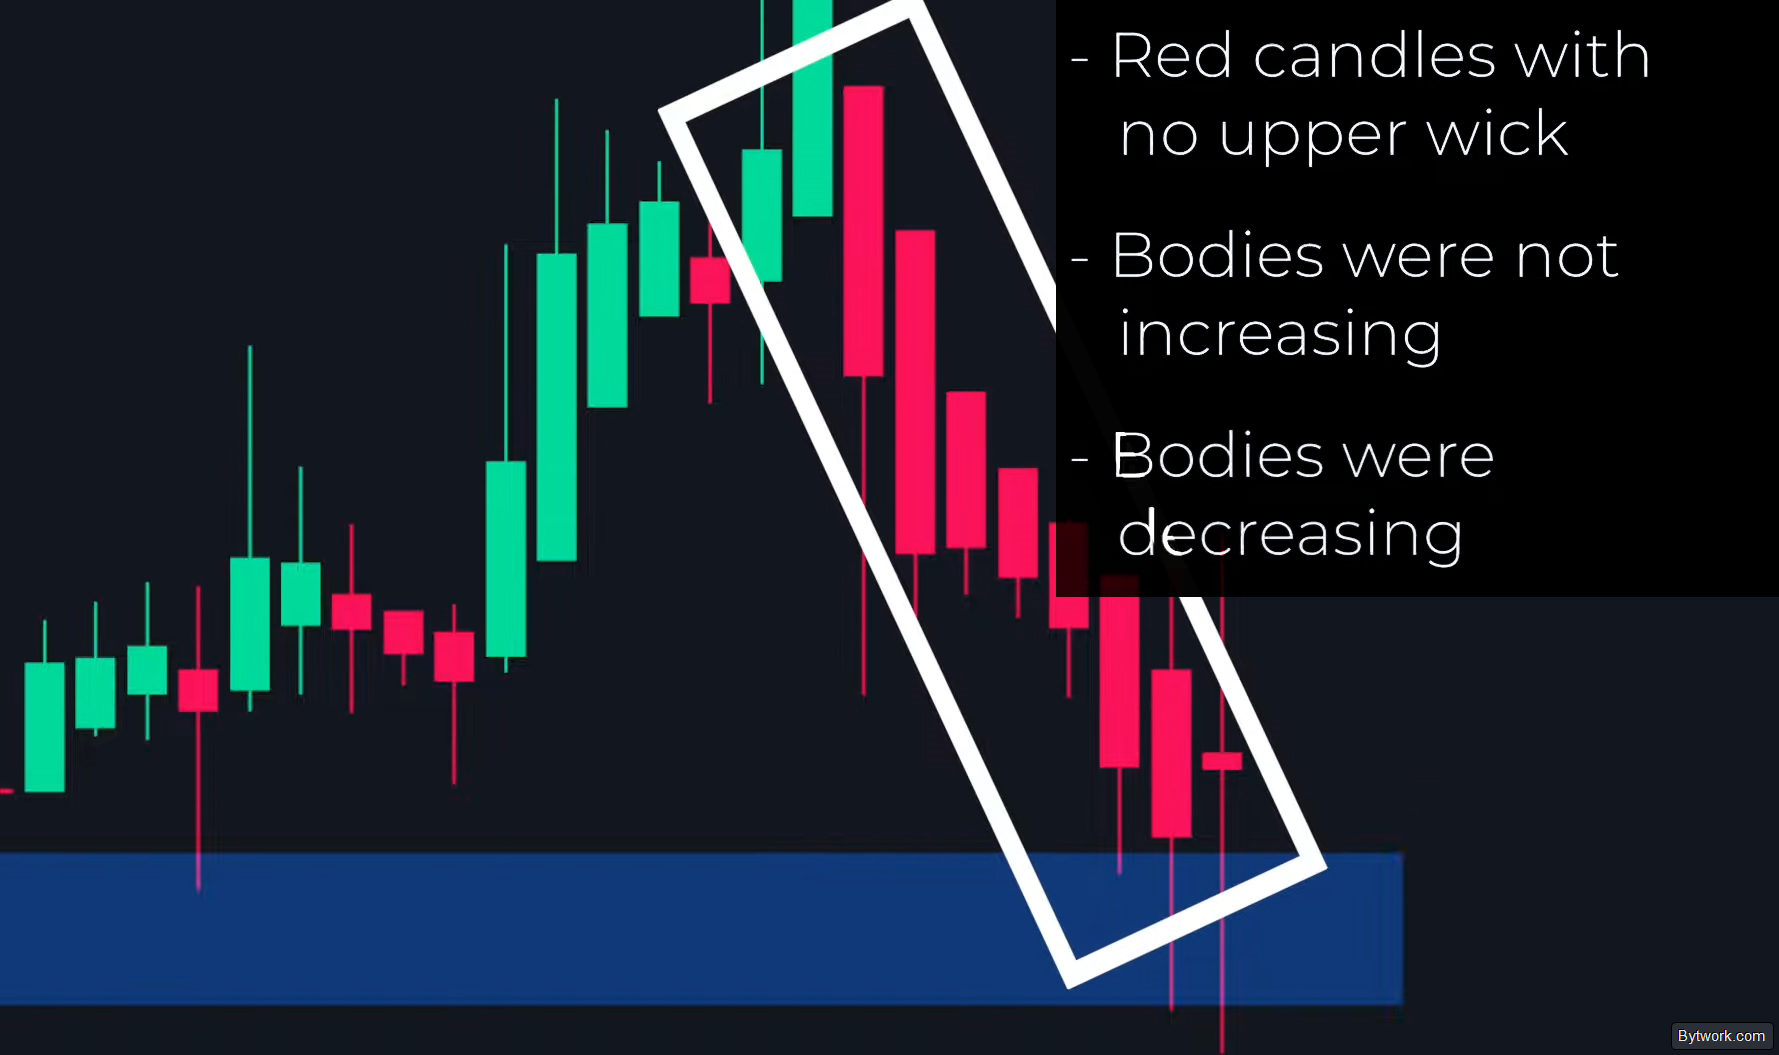
Soon, the price approaches the support level. Now let's look closely at the candles in this downward move. First, we saw a series of red candles without upper wicks, but their bodies were not increasing – on the contrary, they were decreasing. This indicates that the downward movement was not strong.
Then a red candle with a small upper wick appears – this is also a sign of a lack of momentum in the downtrend.
Next, we see a Doji candle with a large upper and lower wick, and this Doji candle formed exactly at the support level.
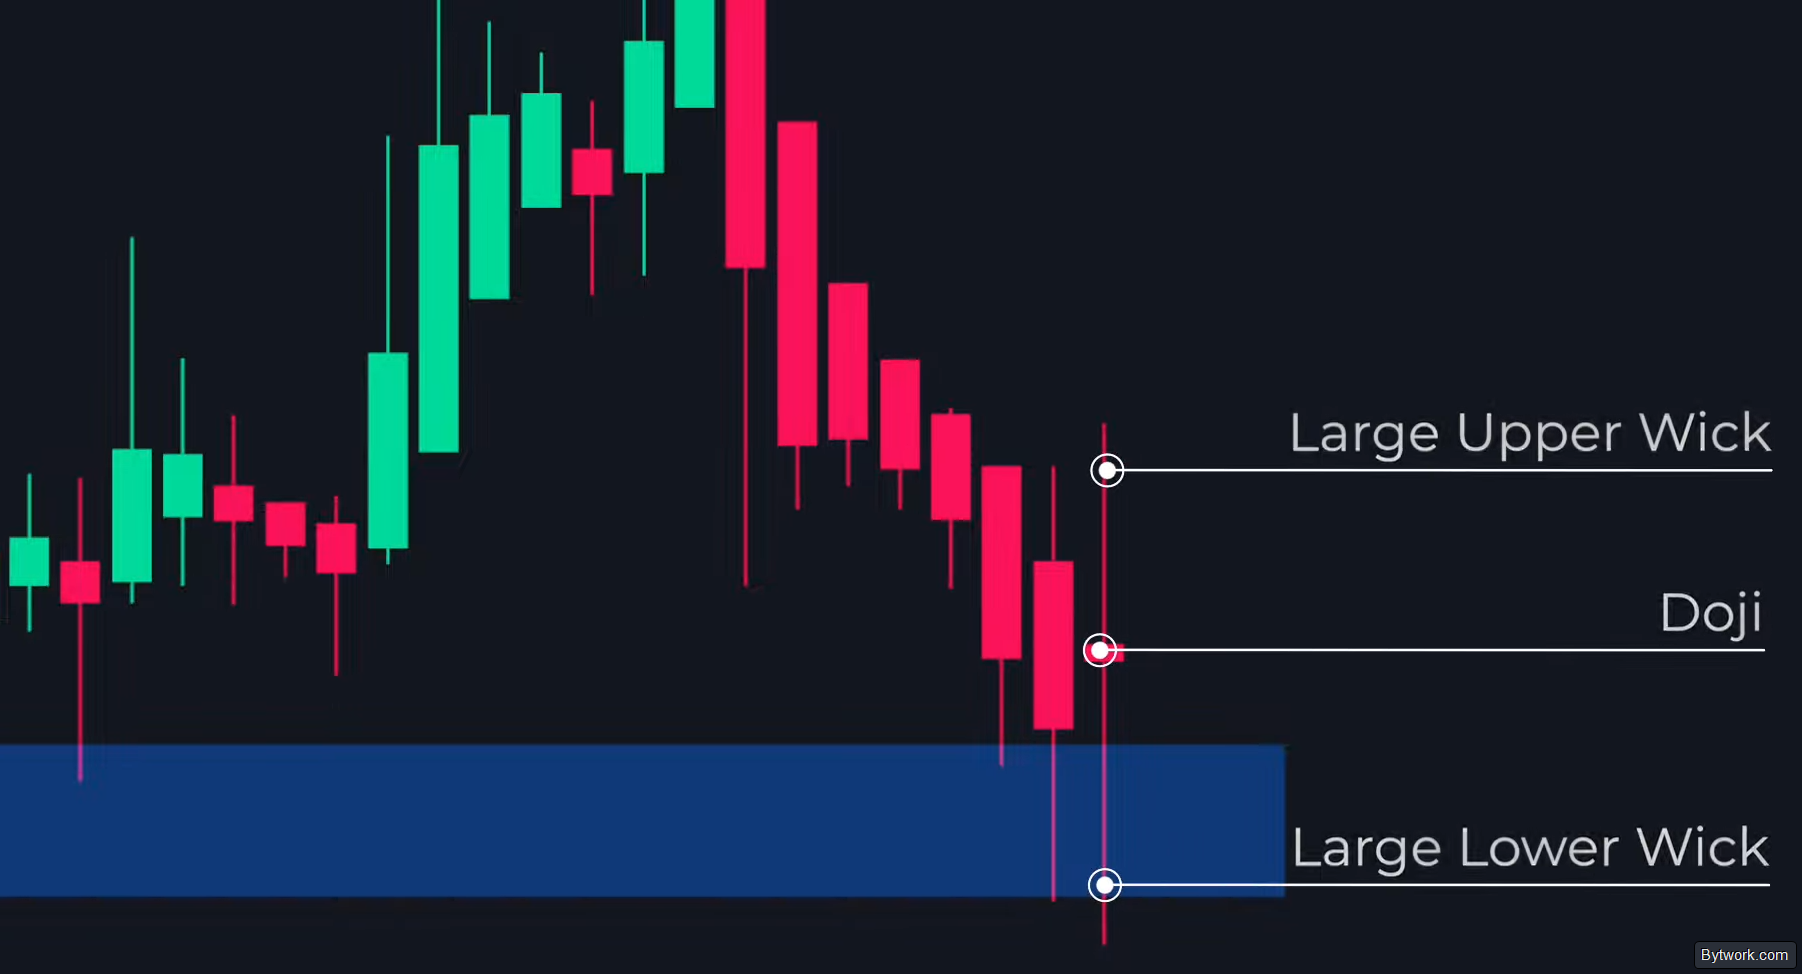
This shows that the support level is holding, and now there is a high probability of an upward move from this point. Finally, below we see a confident green bullish candle with a large body and no lower wick.

This is a strong signal that the price will go up from this point, so a buy order can be opened on this candle. Place the stop-loss below the candle, and set the target at the next resistance level.

The ideal entry point occurs when a Japanese candlestick forms a reversal pattern at a support level (e.g., Hammer or Bullish Engulfing), and the Heikin Ashi candle confirms this by changing color to green without a lower wick.
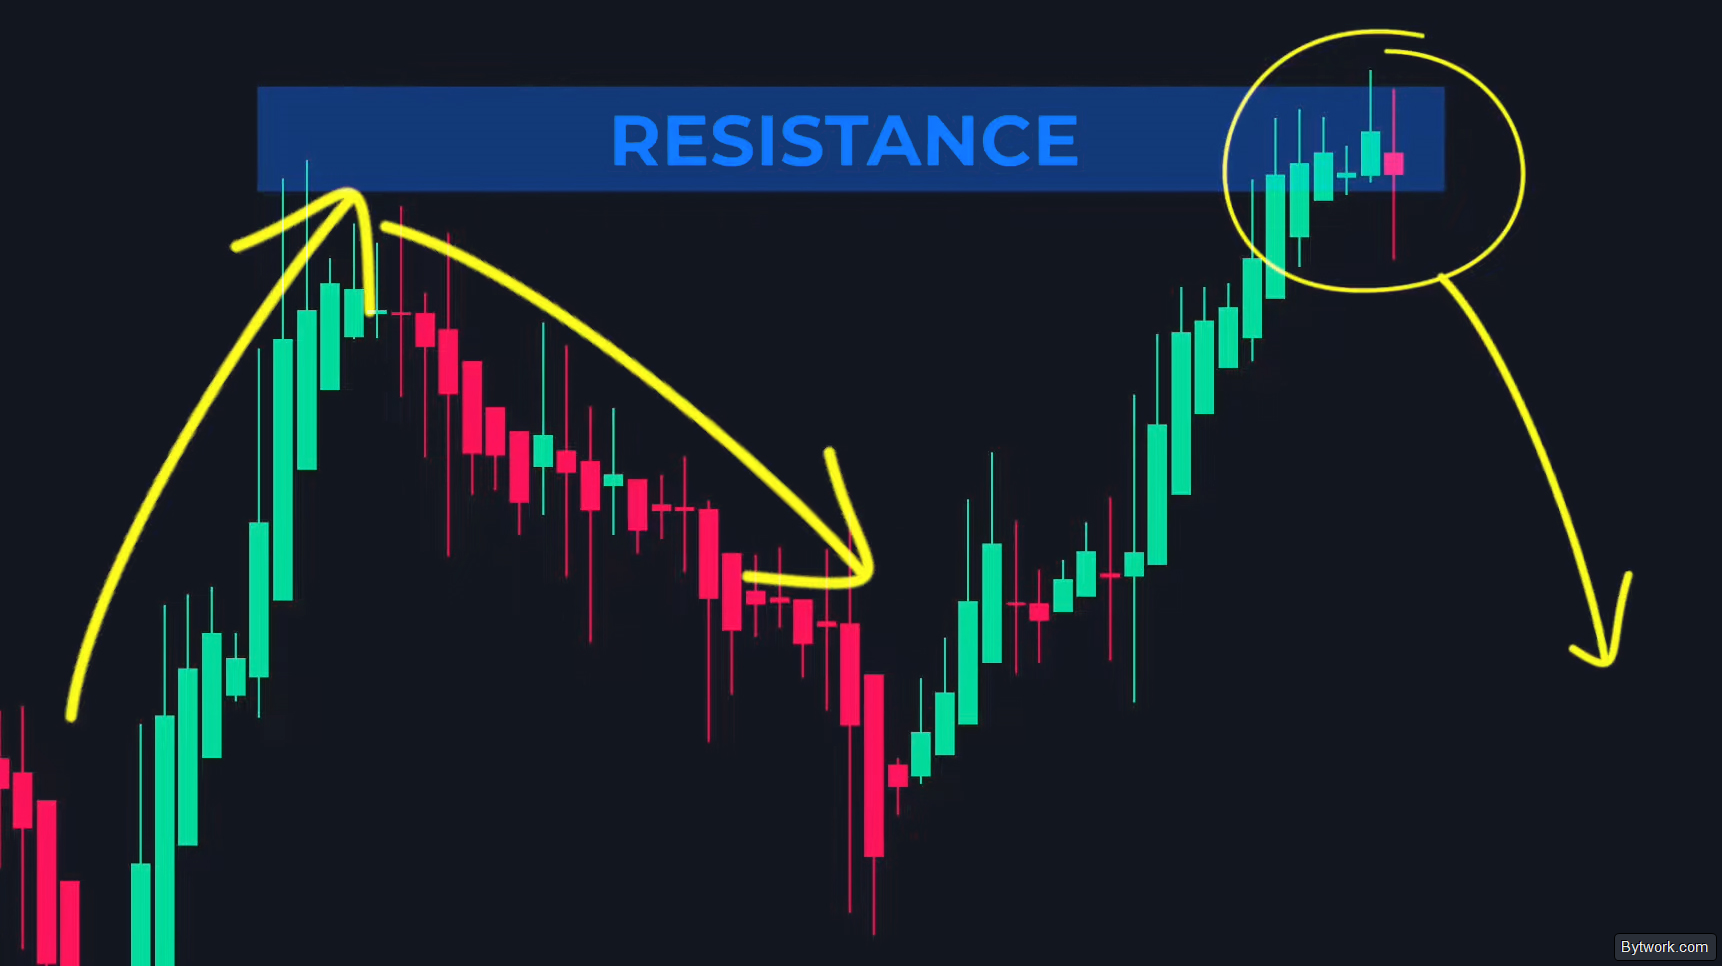
Strategy 2: Selling at Resistance
Here is an example of a sell trade. Earlier, the price reversed downwards from a certain area, so we mark it as a resistance level. Now, as the price returns to the resistance, we expect a reversal downwards. We see that the candle bodies are getting smaller and smaller. There are no lower wicks on these candles, but the shrinking bodies themselves indicate a loss of momentum.
Then a Doji candle with an upper and lower wick appears – again a sign of lost momentum. Finally, we see a red candle with a large body and no upper wick.

This shows that the resistance is holding, and the price will reverse downwards. Therefore, we can open a sell trade at the close of this red candle. Next, we can place a stop-loss above the candle and set a target at the support area.

The most reliable short entry at resistance is the appearance of a red candle with a large body and a complete absence of an upper wick. This is a mathematical confirmation that the average opening price became the period's high.

It's important to understand that a stop-loss should always be placed considering the actual wicks of Japanese candlesticks. In Heikin Ashi, the price is averaged, and an actual price spike through a level can hit your stop-loss that seemed safe on the Ashi chart!
Strategy 3: Trading Breakouts
On the breakout, the price reversed upwards from a certain area, so we mark it as support. When the price returns to this area, we expect it to find support again and move up.
But we see that the price starts forming small Doji candles – this indicates consolidation, and the probability of the support holding decreases significantly. A breakdown of support is possible. Eventually, the price breaks below support with 2 large red candles.

This was a signal of a strong breakout, and we could expect a sustained downward movement. Therefore, we can open a sell trade on this candle, place a stop-loss above the candle, and aim for the next support level.

Note that the second candle breaks the level cleanly, without an upper wick (in Heikin Ashi, this is a critically important sign of strong bearish momentum).
Also, use Heikin Ashi on a higher timeframe (e.g., H1) to identify a breakout pattern (flag, flat top), but look for the entry point on a lower timeframe (M1 or M5) during the retest of the broken level.
Strategy 4: Trading with a Moving Average
On the chart, we are using a 20-period moving average. The price was trading above the moving average, and the average itself was pointing upwards, so we are in an uptrend. We also see that the moving average acted as support during pullbacks.
This time, when the price pulled back to the moving average, we expected it to find support again. Additionally, we have a support level drawn from a previous high, so in this area, we have a convergence of the support level and the moving average.
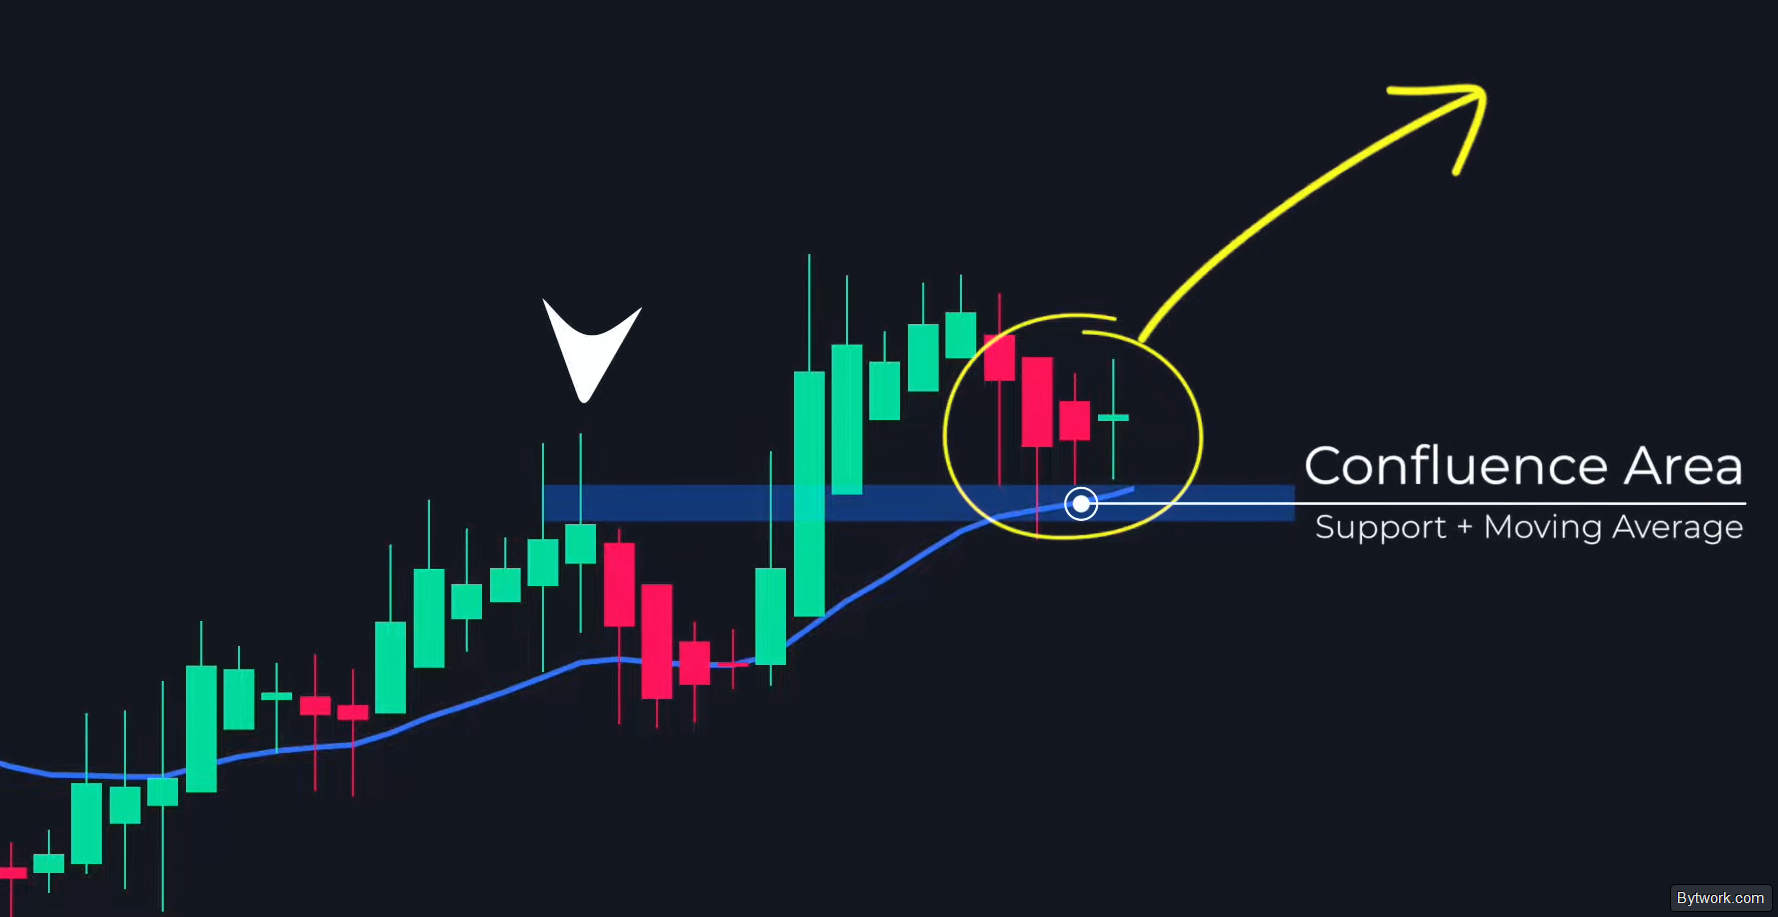
We see 2 Doji candles, which indicate extremely weak downward momentum, and the price is highly likely to find support. Then, 2 green candles appear, confirming our reasoning and providing an excellent trading opportunity.
So, we enter a buy trade at the close of this candle, place a stop-loss below the candle or below the moving average. And since we don't have a resistance level to set a target, we can aim for a risk/reward ratio of 1:2.

This is how Heikin Ashi candlesticks are applied in strategies.

The moving average helps avoid exiting a trade prematurely due to minor corrections.
The position remains open as long as the price is on the desired side of the EMA.
Bonuses
Professional traders do not rely solely on Heikin Ashi and moving averages. They use additional indicators, such as RSI and Fibonacci tools. For example, RSI levels filter Heiken Ashi signals. Overbought zones above 70 signal a potential reversal downwards, oversold zones below 30 signal a reversal upwards. A crossing of 50 determines a bullish or bearish trend, and divergences strengthen reversal signals.
Fibonacci retracement levels help identify support and resistance zones for trend continuation after a pullback, while Fibonacci pivot points, calculated using Fibonacci proportions, provide specific levels for setting stop-losses and take-profits.
Also, look for entry points when RSI or Stochastic are just exiting extreme zones, while the Heikin Ashi candle bodies are still small. This indicates an early stage of a new momentum forming, rather than an attempt to catch a moving train.
You have learned about the advantages of Heikin Ashi candlesticks, but the guide would be incomplete without discussing their drawbacks.
What are the Drawbacks and Risks?
Heikin Ashi does not work for scalping. Scalping requires reacting to every instantaneous price change, while Heiken Ashi signals (e.g., color change) often arrive only after the price has already completed a significant portion of the move. This makes the entry point unfavorable. But this is not the only drawback. Let's look at them in the table.
|
Risk |
Essence of the Drawback |
|
Signal Lag |
Heikin Ashi (HA) averages data, so a trend change signal arrives late (missing 20–30% of the move). Not suitable for precise entry/exit point identification. |
|
Lack of Actual Price |
HA does not display actual market prices. The chart might show a profit, but the actual order execution price will be worse, and the stop-loss will be wider. |
|
Illusion of Profit in Backtesting |
Backtesting strategies on historical HA data yields distorted (overly ideal) results. In reality, many signals turn out to be unprofitable. |
|
Hidden Price Gaps |
The calculation method completely neutralizes gaps between sessions. This deprives you of important support/resistance levels. |
|
False Signals in Ranges |
In a range or low volatility, HA generates many false color changes (whipsaws), leading to stop-loss triggers. |
|
Risks on Lower Timeframes |
Due to mathematical lag, the discrepancy between HA display and the actual price becomes critical for scalping (M1–M5). |
|
Psychological Traps |
Visual simplicity tempts beginners into blind trading based solely on candle color. This often leads to deposit loss. |
Practice shows that due to the market noise filtering process, a confirmed trend change signal (e.g., a candle color change) often arrives only when 20–30% of the move's time has already passed.
Conclusion
Unlike candlestick charts that record literal opening and closing prices, Heikin Ashi calculates each bar's open as the arithmetic mean between the previous bar's open and close. This averaging reduces visual volatility, replacing spike-like movements with smoother trends, but at the cost of losing precise information about opening and closing levels.
The lag, caused by the calculation's dependence on previous bars, makes the Heikin Ashi chart less suitable for short-term strategies that require an immediate reaction to reversals.
We also note the method's risks – the indicator's lag, the absence of actual price, and the subjectivity in level construction. All this can lead to false signals without strict volatility control and money management.
It is important to understand that the essence of trading is that you cannot just guess. You always need to look for multiple convergences to identify high-probability trades.
We have been trading cryptocurrencies since 2018 and have tested hundreds of indicators and strategies. The trading section will help you choose a trading system! Your editor - Pavel Grachev for bytwork.com.
This material is for informational purposes only and does not constitute financial advice.

Now reading


In DePin, people create networks themselves, share traffic or capacity, and receive rewards in tokens from these projects.


The Ellipal firmware update enhances security (fixes vulnerabilities), adds support for new cryptocurrencies and tokens, and optimizes the interface and operational stability.


