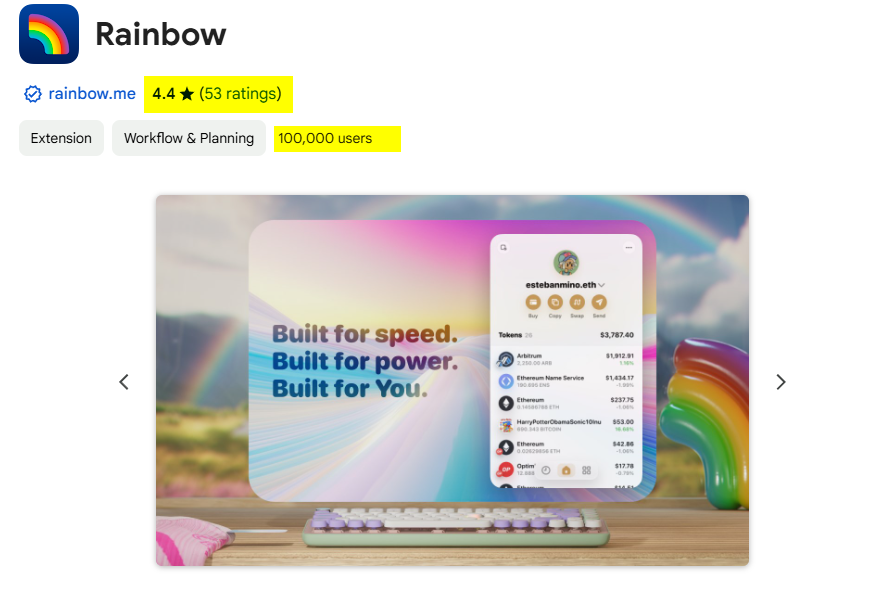
Rainbow Wallet: Extension Review - Airdrops, 2FA, App and Supported Networks
- Wallet had vulnerability
- No 2FA, Lock Screen
- No BTC support
- Simple interface, keyboard shortcuts
- Airdrops, points
- Cheap transactions
- Integration with Ledger
Rainbow Wallet is aimed at reducing fees for the Ethereum network and increasing ease of use. It supports all tokens created on the basis of Ethereum (ERC-20), such as USDT, USDC, BNB, ChainLink and others.
Also, support for other blockchains is implemented:
|
Network |
Description |
Token |
|
Base |
Decentralized application platform, reduces costs. |
No |
|
Optimism |
Optimistic rollups, low fees. |
OP |
|
Arbitrum |
Optimistic rollups, low fees, high speed. |
ARB |
|
Polygon |
For transactions and lower fees.. |
POLY |
|
Zora |
Focus on art and NFTs. |
ZORA |
|
Blast |
Blockchain APIs and tools. |
BLAST |
|
Degen |
For staking, voting, payment. |
Degen |
|
Avalanche |
Smart contracts with low commissions. |
AVAX |
|
BSC |
Smart contracts, DApps support. |
BNB |
|
Apechain |
For the ApeCoin ecosystem, support for NFTs and DApps. |
APE |
|
INK |
Monetization of intellectual property. |
INK |
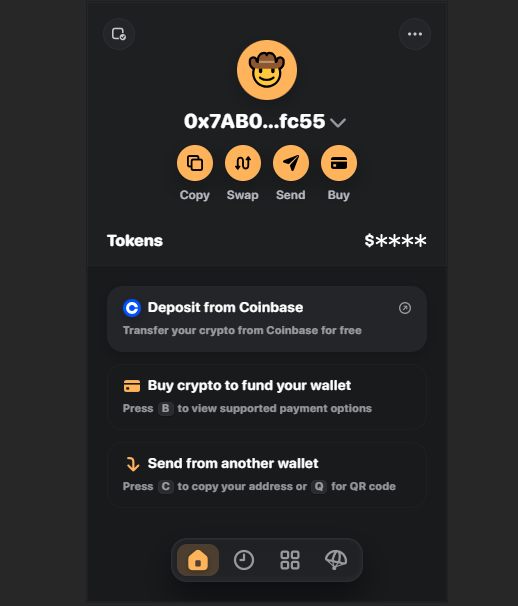
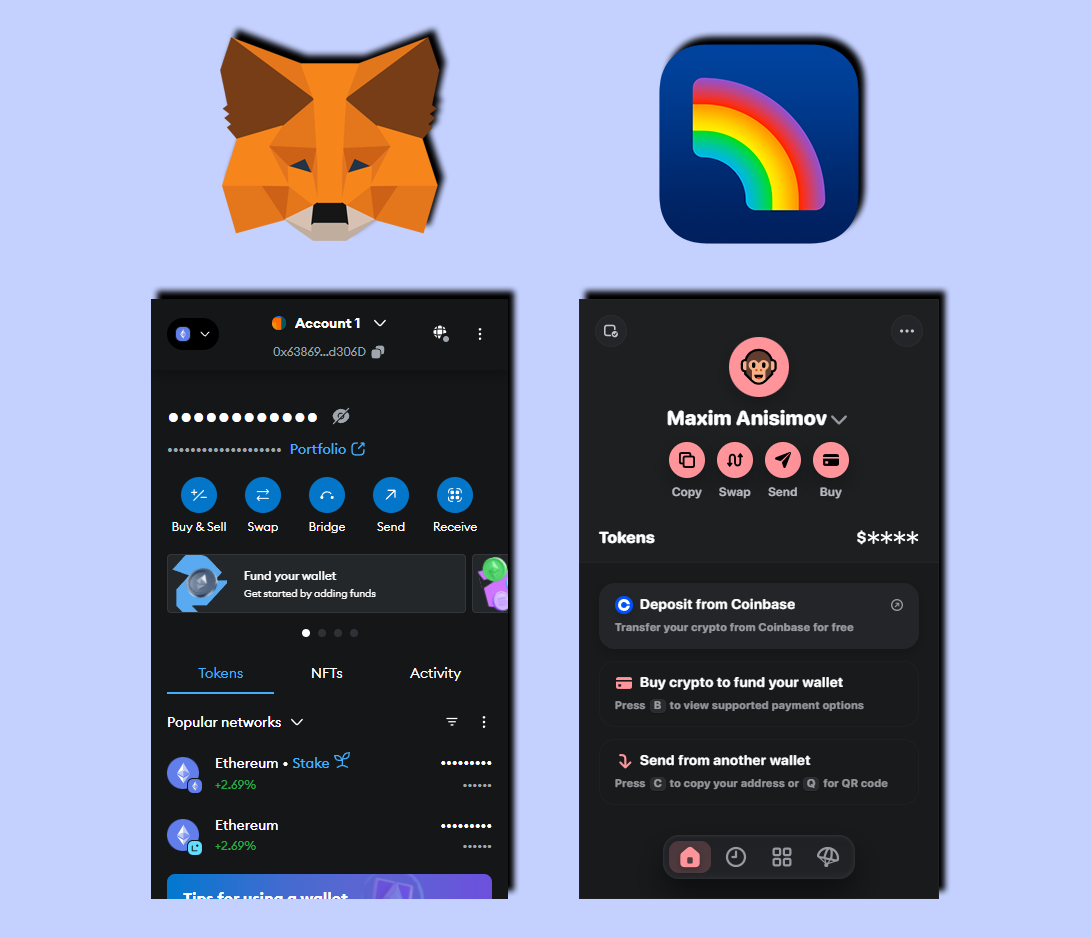
Wallet interface
Despite the support of these networks, we will immediately highlight the minus - the wallet does not support Solana and Bitcoin and works with fewer blockchains than competitors. This makes it less versatile.
Is it worth using? The solution will help you take a look at convenience, security and functionality.
Security and Features
Security:
- Connect hardware wallets - provide an additional layer of security by combining Rainbow with Ledger devices.
- Own your secret phrase - manage your seed phrase for reliable access control.
- Get private keys - have full control over your assets.
- Impersonation Mode - add public addresses or ENS. Monitor transactions and portfolios other users in read-only mode. Learn portfolio management strategies to improve your skills.
Interface:
- Keyboard Shortcuts – Use keyboard shortcuts for quick actions. For example, S key to send a transaction, X to exchange, etc.
- Detailed transactions - track the movement of funds in a clear and convenient format to always be aware of financial transactions.
Cheap transactions:
- Integration with Layer 2 networks - switch to different networks - Optimism, Arbitrum, etc. and conduct fast and cheap transactions.
- Use Bridges - swap assets and move between networks without restrictions.
Airdrops, Points, and Referrals:
- Earn Points - earn rewards that turn your accumulated points into airdrops.
- Referral Program - earn 10% of invited friends' points and their future activity.
DeFi functionality:
- Start token swaps - connect to Uniswap and other decentralized exchanges (DEX) for instant exchange.
- Add liquidity - participate in yield farming programs and become a liquidity provider to earn on your assets.
- Add NFT - store, manage and showcase non-fungible tokens (NFT).
We have looked at the basic functionality, and it promises to be convenient. However, for the sake of completeness of the guide, it is worth looking at the negative aspects and risks. We'll look at all of this below, but let's start with practice - downloading and using the wallet.
Downloading, installing and running the extension
The extension is officially supported in the following browsers on Windows, Mac and Linux for PC:
You can also get the extension in the download section on the official website.
When downloading, it is important pay attention to the number of installations and reviews. This will help ensure that you are downloading the legitimate version.
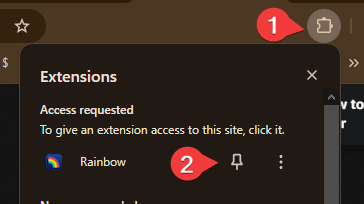
After installation, the wallet icon will appear on the browser panel. It can be pinned for quick access.
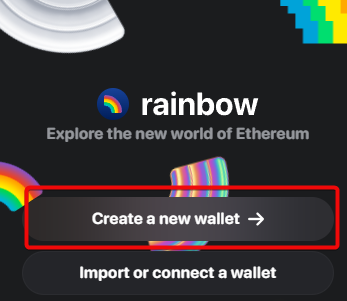
Creating a new wallet
To start creating, click Create new wallet. The import or connect a wallet option is used to restore and transfer existing wallets. We will look at this below.
The extension warns that you need to make a backup copy before using it. With a backup, you can restore, transfer to another application, and fully manage your wallet.
Backup
Click Reveal your recovery phrase.
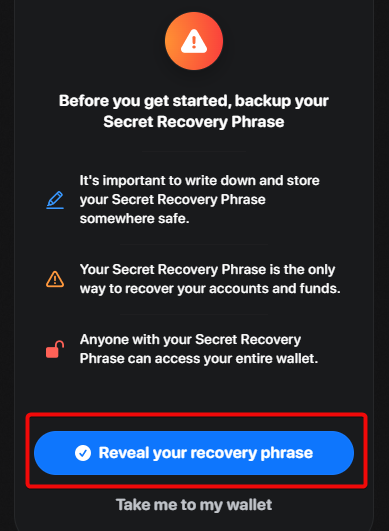
Important: the secret recovery phrase is the only way to recover accounts and funds. Write down and save the secret phrase in a safe place.
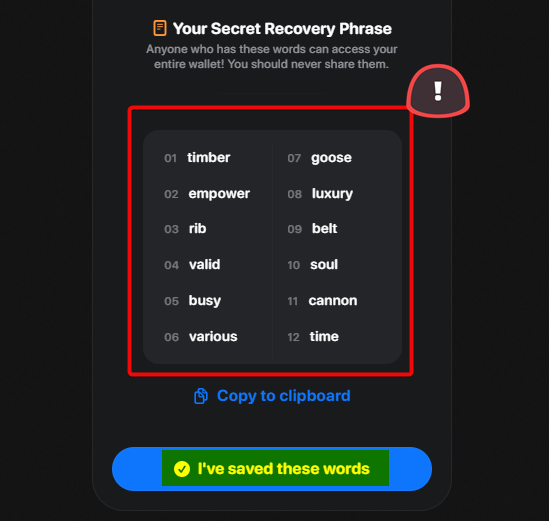
Write down all the words in the order in which they were generated and click l’ve saved these words. The extension will ask you to fake some words to make sure the entry is correct.
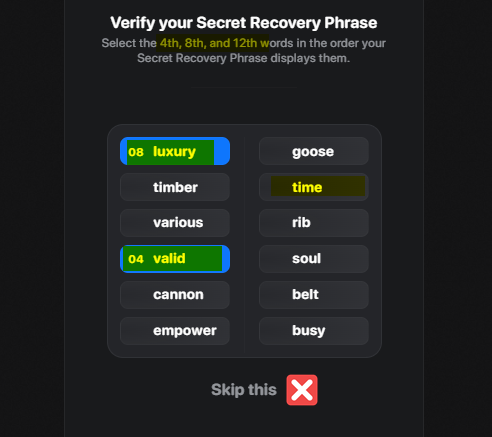
It is not recommended to skip this step. Confirm 3 words, then create a strong password.
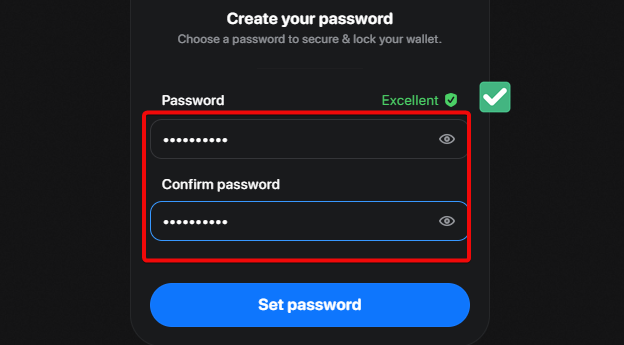
Create a long, unique password with letters, numbers, and symbols, avoiding obvious words, and store it in a safe place.

After entering the password, you will successfully complete the wallet creation. It will display information about hotkeys and links to usage instructions. Now the wallet is ready for use.
How to use
Use hotkeys for easy navigation. For example, click on the extension icon or use the Shift+Alt+R combination on Windows to quickly open the wallet.
Keyboard shortcuts speed up navigation and interaction with the application, minimizing the need to use the mouse. This increases convenience and efficiency if it is important to quickly switch between functions.
Settings include options for changing privacy, choosing a preferred currency and network. And also the language, design theme and sound notification settings.
We will touch on advanced settings below, because first of all we need to understand the basic functions and wallet addresses.
Creating an address
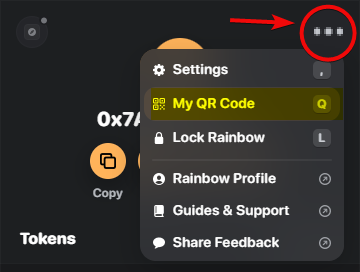
To top up, you can copy the address by clicking the Copy button on the main screen or use the C key. A QR code is also available (Q), to show to the sender. To do this, press the Q key or go to menu → My QR Code.
The QR code simplifies receiving payments - the sender scans it and transfers funds without manually entering the address.
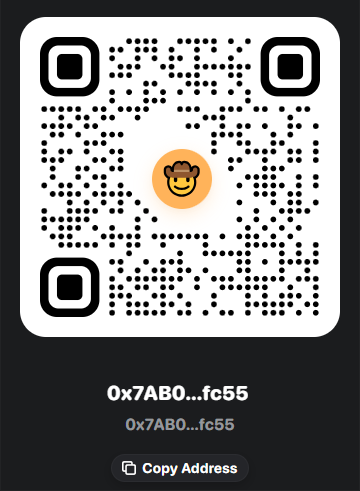
The QR code is used to connect to the dApp, exchange addresses in messengers and social networks, and it also helps to quickly receive payments and donations.
How to top up
The balance is replenished in three ways:
- Via Coinbase
- Buying cryptocurrency from a card
- Receiving funds from another wallet or exchanges
Copy the address or use the QR code to receive funds.
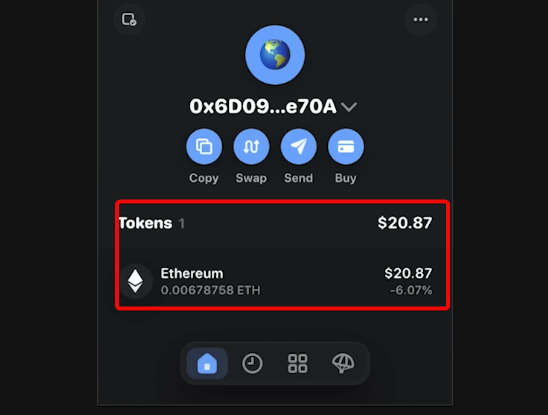
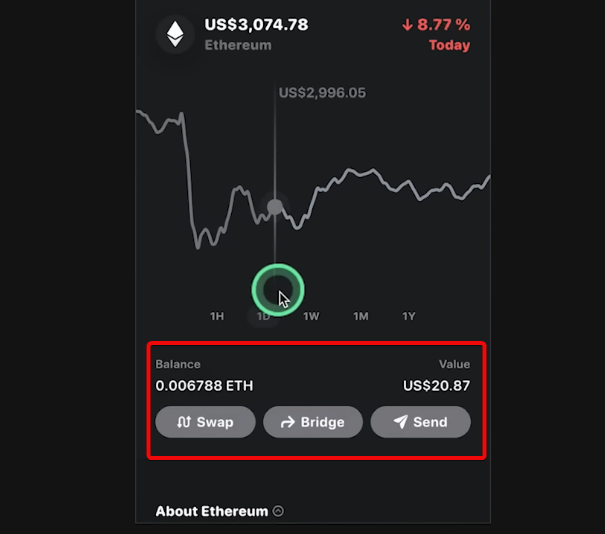
After the cryptocurrency is received, the balance will be displayed in the wallet. If the funds arrive quickly, we are lucky and the network is not overloaded. Click on an asset to see the current rate and available actions: swap, bridge, and send.
How to withdraw
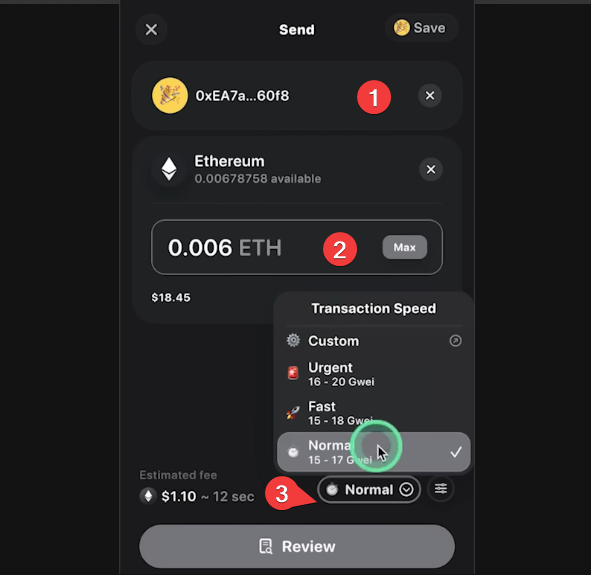
To withdraw funds:
- enter the recipient's address
- select the amount. Use
Maxif you want to send all funds - set up the fee and confirm the transaction.
Track the transfer status in the transaction history.
To transfer transaction details, copy its hash (TX hash) and send it to the recipient for tracking status.
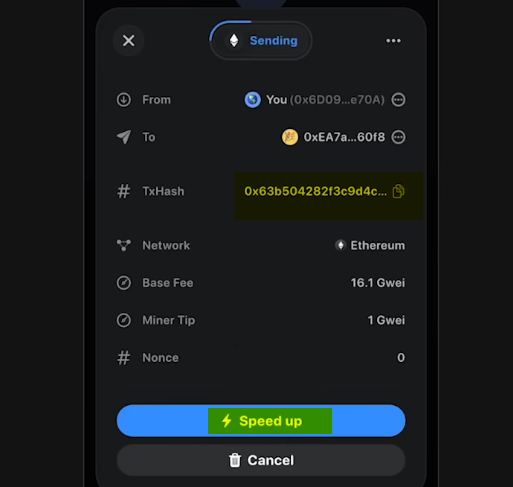
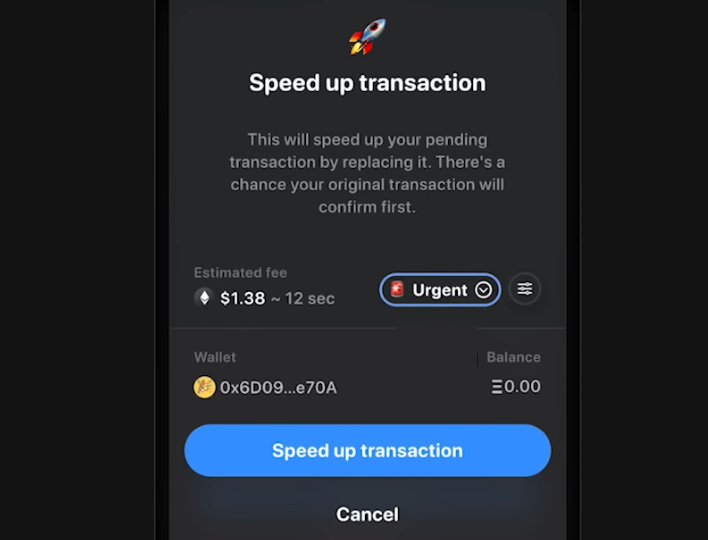
If necessary, speed up the transfer (Speed Up) by paying an additional fee.
Learn the principle of formation of fees in cryptocurrency here.
You can also send and receive cryptocurrency using ENS.
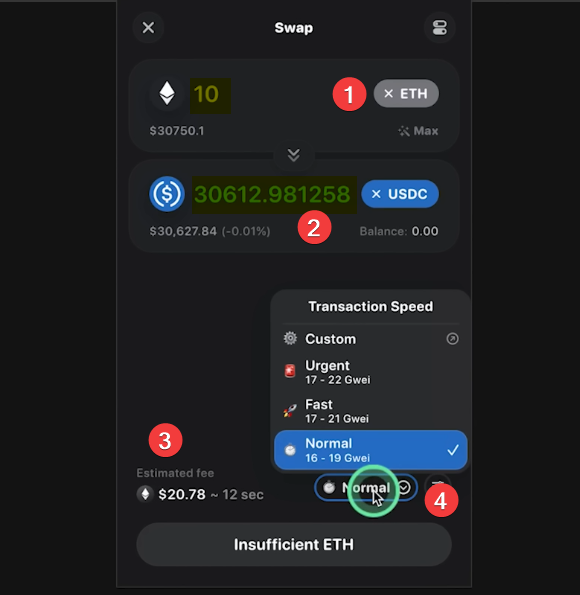
Swap
The wallet supports the function of exchanging cryptocurrencies within the application, automatically selecting the best rates. Swap tokens via the Swap function without having to go to the exchange to buy time.

To make an exchange:
- select a token,
- specify the amount, and the system will automatically calculate how much you can get.
- check the estimated commission and
- customize it as you wish.
Bridge
To transfer funds between blockchains, use the Bridge function, the process is similar to Swap.
For example, using Bridge you can transfer Ethereum from the mainnet to Layer 2 networks such as Optimism, Arbitrum or Zora. To perform an operation, you must select a token and a target network, and then confirm the transaction.
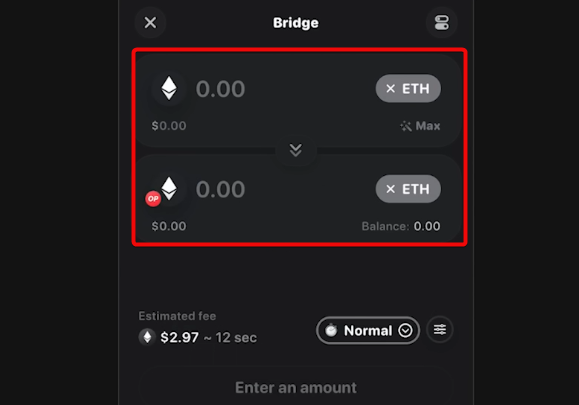
Bridges in Rainbow automatically optimize routes for speed and minimal fees. However, it is possible to set the gas manually (item Normal on the screenshot).
Purchase
MoonPay, Ramp and Coinbase services are available for purchasing cryptocurrencies. However, it is worth considering the commissions, which can reach 2-5%.
Experience shows: most often, buying through exchanges is more profitable.
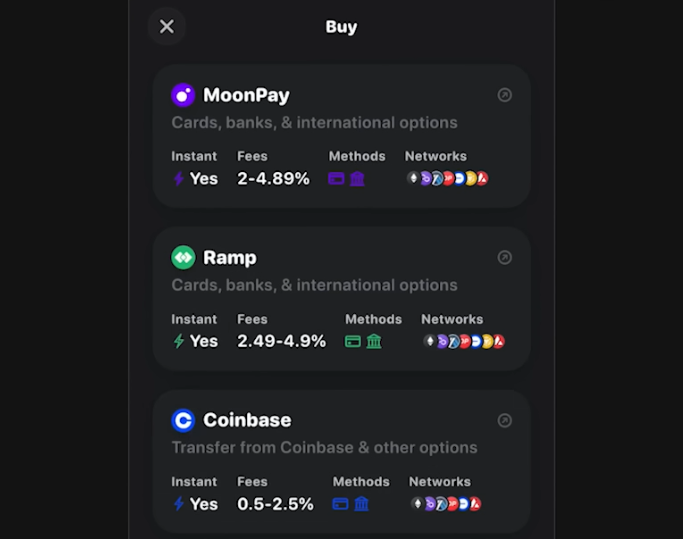
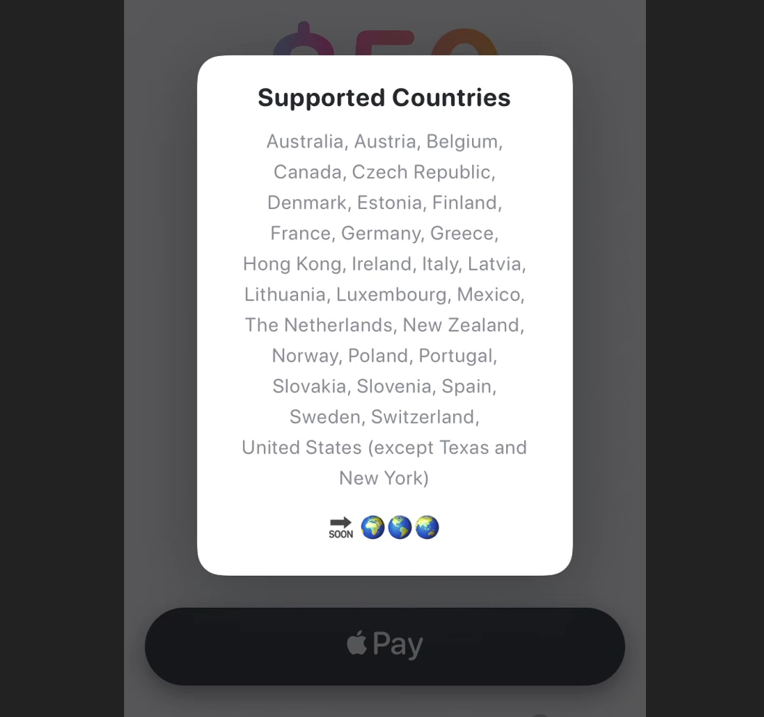
Exchange providers support credit cards and Apple Pay, but they do not work in all countries.
Airdrops and Points
Use the airdrop system to accumulate points based on transactions and wallet activity.
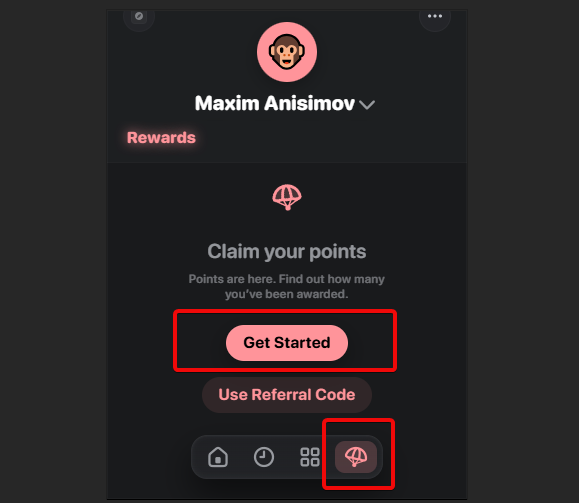
Go to the app and import your most used wallets to increase your points.
The more points you have, the higher your chances of getting a reward during the Airdrop, which encourages regular use of your wallet.
Accumulate points for various actions, such as using built-in sharing features or referring other users. The more active you are in the wallet, the faster your points will grow.
When you join the rewards system, you will automatically receive a referral code that you can share with your friends.
Adding custom networks and tokens
The wallet is not limited to the default networks, which is good news.
Note: this feature is only available in the browser extension and is not supported on mobile.
To add a custom token:
- Click the three dots in the upper right corner of the extension.
- Go to
Settings. - Open the
Networkstab. - Click
+ Add Custom Network. - Select the network you want to add (in this example,
zkSync). - The network settings screen will open.
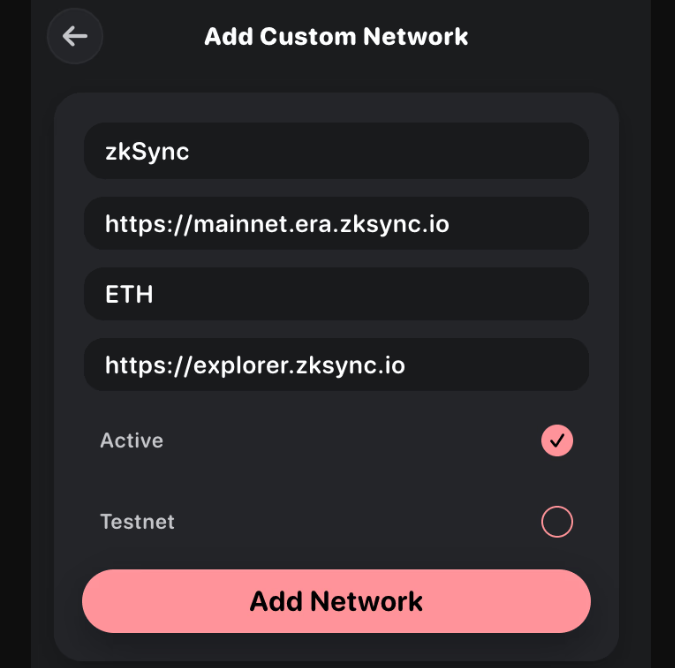
Once added, the network will appear in the Networks list. If necessary, it can be change later.
Advanced settings
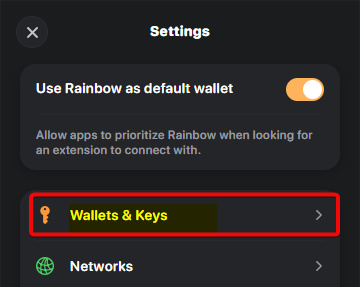
All settings are available in the Settings menu. Click on the three dots in the upper right corner of the extension.
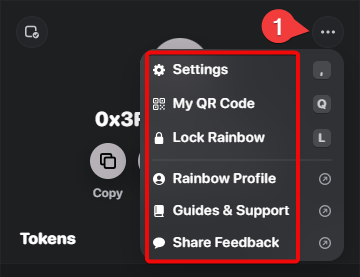
Here we see blocks of advanced settings:
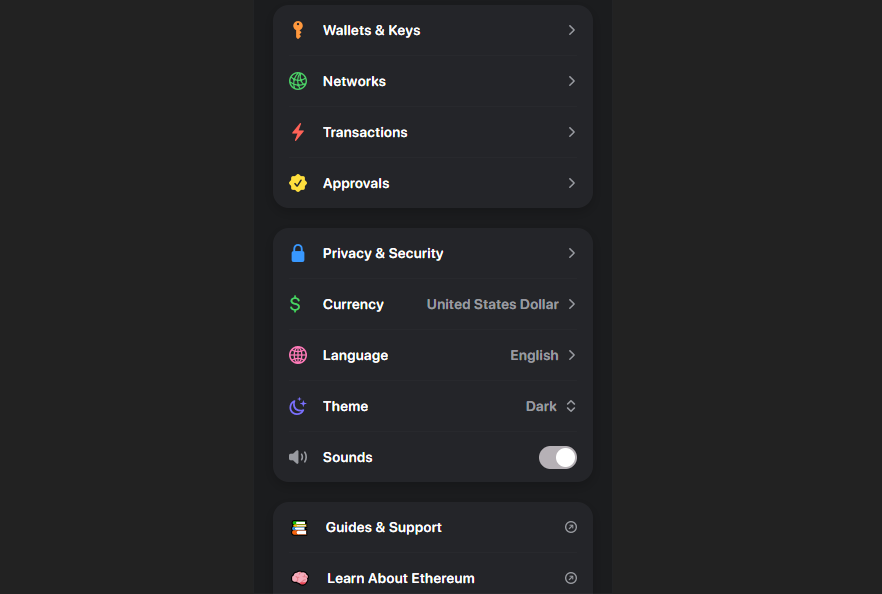
- Wallets & Keys – access your seed phrase and private key, create new wallets and manage them.
- Networks – select and switch between supported blockchain networks.
- Transactions – view the history of sent, received and exchanged tokens.
- Approvals – manage permissions for smart contracts and revoke access to assets.
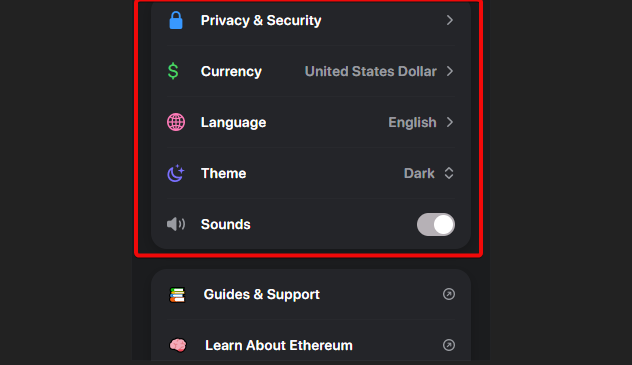
Below is another block of settings:
- Privacy & Security – set up privacy, hidden balances and security settings.
- Currency – select the displayed fiat currency, for example, dollar.
- Language – change the interface language, for example, to Russian.
- Theme – switch between light and dark themes, for example, Dark.
- Sounds – enable or disable sound notifications.
And the last block - reference materials:
- Guides & Support – Explore tutorials and get support.
- Learn About Ethereum – Learn more about the Ethereum ecosystem and what it can do.
Let's take a look at one of the most important points of Wallets & Keys because keys are the heart of any wallet.
Wallets & Keys – allows you to create new wallets and view private keys and seed phrases, as well as import existing wallets from other applications. In this section you can manage multiple wallets, switch between them and safely export data for backup.
Seed Phrase
By clicking on Wallets & Keys we get to the menu for viewing all wallets.
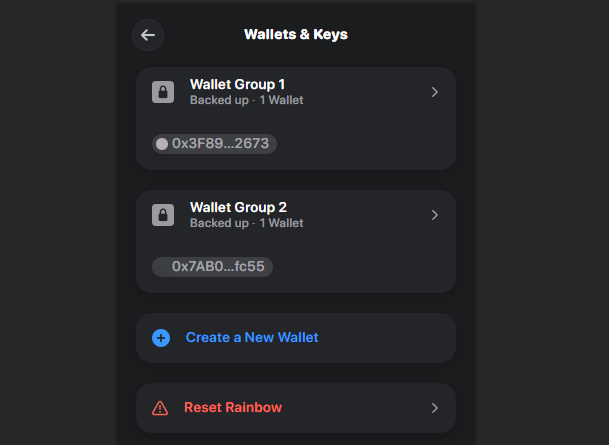
By clicking on the wallet arrow, we will see its details.
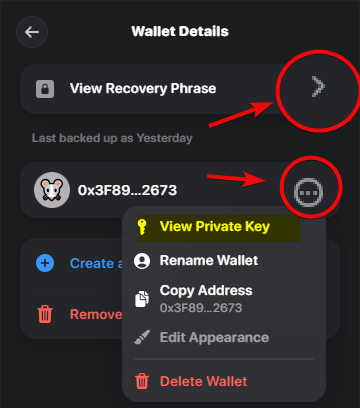
Here you can rename the wallet, as well as access the seed phrase, which we have already saved in the "backup" section. The private key is also available here.
Private Key
Click View Private Key and read the warning.
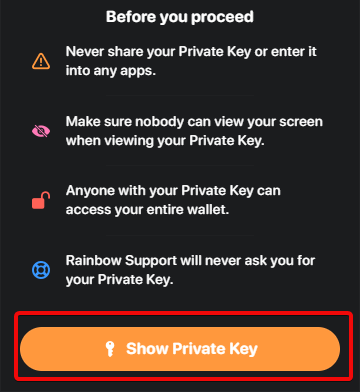
A private key is a unique string that gives the owner full control over crypto assets. It should be kept safe and never disclosed
Move your private keys to different wallets. This allows you to access your assets through multiple apps, which increases convenience and you are not dependent on one wallet.
Despite this, no wallet guarantees 100% security. Therefore, it is recommended to store private keys and seed phrases in a safe place.
Some features are only available in the mobile app, so let's go there.
Mobile app
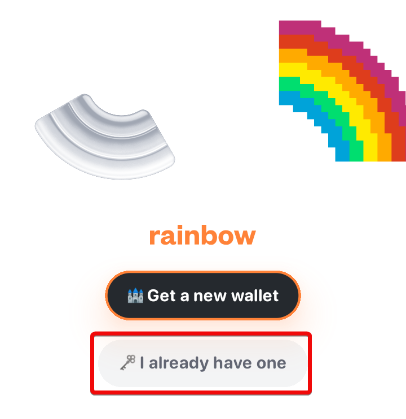
Download and install the app from Google Play or App Store. When you first launch it, you need to choose to either create a new wallet or import an existing one. We will choose import because we already have a wallet.
Import and Restore
The following options are available in the restore plan:
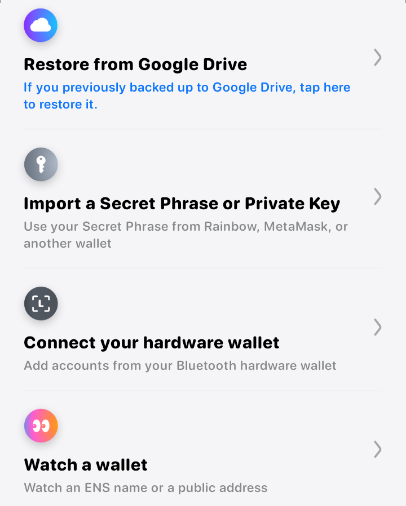
- Restore from Google Drive – if you previously created a backup copy on Google Drive, restore it.
- Import a Secret Phrase or Private Key – use a secret phrase from Rainbow, MetaMask or another wallet.
- Connect your hardware wallet – add accounts from a hardware wallet via Bluetooth.
- Watch a wallet – monitor the ENS name or public address.
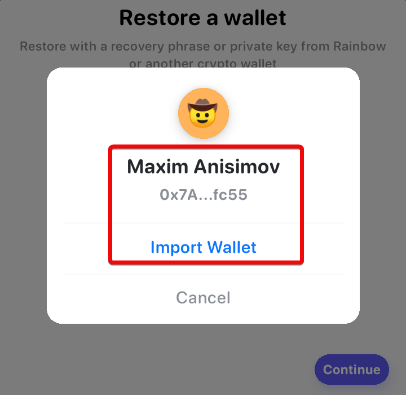
Let's look at these functions. But first, let's restore the wallet using a seed phrase. To do this, select this item, enter the words and click Continue.
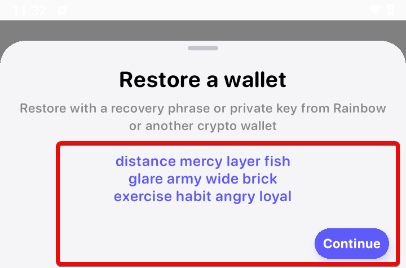
We will be prompted to enter the name of the wallet. Let's name it after bytwork.com editor Maxim Anisimov and click Import Wallet.
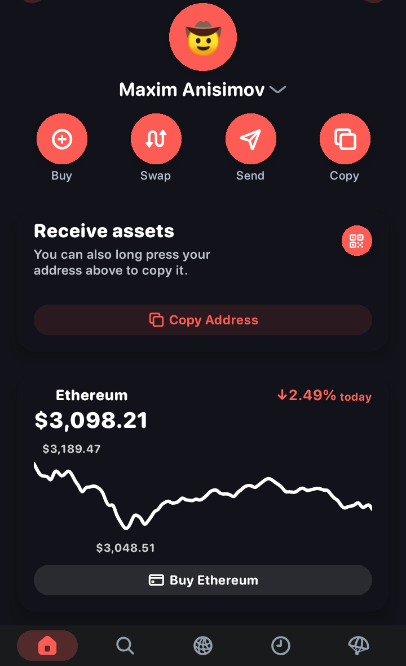
We have successfully restored the wallet and see the interface of the mobile application. In general, it repeats everything that is in the browser extension. However, there is a function for monitoring wallets – watch only.
Watch-Only
Watch Mode allows you to monitor the activity of any wallet or view its contents. If you have a hardware wallet, you will see your NFTs and balance right in the app. All you need to do is enter your wallet's public address or ENS domain.

How to add a wallet to Watch Mode:
- Open
Wallet Switcherby clicking the arrow next to the wallet name. - Click +
Addin the lower right corner. - Select
Watch a wallet. - Enter your wallet's public address or ENS domain and click
Continue. - Enter the wallet's name (or leave the suggested one) and click
Import Wallet.
Done! You can now view the assets of this wallet.
How do I manage my account in Watch Mode?
If your wallet is imported only by public address, it will be viewable only.
To gain full control, verify ownership by importing your secret phrase or private key. To do this, open your profile or transactions screen, click on your wallet name/address, and select Import.
Integrate with Ledger
To integrate with Ledger, click on the down arrow next to the public address to open the wallet switcher. In the lower right corner, select + Add, then Connect your hardware wallet.
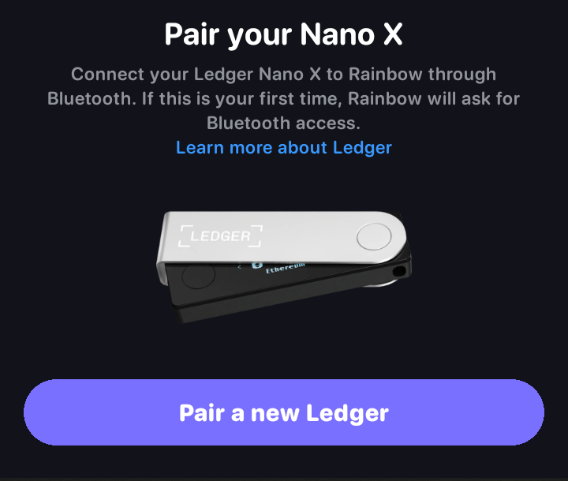
Rainbow will start searching for devices and connect your Ledger. Please note that Bluetooth is only available for the Ledger Nano X. Other models are not supported at this time.
Make sure you have the Ethereum app installed on your Ledger. If you don't have it, install it via Ledger Live and open it by holding down both buttons on the device. Then enable blind signing mode on the hardware.
Staking
Rainbow supports staking functions, allowing you to participate in delegation contracts and receive rewards. The wallet also includes staking pairs such as Ethereum and Lido.
Participation in staking requires interacting with contracts through the wallet, and rewards are accrued for fulfilling the terms of contracts, such as providing liquidity or depositing tokens.
In our opinion, this wallet has unremarkable staking. In terms of convenience or functions, there is nothing here.
NFT
Rainbow supports NFTs, including storing, viewing, and creating them. In partnership with Zora, the wallet offers convenient tools for issuing and trading digital collections, such as Rainbow Zorbs, a special edition NFT that gives access to a unique app icon. Use Zora’s Creator Toolkit to deploy a smart contract and manage sales without coding.

Integrate with popular marketplaces including OpenSea, Blur, Rarible, SudoSwap, Foundation, and x2y2 to buy and sell NFTs. Open offers on NFTs and manage collections through a pretty user-friendly interface.
Save POAPs (Proof of Attendance Protocol) - special NFTs that confirm participation in events. Add them to your wallet and view them along with other assets.
NFTs are bright, colorful digital images, like the wallet interface itself. But where does this attraction to such a design come from? Let's look at the developer's story.
Developer's Story
Mike Demarais is the co-founder and lead developer of the wallet. Previously, he worked as an engineer at the financial platform Balance.io, a senior programmer at a startup, a front-end developer, and a co-founder of a startup developing a web interface for personalizing toys. Perhaps, this is where his attraction to bright web applications comes from.

In his interview, he ironically dresses up a fox (the main symbol of the MetaMask wallet), saying that the competitor has a number of problems with ease of use and connecting hardware devices.
Rainbow Kit, in turn, allows developers to integrate support for various wallets, rather than being limited to MetaMask, and make the connection process more convenient for users.
However, a bright design is secondary when it comes to security. It's time to consider the disadvantages.
Disadvantages, comparisons and opinions
One of the main disadvantages of Rainbow Wallet is the lack of two-factor authentication. In the era of frequent scams, not having such a function seems like a crime.
The wallet also lacks basic security features, such as blocking the application during inactivity, which reduces the overall level of protection and makes users more vulnerable.
Problems with transactions are also common, when the application gets stuck at the authorization stage or cannot complete the transaction. Users also complain about high fees and incorrect display of funds after transactions.
These issues are compounded by poor customer support, which does not respond to inquiries even through social media. And the cherry on top is the hacks in the past.
Hack
GitHub user "huihzhao" reported a hack, he lost 30,000 ETH due to the fake Base Bridge website. He accidentally confirmed the fraudulent transaction because the signature was illegible. He cited the default eth_sign feature in Rainbow Wallet as the reason, and suggested disabling it by adding warnings to users.
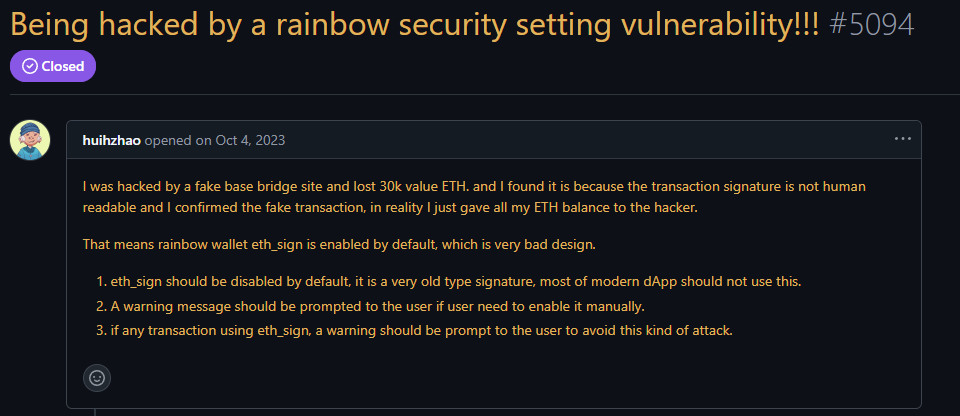
Developer Skylar Barrera responded that eth_sign will not be disabled, as it is still in use. However, the team is working on improving security by adding warnings about suspicious dApps and transaction simulations so that users understand what they are signing.
Later, user Howdy4228 reported that he had also fallen victim to this vulnerability. He confirmed the issue with eth_sign.
Bottom Line: Is the Wallet Worth Using?
Rainbow has strong competitors, including MetaMask with 16,000,000 installs. MetaMask has a high level of security, but its interface can be less user-friendly. The balance is displayed separately for each network, and the bridge requires an external service. MetaMask is suitable for users who value flexibility and security.
On the other hand, if you use Layer 2 solutions (Base, Arbitrum, Polygon, Optimism), Rainbow is not a bad choice. Its clear interface with a simplified design makes it convenient and fast to use. It also supports the connection of hardware wallets - a feature that mobile wallets do not always offer.
So, although Rainbow Wallet has an attractive interface and interesting features, it clearly lacks stability and security. Long-term use will require significant improvement in these areas.
Support
- Contact support at support@rainbow.me
- Help and guides.
- X profile: @rainbowdotme
Not sure which wallet to choose? Go back to the wallets section and see comparisons, ratings, and features.
Ask questions in the comments and write your experience using this wallet.


