Unlocking the CMP 170HX: How to get 64/80 GB of memory?

The unlocker for the CMP 170HX graphics cards is out, and the results are nothing short of stunning. The implementation isn't perfect yet – there are many errors and pitfalls, so we’re here to share our unlocking experience.
Here you will find our CMP 170HX review, complete with performance benchmarks in AI inference and mining.
30‑Second Unlock Verdict
After unlocking, here’s what you get:
- 8 GB version (Hynix) – reliably delivers 64 GB of video memory.
- 10 GB version (Samsung) – up to 40 GB stable, or 80 GB with instability; memory banks must be tested individually.
- Pearl mining – 150–170 TH/s at 200–250 W. With efficiency of 1.25 W/TH, it outperforms the RTX 5090.
- Ethereum Classic – yields ~160 MH/s, profit ~$1.5 per day per card.
- LLM inference – half the speed of the 5090, but the 64 GB capacity opens up models that simply won't fit on the 5090 (which has 32 GB).
However, there is a risk: not every unit will give the same performance boost, and an unstable firmware can permanently brick the card.
Who is this unlock for?
If you already own these cards, the unlock is free and the risk is justifiable. But if you are planning to buy new ones, only do so if you are comfortable with Linux/HiveOS and are ready to experiment.
Warnings Before Unlocking – 4 Facts
1. Memory Instability
The 10 GB versions often fail to deliver the advertised 80 GB. In practice, you need to test each memory bank and disable faulty sections (utilities like cmpunlocker and memtest_vulkan are available for this).
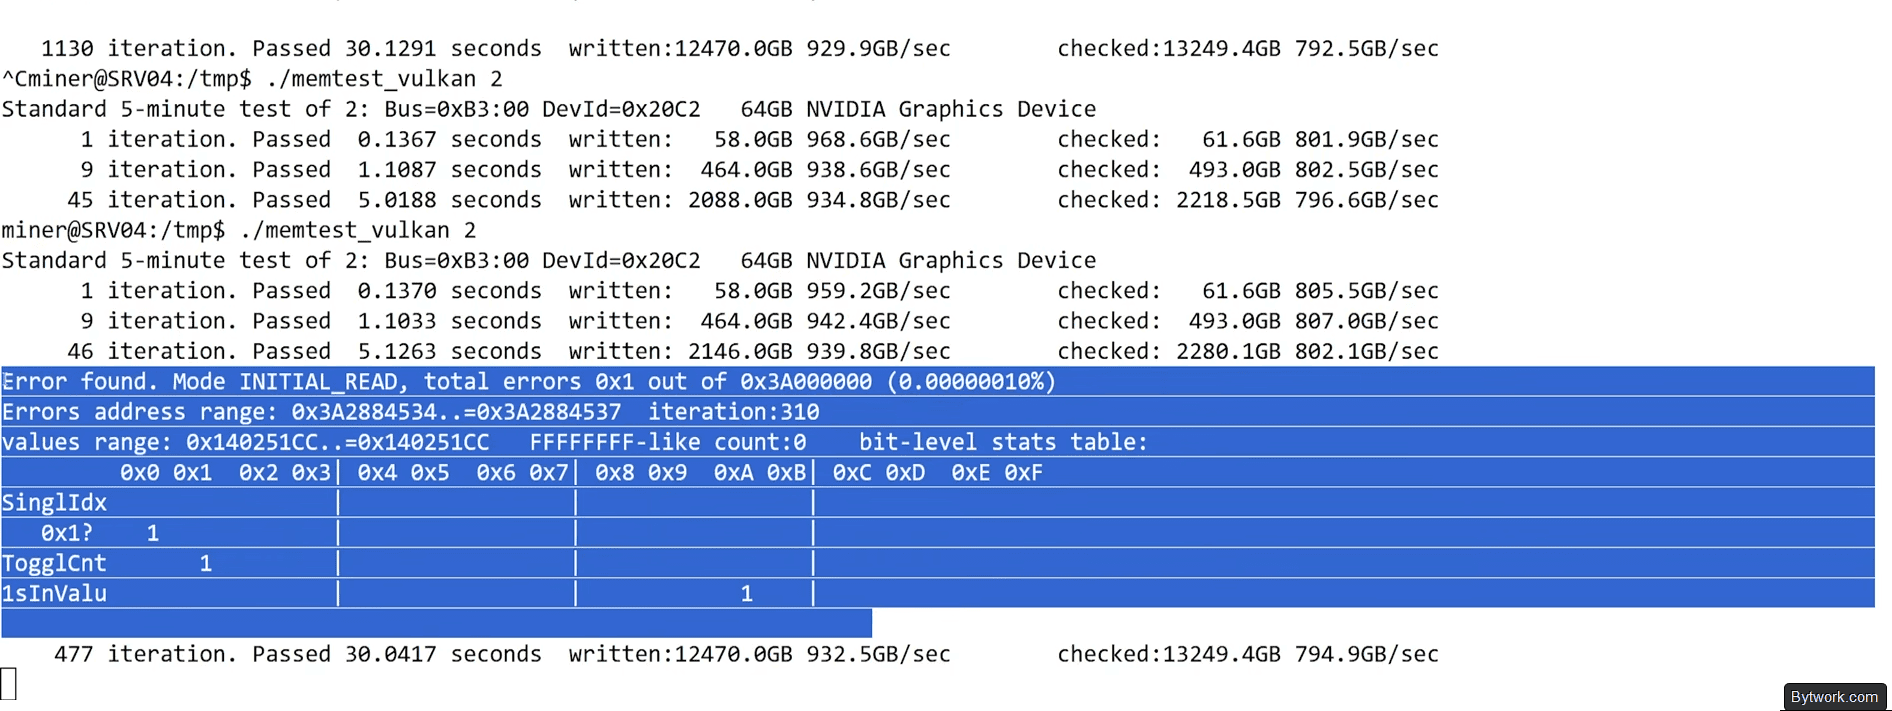
The 8 GB (Hynix) versions are more stable and consistently give 64 GB without issues.
2. PCIe Gen1 x4 Bottleneck
The bus runs at x4 (Gen 1) speed, which slows down model loading into memory. But once the model is loaded, inference runs smoothly.
A hardware modification (soldering capacitors to enable x16) does work. The stock card on Gen2 x4 delivers 1.58 Gbit/s, while the modified one with unlocked x16 reaches 6.37 GB/s. However, you need to remove the shroud and perform soldering – which requires skill.
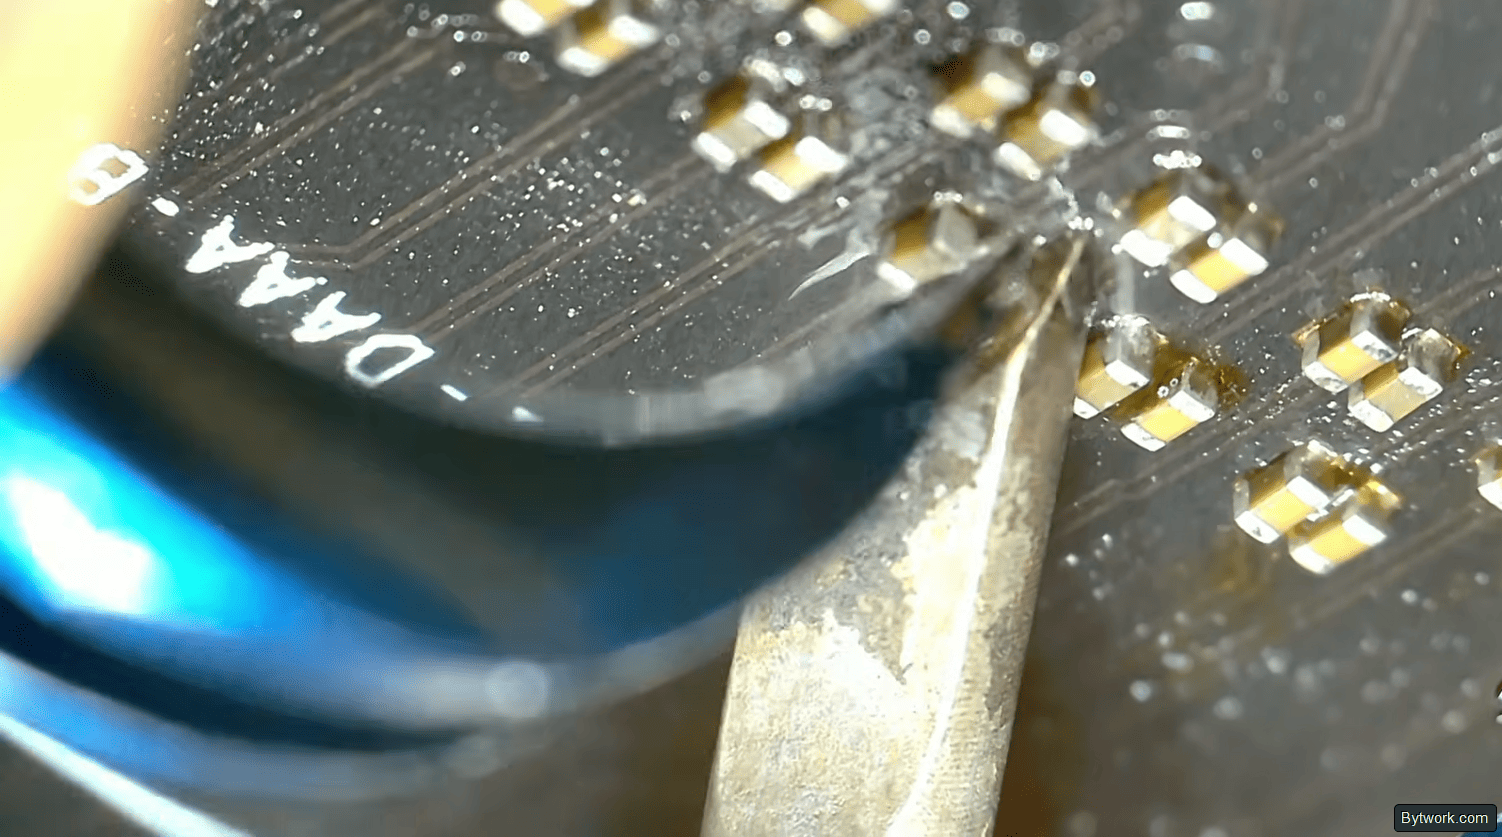
This takes experience, and not everyone succeeds.
3. Heat and Power – 300 W
The stock TDP is 250 W. You can increase it up to 300 W, but in reality, Gigabyte servers overheat and run red‑hot under such load.
In practice, a safe operating range is 180 W per card. This maintains stability and extends the GPU’s lifespan.
4. Drivers
The unlock relies on the open‑source NVIDIA drivers version 610.43.03. NVIDIA may remove them from the repository at any moment, so save them to disk beforehand. Without the drivers, you won’t be able to re‑install them later!
With these risks in mind, let’s proceed to the unlock process.
Step‑by‑Step Guide – 2 Working Methods
Method 1 (Simple) – PEARLSKI Miner with Built‑in Unlocker
This method is suitable if you don’t mind starting Pearl mining first. The unlocker will trigger automatically, and the unlock persists even after stopping the miner.
Step‑by‑step process using the miner:
- Download the latest version of the Pearlski miner from GitHub.
- Install it like any other miner on Linux or HiveOS.
- Start mining – the unlocker activates automatically.
- Stop the miner – the cards remain unlocked.
You will need Linux kernel version 6.6 or newer, so check the kernel version in HiveOS before installation.
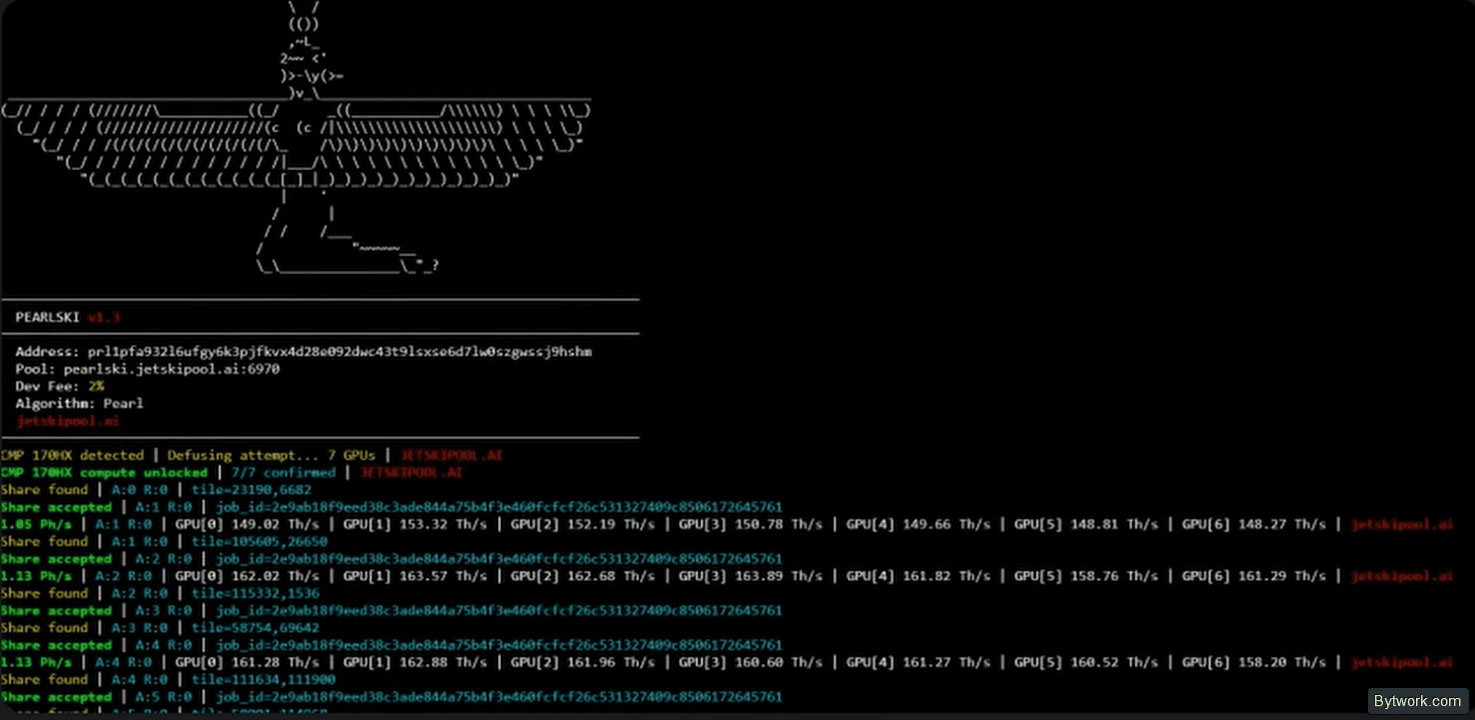
After installing the driver, be sure to wait 15–20 minutes before rebooting. A common rookie mistake is rebooting too early, which prevents the driver from fully applying.
Method 2 (Manual) – Standalone Unlocker for HiveOS
Choose this path if you don’t want to mine Pearl and plan to use the cards for AI right away. Let’s go through the unlock process. Start by installing a stable HiveOS image with kernel 6.6 or higher.
Step by step:
Step 1 – Install HiveOS Beta 22
This is essentially Ubuntu 22.04 with kernel 6.6, required for the patched driver 610.43.03. Only this driver can reprogram the PMU registers of the CMP 170HX.
Don’t forget to stop the miner with the command miner stop.
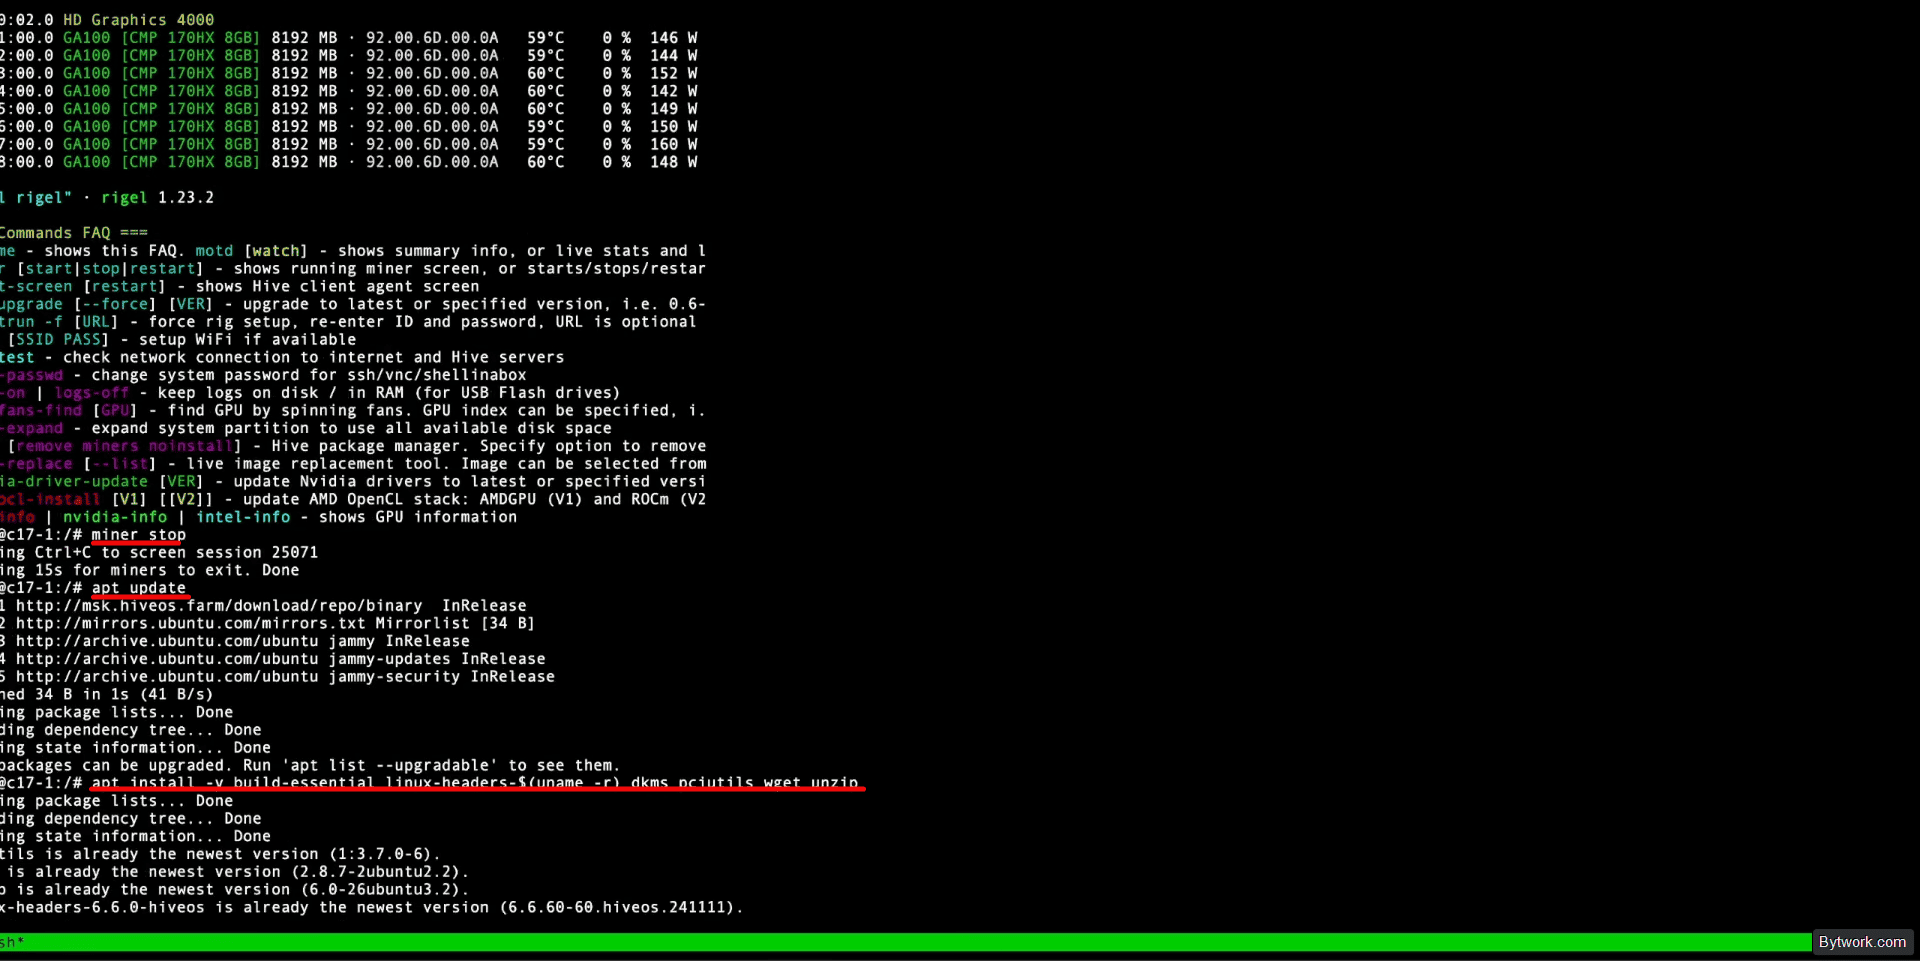
Step 2 – Prepare the System
apt update
apt install -y build-essential linux-headers-$(uname -r) dkms pciutils wget unzip
apt update refreshes the package index, and installing build-essential, linux-headers, dkms, pciutils, wget, unzip provides the kernel build environment and tools for compiling the NVIDIA module with power limit (PLM) and PCIe 4.0 x4 bypass patches.
Step 3 – Disable Secure Boot in UEFI
Secure Boot blocks the loading of unsigned modules, and our patched driver lacks a valid signature. Disabling it is mandatory for injecting code that modifies HBM2e timings via register 0xC0F8.
Step 4 – Clean Old NVIDIA Drivers
These commands purge all remnants of drivers versions 550.142 and 470.xxx from the module tree and DKMS.
rm -f /lib/modules/$(uname -r)/updates/dkms/nvidia*.ko
rm -f /lib/modules/$(uname -r)/extra/nvidia*.ko
rm -f /lib/modules/$(uname -r)/kernel/drivers/video/nvidia*.ko
dkms remove nvidia/550.142 --all 2>/dev/null
dkms remove nvidia/470.xxx --all 2>/dev/null
rm -rf /var/lib/dkms/nvidia/
depmod -a
update-initramfs -u -k $(uname -r)
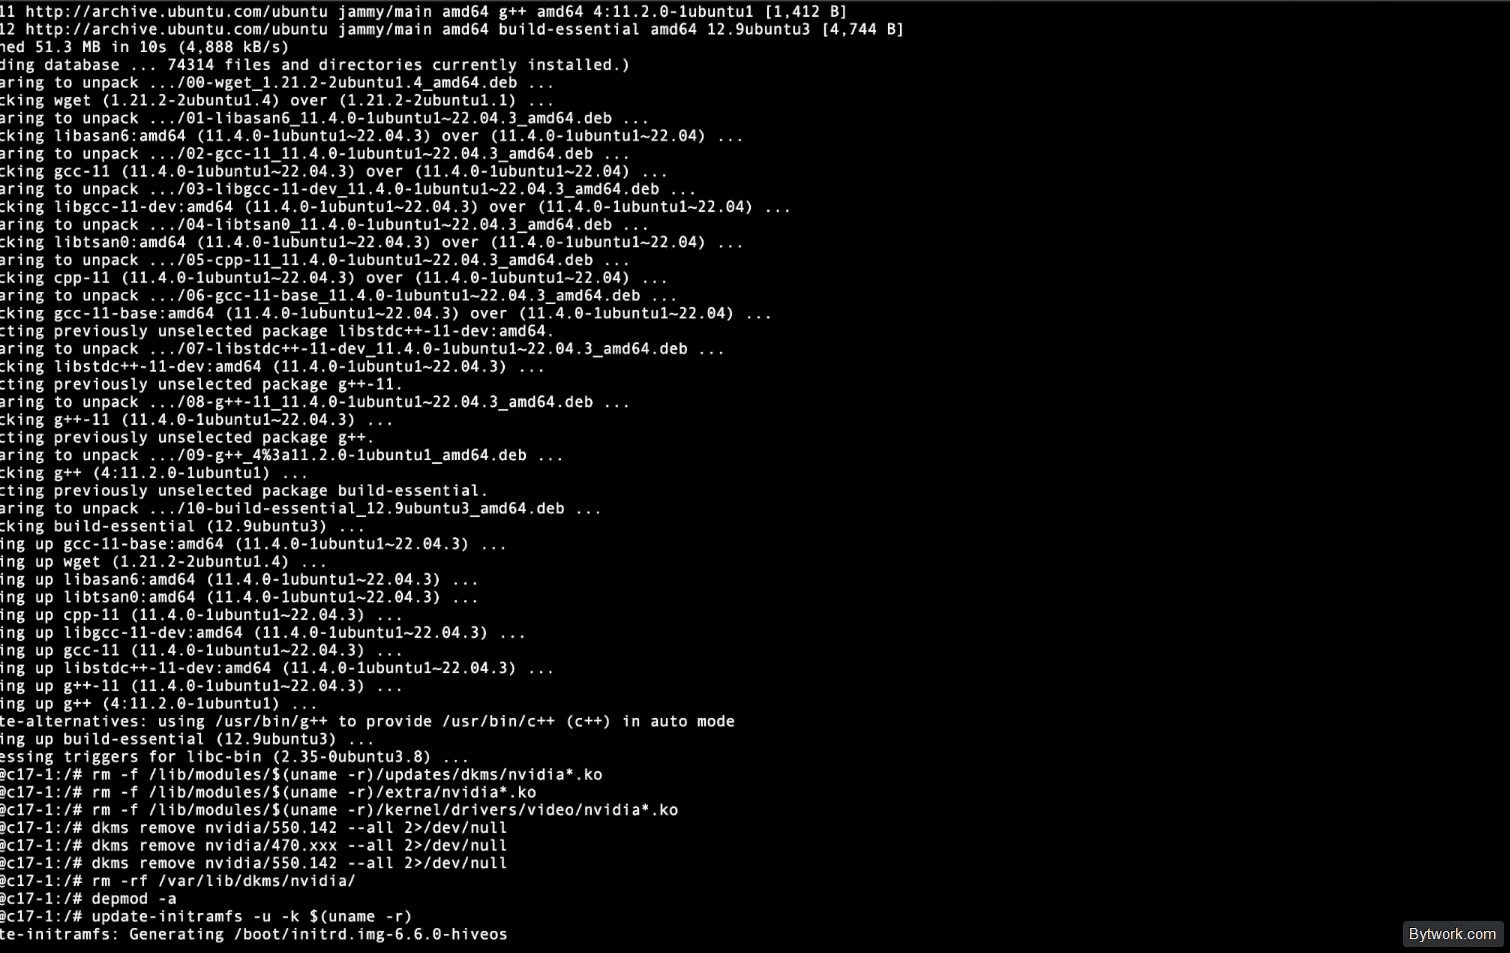
Then the commands rebuild the module database with depmod and initramfs. This is to avoid conflicts with the new driver 610.43.03, which raises memory bandwidth from 1.6 to 1.8 TB/s by changing tRCD from 18 ns to 14 ns.
Step 5 – Upload the Archive
This archive on GitHub contains the modified driver with a patch that overrides the device ID (PCI ID 0x1E3C) and forces 0.85 V core voltage, raising the power limit from 250 W to 320 W to bypass the OTP hardware protection.

Optionally, you can upload the archive to your own cloud and download it via curl.
Step 6 – Extract the Archive and Install the Driver
Extract, set permissions, and run install.sh.
unzip cmp170hx-unlock-610.43.03.zip
cd cmp170hx-unlock
chmod +x install.sh
sudo ./install.sh
Installation may take 15–20 minutes. The 610.43.03 driver compiles and installs with patches that boost HBM2e clock from 1.0 GHz to 1.2 GHz, pushing Ethash hashrate from 165 MH/s to 195 MH/s (~18% gain) by rewriting register 0x0A3F.
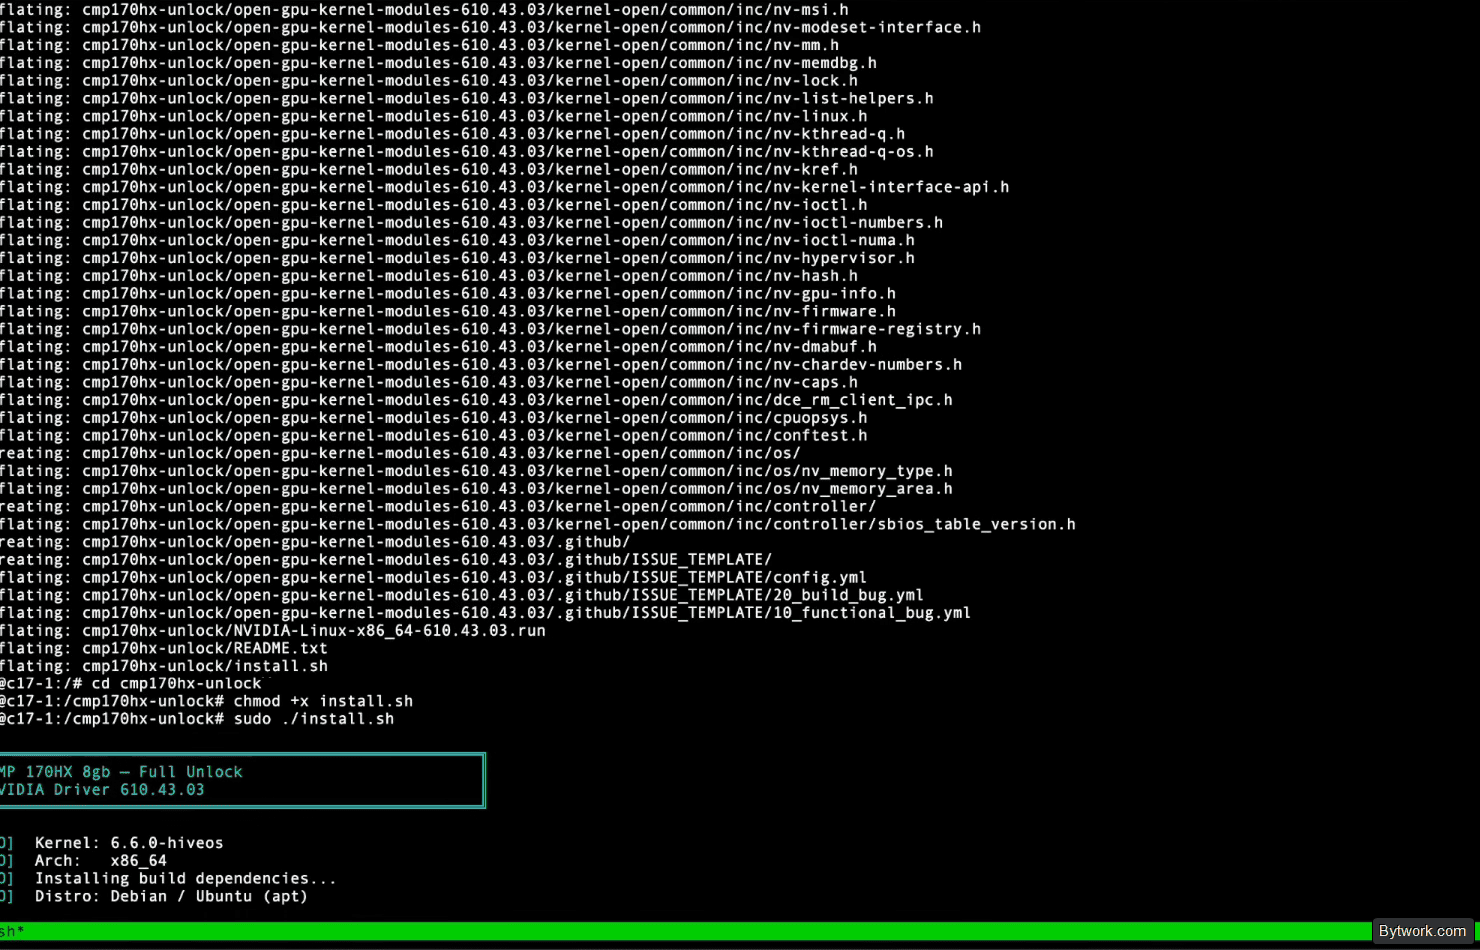
Step 7 – Cold Reboot
shutdown -h now completely powers off the system – this is required to reset the PCIe controller and apply changes to the non‑volatile memory.
sudo shutdown -h now
The PLM unlock will only take effect after a full power cycle.
Step 8 – Wait for Complete Shutdown
Wait until all indicators go dark, unplug the power cable (or UPS) for 15 seconds, then reconnect power and boot the system.
Removing power resets all capacitors and restarts the PMIC controller (NCP81174), which forcibly clears the OTP registers and finally activates the unlock, effectively increasing the bus bandwidth by 3‑4 times.
After reboot, the card will load with the unlocked VRAM size.

Let’s also consider an alternative approach – without HiveOS, on plain Ubuntu.
Unlock Commands for Ubuntu
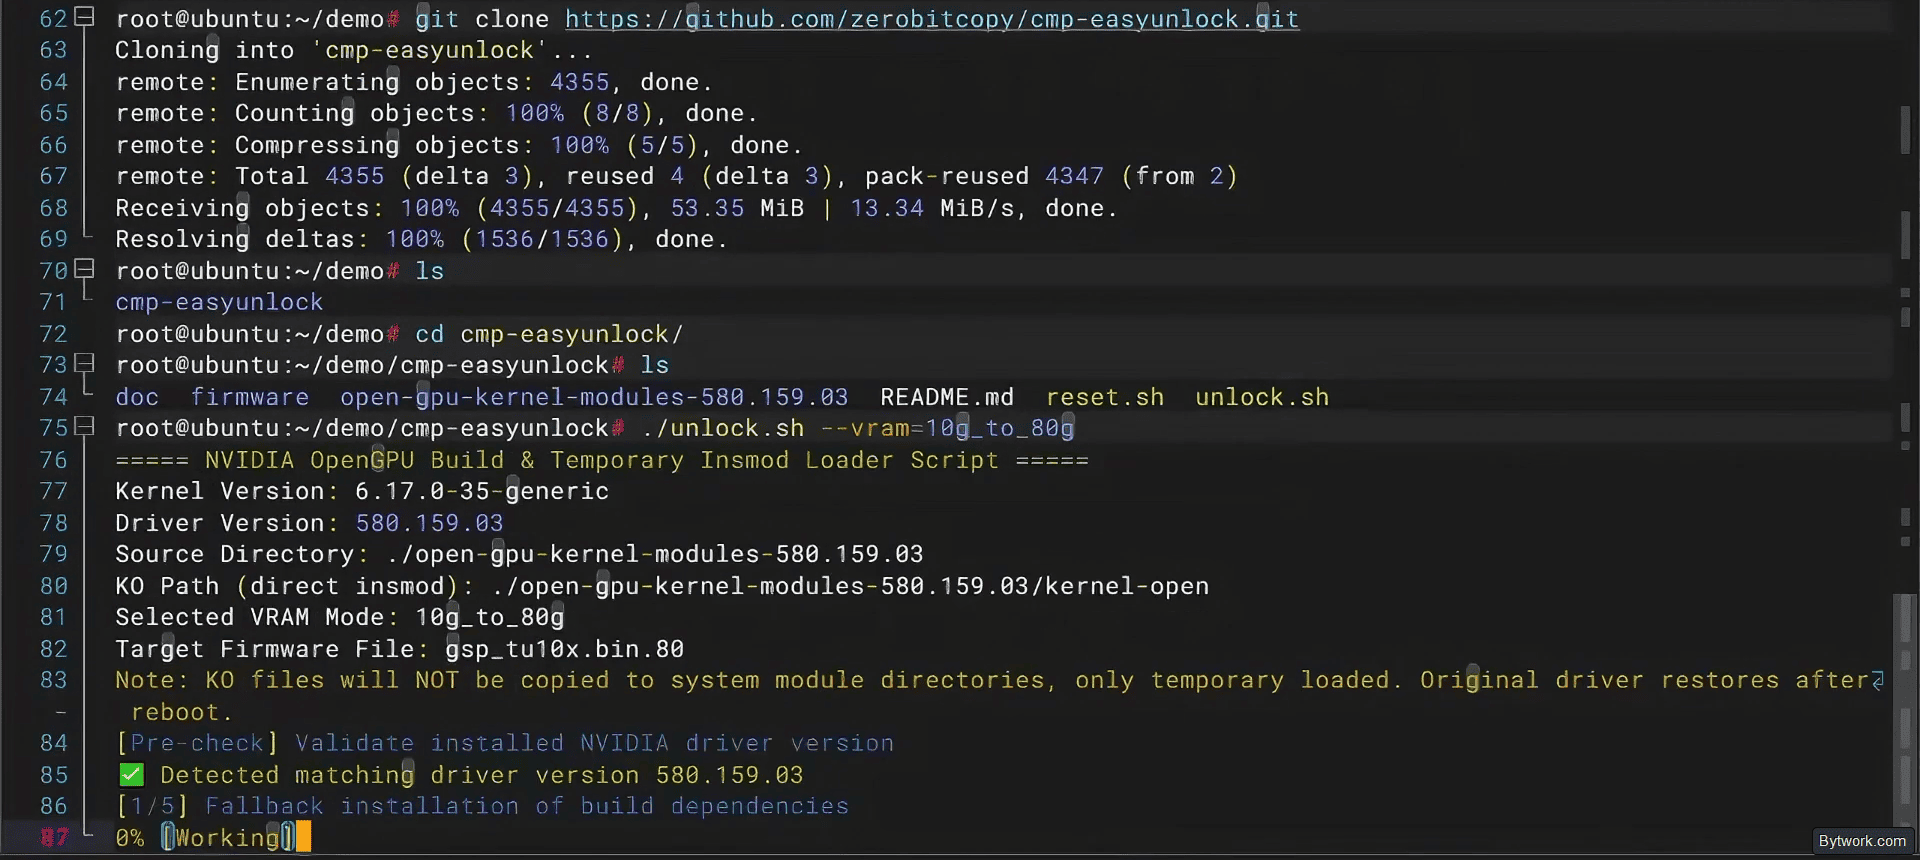
Here’s the command sequence for Ubuntu:
git clone https://github.com/zerobitcopy/cmp-easyunlock.git
ls
cd cmp-easyunlock/
ls
./unlock.sh --vram=10g_to_80g
Explanation:
git clone– downloads the unlock tools repository.ls– checks that thecmp-easyunlockfolder appeared.cd cmp-easyunlock/– navigates into it.ls– lists contents (it containsunlock.sh,reset.sh,firmwarefolder, etc.)../unlock.sh --vram=10g_to_80g– runs the unlock script with VRAM mode selected (10 GB → 80 GB).
Then the command nvidia-smi will show that the CMP 170HX memory has become 80 GB:
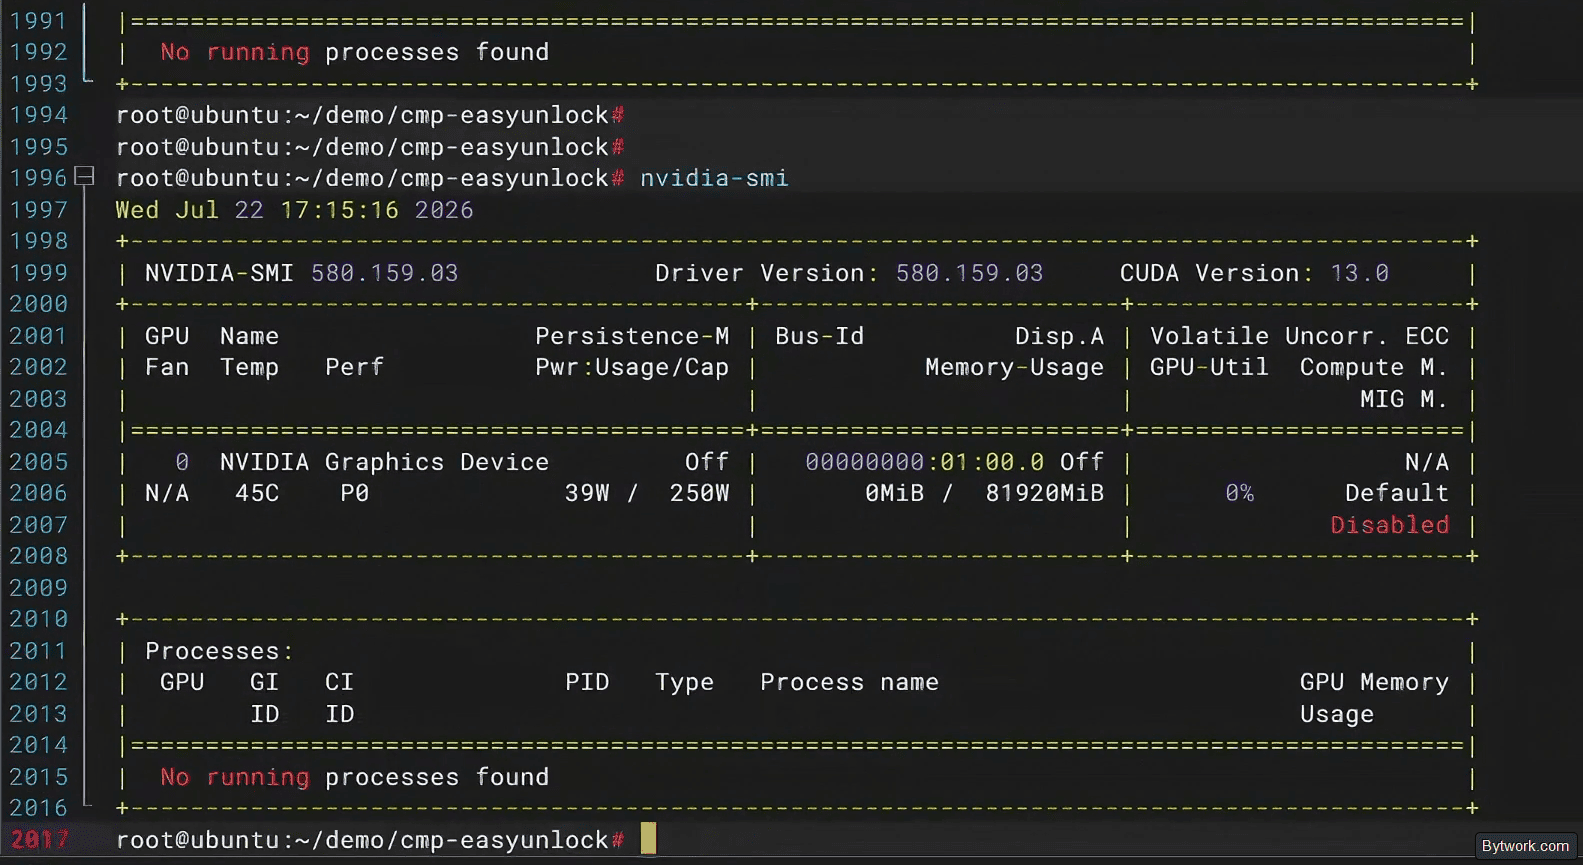
Now you can run heavy AI models.
What If Things Go Wrong?
Let’s address your questions about the unlock.
- The card doesn’t deliver the promised memory (e.g., 80 GB keeps crashing)?
-
This is typical for the 10 GB versions. Run the memory bank checking tool memtest_vulkan. It will detect faulty sections and allow you to disable them. In reality, many cards work fine at 40 GB – which is enough for most LLMs.
- The system freezes or crashes under load?
-
Lower the power to 180 W – that’s a proven safe mode. Check your cooling. At 300 W, Gigabyte servers overheat and trigger protection shutdowns.
- Driver installation fails due to incompatible kernel version?
-
Make sure your kernel is 6.6+. If not, install a fresh HiveOS image.
- The card becomes undetectable after flashing?
-
There is no rollback. In practice, the only option is to re‑flash the card via a programmer (which is an extreme measure, only feasible for engineers). The risk of bricking the card is significant.
What Are the Real‑World Numbers?
- What memory capacities unlock reliably on different versions?
-
8‑GB (Hynix) – reliably up to 64 GB. 10‑GB (Samsung) – up to 40 GB, 80 GB is inconsistent.
- What needs to be done so the unlock persists after reboot?
-
Create an individual configuration for each GPU after testing memory banks and disabling faulty ones.
- What is the maximum achievable VRAM and what are the limitations?
-
Theoretically, you can reach 80 GB of HBM2 memory. However, according to unofficial sources, this would require dropping the clock frequency by about 40%, which may significantly hurt performance.
Time to summarise.
Final Thoughts
Unlocking the CMP 170HX removes the software shackles from the GA100 chip – essentially an NVIDIA A100. A vulnerability in the Falcon processor opens access to the hidden HBM2 memory. The 8‑GB versions are more reliable, while the 10‑GB Samsung ones often glitch at full 80 GB, so on Windows they are often capped at 40 GB for peace of mind.
After the unlock, performance skyrockets – fP64 by 59×, FP32 by 31×.

In practical terms, the system RAM should be at least twice the total VRAM. The PCIe Gen 2 x4 limitation slows down loading of neural network weights, but the actual computations are fast. The TDP of 250–300 W means you need a well‑ventilated server chassis.
In the end, getting a free upgrade to 80 GB or 64 GB is a very nice bonus. Happy unlocking to you too. Yours truly – Maxim Anisimov for bytwork.com.

Now reading


In DePin, people create networks themselves, share traffic or capacity, and receive rewards in tokens from these projects.