Review of the Arculus Hardware Wallet: Security, Addresses, Fees, and App Setup
A no-frills app with no unnecessary features.
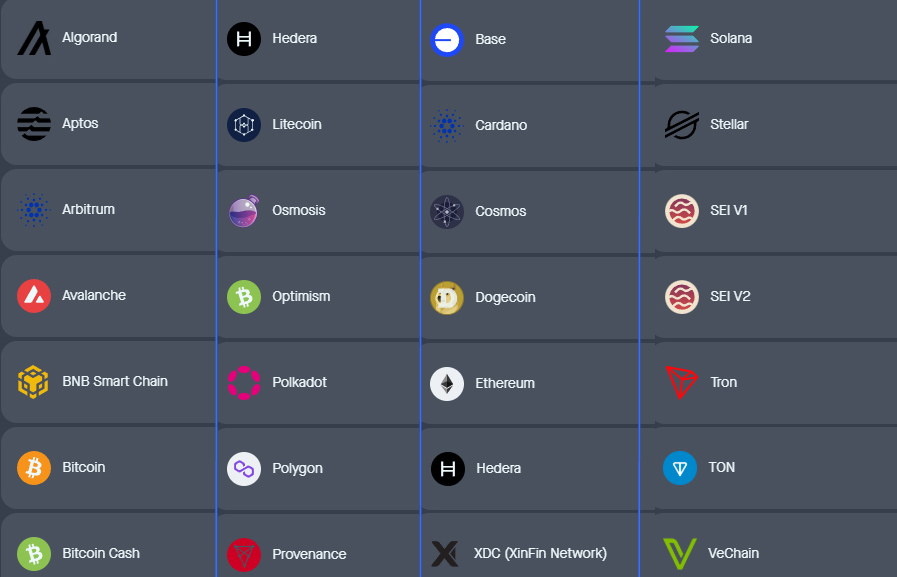
Arculus is a hardware wallet in the form of a metal card, created for the secure storage of cryptocurrencies and NFTs, supporting most popular networks. This is achieved by allowing you to add any token from the supported blockchains.
There are 27 blockchains here, including: BTC, ETH, Solana, Tron, TON, Doge, etc., and over 80 cryptocurrencies.
The wallet only functions when paired with the mobile app.
Upon receiving the wallet, ensure that the packaging is original and sealed.
Inside the box you will find a thank-you card with instructions for downloading the app, a "Getting Started" card with a QR code for quick access to the app, a recovery phrase writing sheet, and the Arculus card itself.
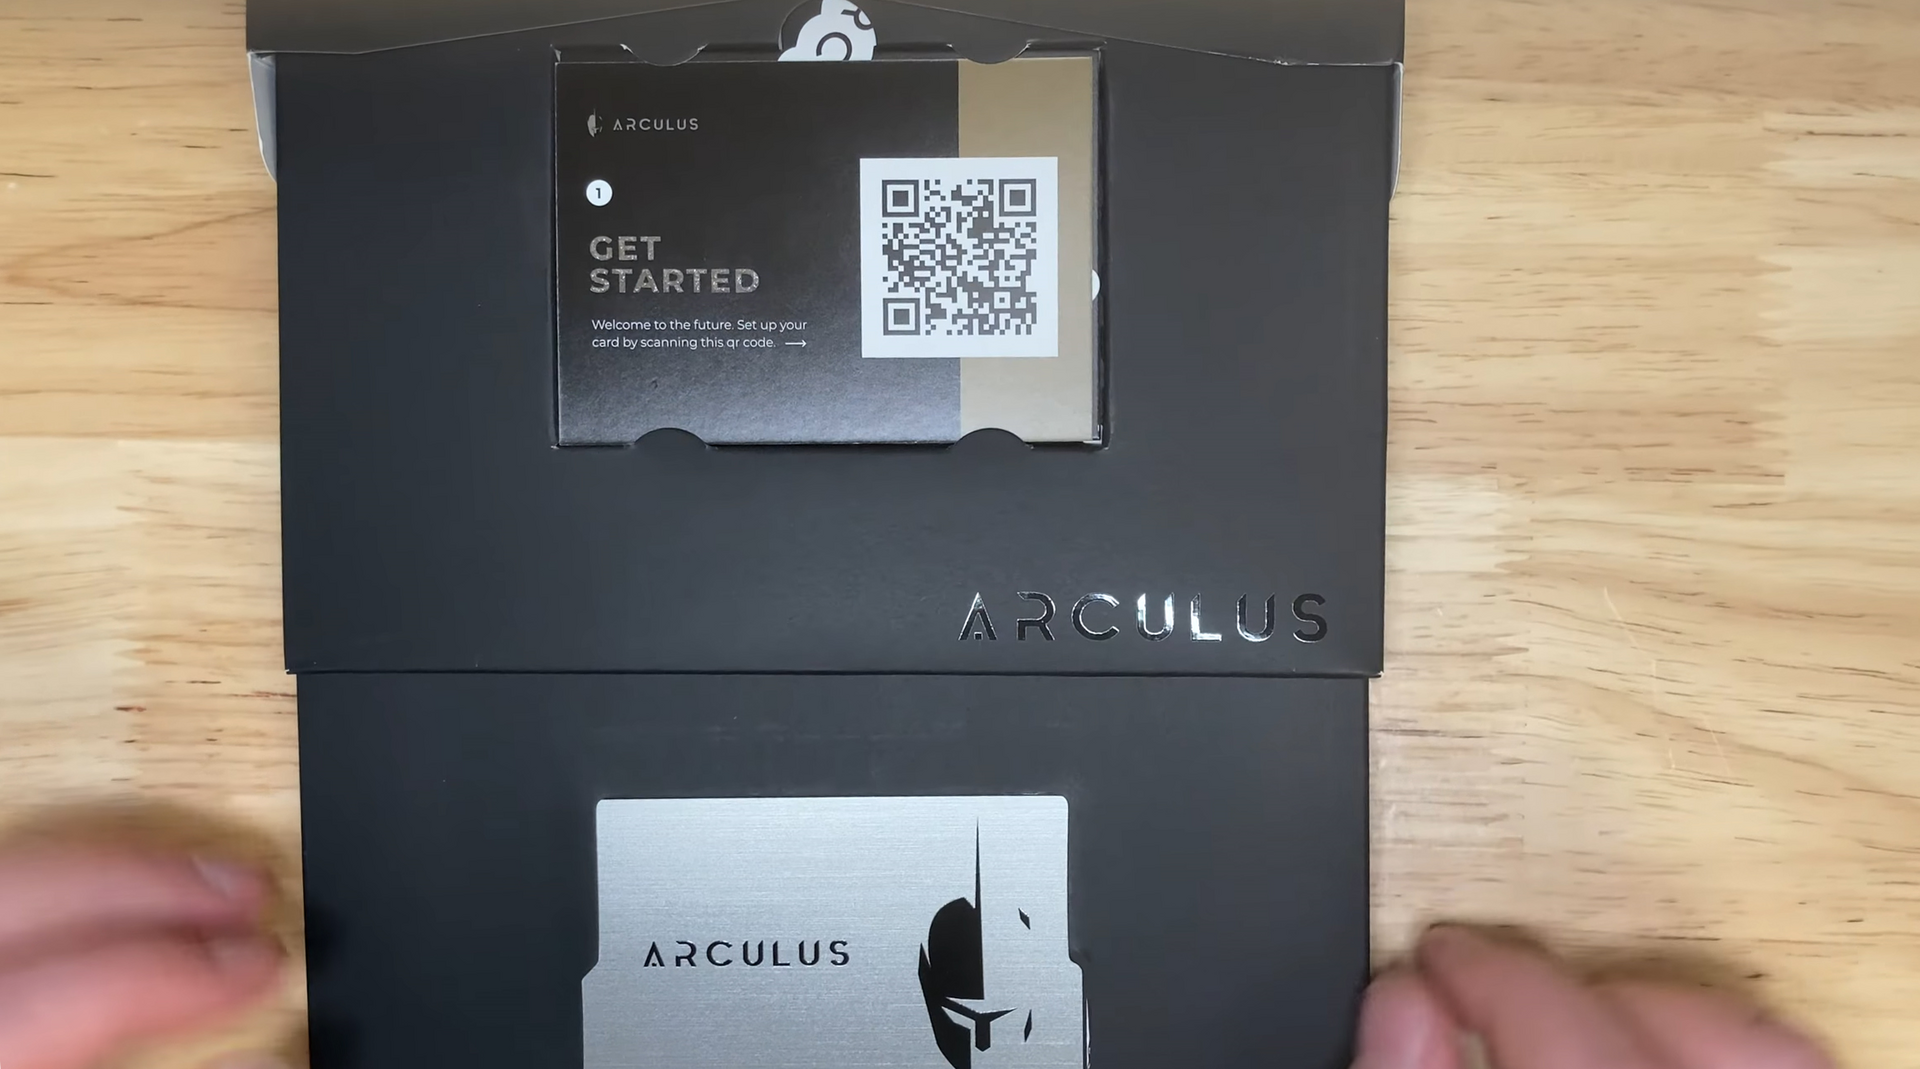
Box Contents
Security and Features
There are both pros and cons to this wallet—let’s be honest. We’ll start with the pros.
- Three factors for confirmation – use a PIN code, your phone’s biometric authentication, and tapping the card itself to approve transactions.
- Looks nothing like a wallet – attackers won’t recognize it as a hardware wallet if it’s stolen.
- Random number generator – the wallet generates the seed phrase using cryptographic methods and the EIP-2333 standard.
Now for the drawbacks.
The point of a hardware wallet is to eliminate the need to trust an online application—you must confirm transactions on the physical device itself. Here, it’s just a card with no screen. You can’t see on the card which transaction you are approving.
For example, if the app initiates a transfer from wallet A to wallet B, you need to verify that the addresses match both in the app and on the device. Without this check, the hardware wallet loses all purpose.
Moreover, when creating the wallet, the seed phrase is displayed on the phone. Trusting only the app undermines the security of the hardware wallet.
We will test the security of this wallet in practice a bit later. But first, let’s move on to the economic aspects.
Your benefits:
- Web3 connectivity – connect to any dApp to earn staking rewards or participate in other activities.
- Built-in buy and swap – perform crypto purchases and swaps in local currency directly within the wallet.
- Integrated NFT support – manage NFTs across multiple networks in one app.
Now, let’s move on to hands-on practice.
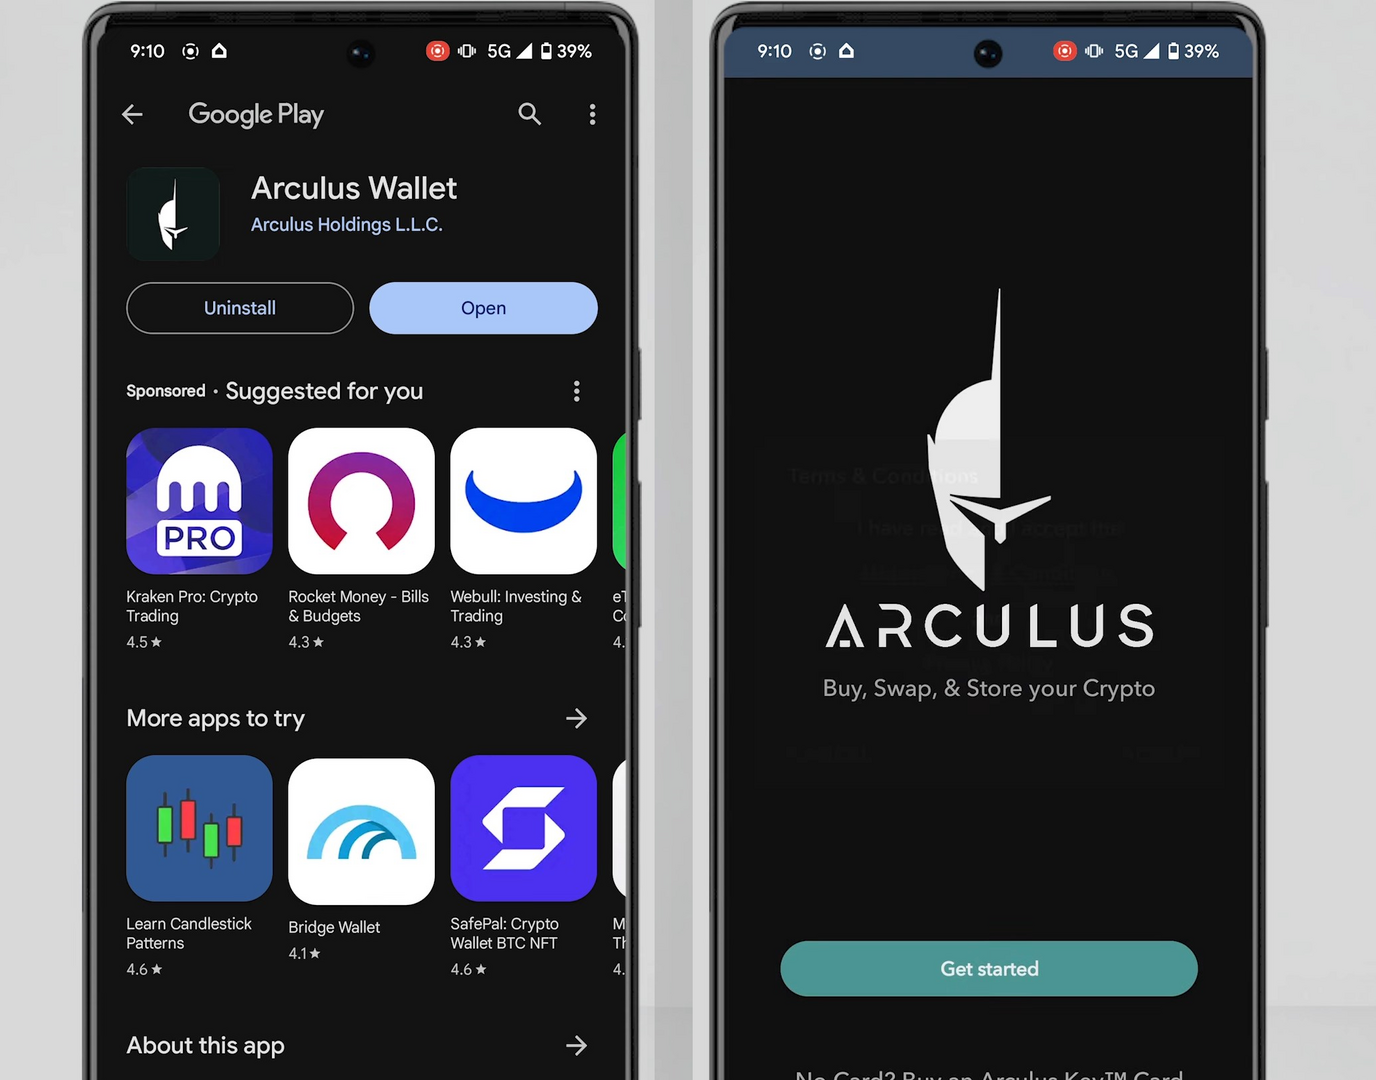
Download and Installation
First, find the Arculus app in the App Store or Google Play, or scan the QR code on the "Getting Started" card.
Install the app, open it, tap Get Started, and accept the Terms of Service and Privacy Policy.
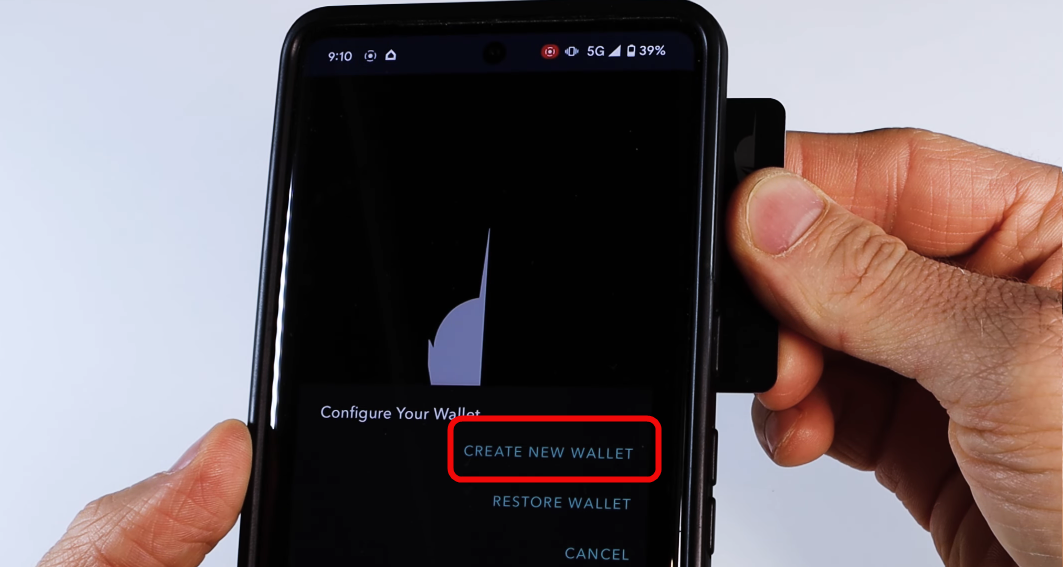
Creating a New Wallet
Next, hold the Arculus card to the back of your phone. It may take a bit of sliding until the phone recognizes it.
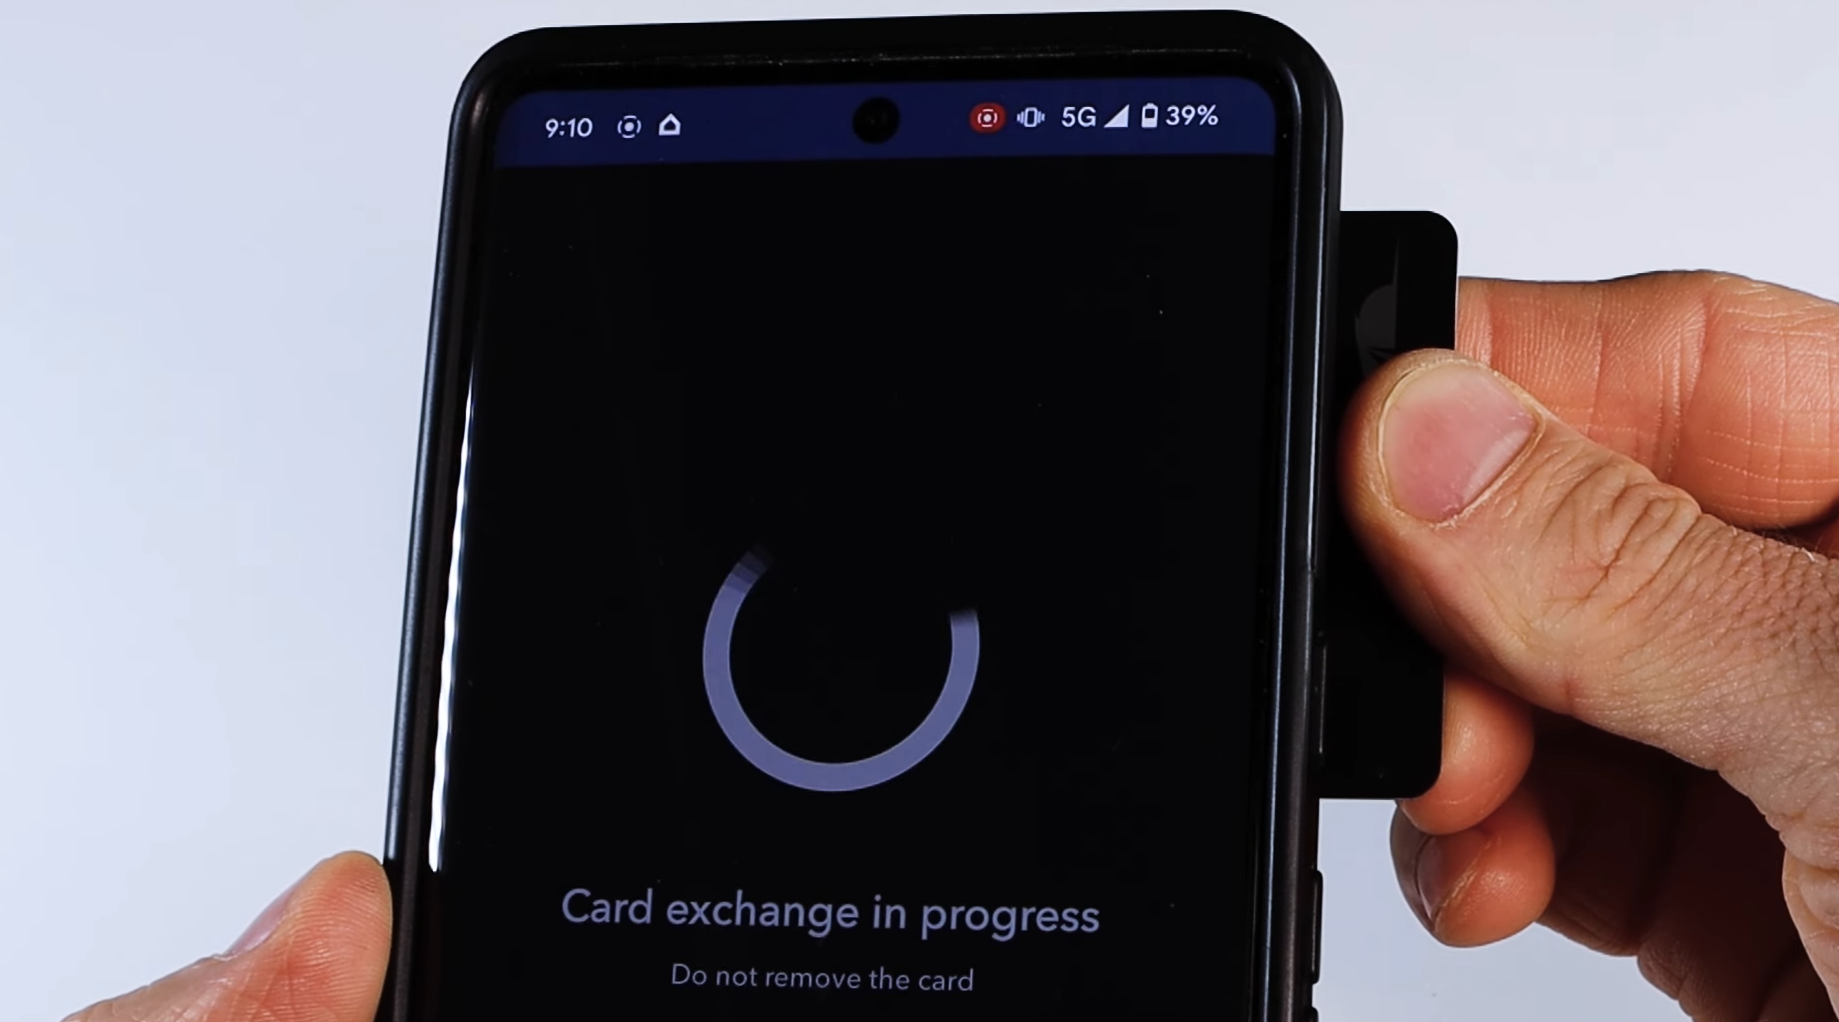
Once connected, select Create New Wallet.
You can choose a 12- or 24-word recovery phrase. Opting for 24 words is recommended for greater security.
Optionally, enable biometric authentication for an extra layer of protection.
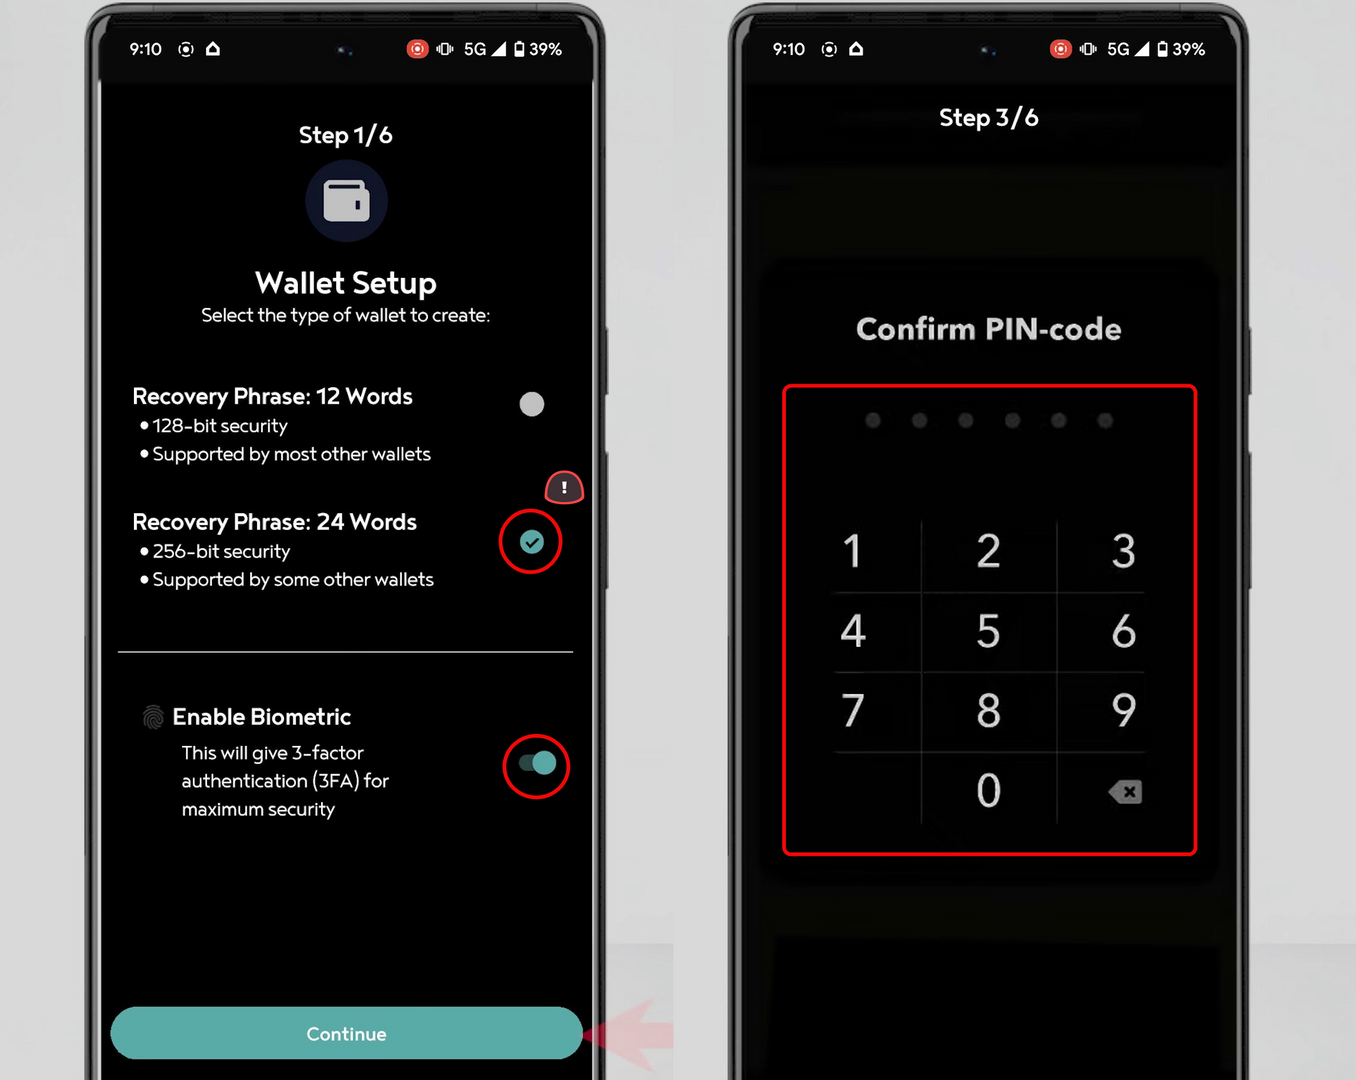
Tap Continue, set a PIN code, and then hold the card to the phone again to complete the setup.
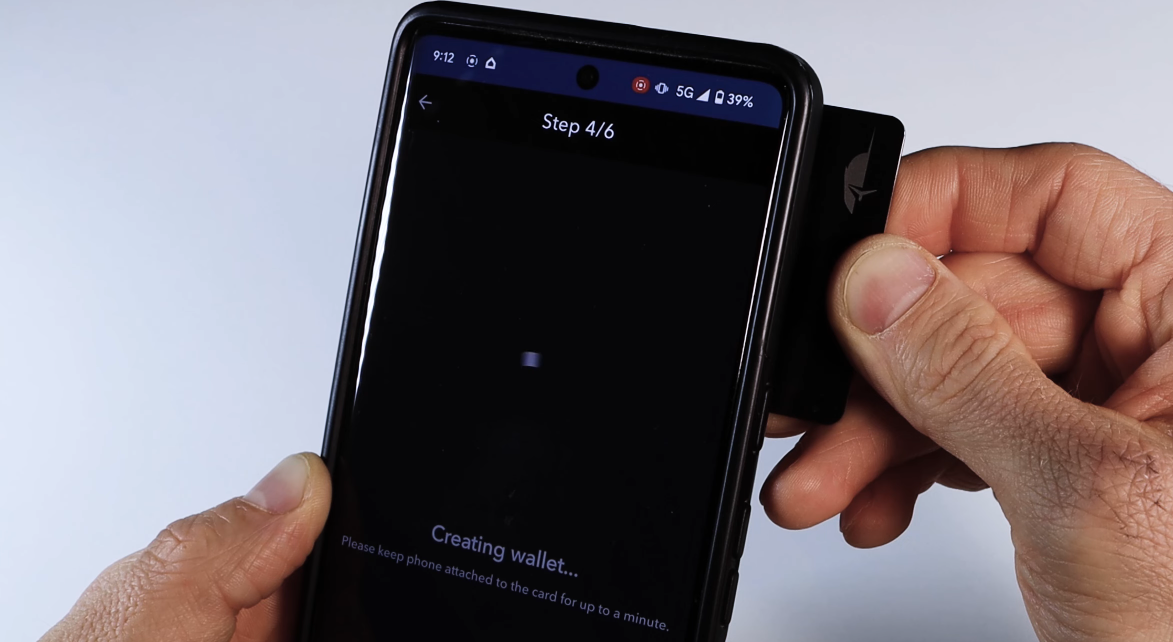
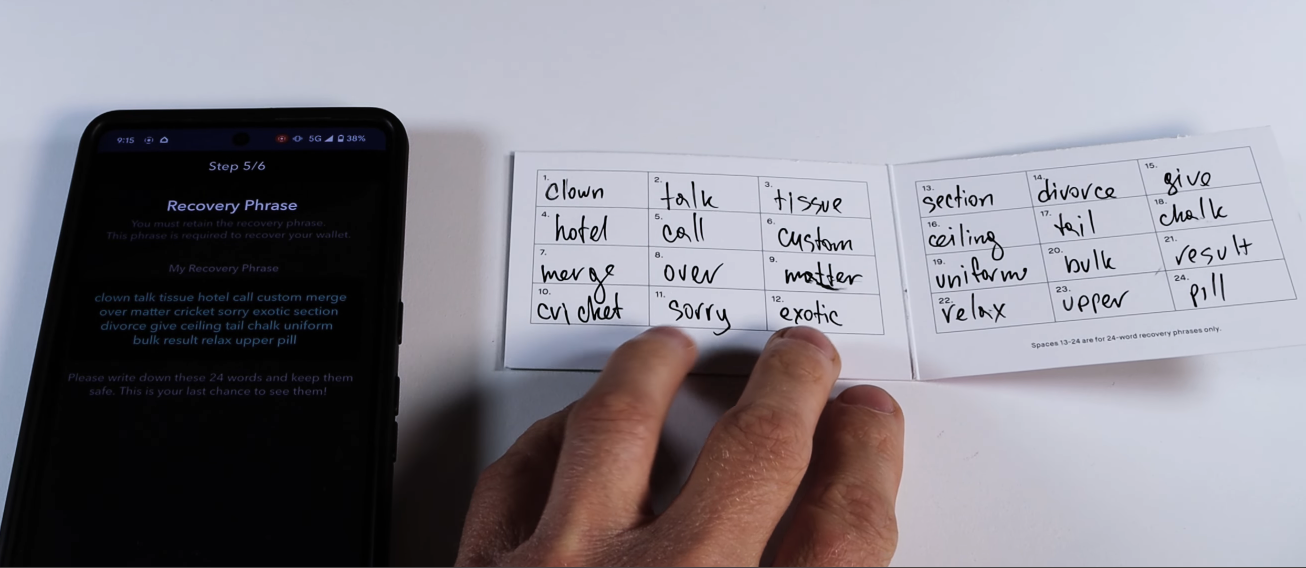
After this, Arculus will generate your 24-word seed phrase—crucial for recovering your wallet. Let’s take care of writing it down.
Backup
Write down the recovery phrase in the exact order on the supplied sheet. It’s best to make multiple copies and ensure no one else sees your screen or the sheet.
As the final step in the setup and backup process, tap the words in the correct order on your phone and then tap Confirm.
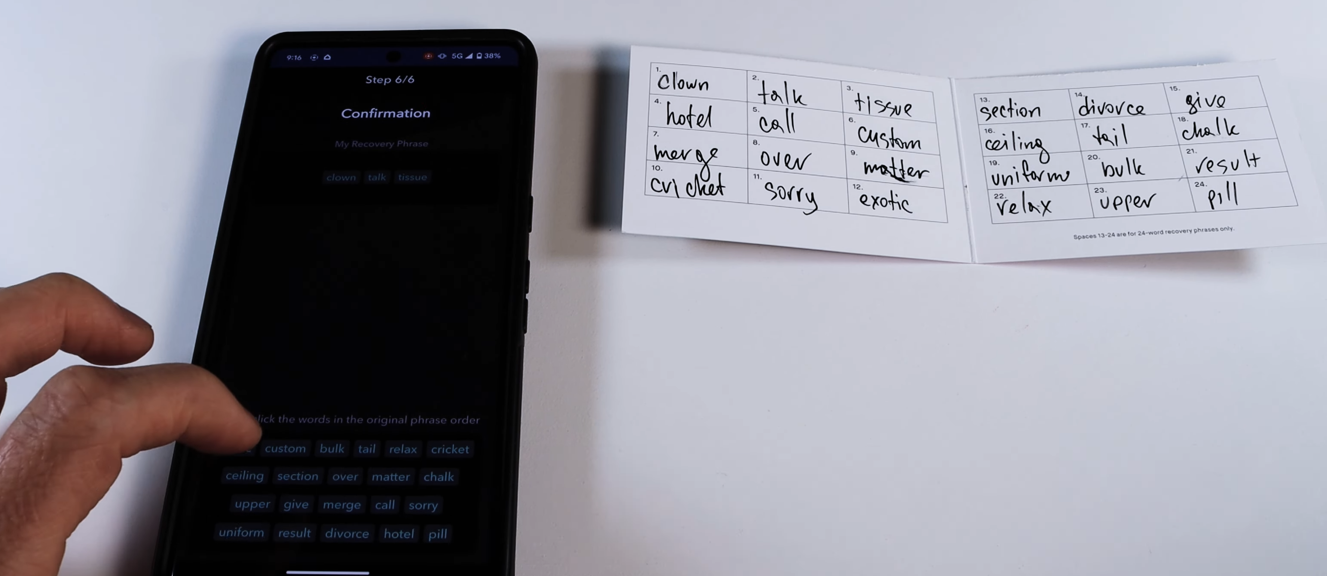
Store the sheet with your seed phrase in a secure location: without it, you risk permanently losing access to your wallet and assets. Never share your recovery phrase with anyone—it compromises your security.
Congratulations! Your wallet is set up and backed up on paper. You can now begin using it.
How to Use
The app interface is very simple and consists of three tabs:
Wallet– view your coins and NFTs, initiate transactions, and browse your NFT collection.Buy/Swap– purchase or swap crypto directly within the app.History– view the history of all your transactions.
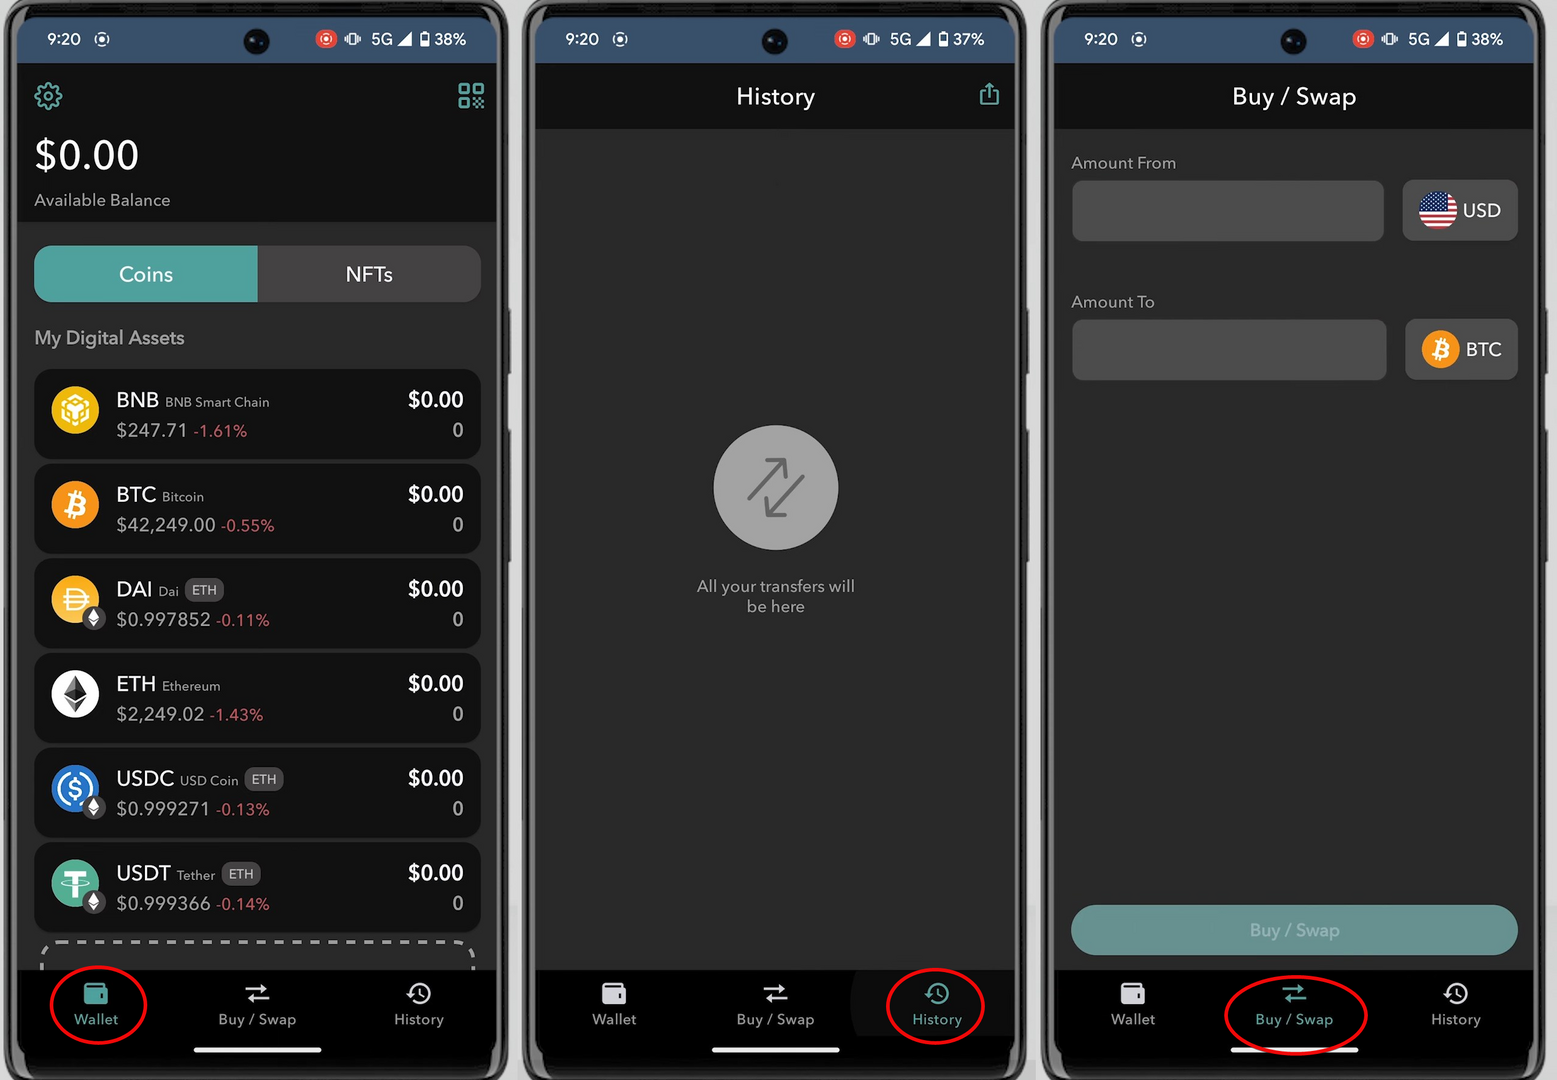
Let’s go to the Wallet tab to fetch addresses and send some coins.
Creating an Address
Addresses are in the first Wallet tab. First, tap Manage Assets to choose which coins to display.
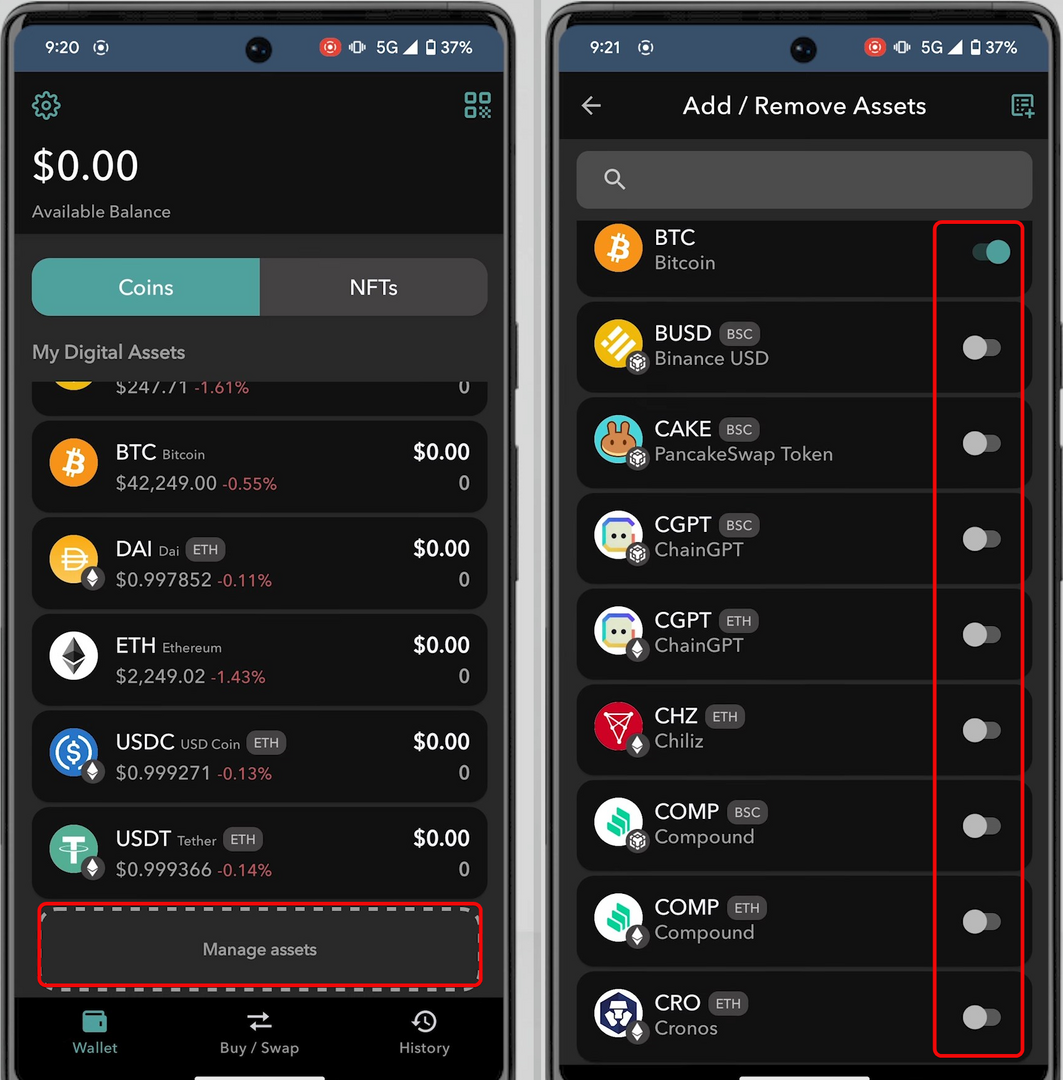
All supported coins are listed here—type the name, e.g., Tron, in the search bar, enable it, then tap Apply. It will then appear in your assets list.
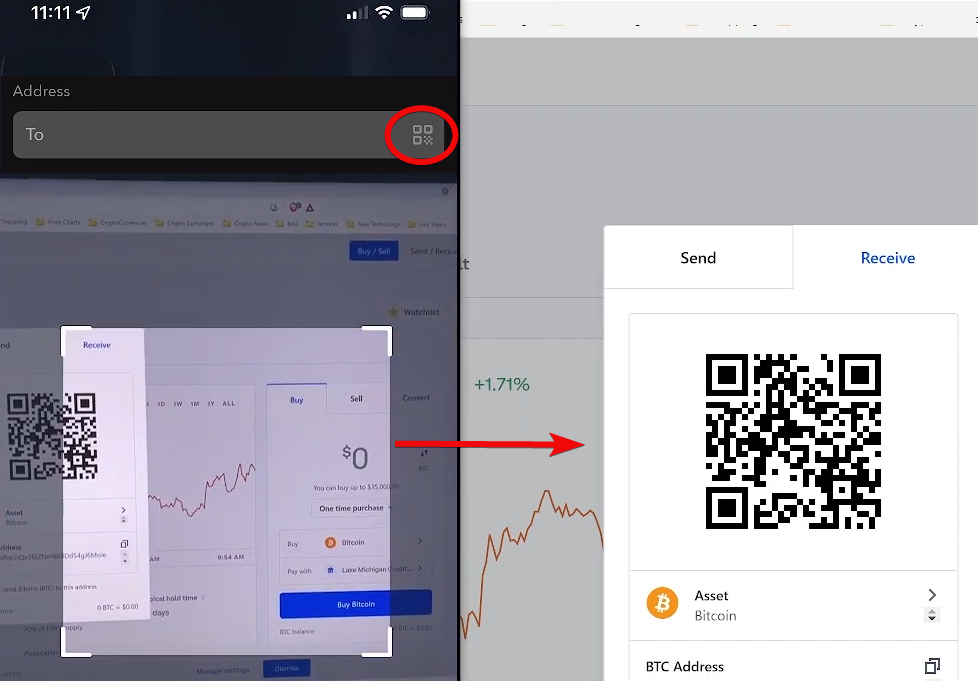
To get an address, select the coin and tap Receive.
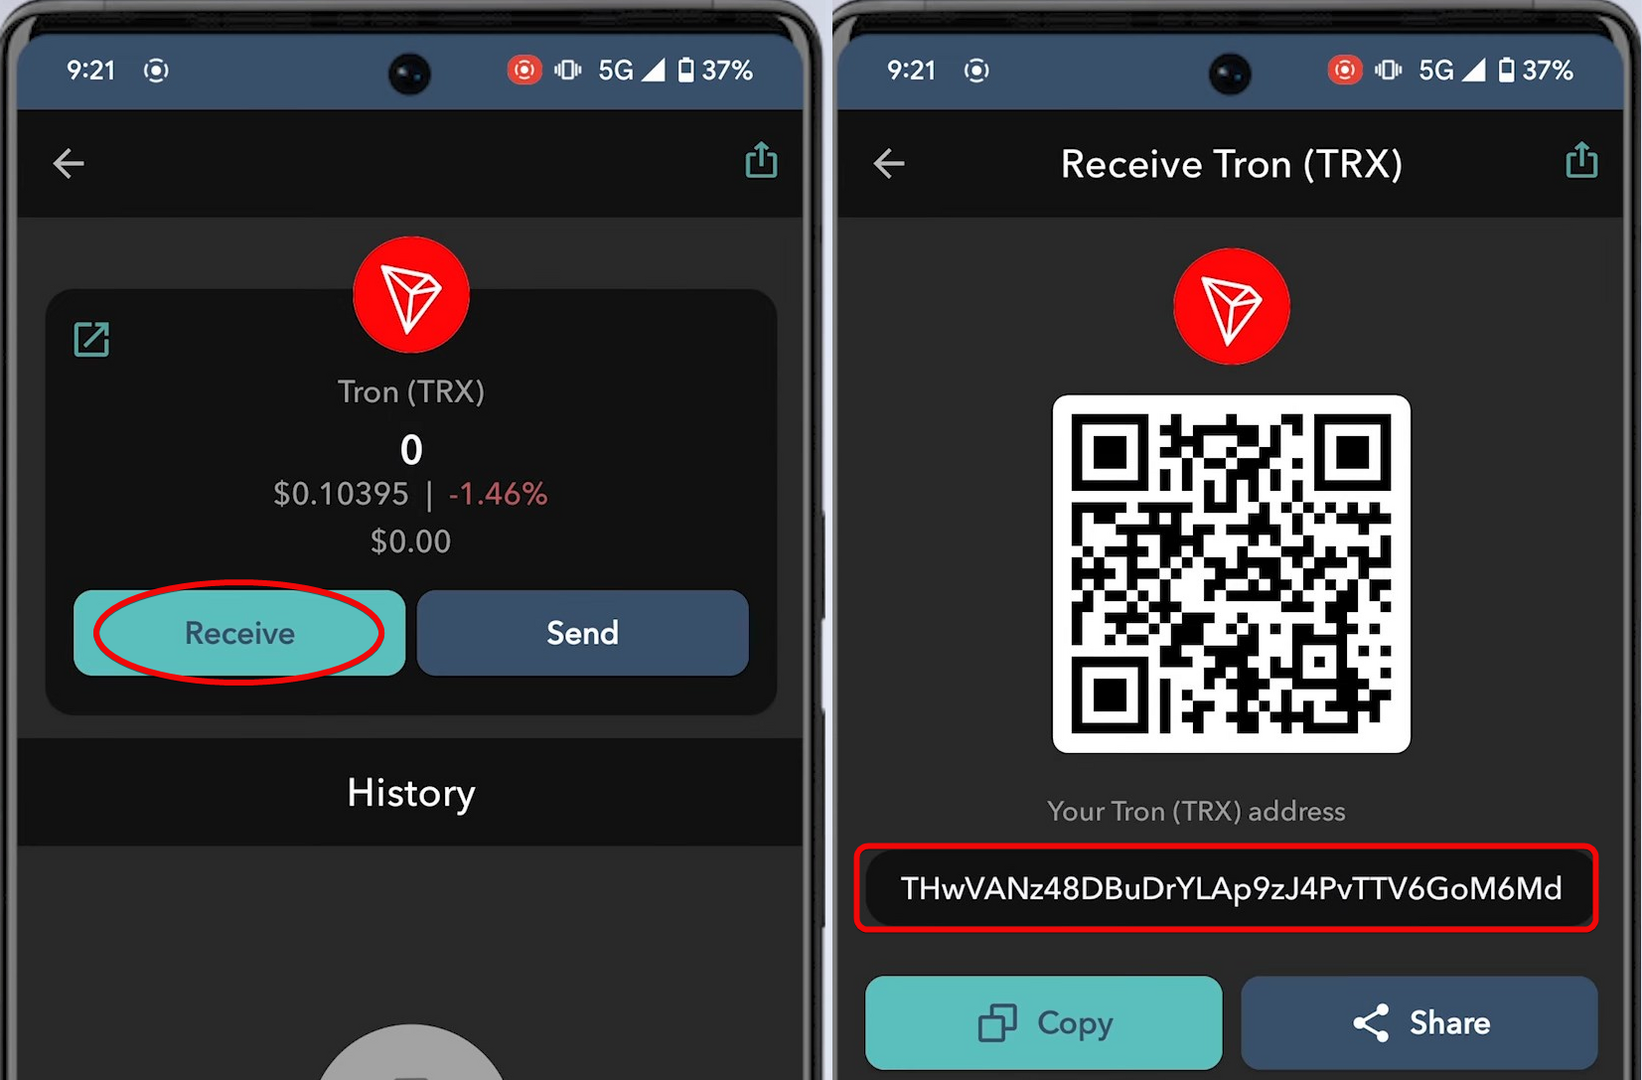
Depositing Funds
Let’s deposit TRON into the wallet. Tap the coin, choose Receive, then copy and share your address with the sender or send funds from another wallet. You can also share the QR code.
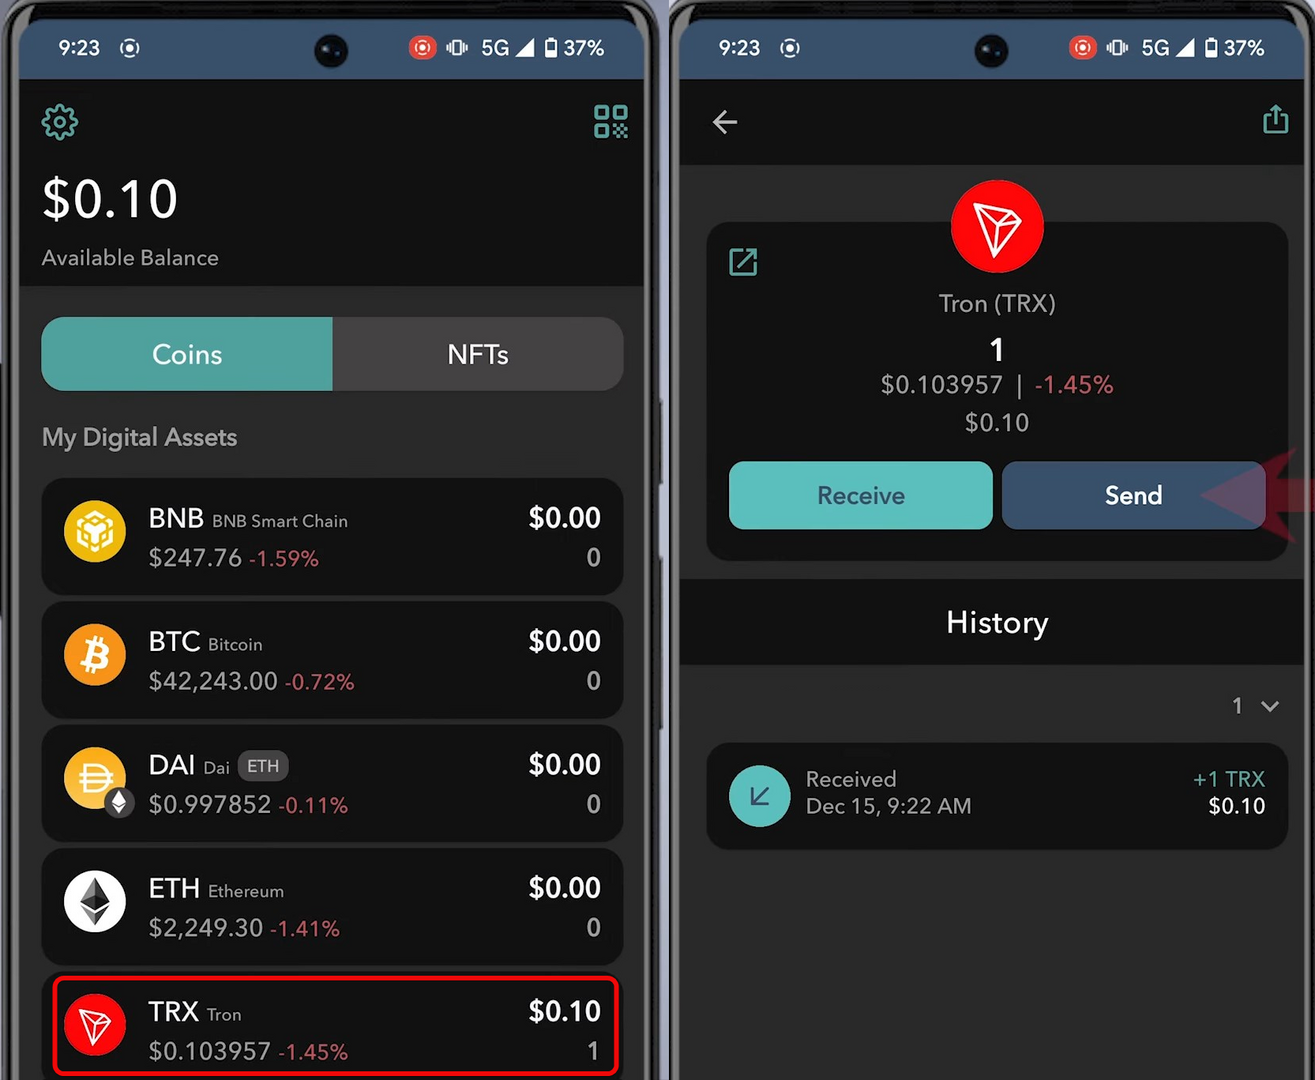
The received funds will appear in your wallet menu.
Depositing via Coinbase. Let’s look at depositing BTC as another example.
Open the Coinbase app or Coinbase wallet, select Bitcoin under Assets, and tap the Send icon (paper airplane).
Enter the amount to send (beginners should start with a small test amount to minimize risk).
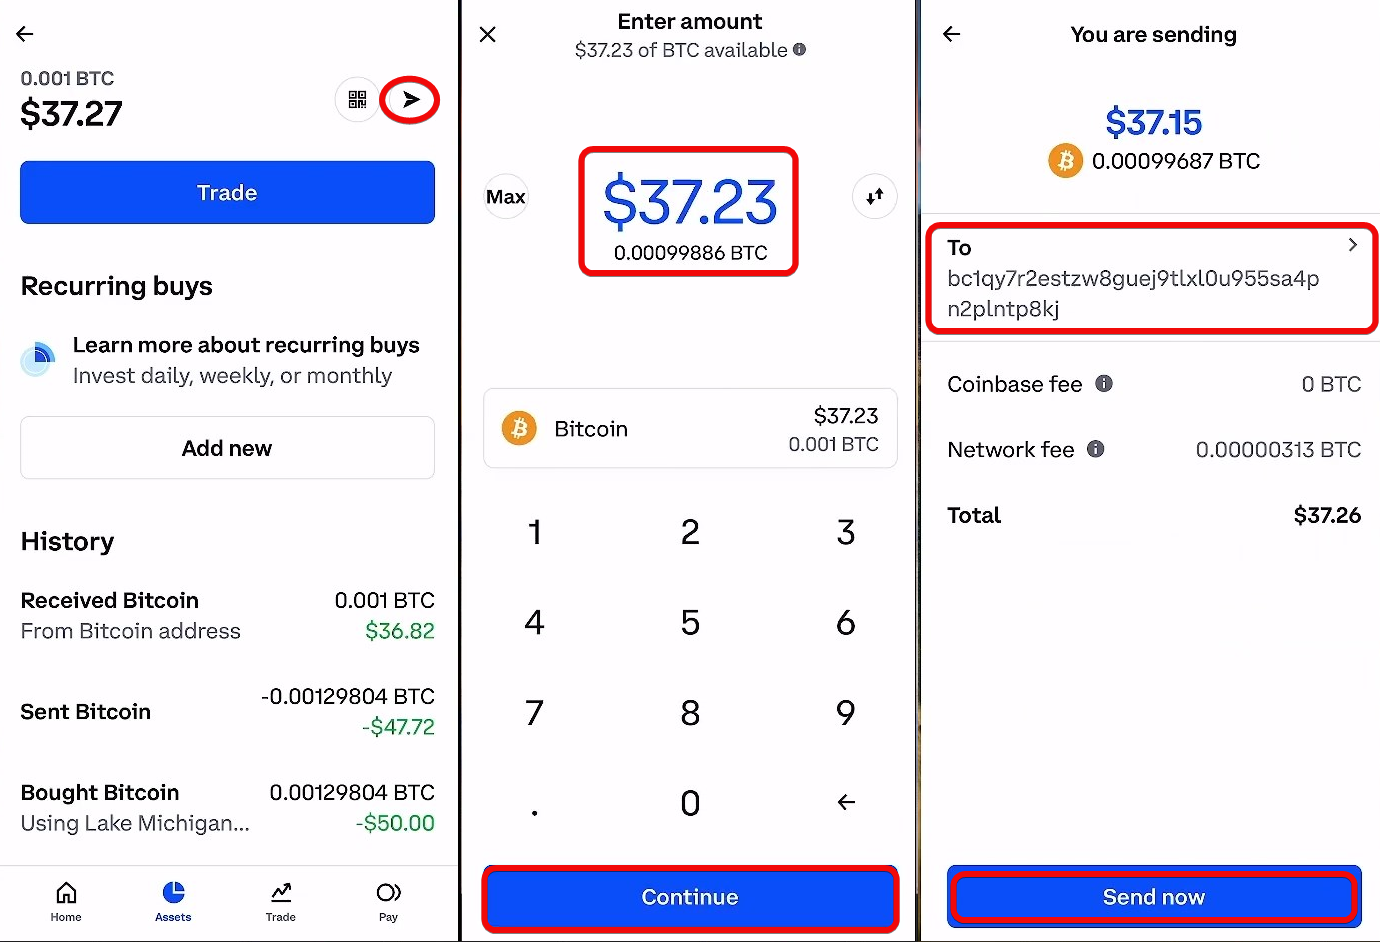
After verifying the destination address, review transaction details including network fees, and authorize with two-factor authentication (e.g., Google Authenticator).
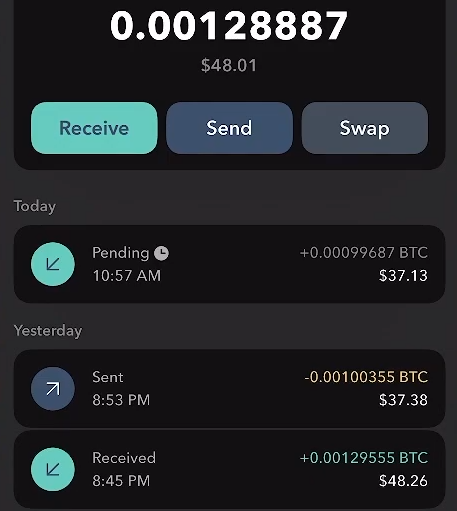
BTC will be sent to your Arculus wallet and appear in the transaction history after blockchain confirmations.
Withdrawing
Now let’s withdraw funds. Select the coin and tap Send. Scan the recipient’s QR code or paste their address, enter the amount, and tap Next.
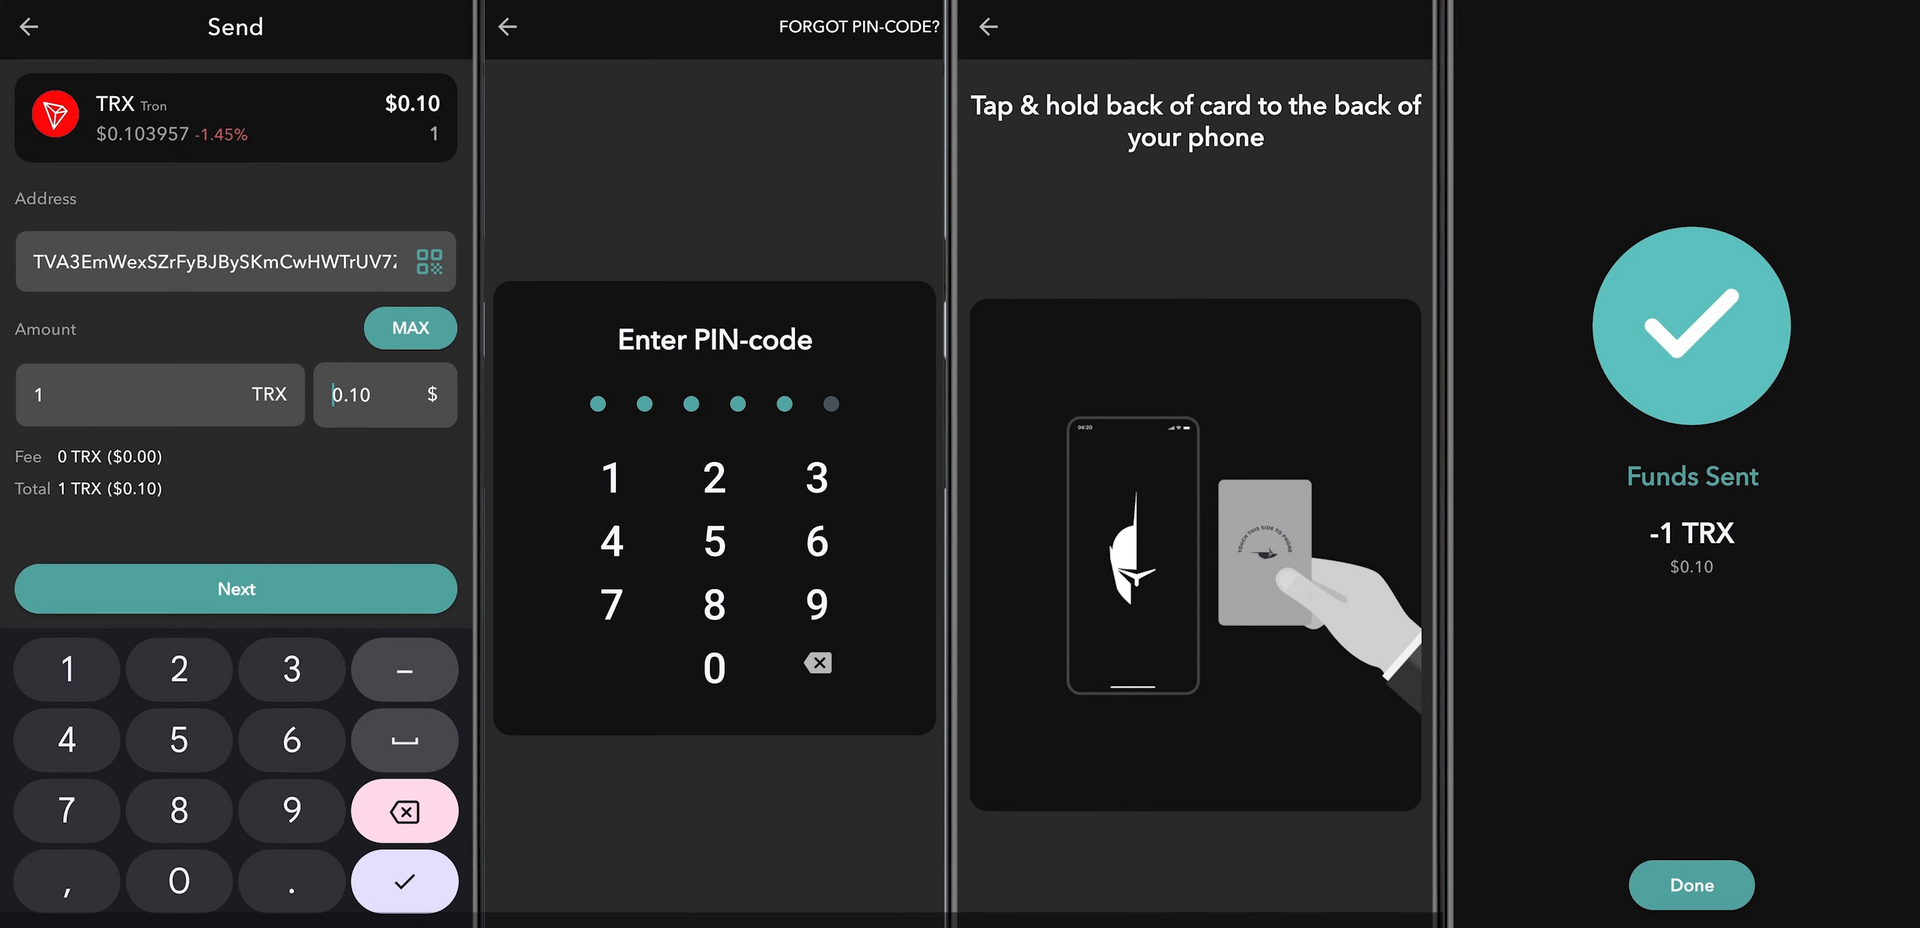
Enter your six-digit PIN, then hold the back of your card to the phone until the transaction completes.
Congratulations! Your funds have been sent.
For easier transfers, the wallet includes a QR scanner. Tapping the QR icon when sending lets you scan from another device, avoiding manual address entry.
Swapping and Buying
The app lets you buy and swap crypto through partner services. You can enter local currency and buy BTC/ETH instantly.
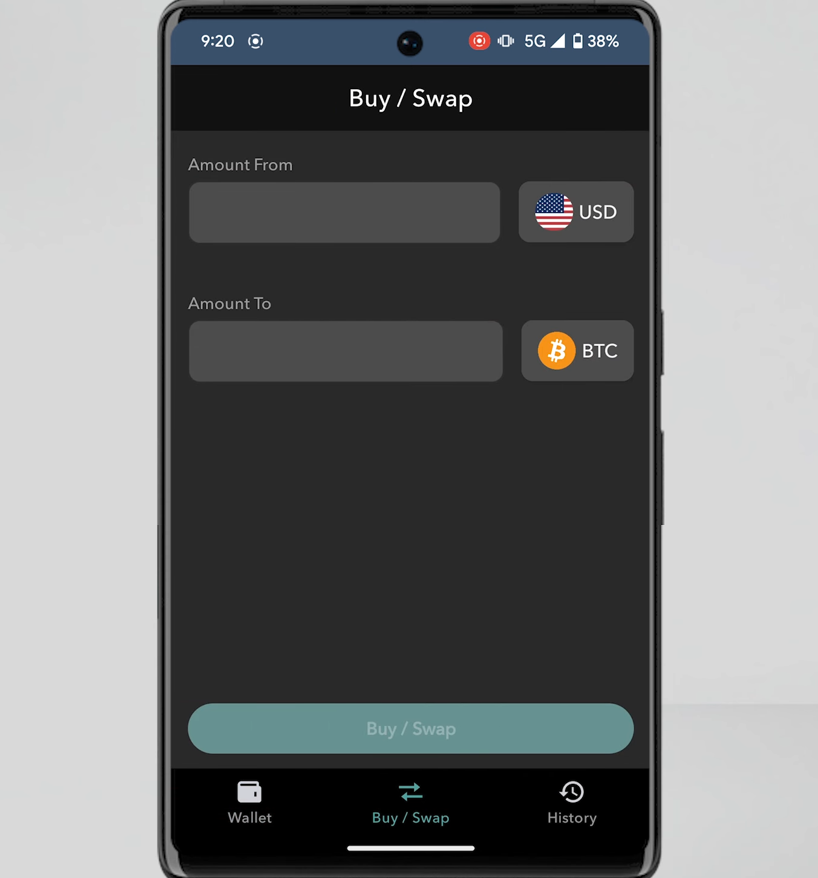
Note: local currency purchases may not be available in all regions.
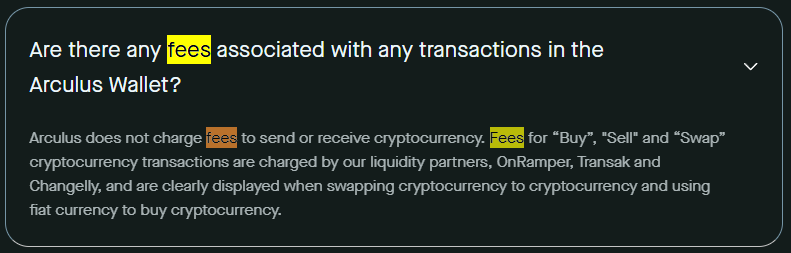
Fees
Exchange and purchase fees are charged by the partner services as detailed in their FAQs.
Arculus does not charge for sending or receiving crypto—you pay only the network fees, which vary with blockchain congestion.
NFT Support
The app has a dedicated NFT section where you can select a network and send/store non-fungible tokens directly on your Arculus card.
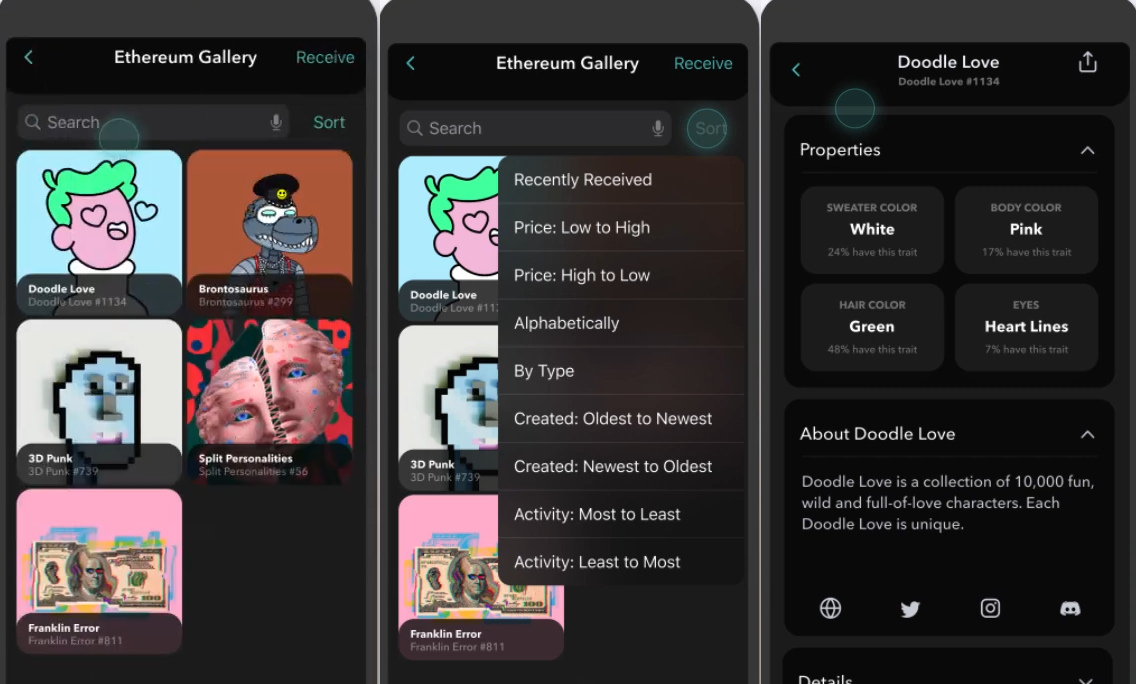
Arculus also supports Polygon NFTs alongside major cryptocurrencies and ERC-20 tokens.
Additionally, you can connect to Web3 applications via WalletConnect to earn (e.g., staking, farming, or trading), buy tokens, play blockchain games, and more.
WalletConnect
The wallet uses the WalletConnect protocol for secure Web3 connections. To start, select WalletConnect on any dApp, NFT marketplace, DeFi site, or other Web3 platform.
For example, on OpenSea click the wallet icon in the top right, choose WalletConnect, then scan the QR code from the prompt within the Arculus app.
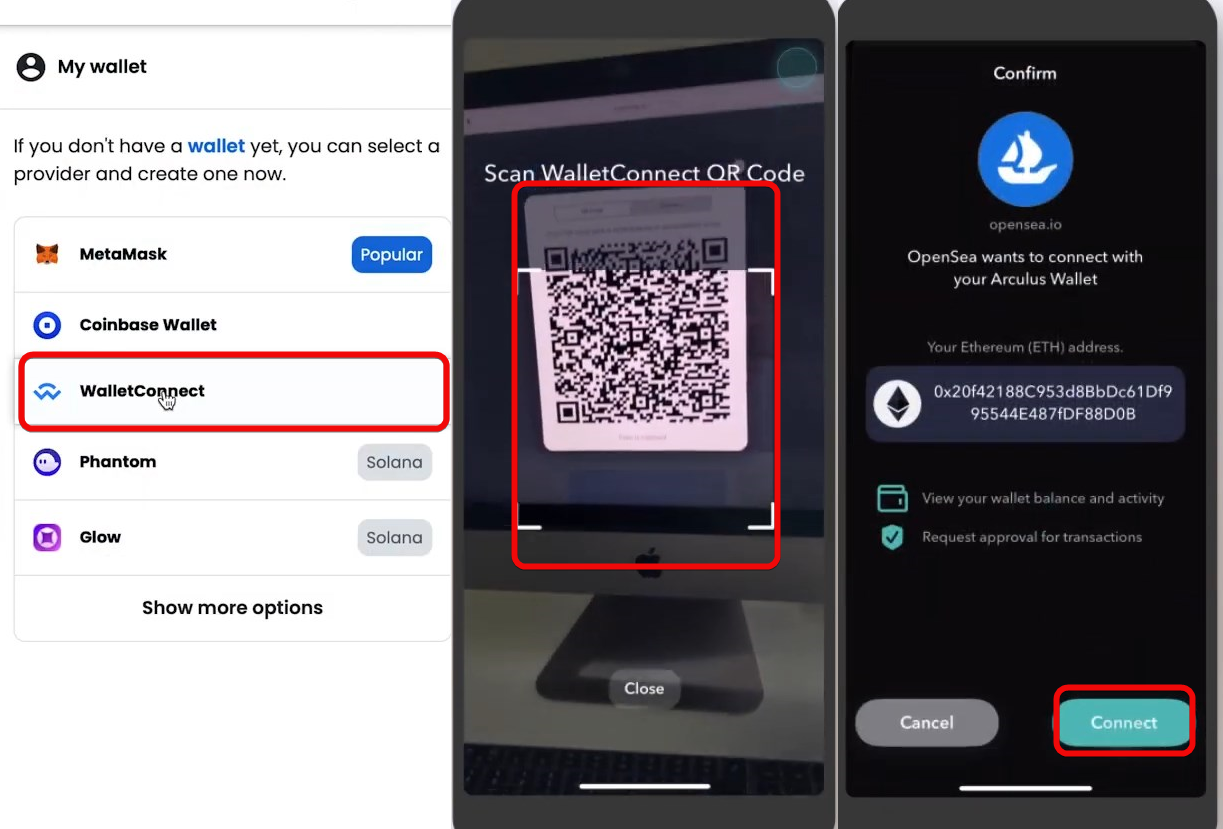
Your phone will then ask you to confirm the connection—tap Connect, and you’re linked. The process is similar across most platforms, though some may require an account.
To disconnect, go to Settings in your wallet, select WalletConnect, and choose the platform you wish to disconnect from.
Advanced Settings
Importing and Restoring
To restore your wallet on a new device, install and open Arculus, tap Get Started, and hold the card to the back of your phone to activate NFC.
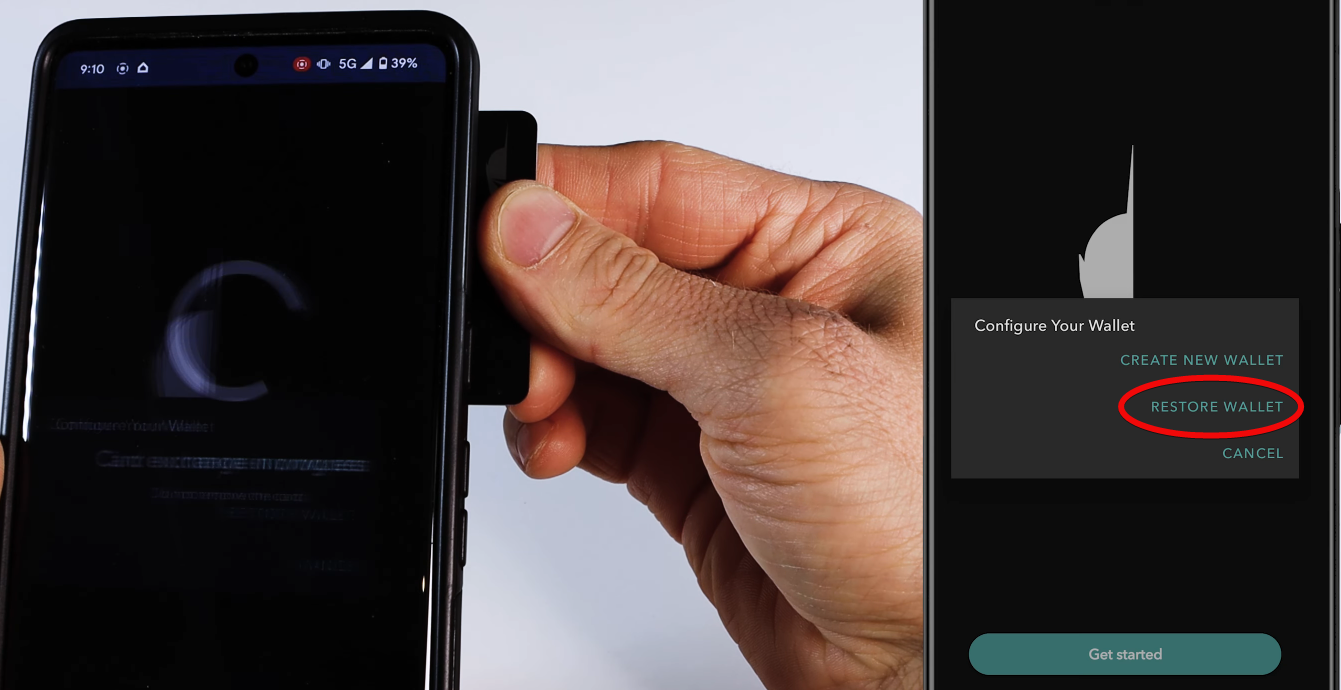
Then select Restore Wallet, enter a new six-digit PIN (this will overwrite the previous one on all devices), and confirm it.
Next, enter your 12- or 24-word recovery phrase and tap Restore, holding the card in place until the process completes. Finally, tap Go to the Home Screen—your wallet is ready to use!
Conclusion: Critique and Should You Use It?
First, the wallet is not open source, which raises transparency concerns. The community cannot verify what the app actually does—whether it stores or transmits your keys, etc.
- Documentation is limited. We’d like to see more technical specifications and greater transparency.
- The chip’s internal memory is only 512 KB, which is very small by today’s standards.
- According to their FAQ, you can create only one wallet on the card. If true, this is a significant limitation.
Supporting just 80+ coins is no longer impressive, and many users need more. Especially if your strategy is to hold both proven coins like BTC and ETH and potentially promising new or niche tokens.
We always advise against putting all your eggs in one basket, and being limited to one wallet exacerbates privacy issues by forcing you to reuse addresses.
Additionally, there’s no information on how to reset the PIN code.
Whether to use this wallet or choose one from our comparison ranking is ultimately up to you.
Support:


