Download and configure NiceHash Miner [v3.1.0.4] for MAX Profit
NiceHash is a platform for earning Bitcoin and some other cryptocurrencies.
NiceHash is not really mining. In other words, you sell the power of your equipment and get Bitcoin in return. In traditional mining, through command line programs, you mine any coin and completely decide what to do with it and at what rates to sell it in BTC or Rubles.
If you want to mine cryptocurrency directly, read more about how to mine Ethereum Classic on video cards in Windows.
However, for beginners, especially those who want to try to make money on their equipment for the first time , it can be difficult to set up traditional programs. Therefore, we have prepared this step-by-step instruction for you.
Review
First, let's look at the advantages of the platform.
Benefits
The ability to receive Bitcoin immediately (you can also convert to ETH, LTC, XRP, BCH, ZEC )
Save time on set-up
Low minimum payout threshold
Relatively simple setup
Convenient statistics monitoring
Auto-switching algorithms for mining the most profitable coin at the current time
However, our portal about mining and cryptocurrencies - Bywork, aims to tell you the whole truth about the Cryptoindustry, because this is our mission. That is why, we will honestly tell you about all the shortcomings of this platform.
Disadvantages
The site was hacked once and all the money was stolen
In fact, this is an extra intermediary, and if you know how to configure programs manually, then it is better to mine on pools. On our website, in the Programs section, you can find all the programs required for mining and settings for them.
Earnings are less than on traditional programs and pools, because if you mine the coin directly, then you can sell it at a higher price on the pump. Example: today, at the current exchange rate, the video card brings $ 1, and tomorrow 0.50 cents. And in the case of using Nicehash, you sell capacities for both $ 1 and $ 0.50. And if you use traditional pools, then you yourself decide at what price to sell.
Large Commission from 2% to 5% only for Nicehash + commission of third-party miners.
There are high fees for all transactions, especially when it comes to withdrawing money to external wallets.
Algorithm auto-switching is good on the one hand, but on the other hand it can harm the equipment if power consumption changes dramatically when the algorithm is changed
You do not control the process of mining cryptocurrencies. Because the nice hash chooses which coins to mine, but at the same time you always get only BTC.
Well, if you are not confused by the shortcomings of the platform, or you just want to try to start mining, then this platform is for you.
You can also buy power on the site. This is necessary when you are interested in mining any cryptocurrency, but you do not have the necessary equipment for this. Or you buy capacities cheaper and direct them to the pool, where the earnings are higher than to Nicehesh.
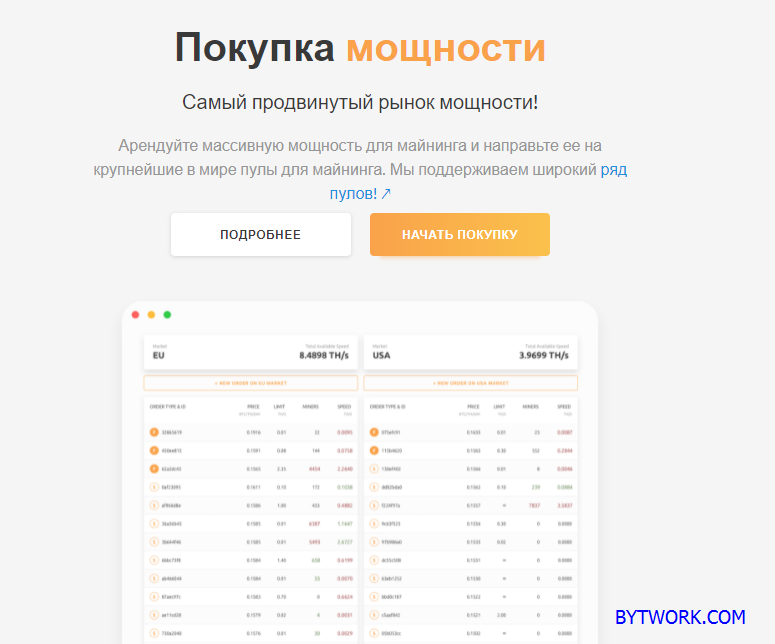
However, in this step-by-step tutorial, we will be looking at selling capacity in order to earn BTC. Therefore, we read on.
Quick run
Go to the official website of the platform and download the miner.
You can also download the miner from Mega
If you do not have an account, the platform will offer you to register first before downloading. Registration is needed to track statistics, link a BTC wallet and receive payments. The registration process is pretty straightforward. But we will consider it primarily from a security point of view !
Sign up
So, let's go to registration: https://www.nicehash.com.
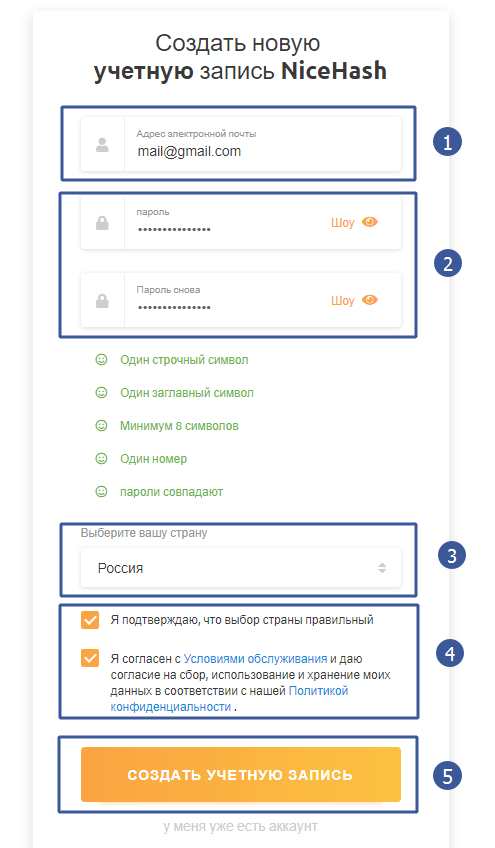
- Enter your Email address. We recommend using Google mail, because it is the most secure at the moment. Mail on mail.ru is easy to hack, because it does not have the same protection levels as in Google.
- Coming up with a password. The password must be complex. We recommend choosing a non-existent word because all existing words are in the databases of hackers using Brute force. Therefore, we write in the password lowercase and uppercase letters, numbers and symbols. The longer the password, the harder it will be to crack.
- Choosing a country
- We read the conditions, if they fit, put a check mark
- Create an account
And so, we registered. Enter your username and password and get into your personal account.
Personal Area
The new personal account is available at: https://www.nicehash.com/my/dashboard.
It looks like this:
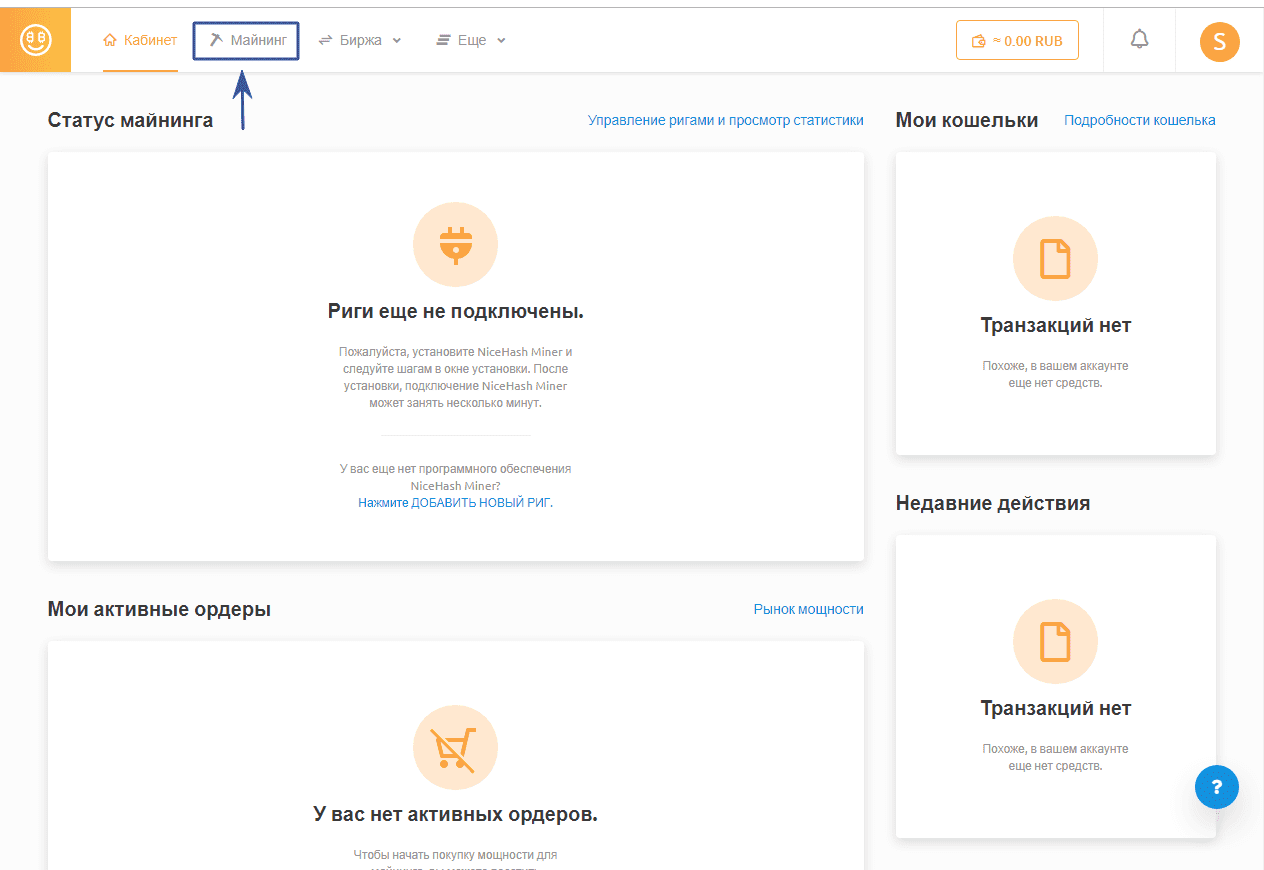
There are three main tabs in the new personal account: this is the Cabinet itself, Mining, Exchanges and additional ones.
- The cabinet tab is still empty. All basic information, wallets and recent activities will be summarized here.
- Mining tab - to track your statistics
- On the exchange it will be possible to exchange your BTC for other altcoins (at the extortionate commission - 0.5% at the time of this writing. For comparison, on the exchanges, the commission is 0.1%!).
Having admired the new interface, we must now think about protecting our account, because NiceHash has already been hacked once.
Safety
First of all, we will set up our security, because we do not want our Bitcoins to be stolen.
Click on the avatar with the account in the menu on the right and go to "My settings"
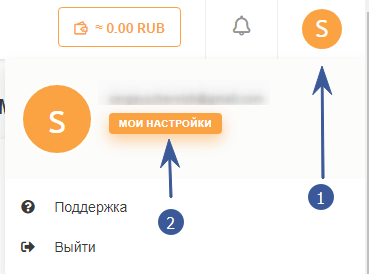
Here we select the "Security" tab and be sure to enable 2fa - Google's two-factor authentication.

We are now ready to launch!
How to start
To start mining, click "Add new rig"
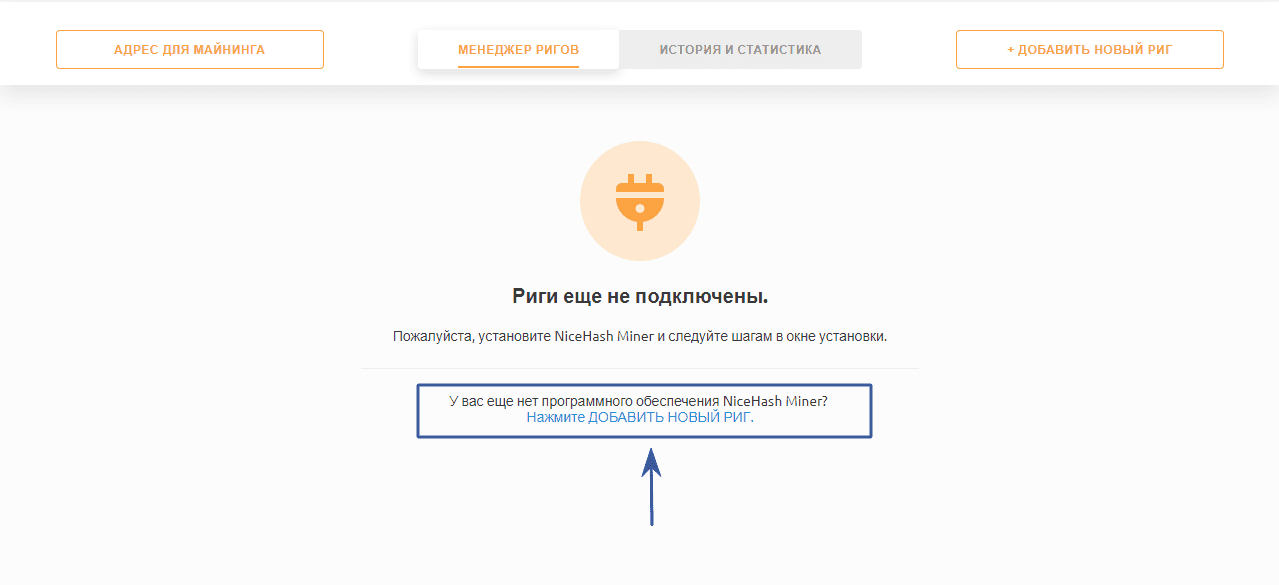
and do the following steps:
- Downloading the program
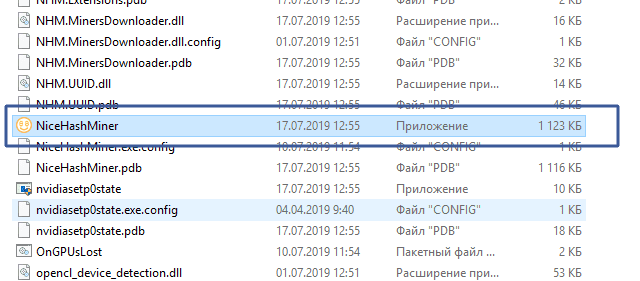
- We take it to any convenient place
- (Optional) Add the entire folder with the miner to the anti-virus exceptions because some antiviruses, such as Kaspersky, may consider miners to be malware.
- Find the NiceHashMiner.exe file in the program folder and run it
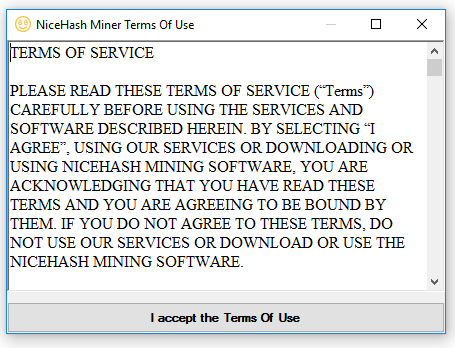
- The program will ask you to accept the Terms
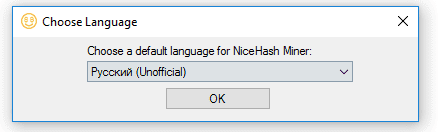
- Choosing the interface language
- We agree if we understand the risks
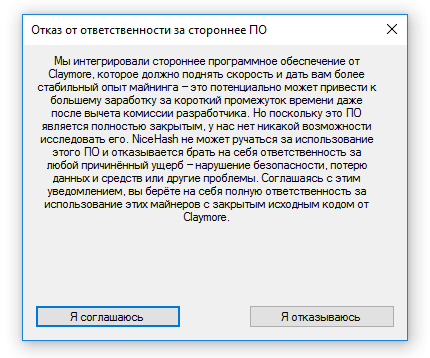
The program will say that it is not responsible for all miners that are inside the NiceHash shell.
Now you need to configure the platform for your hardware.
How To 100% Unlock LHR
NiceHash supports 100% LHR unlock developed by NBminer.
First, make sure you are using NBMiner_LHR plugin version 17.1 or higher. This plugin version includes miner binary version v41.3.
You can check the plugin version in NiceHash Miner > Plugins tab. If you are not using the latest version of the plugin, simply click the UPDATE button to update it.
To use NiceHash LHR full unlock, run the program as administrator. Otherwise, a full LHR unlock will not work. After you run NHM as administrator, mining will automatically apply 100% LHR unlock.
Tip: re-benchmark your graphics card after updating the NBminer_LHR plugin.
Customization
At the first launch, the platform must test your hardware and select algorithms that can be mined on the hardware.
The shell will also download all the necessary miners and libraries:
After waiting for the download, we begin the configuration.
We choose the servers closest to us because the closer the server is to us, the lower the ping, hence the lower the latency and the faster the jobs arrive.
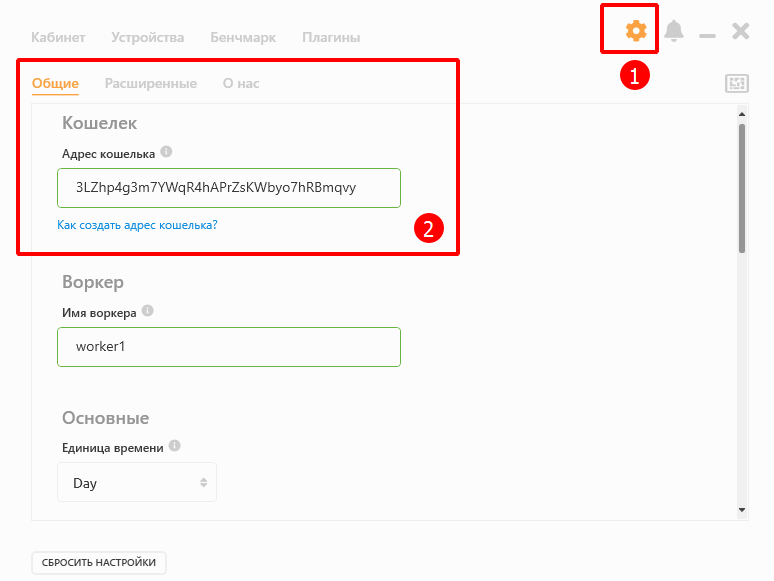
Enter your address Bitcoin. You can get it in the new personal account in the Wallet Overview section:
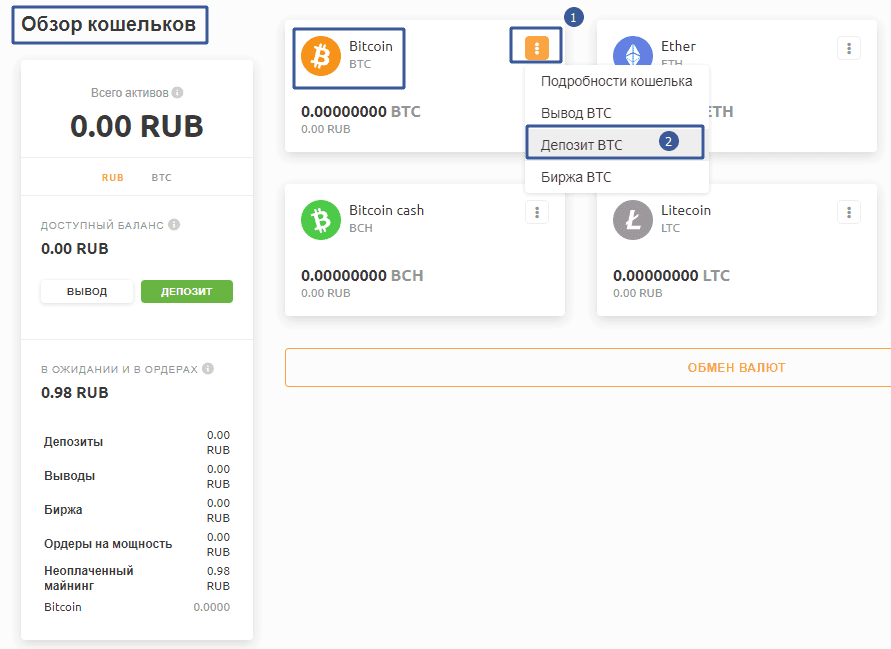
- Click on the menu near Bitcoin
- Choosing Deposit BTC
We see such a window:
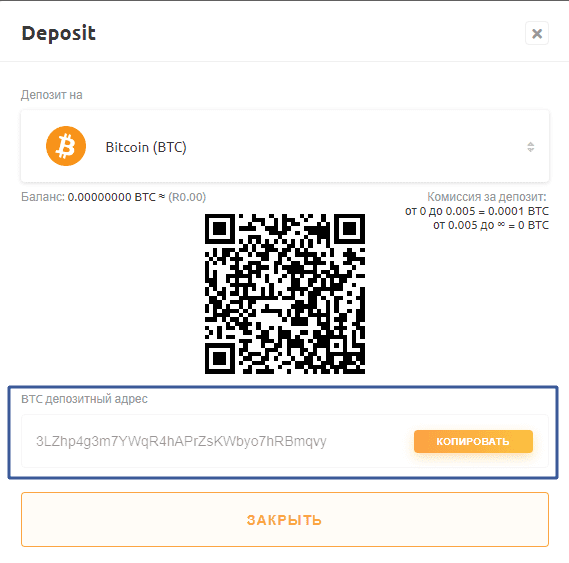
3LZhp4g3m7YWqR4hAPrZsKWbyo7hRBmqvy- this is the Bitcoin address to which the coins will be credited. You will have your own address (other characters).
Copy this address and paste it into the program in the Bitcoin Address field (number 2 in the screenshot):
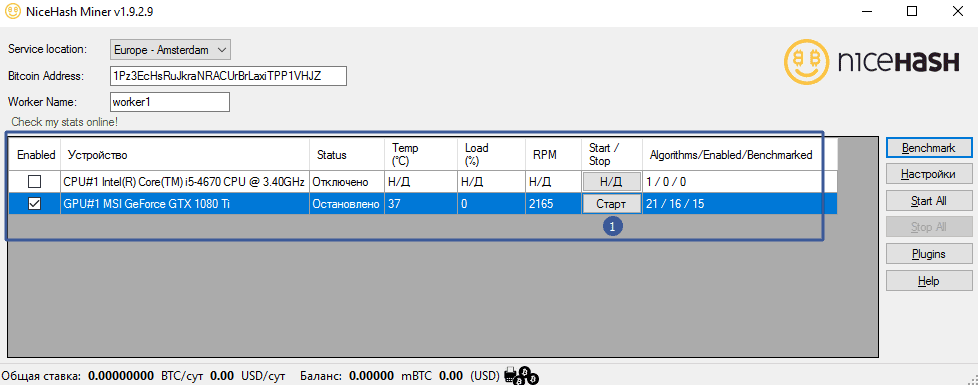
Below we see "Worker name" - this is the name of the computer - we indicate any in Latin. This name will be displayed in the statistics section.
After starting the program for the first time, you need to run the Benchmark - this is testing the equipment.
We see a window with a choice of testing settings:
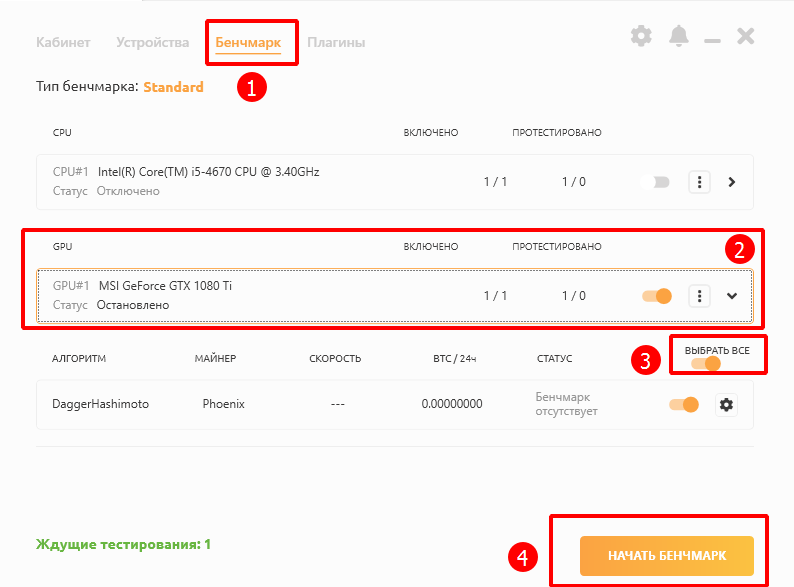
- Selecting the "Benchmark" tab
- Choosing devices
- We select all algorithms for testing. Algorithms with a plus are for Dual Mining. It is not profitable now, so you can skip it.
- We start the test by clicking on the Start button
After testing your hardware, the program will choose the optimal algorithm, which largely depends on the current cryptocurrency rates and capacity orders from NiceHash.
We return to the main window of the program. We see in the algorithms field that we have selected 18 algorithms (you may have other numbers, depending on the type of video cards )
We press start. A command line window will open with the miner that is currently generating income most profitably:
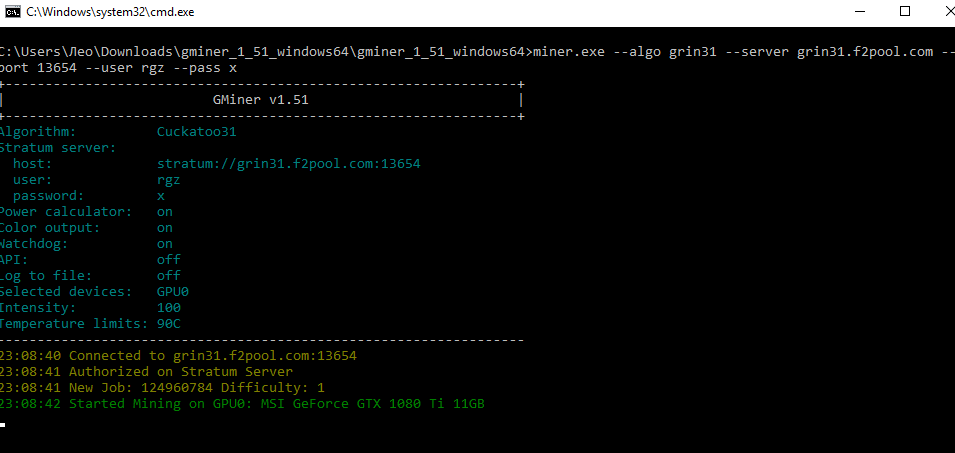
That's it, the mining process has begun. The window may differ, depending on the algorithm on which the coins are currently being mined. But the principle remains the same.
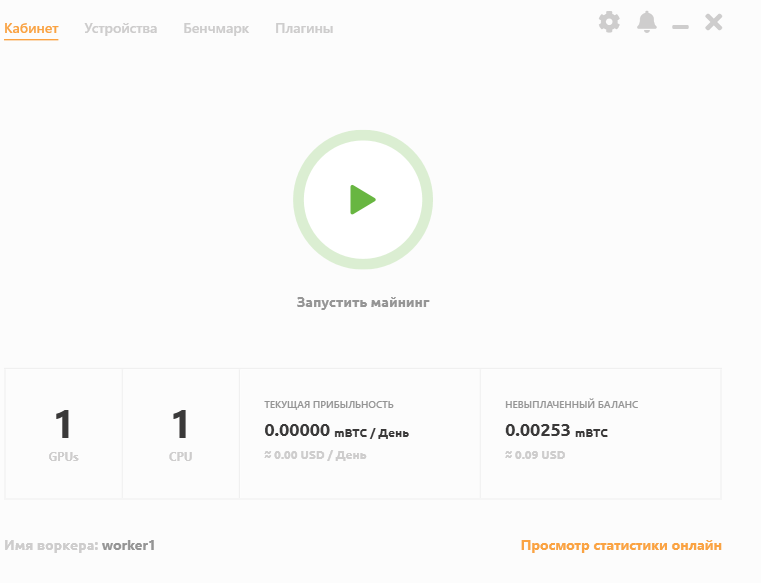
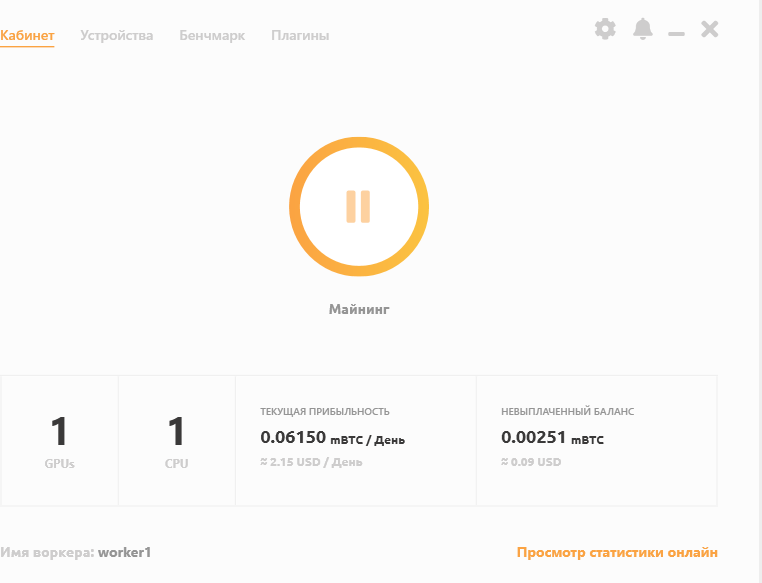
In the platform shell itself, we see the following
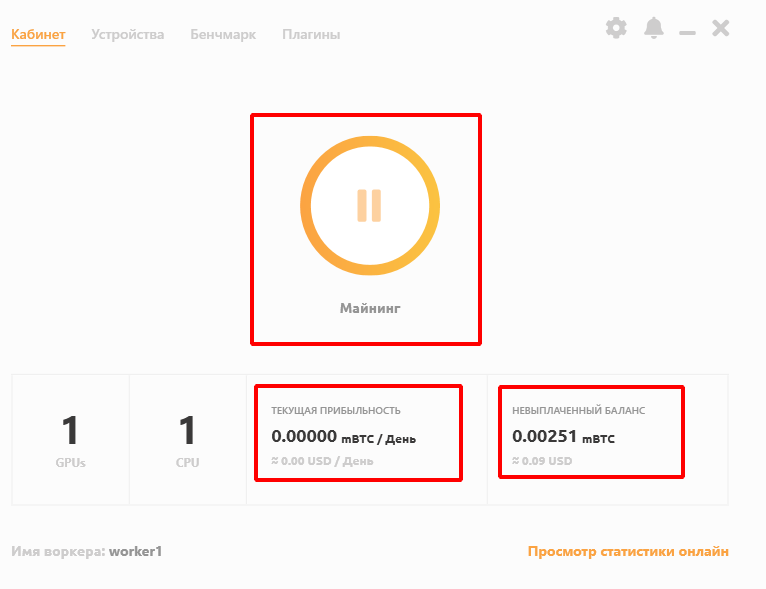
- Mining status. If the pause button is active, then mining is in progress.
- The hashing speed must be viewed in the miner's console (it is this speed that is entered into the calculators to calculate the profitability)
- Number of mBTC per day (0.00100000 BTC = 1 mBTC)
- How much USD brings per day
- How many devices are available for mining
In online statistics we will find:
- Mining Temperatures (Read our Guide to Allowable Mining Temperatures to conserve cards and how to cool graphics cards if they overheat )
- Fan speed
All this is great, but how to understand how much we will earn from this? To do this, let's turn to statistics.
How to view statistics
Go to NiceHash website and track statistics (Mining tab):

- Rigs are mined - this is the number of your miners (computers or farms )
- Current profitability / 24h - a predicted calculation of how much you will earn in 24 hours in BTC / Rubles (only at the current exchange rate!)
- The unpaid balance is how much you have already earned. You must collect at least 1000 Satoshi (0.0000000 BTC) to receive the payout to your wallet.
- Payout - how many hours are left for payout.
- Btc wallet balance - balance
Below we see the farm management window

- We can remotely stop / disable mining
- Create a new group - if you have several farms, you can combine them into groups
- Organize groups and rigs - you can also move rigs between groups
- Expand All Items - Expands Hidden Fields
- Collapse All Items - Collapses Expanded Fields
- Manage rig notifications is a useful setting, when enabled, you will receive email notifications that the farm is frozen or is not working
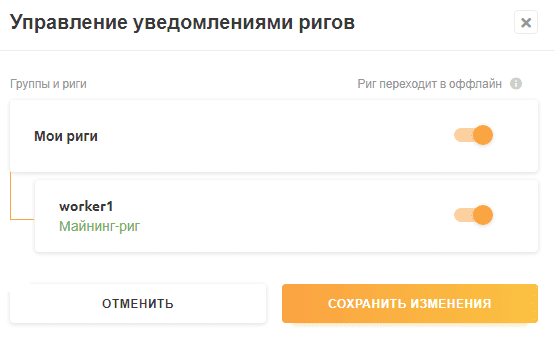
We turn on the slider near the rig and save, because we need notifications about a simple farm.
Below we see more detailed statistics:
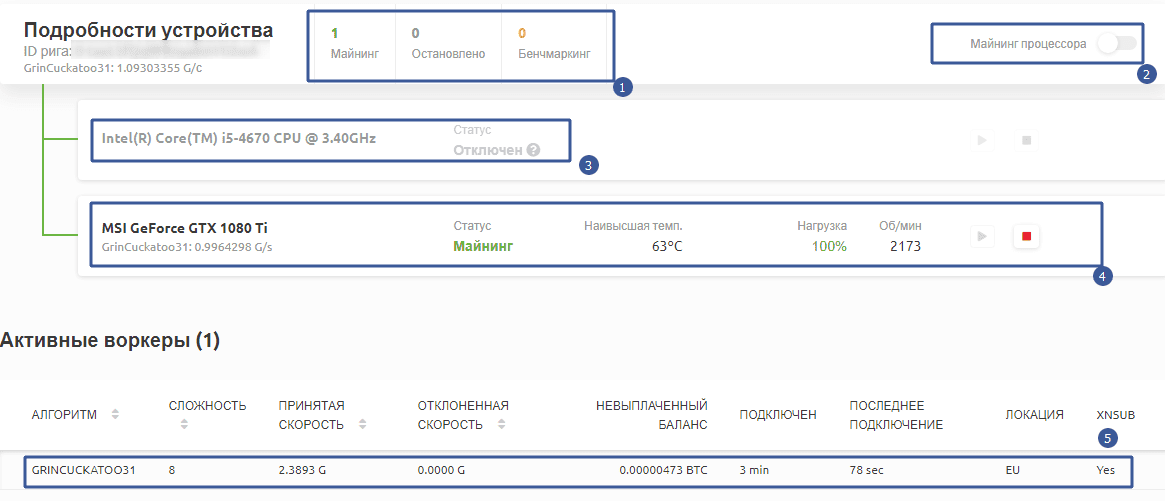
- Device status - 1 card is mining, 0 is stopped, 0 is being tested
- CPU mining disabled
- Processor information
- Information about the video card: Name, status, temperature within normal limits, card load, fan revolutions per minute
- Mining statistics: Algorithm, Difficulty, Speed (power) in units of measurement, How many decisions are rejected (happens due to overclocking of cards), Balance, running time, xnsub - this is for algorithms with very high complexity and for miners with very high hash speeds. This parameter is used most often for ASICs.
Scrolling down even further, we will see a graph of statistics:
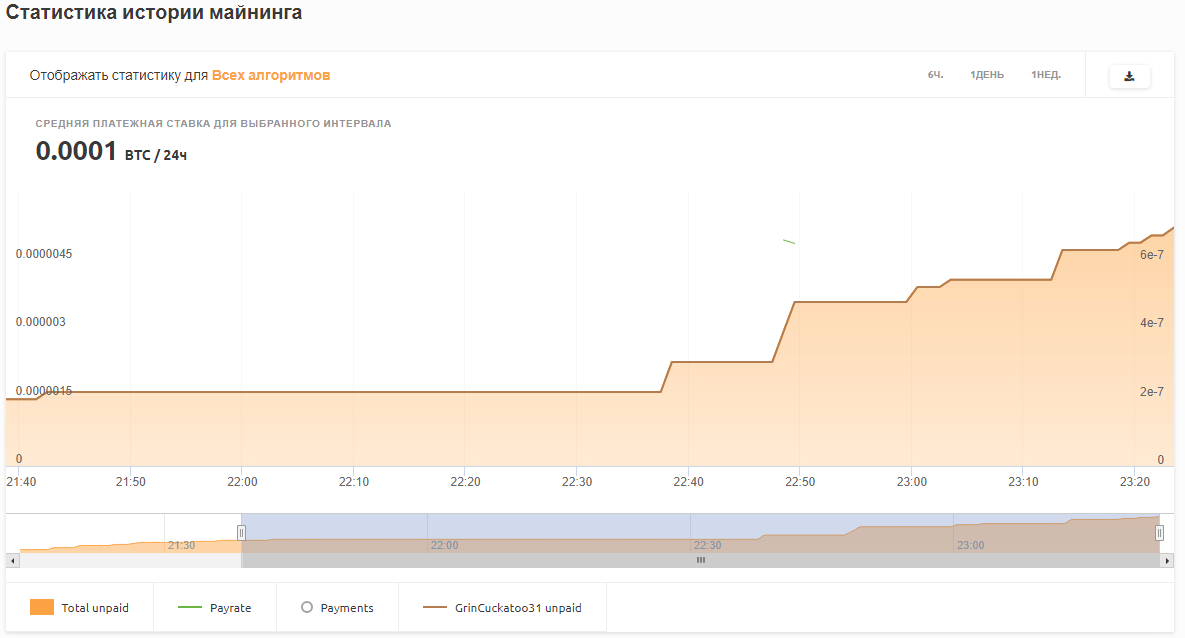
It displays unpaid amount, pay rate, payments, unpaid GrinCuckatoo31 algorithm (you may have a different one).
Statistics are good, but money is better. How to receive the money?
Money withdrawal
To withdraw, go to the "Wallet Overview" tab.

For this:
- Click on the balance.
- We select the item "Conclusion".
Withdrawals from nice hash occur once a day. Miners receive payments using the PPS system.
Payments can be received both to the internal wallet of the platform and to an external (cold) wallet or exchange.
Attention! We strongly recommend that you put a cold wallet, or in extreme cases, use a cryptocurrency exchange wallet . But do not keep your Bitcoins in the internal wallet of the platform, because it has already been hacked.
Exchanges can also be hacked, because these are online services with different degrees of protection. That is why we recommend keeping your funds in your cold wallet (which will not have access to the Internet). Ideally, use an old laptop that you rarely use and don't go online. Thus, if it is not on the Internet, then it cannot be hacked.
|
Payment Schedule |
Nicehash wallet |
External wallet |
|
Once a day |
If your unpaid balance is more than 0.001 BTC |
If your unpaid balance is more than 0.1 BTC |
|
Once a week* |
/ |
If your unpaid balance is more than 0.001 BTC |
The platform will strongly recommend and insist on storing funds in its system. For example, overestimate the commission for withdrawal to external wallets (Now it is 5%, instead of 2% on the internal one). But we honestly warned you about the risks. Decide for yourself.
Now let's consider the commissions of the site.
Commissions
We are primarily interested in commissions for the sale of capacity, because we are mining, not buying capacity.
|
Description |
Commission |
|
Payouts for balances less than 0.1 BTC to external wallets |
five% |
|
Payouts for balances from 0.1 BTC to external wallets |
3% |
|
Payouts for balances from 0.001 BTC to NiceHash wallets |
2% |
These were commissions for the sale of your capacity, but the platform also has commissions for withdrawing money:
|
Withdrawal method |
Withdrawal amount |
Commission |
|
Any BTC wallet |
0.001 (min) to 0.1 BTC |
0.0001 BTC |
|
Any BTC wallet |
More than 0.1 BTC |
0.1% of the withdrawal amount |
|
Coinbase ** |
More than 0.001 BTC |
IS FREE |
|
Payeer |
From 0.001 BTC (min) |
0.95% (will be charged by Payeer) |
If you are not satisfied with such commissions, then we recommend using traditional mining programs.
Configuring additional parameters
If you have already launched the program, but you are interested in the settings for profitability and stability, then continue reading.
The program has three settings tabs, these are General - basic settings, Advanced - advanced and Devices / Algorithms - Select devices and Algorithms.
Let's go to the General tab.
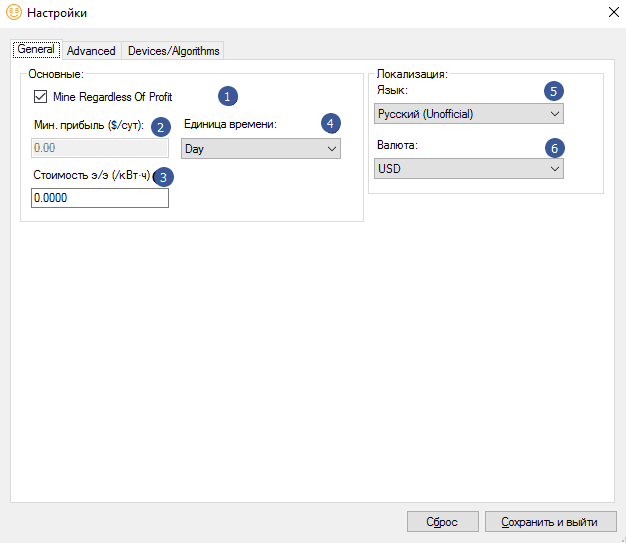
- Mine Regardless Of Profit - this checkbox means that the program will mine regardless of the profit. Those. If you have expensive electricity, and mining has become unprofitable, then the program will still dig for the future.
- Below you can set the size of the minimum profit.
- The cost of electricity in kilowatts per hour. If you set it, then you can specify the minimum profit at which the program will work. This is useful if you have very expensive electricity and do not want to mine in the long term.
- Time unit - needed to calculate statistics.
- Localization - here you can select the interface language
- Currency - select the currency to which all calculations will be carried out in the program window.
Next, go to the Advanced tab.
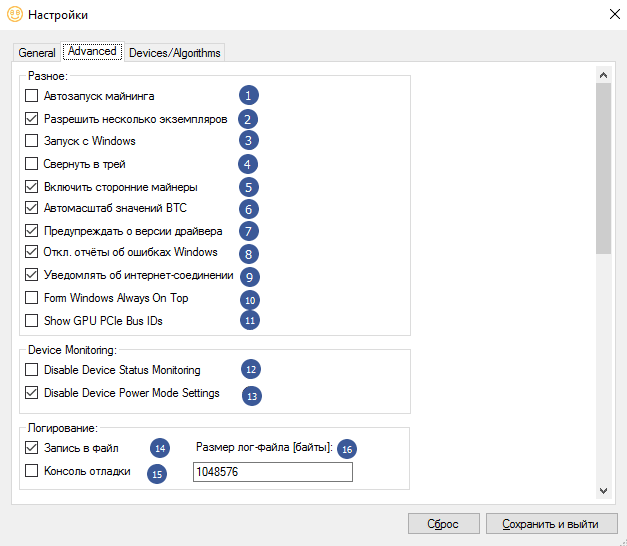
We have a lot of settings here. Let's go in order:
- Mining autostart - if checked, mining will automatically start when the program starts (otherwise, you will need to press the "Start" button). It is better to enable it if everything is configured correctly.
- Allow multiple instances - you can run multiple windows of the program.
- Launch from Windows - the program will start mining when you turn on and restart your computer.
- Minimize to tray - the program will minimize to the system tray (at the bottom right, where the time and calendar are in windows).
- Enable third party miners - use closed source programs (increases profitability, but can be dangerous).
- Autoscale of BTC values - check if you want to see the BTC value with a suitable scale.
- Warn about driver version - the platform will inform you that your video card driver is outdated and needs to be updated.
- Off Windows error reporting is best left as it is. some programs are not stable and reports will show what the error is.
- Notify about internet connection - the program will notify you about internet interruptions.
- Form Windows Always On Top - the program will always be on top of other Windows windows.
- Show GPU PCI-e Bus Ids - Show PCI-e bus ID is generally a useless option.
Next are the monitoring settings.
Device Monitoring :
- Disable Device Status Monitoring - disable the program from receiving data on the status of the processor, AMD and NVIDIA cards (temperatures, load, fan speed and power consumption).
- Disable Device Power Mode Settings - The program will not try to set device power mode settings (currently only for NVIDIA).
Next are the log settings.
Logging :
- Writing to File - everything written to the console will be written to a text file. If everything is stable, then it is better to turn it off, because this can load the disk.
- Debug Console - Open the Debug Console (for advanced users).
- Log file size [bytes]: - set the maximum size of the log file.
In the last tab, Devices / Algorithms, you can select algorithms for mining and manually set the speed that cards give out with your overclocking and downvolting (power consumption).
Overclocking cards - increases profitability, and downvolting reduces their power consumption. For both cases, MSI Afterburner is most commonly used .
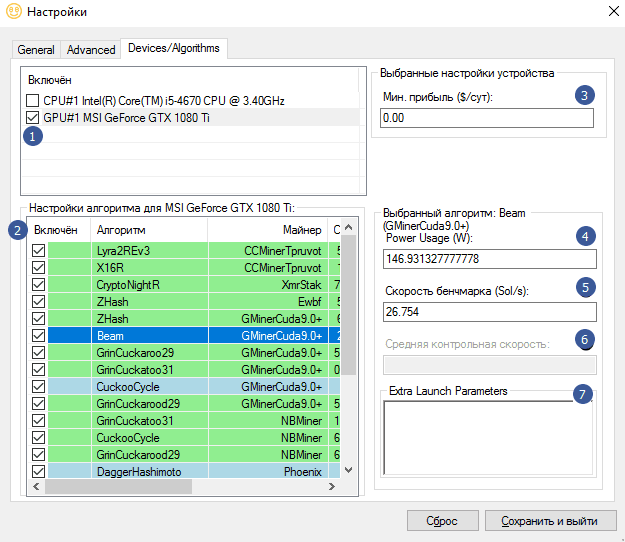
- Choosing devices that will mine
- Choosing algorithms
- (Optional) you can specify the minimum profit to start mining
- (Optional) You can specify the power consumption of your equipment. The site shows approximate power consumption, but for accurate data it is better to use a Wattmeter.
- (Optional) you can specify the speed that your devices give out with your overclocking of the kernel and memory.
- Not available
- (Optional) you can specify specific commands to run (for advanced users).
List of supported algorithms:
ZelHash
ZHash
X16Rv2
X16R
X13
X11
VerusHash
Scrypt
SHA256AsicBoost
SHA256
RandomXmonero
Qubit
Quark
Octopus
NeoScrypt
Lyra2Z
Lyra2REv2
Lbry
Keccak
KHeavyHash
KAWPOW
GrinCuckatoo32
GrinCuckatoo31
Equihash
Eaglesong
ETCHash
Decred
DaggerHashimoto
CuckooCycle
CryptoNightR
Blake2s
BeamV3
Autolykos
Download
Download for Windows:
3.1.0.4
3.0.9.1
NHM windows 3.0.5.6
NiceHash Miner 3.0.4.0
NiceHash Miner 3.0.0.9
NiceHash Miner 1.9.2.21
NiceHash Miner 1.9.2.19
NiceHash Miner 1.9.2.18
NiceHash Miner 1.9.2.17 New Platform Windows
NiceHash Miner 1.9.2.15 New Platform Windows
NiceHash Miner 1.9.2.14 New Platform Windows
NiceHash Miner 1.9.2.13 New Platform Windows
NiceHash Miner 1.9.2.12 New Platform Windows
NiceHash Miner 1.9.2.11 New Platform Windows
NiceHash Miner 1.9.2.10 New Platform Windows
NiceHash Miner 1.9.2.9 New Platform Windows
Changelog
1.9.2.21
- Added Cuckaroom algorithm.
- Fixed UUID checking in some Windows versions.
1.9.2.19
- Added XMRig as a pre-installed miner plugin for the RandomX-monero algorithm.
1.9.2.18
- Added support for the RandomX algorithm - monero
1.9.2.17
- Fixed versions of config files. Fixed configuration backups.
- Fixed potential deadlocks on certain systems with the NHM-WS module.
- Removed OpenCL.dll from shared DLL folder. The above DLL may break device detection on some miners.
1.9.2.15
- Added X16Rv2 algorithm
- Fixed debug console
- Fixed AMD GCN4 + detection
- Moved algorithm settings to benchmarks page
- Removed broken profitability function for one video card
- Implemented AMD TDP settings
- Combined NVIDIA and AMD TDP settings, SIMPLE mode, PERCENTAGE and RAW. It is now not possible to set the TDP higher than the factory default for the video card (if you want to set the values higher than the default, you should disable NHM TDP settings and use an external tool). Values out of range in PERCENTAGE or RAW mode will be reset to the nearest valid value (minimum or maximum).
Major improvements:
- Removed CCMinerMTP from the integrated list (not supported)
- Fixed supported algorithm memory requirements (GRIN31 / cuckatoo)
- Updated VC Redist Plugin 2015-2019
- Version 1.9.2.15 NHM is not compatible with external plugins with version lower than 3.0 -> Minimum major version is 3.
- Removed support for integrated miners
- Miners can now be updated via the plugins form
1.9.2.14
- Updated plugin binaries:
- GMiner 1.62 (internal)
- XMrig 0.21.0 (external)
- Removed TTMiner and Ewbf plugins from internal / integrated miner plugins (available only as external).
- Fixed translations.
1.9.2.13
- Updated plugin binaries:
- ClaymoreDual 15.0 (internal)
- GMiner 1.59 (built-in)
- NBMiner 24.4 (built-in)
- TT-Miner 3.0.5 (built-in)
- LolMiner 0.8.8 (external)
- Z-enemy 2.1 (external)
- CryptoDredge 0.21.0 (external)
- Xmr-Stak 2.10.7 (built-in)
- Fixed infinite NVIDIA restart loop
- Added an updateable installer
1.9.2.12
- Added support for fork BeamV2 via GMiner and LolMiner (NEW PLATFORM ONLY)
- Updated plugin binaries:
- GMiner 1.55 (built-in)
- T-Rex 0.13.2 (built-in)
- TT-Miner 3.0.1 (built-in)
- TeamRedMiner 0.5.7 (integrated)
- BMiner 15.7.6 (external)
- LolMiner 0.8.6 (external)
1.9.2.11
- Updated binary miner plugins:
- NHM.DeviceMonitoring restores NVIDIA device monitoring on driver failure
- Fix mismatch between client name and web worker (NEW PLATFORM)
1.9.2.10
NHM.DeviceDetectionnow checks if NVIDIA OpenCL backend is enabled (important for miners using NVIDIA OpenCL backend like lolminer)- Updated binary miner plugins:
- Removed list of miners -
nhm\miner_bins_urls.json. Each miner plugin contains it innhm\miner_plugins\Plugin\internals\MinersBinsUrlsSettings.json. - Fixed Grin algorithm - Cuckarood29.


