MSI Afterburner: how to overclock GPU in gaming and mining - power limit, monitoring, core voltage
- Msi Afterburner what is it?
- Msi Afterburner is a program for overclocking video cards (memory and core), as well as for undervolting. The program allows you to monitor the internal indicators of the card (monitoring temperature, voltage, fan speed, and much more).
How to use
To use the program, you must first download, install and configure it. Let's consider all these points.
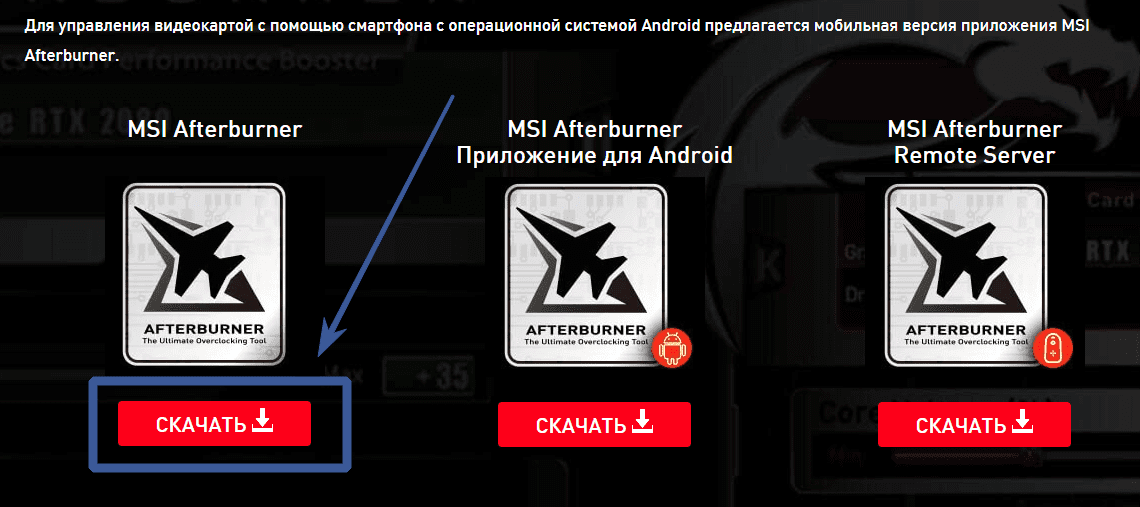
First you need to download the program.
To do this, go to the official MSI Afterburner website and scroll down to the download section of the website:
How to install MSI Afterburner
After you have downloaded the archive, unzip it, go to the unzipped folder and run the “MSIAfterburnerSetup.exe” installation file. Where to install is up to you, but it is advisable to use standard system paths C:\Program Files (x86)\MSI Afterburner - this is for Windows 10.
We click "next" everywhere.
Having reached the point "select the program components for installation" - uncheck the "Riva Tuner Statistics Server" checkbox.

Then we press "next" and wait for the installation to finish.
After installation, launch MSI Afterburner.
MSI Afterburner is very easy to use. In order to understand how the program works, let's study the parameters and what they are responsible for.
Setting up MSI Afterburner
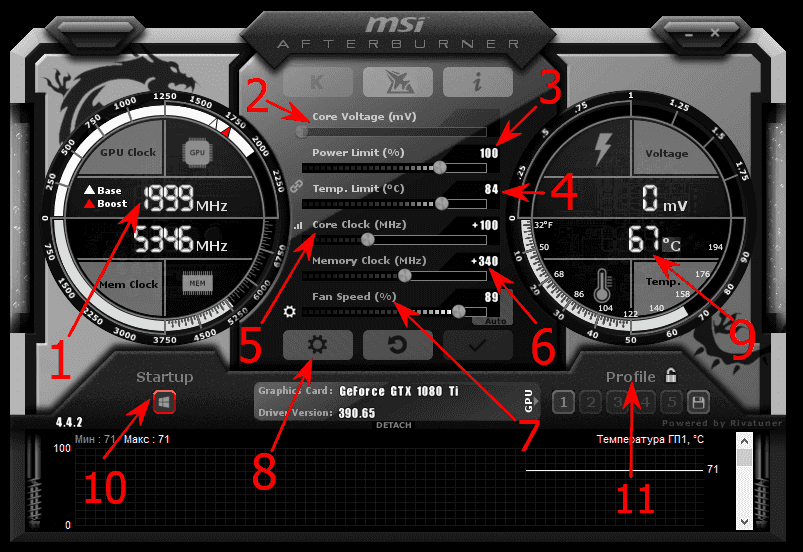
- Gpu Clock is a measure of the clock speed of a video card. If you have a farm with several cards, then the selected video card will be shown.
- Core Voltage (mV) - this slider is responsible for the power consumption of the video card, you can either overclock or lower this indicator. The lower the Core Voltage, the less energy costs: lowering this indicator will allow you to save on electricity, and if you hit the ceiling on energy consumption, this function will reduce the current consumption of video cards, and will allow you to install additional cards if you are a miner...
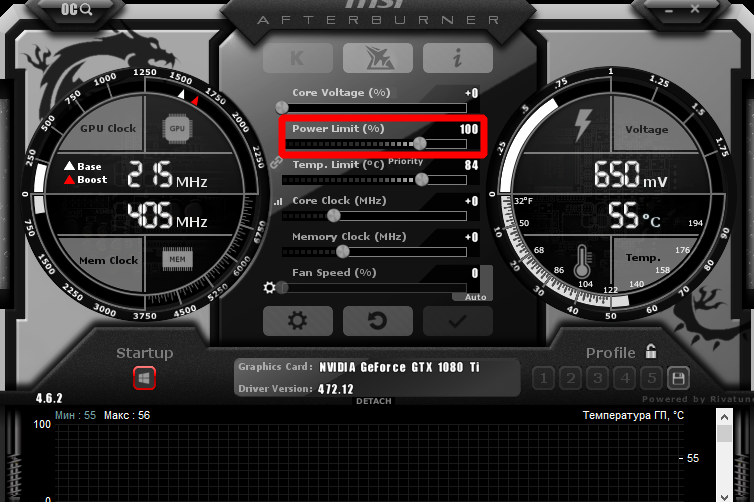
- Power Limit - responsible for the power consumption of the card. With higher overclocking, that is, if you want to overclock the video card strongly, then the power consumption must be added, otherwise the card will not hold the frequencies and reset them to the factory ones. The indicator is often locked. Below we will tell you how to unlock it.
- Temp. Limit - a slider responsible for the critical temperature of the video card. If this (set by you) indicator is exceeded, the video card will drop the frequencies (go into throttling).
- Core Clock (MHz) is the overclocking of the GPU (graphics processing unit) of the video card.
This overclocking is necessary to increase the hash rate of your video card during mining or to improve performance (FPS) in games.
- Memory Clock (MHz) - This is the overclocking of the video card memory. This usually gives a small boost in games, but in mining, the increase is noticeable.
Especially in the ethash algorithm.
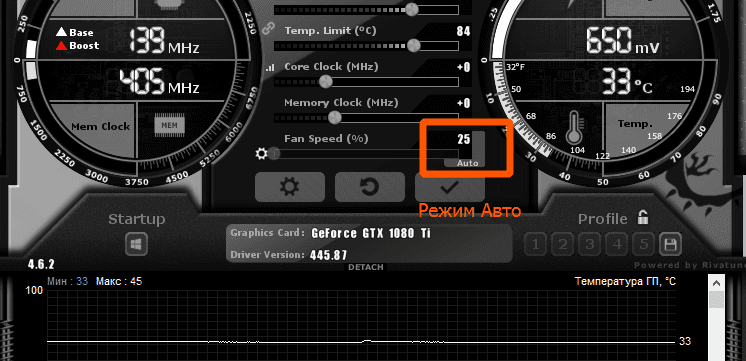
- Fan Speed is a slider that controls the rotational speed of the video card fans. Where 100% is the maximum rotational speed and 0% is the minimum speed. If Fan Speed is blocked, then it must be unblocked by clicking on the word "Auto", which is next to it. In "Auto" mode, the fans will automatically set the percentage of the load, depending on the temperature of the GPU. But when mining in "Auto" mode, this indicator will almost always be 100%, since the mining process itself heats up the video card a lot.
Fan Speed - if your video card gets too hot, we still do not recommend setting 100% rpm, as this will quickly exhaust the resource of coolers (and this is one of the most frequent breakdowns).
- Button that opens advanced settings.
- GPU core temperature. If there are several video cards in the farm, then the last selected video card and its temperature are displayed.
- Start Up - will add msi afterburner to startup. If the icon is outlined (in this case, red, but it also happens in a different color, since you can install a different theme), then MSI Afterburner will automatically start when you turn on the computer (farm).
- Profile - These are metrics from one to five. They are responsible for saving your configuration. That is, you can set the desired overclocking (memory, kernel), the required fan speed, etc. will immediately apply all settings to the video cards that you specified.
When increasing the overclocking of the video card in memory and in the core, it is best to add 10 units each.
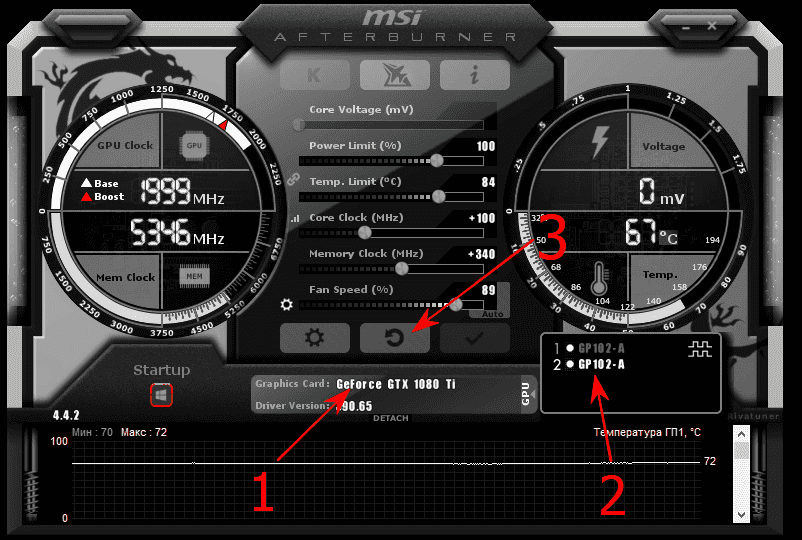
- Name of the selected video card
- When you click on the word "GPU", a list of all video cards will appear. Choose each card in turn and set the overclocking and fan speed for it.
- Reset all overclocking settings to factory defaults.
You can also overclock video cards right in the miners. See examples of overclocking:
Video Guide
Before we begin, remember that overclocking is not safe and there is a risk of irreparable damage when setting up your graphics card.
MSI Afterburner makes overclocking easy, but it is highly recommended to use a fair amount of common sense.
If you feel that you have gone too far with overclocking, stop immediately and seek advice from competent sources before proceeding.
How to Overclock a GPU
Overclocking in MSI Afterburner follows standard overclocking and testing techniques to find the highest and most stable settings. Don't forget to click the "Apply" button after any changes.
- First, set the
Power LimitandTemp Limitsliders to their maximum. With these settings, the graphics card will be more energy efficient and will reach higher temperatures. The video card will never reach the upper limit unless a major hardware malfunction occurs, so don't be surprised if the maximum temperature appears dangerously high. The card manufacturers define these parameters and therefore they are considered safe and there is no risk of damaging the video card. - Increase the core clock slider slightly. Each division of the slider corresponds to one MHz above or below the stock clock speed, depending on whether you move up or down. We recommend adding 20 to 30 MHz. Don't forget to click “Apply” after increasing the clock speed.
- For each increment, run Kombustor in the background and check for artifacts, screen flickering, black flashes, or glitches. Take a couple of minutes to observe each change.

- Once you run into a constant amount of graphics problems, stop overclocking. Don't worry about unusual behavior; this is to be expected and is a way for the GPU to tell us that it has reached its maximum power. Crashes and black screens reset the graphics card driver, after which you can restore the clock speed after a few seconds.
- Decrease the core clock in small increments of about 5 MHz until all artifacts / graphics issues are gone and the Kombustor is stable. We also recommend testing any changes in the context of a demanding miner or game. Bump up the settings to ultra to make the graphics card work hard to see the changes more clearly. If you have problems, reduce the clock speed.
- Next, we will apply the same stress test to the memory clock speed, but with a larger step. We recommend 50 to 100 MHz.
- Once you run into persistent graphics issues in Kombustor, decrease the memory clock speed in small steps until you find a stable speed. Also test it in the game.
- We now want to test the new core and memory clock speeds over an extended period. Start Kombustor and let it run for a good 10 minutes, checking for artifacts and glitches. Decrease the speed in small increments until you have a stable combination of both.
- When you're happy with overall stability, remember to save your settings as a profile by clicking the floppy disk icon and then one of the profile buttons 1-5.
Advanced settings
Clicking on the gear (settings) will open all MSI Afterburner settings.
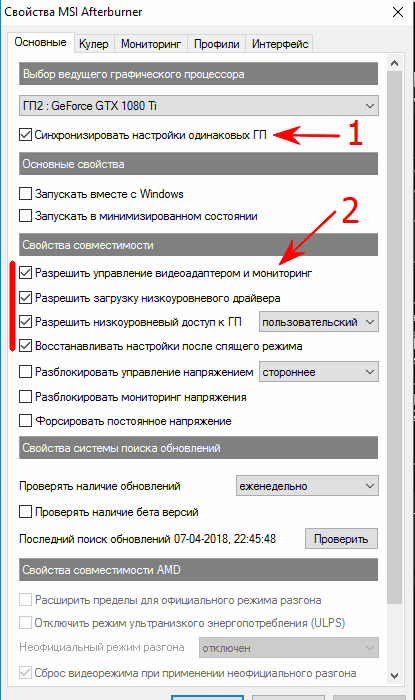
- If your video cards are of the same model, of the same manufacturer, then it is best to check the "Synchronize settings of the same GPU" checkbox. This will help you (if you have a farm of several cards) to make overclocking settings for one card, and will apply to all at once.
- We advise you to check all these checkboxes for more convenient work with MSI Afterburner.
Configuration files can be used to apply locked and advanced settings.
To enter the configuration editing mode, right-click on the MSI Afterburner shortcut and select File location.

The folder with the installed program will open. We will see a lot of files in it. We need to select the Profiles folder:
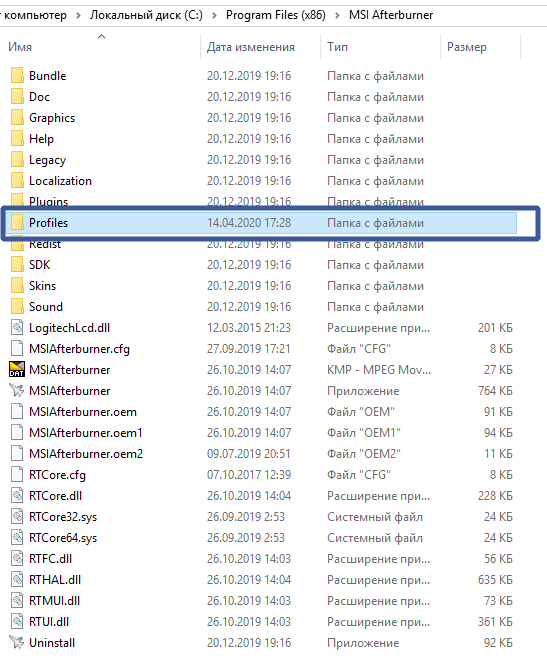
It contains configuration files:

You can edit them in any text editor in administrator mode. It is very convenient to use standard Windows 7/8/10 Notepad for editing, or Notepad ++ (it is even more convenient).
This folder contains the following files:
MSIAfterburner.cfg- the main file of the basic configuration of the program (located in the "Profiles" directory along the pathC:\Program Files (x86)\MSI Afterburner\Profiles);- files with the extension
*.cfgc starting withVEN_ …describe the overclocking and undervolting settings for each video card. The number of these files will be comparable to the number of your video cards.
Before starting editing, it is wise to back up these config files to a different folder in order to restore everything if something goes wrong.
If there are syntax errors in the configuration files, then both undervolting and overclocking will not work. And in the program interfaces, the sliders will be locked.
How to unblock core voltage
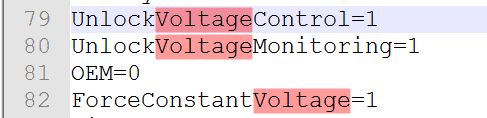
To unlock the voltage, you need to specify a unit in the following options in the main configuration file MSIAfterburner.cfg in the section Settings in administrator mode:
UnlockVoltageControl=1 (разблокировать управление вольтажом)
UnlockVoltageMonitoring=1 (разблокировать мониторинг вольтажа)
StartupDelay=0 (задержка времени для применения разгона/андервольтинга)
ForceConstantVoltage=1 («Принудительное постоянное напряжение»)
Example:
For AMD
If you want to enable informal overclocking mode, make or add changes to the following lines:
[ATIADLHAL] UnofficialOverclockingMode=1 UnofficialOverclockingEULA=I confirm that I am aware of unofficial overclocking limitations and fully understand that MSI will not provide me any support on it
Example:

For Nvidia
For Nvidia, in the file, MSIAfterburner.cfg you can change the voltage values when adjusting the overclocking / undervolting using the "Curve" curve (often called "curvature"):
VFCurveEditorMinVoltage = 700 (lowest possible voltage, can be set to 650 mV)
VFCurveEditorMaxVoltage = 1250 (maximum possible voltage, in millivolts)
Determine the settings for each card separately
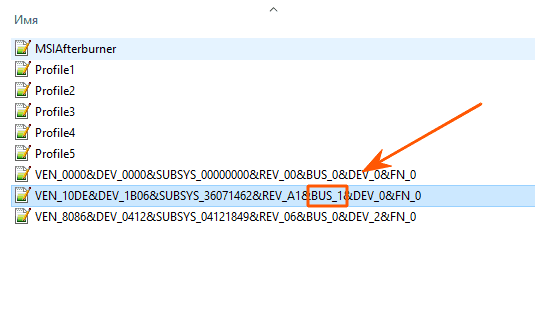
Files with an extension *.cfg with a name starting with VEN_1... allow you to apply overclocking and downvolting for each card.
Example
The syntax for these files is as follows:
[Startup]

Format = 2

PowerLimit = 90

ThermalLimit = 65

CoreClk = 1100

MemClk = 1925

CoreVoltage = 750

[Settings]

VDDC_Generic_Detection = 1
The last line ( VDDC_Generic_Detection=1 ) will cause the program to access the graphics card controller via the nVIDIA voltage regulator.
How to understand which file *.cfg belongs to which card?
To do this, you can match the bus number ( BUS ), which is indicated in the name:
In the graphical interface, you can find out the bus number by clicking on the icon i:

By comparing the bus identifiers of the required card in the Information window with the bus in the file name *.cfg, we will understand that this is one and the same card if we have a lot of them in the system.
Now we can make changes further.
In the configuration files *.cfg for each video card, we will indicate the values of temperature limits (in degrees Celsius), Power Limit (power in percent), Core and Memory Clock (core and memory frequencies in megahertz), fan modes (Fan Speed) of the card and their speed.
Using the graphical interface, we can also specify the autostart of the application and the desired overclocking profile, core voltage, fan parameters, etc.
It is better to turn off the option to synchronize the settings of the same GPU, because even cards from the same manufacturer usually have their own unique overclocking potential.
We recommend that you tick the apply at windows startup option.
How to enable fan control
When mining, we recommend setting the minimum rotation speed to 40-60%. Next, we will select acceptable settings that allow the card to operate at the optimal temperature, and at the same time not increase the noise and wear of the fan bearings.
Example:
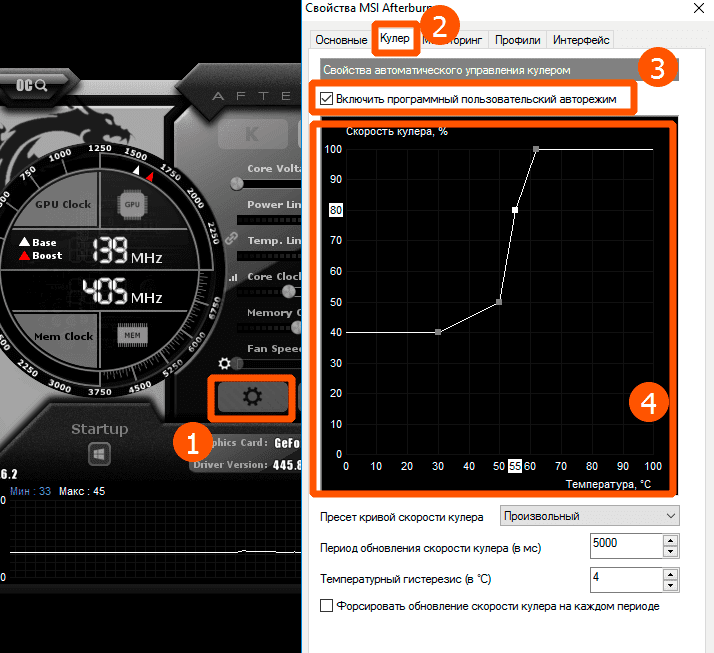
To auto-control the rotational speed of the fans of the graphics adapters according to the configured rotation curve, the button Auto must be connected in the graphical interface:
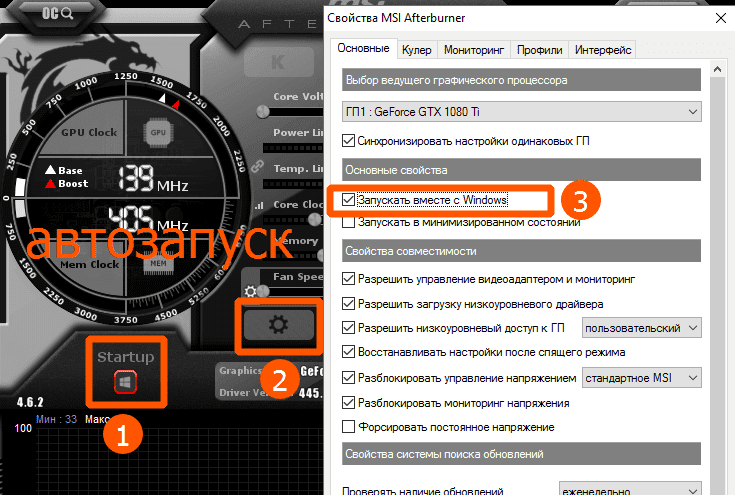
How to add MSI Afterburner to Startup
To automatically apply overclocking options for all video cards, you need to set the necessary parameters and save them to a profile.
To automatically apply the profile, you need to click on the button with the Windows icon - Startup.
The use of personal settings for video cards will be performed every time the farm or computer is started.
You also need to click on the gear Options and turn on the checkmark Run with Windows.
Power Limit
In the characteristics of the video card, you can see its declared power consumption. GPU power consumption is indicated in Watts. The higher the TDP, the more power is consumed by the graphics adapter in full load.
![]()
In the description of the software is indicated:
Adjusts the limit of power consumption leading GPU, power management technology if the adapter is supported (the Power Limit translates Within the consumption limit).
To change it, you can drag the slider to the desired position or use the cursor keys to create a limit. In principle, by clicking on the adjacent input field, you can enter the desired value for the power consumption limit from the keyboard.
Usage Scenarios: As mentioned earlier, in accordance with its declared characteristics, the GPU may understate the operating frequencies. Without changing the Power Limit parameter, you will not be able to dramatically affect the performance of the GPU.

It can be used to increase or decrease the maximum power consumption of the video card. An increase in consumption by a video card should be expected when it is overclocked. In the case of undervolting, you can get a decrease in performance, temperatures and noise.
It's no secret that the operation of a video card at low temperatures leads to a longer service life. You can also reduce the GPU load by limiting the number of FPS in Windows 10 games. We recommend that beginners do not change the Power Limit and Core Voltage values on their own.
Power Limit (%) is used to subtly change the power consumption limit. It is enough to increase or decrease the value by simply dragging the slider. Raising the limit is needed to overclock the video card. And a decrease - to reduce operating temperatures and consumption.
How to unlock the Core Voltage, Power Limit and Temp Limit sliders
An example of an inactive option:
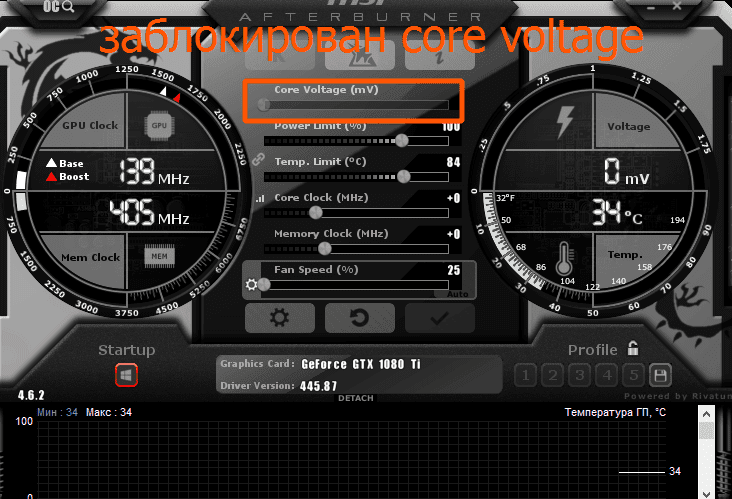
To unlock the voltage, overclocking and fan speed, you need to click on the settings gear:
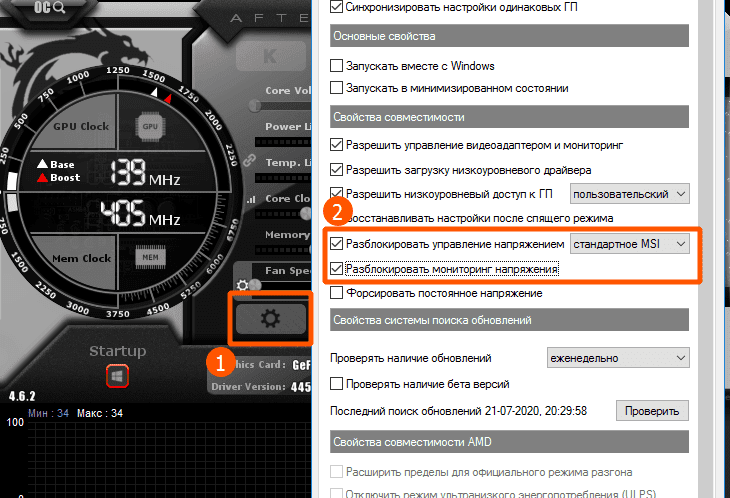
Here we can tick off the options we need - Unlock voltage control and Unlock voltage monitoring.
You can also unlock Core Voltage in the files *.cfg for each video card separately by enabling the function VDDC_Generic_Detection.
Example:
[Settings]
VDDC_Generic_Detection=1
If there are no such lines there, then you need to insert them into each configuration file yourself.
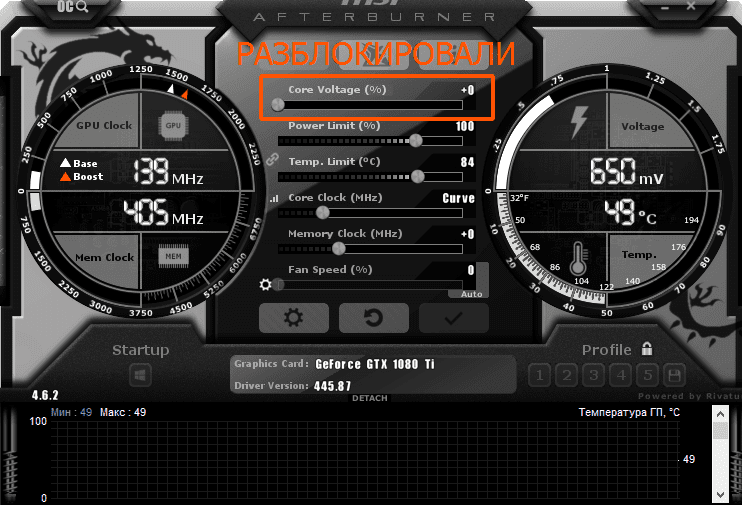
The Core Voltage slider is now active.
Also, do not forget to check Unlock voltage control and Unlock voltage monitoring in the settings.
Analogs
Analogs of this program include:
- overdriveNTtool
- RivaTuner
- CAM (monitoring only)
- EVGA PrecisionX 16
- NVIDIA Inspector (only displaying information about the video card)
- AgaueEye (for displaying FPS on Windows)
- Nvtray
How to enable overlay
Click the monitoring tab then click the checkmark beside the metric you want to display and click the checkbox for “Show in On-Screen Display” in the “properties” section and click the “Apply” button.
Conclusion
MSI Afterburner is a simple and easy-to-use program. It is very easy to overclock video cards with it. In the settings of the "interface" menu, you can always change the skin of the program.
Also MSI Afterburner shows the temperature and frequency of the video card.
This is a very convenient and irreplaceable mining program!
Versions


