T-Rex miner NVIDIA: Step-by-step guide. Download and configure
KAWPOW
GTX 1060 - 9,5 Mh/s
GTX 1070 - 14 Mh/s
GTX 1070Ti - 15 Mh/s
GTX 1080 - 18 Mh/s
GTX 1080Ti - 23 Mh/s
T-Rex is a closed source miner for NVIDIA graphics cards only. The program has a 1% commission that goes to developers. This software is available for Windows and Linux and supports CUDA 10.0, CUDA 9.2 and CUDA 9.1.
This guide assumes that you already have a wallet for the coin you will be mining and have chosen a reliable mining pool.
How to start
- Download program
- Unzip
- Create new or edit ready-made.bat files by entering information about the pool and wallet of the coin
The contents of the program folder looks like this:
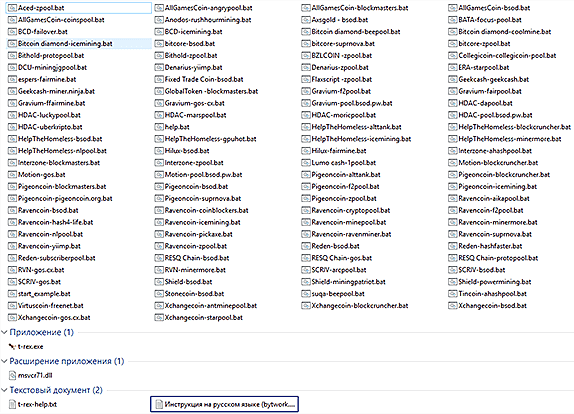
The folder contains full instructions in Russian and.bat files with a coin and a pool. In order to set up mining for your wallet, you need to edit the.bat file or create a new one by analogy with the existing one.
How to customize or modify a.bat file
Right-click on the file, select "Change".
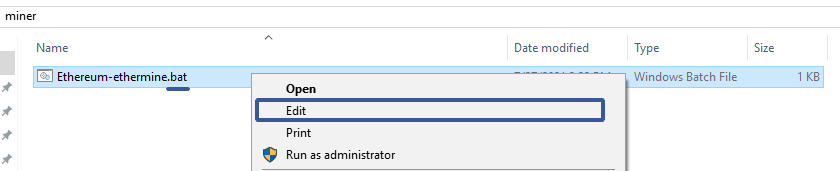
A text document will open and you will see a list of program commands. The -u switch is responsible for the address of the digital wallet. It also needs to be replaced.
However, for those who are interested in the full configuration of the program, we will consider the contents of the batch file in more detail.
Below we will consider the settings for the batch file for different coins.
Settings for Ethereum (ethermine)
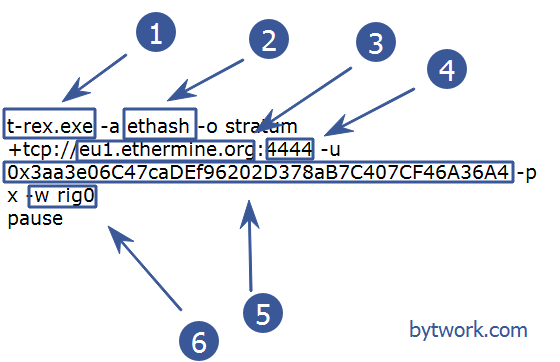
t-rex is thename of the program that will be launched using the.bat file.-a ethash is thename of the coin mining algorithm. The list of available algorithms is listed above.-o stratum + tcp://eu1.ethermine.orgspecify the pool address. The -o stratum+tcp:// construct is required.:4444after the address of the pool, put a colon and indicate the port of the pool.-u 0x3aa3e06C47caDEf96202D378aB7C407CF46A36A4after the -u key, specify the address of your digital wallet.-w rig0specify the name of the worker. This is the name of the farm. Specify as you see fit.
Here's some sample code:
t-rex.exe -a ethash -o stratum+tcp://eu1.ethermine.org:4444 -u 0x3aa3e06C47caDEf96202D378aB7C407CF46A36A4 -p x -w rig0

pause
If you write a command pause at the end of the batch file, the console will not close, even if there is a syntax or other error.
Note! Extra spaces, punctuation marks and other symbols are not allowed in the syntax of the batch file. Everything should be as in the example. Only change the wallet to your own.
LHR unlock commands
--lhr-tune [Ethash, Autolykos2] LHR tuning value that indicates the percentage of the full speed the miner tries to achieve for LHR cards (default: -1). Range from 10 to 95
-1- auto0- disabled (use for non-LHR cards)74- recommended starting value for most LHR cards in low power mode (see--lhr-low-power)78- recommended starting value for most LHR cards
Can be set for each GPU separately, e.g. "lhr-tune": "0,0,77.5,0" - this will set LHR tuning value to 77.5 for the third GPU.
--lhr-autotune-mode [Ethash, Autolykos2] LHR auto-tune mode (default: down). Valid values:
off- auto-tune is disabled. LHR tune value is fixed during mining, and will not change no matter how often LHR lock is detecteddown- LHR tune value will decrease if the miner detects LHR lockfull- same as"down"but additionally miner will be trying to increase LHR tune value if it’s stable on the current LHR tune level
--lhr-autotune-step-size LHR auto-tune step size (default: 0.1). Indicates by how much LHR tune value is changed by the LHR auto-tuner.
--lhr-autotune-interval LHR auto-tune time interval in minutes (default: 5:120). Format: <interval_up>:<interval_down>. "<interval_up>" is the period of time in minutes the GPU must be mining without hitting LHR locks before the miner attempts to increase the LHR tune value.
If the GPU has tripped LHR, LHR tune value will not decrease if the previous LHR lock was detected more than "<interval_down>" minutes ago.
--lhr-low-power [Ethash] Reduces power consumption in LHR mode at a cost of a slightly lower hashrate (default: 0).
Settings for Nicehash
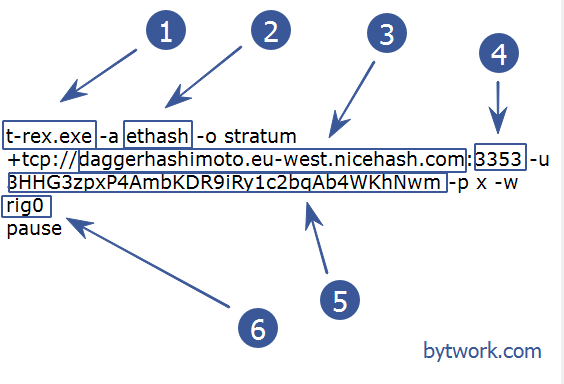
t-rex is thename of the program that will be launched using the.bat file.-a ethash is thename of the coin mining algorithm.-o stratum+tcp://daggerhashimoto.eu-west.nicehash.comspecify the pool address from niceash.: 3353after the pool address we put a colon and indicate the pool port.-u 3HHG3zpxP4AmbKDR9iRy1c2bqAb4WKhNwmafter the -u switch, specify the address of your digital wallet from the nicehash program account.-w rig0specify the name of the worker. This is the name of the farm.
Here's some sample code:
t-rex.exe -a ethash -o stratum+tcp://daggerhashimoto.eu-west.nicehash.com:3353 -u 3HHG3zpxP4AmbKDR9iRy1c2bqAb4WKhNwm -p x -w rig0

pause
Settings for Binance Pool
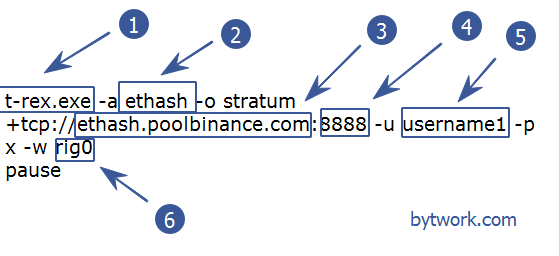
t-rex is thename of the program that the baht file will run.-a ethash is thename of the coin algorithm.-o stratum + tcp: //ethash.poolbinance.comspecify the address of the binance exchange pool.: 8888after the pool address we put a colon and indicate the pool port.-u username1after the -u key, specify the login from the binance exchange account.-w rig0specify the name of the worker. This is the name of the farm.
Here's some sample code:
t-rex.exe -a ethash -o stratum+tcp://ethash.poolbinance.com:8888 -u username1 -p x -w rig0

pause
Just change the username after the key -u to your account name.
Batnik for Ravencoin (RVN)
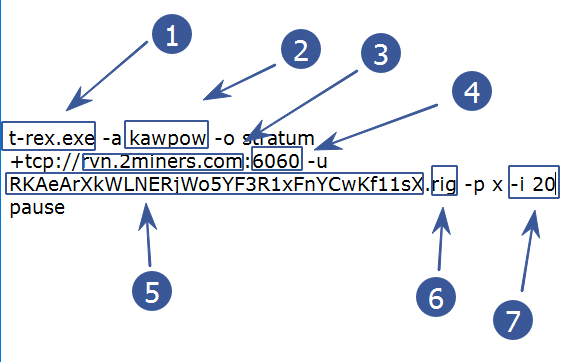
t-rex thename of the program that will be launched using the.bat file-a kawpow thename of the mined coin algorithm.-o stratum + tcp: //rvn.2miners.comspecify the pool address. The -o stratum + tcp: // construct is required: 6060after the pool address put a colon and indicate the pool port-u RKAeArXkWLNERjWo5YF3R1xFnYCwKf11sXafter the -u key we indicate the address of your digital wallet.rigspecify the name of the worker. This is the name of the farm.-i 20set the intensity of the program
Here's some sample code:
t-rex.exe -a kawpow -o stratum+tcp://rvn.2miners.com:6060 -u RKAeArXkWLNERjWo5YF3R1xFnYCwKf11sX.rig -p x -i 20

pause
Batnik for Firo (zcoin)
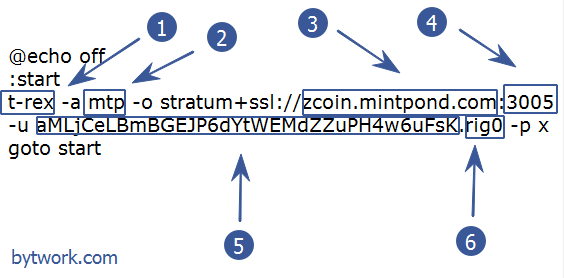
t-rex thename of the program that will be launched using the.bat file-a mtp is thename of the coin mining algorithm.-o stratum + ssl: //zcoin.mintpond.comspecify the pool address. This example uses the constructstratum+ssl://. SSL is a secure connection. It is safer, however some PCs experience connection failures via ssl.: 3005after the pool address put a colon and specify the pool port-u aMLjCeLBmBGEJP6dYtWEMdZZuPH4w6uFsKafter the -u switch, specify the address of your digital wallet..rig0specify the name of the worker. This is the name of the farm.
Here's some sample code:
@echo off

:start

t-rex -a mtp -o stratum+ssl://zcoin.mintpond.com:3005 -u aMLjCeLBmBGEJP6dYtWEMdZZuPH4w6uFsK.rig0 -p x

goto start

pause
This example uses a restart loop. The teams :start and are responsible for it goto start. Read more about how to automatically restart the miner if it stops working in Windows.
So, we have configured the program to mine various coins. By analogy, other coins are configured on other algorithms. We launch our batch file by double-clicking and see what the miner's console window writes to us:
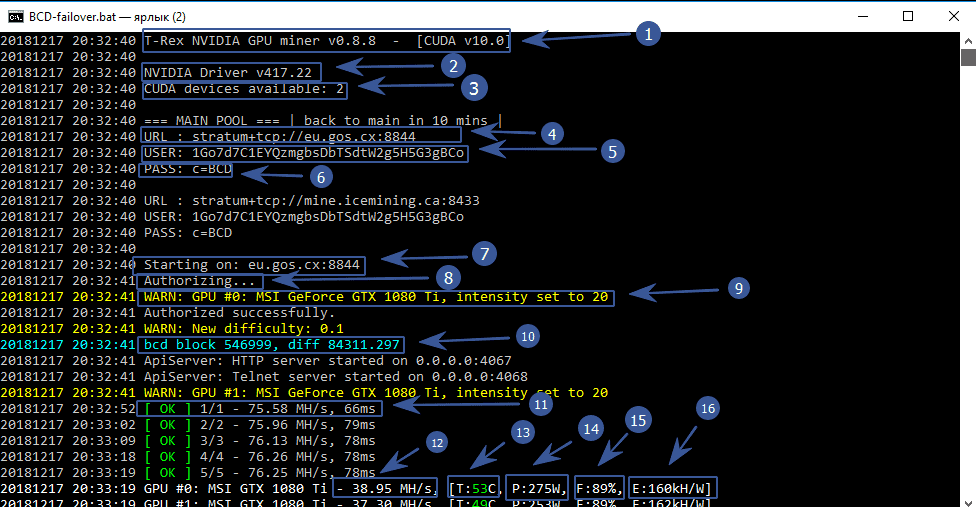
- Program version
- Installed driver version
- List of video cards available for mining
- Pool address that you specified in the batch file
- The wallet address that you specified in the batch file
- Coin token or pool password. Pools rarely use a password, so in 90% of cases, you need to specify a token
- The program configures the connection to the pool
- Pool authorization
- The intensity is set to 20. We set it in the batch file with the -i parameter
- Current block and network difficulty of the mined coin
- The total hashrate of your farm. Hashrate calculator here
- Hashrate of one video card
- Graphics card temperature
- Consumed electricity
- Fan blade speed
- Efficiency Kh / Watt
This completes the configuration of the program, but we move on to examining all the possible commands.

Command line arguments (advanced settings)
Performance:
-i, --intensity Intensity of video cards 8-25 (default value: auto).
--cpu-priority The priority of the program process (default value: 2). 0 is inactive, 2 is normal, 5 is the highest.
Pools connection parameters:
-a, --algo Specify the hash algorithm to use. The list of supported algorithms is listed at the beginning of the article.
-o, --url URL of the mining server.
-u, --user Username for the mining server.
-p, --pass Password for the mining server.
-r, --retries The number of connection attempts if the network is down.
-R, --retry-pause Pause in seconds between connection attempts.
-T, --timeout Network timeout, in seconds (default: 180)
--time-limit Network timeout, in seconds. (default value: 0 - disabled)
--back-to-main-pool-sec Forces the miner to switch back to the main pool in case of working with the reserve pool. The parameter is set in seconds. (default: 600)
--reconnect-on-fail-shares Forces the miner to immediately reconnect to the pool on N consecutive failed shares (default: 10).
--fork-at Allows automatic algorithm switching using this parameter.
Example RVN fork: --fork-at KAWPOW=2020-05-06T16:00:00
Settings for ProgPOW:
--coin Specify the name of the coin for the ProgPOW agglomeration variant.
--nonce-start Specify the number of nonce for finding a solution (for SOLO mining).
--nonce-range-size Specify the size of the Nonce range to search. The range will be divided among all devices (for SOLO mining).
Disable graphics card:
-d, --devices Specify Nvidia devices. You can select only certain cards for mining using a comma. For example -d 0,2,5 in this case only the first, third and sixth cards will be mined. Device ID counts start from 0.
--ab-indexing View the sorting of devices by bus ID. The first device starts with 1)
Safety:
--exit-on-cuda-error Forces the miner to exit immediately on a CUDA error.
--exit-on-connection-lost Forces the miner to exit immediately if the connection is lost.
--no-watchdog Disable watchdog timer (not recommended).
Power consumption, temperatures and overclocking:
--temperature-limit GPU shutdown temperature. (default value: 0 - disabled) You can find out about safe temperatures in mining here. And how to cool video cards here.
--temperature-start GPU temperature to turn on the card after shutdown. (default value: 0 - disabled)
Log file
-P, --protocol-dump User protocol log.
-l, --log-path Full path of the log file.
Example:
--log-path c:\trex.log
Interface:
--no-color Disable color output in the console.
--temperature-color Set temperature color for GPUs. Example: 55.65 - this means that temperatures above 55 will be yellow, above 65 will be red. (default: 67.77)
-N, --hashrate-avr Sample rate in seconds used to calculate the average speed (default: 60).
--sharerate-avr Sample rate in seconds used to calculate share share (default: 600).
--gpu-report-interval GPU statistics reporting frequency. (default: 5, that is, every fifth shares)
-q, --quiet Quiet mode. No GPU statistics will be shown.
--hide-date Don't show date in console.
--no-nvml Disable GPU NVML statistics.
Working with API:
-b, --api-bind-telnet IP: port for miner API via telnet (default value: 0.0.0.0:4068). Specify 0 to disable.
--api-bind-http IP: port for miner API over HTTP (default value: 0.0.0.0:4067). Specify 0 to disable.
-J --json-response The telnet API server will make json responses.
Other settings:
--autoupdate Perform an automatic update whenever a newer version of the miner is available.
-B, --benchmark Run benchmark (testing and debugging).
-c, --config Load and use a JSON configuration file.
--version Display help.
-h, --help Display program version.
Using the Watchdog
Watchdog is designed to monitor the state of the miner and restart T-Rex if it crashes or freezes for any reason.
Also, Watchdog can automatically update if a new version is available.
Use watchdog the same way you use T-Rex. Just replace t-rex.exe with watchdog.exe in your bat / script file in order to use it.
We recommend using watchdog to avoid mining downtime and make sure your GPUs are running 24/7.
Using json config
To start T-Rex from the "config.txt" configuration file enter in the batch file: t-rex -c config.txt
Use the "config_example" file as an example to create your own configuration.
Using the http api
There are several handlers available for the HTTP API.
By default, the HTTP API server binds to 0.0.0.0:4067. This means that you can access your miner through external and internal network interfaces.
A typical example of a request structure: http://your_ip:your_port/name
TREX
The "trex" handler is designed to display the miner's monitoring page in your web browser. You can view the statistics of the miner in real time, and change the parameters and configuration of the miner very, very quickly. Also here you will see updates if they become available.
To activate the handler, go to http://127.0.0.1:4067/trex using your web browser.
CONFIG
The "config" handler is designed to change your configuration on the hard disk, as well as to quickly change some parameters of the miner.
You can change several parameters with one request. GET and POST requests are supported.
If you use config (in a running miner, for example, like this: t-rex.exe -c config_file), then any action with the "config" handler will be saved in the selected config_file.
You can use this handler for automation purposes, such as changing the configuration while doing work, shutting down the miner via the API, and then restarting it with the new parameters applied.
Examples of using GET:
http://127.0.0.1:4067/config?protocol-dump=true
Will dump the protocol and write it to config_file.
http://127.0.0.1:4067/config?algo=x16r&devices=0,1&intensity=20,21
If you use this configuration, it will write the following configuration settings to it:
algo=x16r
devices=0,1
intensity=20,21
http://127.0.0.1:4067/config?algo=x16r&devices=0,1&intensity=20,21&config=test.conf
Saves the settings to the "test.conf" file, which will be created in the folder where the miner is located.
algo=x16r
devices=0,1
intensity=20,21
http://127.0.0.1:4067/config?config=test.conf
Save your current miner settings to a "test.conf" file.
Shows you the current state of the configuration
http://127.0.0.1:4067/config?hashrate_avr=10&temperature-limit=70&temperature-start=40
Will set the following parameters. Everything happens very quickly.
hashrate_avr=10
temperature-limit=70
temperature-start=40
Examples of using POST:
For POST requests, you must use the correct json object with the parameters you want to change.
POST payload:
{
"hashrate_avr": 10,
"temperature-limit": 70,
"temperature-start": 40
}
The name and type parameters in json are identical to the json config parameters you are using.
Summary
The "summary" handler is designed to display all information about the current mining process.
To activate the handler, go to http://127.0.0.1.1:4067/summary using your web browser.
Sample response with comments:
{
"accepted_count": 6, ----- The number of accepted shares.

"active_pool": {----- Information about the pool your miner is currently connected to.
"difficulty": 5, ----- The current difficulty of the pool.
"ping": 97, ----- Pool latency.
"retries": 0, ----- The number of connection attempts in case of connection loss.
"url": "stratum + tcp: //...", ----- The pool connection string.
"user": "..." ----- Usually your wallet address.
},

"algorithm": "x16r", ----- The algorithm that was set in config.
"api": "1.2", ----- version of the HTTP API protocol.
"cuda": "9.10", ----- version of the CUDA library.
"description": "T-Rex NVIDIA GPU miner",
"difficulty": 31968.245093004043, ----- The current difficulty of the network.
"gpu_total": 1, ----- The total number of GPUs installed on your system.

"gpus": [{----- List of all currently running GPUs on your system with statistics.
"device_id": 0, ----- Internal device identifier, useful for developers.
"fan_speed": 66, ----- Rotation speed of the fan blades in% of the maximum speed.
"gpu_id": 0, ----- User-defined device ID in configuration.
"hashrate": 4529054, ----- Average hash rate for N seconds, defined in the configuration.
"hashrate_day": 5023728, ----- Average hash rate per day.
"hashrate_hour": 0, ----- Average hash rate per hour.
"hashrate_minute": 4671930, ----- Average hash rate per minute.
"intensity": 21.5, ----- User-defined intensity.
"name": "GeForce GTX 1050", ----- Current device name.
"temperature": 80, ----- Current temperature of the device.
"vendor": "Gigabyte" ----- Current device vendor.
"disabled": true, ----- Device state. May appear if the device has reached the temperature limit (--temperature-limit)
"disabled_at_temperature": 77 ----- Device temperature when disabled. May appear if the device has reached the temperature limit.

}],

"hashrate": 4529054, ----- The total average hash rate for all active devices for N seconds, defined in the configuration.
"hashrate_day": 5023728, ----- The total average hash rate per day.
"hashrate_hour": 0, ----- The total average hash rate per hour.
"hashrate_minute": 4671930, ----- The total average hash rate per minute.
"name": "t-rex",
"os": "linux",
"rejected_count": 0, ----- This is the number of counted shares.
"solved_count": 0, ----- This is the number of blocks found.
"ts": 1537095257, ----- Current time in seconds since the beginning of the epoch. (ref: https://www.epochconverter.com)
"uptime": 108, ----- Uptime in seconds. This shows how long the miner has been running.
"version": "0.6.5" ----- Miner version.
}
Control
The "control" handler is required to configure the T-Rex timer in real time.
The following commands are supported since API 1.3.
Shutdown
To terminate your miner with a GET request type, type in the address bar of your browser and press Enter:
http://127.0.0.1:4067/control?command=shutdown
Hashrate-avr
To change the sample size of the real-time average hash rate with the GET request type, type in the browser line and press Enter:
http://127.0.0.1:4067/control?hashrate-avr=1
It will be established for 1 sec.
gpu-report-interval
To change how often GPU reports appear in the log, type the following command in your browser and press Enter:
http://127.0.0.1:4067/control?gpu-report-interval=10
Now you will see GPU statistics every 10th fraction.
you can disable statistics (enter quiet mode) by setting gpu-report-interval to 0.
no-color
To disable color output in the console, type in the address bar of your browser and press Enter:
http://127.0.0.1:4067/control?no-color=true
Turn on:
http://127.0.0.1:4067/control?no-color=false
protocol-dump
To enable the dump of the user's log into the console / log, type in the address bar of the browser and press Enter:
http://127.0.0.1:4067/control?protocol-dump=true
Disable:
http://127.0.0.1:4067/control?protocol-dump=false
If you prefer POST, set the request body to {"protocol-dump": true}.
time-limit
To set a time limit in seconds for the miner (it will be disabled after a timeout), enter the following line in the browser line and press Enter:
http://127.0.0.1:4067/control?time-limit=120
After this request, it will turn off your miner after 120 seconds.
Disable:
http://127.0.0.1:4067/control?time-limit=0
If you prefer POST, set the request body to {"time-limit": 120}.
Troubleshooting
The program hangs at startup
If the program freezes at startup, then try to slightly lower the intensity -i 19.
If this does not help, then try to lower the overclocking of video cards or remove it altogether.
The program crashes
If the program crashes after some time, then do the following:
- increase the swap file

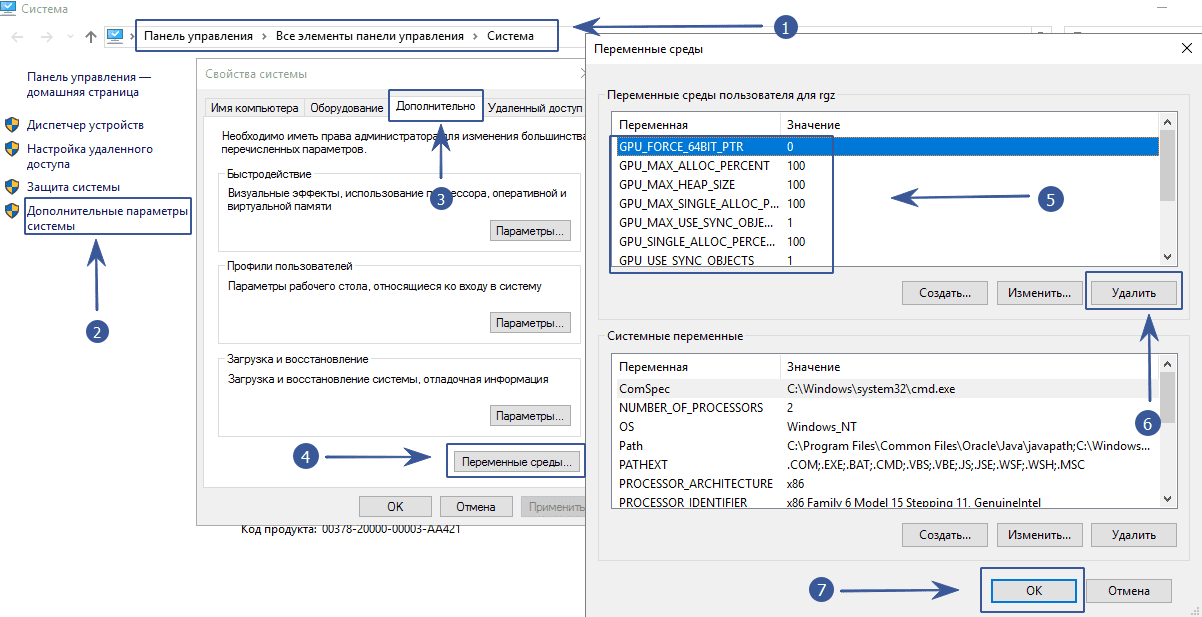
- remove environment variables from old miners. System properties / advanced system parameters / environment variables - remove variables from old programs. Don't delete system variables! Remove only those starting with GPU_FORCE and reboot the system
- reduce overclocking
- check all contacts from risers and power supply (with the system off). Sometimes it helps to swap the riser.
- make sure the power supply is sufficient for the load. Different mining algorithms consume different amounts of electricity

Download
Download for Windows
0.26.8
0.26.1
0.21.5
0.21.4
0.18.11
0.15.4
0.14.6
0.14.4
0.13.2
0.13.0
0.12.1
0.12.0
0.11.1
0.11.0
0.10.2
0.9.2
0.9.1
0.8.9
Download for Linux
0.26.8
0.26.1
0.25.15
0.18.11
0.14.6
0.14.4
0.13.2
0.13.0
0.12.1
0.12.0
0.11.1
0.11.0
0.10.2
Version history
If you still have any questions, please do not hesitate to leave your comments.
Happy mining!
Version history
0.14.6
- bugs fixed
0.14.4
- Added x16rv2 algorithm (upcoming RVN fork)
-
Added the ability to automatically switch the algorithm using a new parameter
--fork-at
see the help file for more details.RVN fork: --fork-at x16rv2=2019-10-01T16:00:00
0.13.2
- fixed Tensority algorithm for antpool (BTM)
0.13.0
- Added tensority algorithm (RTX cards, 3% of developer commission) - used for Bytom coin
- Added dedal algorithm back (it was removed in previous versions)
- Added SSL support (URL scheme must be ssl, for example "stratum + ssl: //veil-eu.coinblockers.com: 4244")
Cosmetic changes and bug fixes:
- Watchdog displays GPU restart statistics
- Miner restart is automatically performed by watchdog after update no longer increments timer restart counter
- Fixed miner completion API command when called with watchdog enabled
0.12.1
- Increase production on the MTP algorithm by 1-3% on some maps
- Added the ability to view the T-Rex log file in a web browser (by default at http://127.0.0.1:4067/log )
0.12.0
- Added honeycomb algorithm (Beenode coin)
0.11.1
- Increased mining speed on the x25x algorithm
New opportunities:
- Use environment variables in configuration files.
- Use
%YOUR_ENV_VAR%in any field of the config file and it will replace itYOUR_ENV_VARwith the environment variable value set on your system.
Error correction:
- Temperature limiting error (the video card would shut down if there were problems with NVML)
- P2pool fixed
- Errors and unsupported NVML features are shown
- MTP share log messages are truncated using --protocol-dump command
- Fixed launch error in some cases for CUDA 9.1 builds
0.11.0
- Added x25x algorithm (SUQA / SIN will be used after forks)
Bug fix (built-in watchdog):
- Miner does not start when using Windows Task Scheduler
- Miner reboots on Linux / Hive OS
- Saving one log file when restarting the miner
0.10.2
- Added MTP algorithm (Zcoin)
- Added support for Tesla P100
- Added built-in watchdog timer (can be disabled using the command
--no-watchdog) - Default timeout increased from 3 to 5 minutes
- New option
--hide-dateto hide the date part of the timestamp in the console - Windows is not allowed to go to sleep while T-Rex is running
Error correction:
- Fixed "does not validate on CPU" error on RTX cards (CUDA 10 builds)
- Long developer board sessions if system time jumps
- Graphics cards keep hashing even if pool connection is lost
Note. The built-in watchdog timer allows (auto) updates, no need to use an external watchdog timer anymore.
If you run into any problems - a temporary workaround will disable it with the command --no-watchdog.


