SafePal browser extension: security, deposit, withdrawal
A multifunctional Web3 wallet supporting multiple blockchains, features, and dApps. No history of security breaches.
You’ll learn how to safeguard your crypto against phishing and how to connect with hardware wallets. Also, save up to 95% on fees through L2 networks and make transactions without gas tokens thanks to the Gas Station feature.
The SafePal wallet browser extension allows you to store, manage, and exchange your crypto assets. It provides all the essential Web3 tools: DeFi, NFT, dApps, Swap, and support for multiple networks.
The extension is a standalone hot wallet that is not connected to the SafePal hardware wallet.
Wallet Appearance
Networks:
It supports numerous popular blockchains: Bitcoin, Ethereum, Tron, Solana, TON, Dash, BNB, Polkadot, Kusama, Polygon, Dogecoin, Zcash, among others.
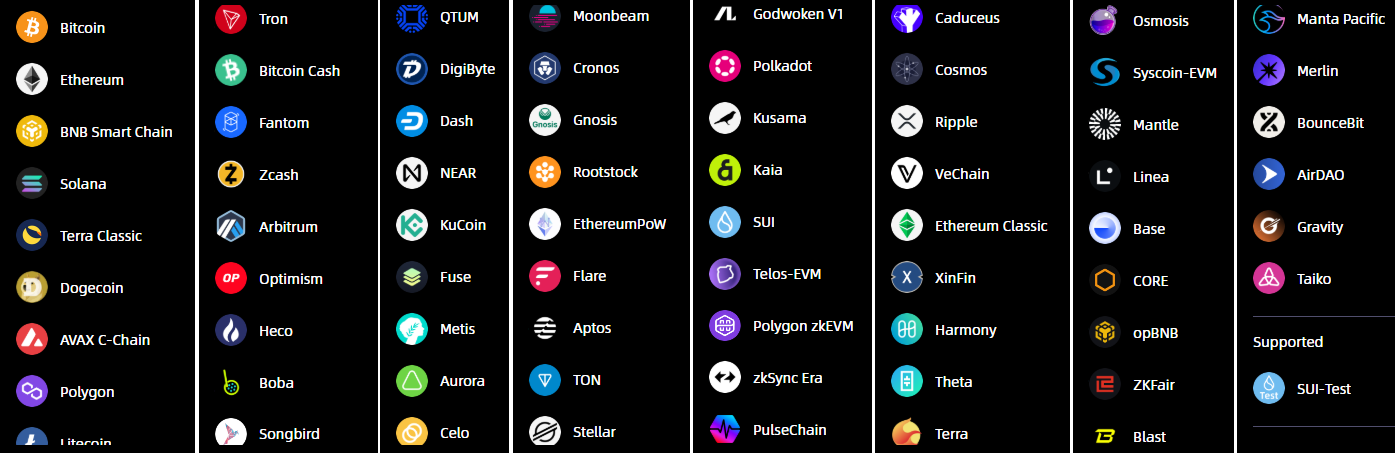
To help you save up to 95% on ETH fees, Ethereum Layer 2 networks are also available:
- Arbitrum
- Optimism
- zkSync Era
- Boba
- Metis, etc.
The idea is that you interact with your wallet’s features through these networks while paying only minimal off-chain ETH fees. The results are then “proven” on Ethereum.
Platforms:
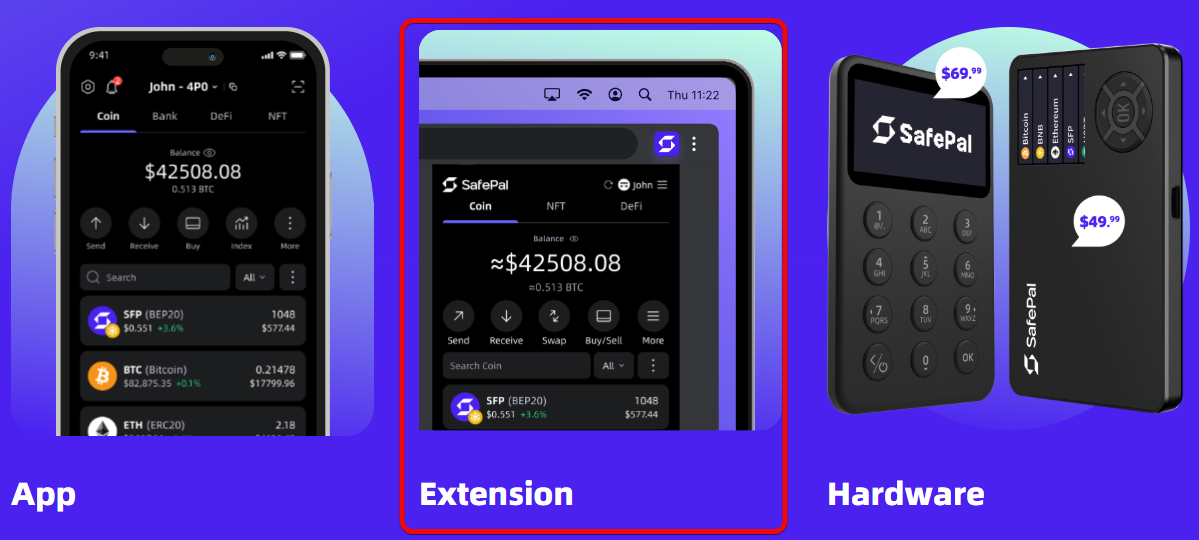
SafePal is available as a software wallet via a mobile app and browser extension, as well as a cold hardware wallet. This text focuses on the browser version.
Every wallet should first and foremost be evaluated in terms of security.
Security and Features
You’ll discover the three most crucial aspects of any wallet: security, cost-effectiveness, and ease of use.
Security:
Self-custody of keys – use the wallet as an interface for interacting with coins, while you retain your private keys with no intermediaries.
Compatibility with hardware wallets – connect to your mobile and hardware wallets (SafePal or Ledger) via QR code or Bluetooth to keep your keys encrypted.
Phishing alerts – the wallet detects scams, phishing attempts, and security vulnerabilities through its Phishing Detection feature.
Additionally, you can add a “watch-only” wallet address – without entering a seed phrase or private key. This is the Watch-only feature. Now, let’s move on to the economics.
Your Advantage:
Gas Savings – use the Gas Station feature so you don’t need to purchase network tokens when your balance is insufficient to cover fees.
L2 Networks – save up to 95% on fees by utilizing Layer 2 networks, then bridge back to the mainnet via cross-chain swaps.
Built-in Swap, Buy/Sell, NFT and dApps – conduct all your crypto operations right within the wallet interface.
Now, let’s explore its user-friendliness.
Ease of Use:
Multi-currency – manage different networks and coins within a single interface.
Cross-platform – use the wallet as a browser extension, mobile app, or even order the hardware wallet.
Simple Interface – switch themes, languages, and display balances in your local currency, for example, USD.
It’s time to test these features and security in practice. Let’s download and install the wallet.
Download and Installation
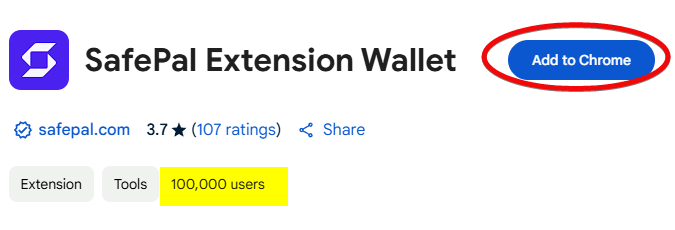
To begin, visit safepal.com, choose the extension, and select your preferred browser. We are using the version for Chrome. Install the extension.
After installation, you can pin it for quick access.
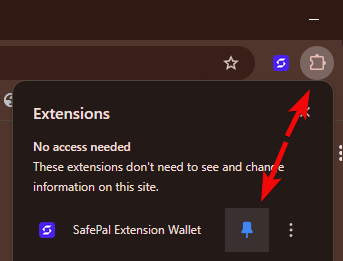
Click the extension icon to open SafePal, then click Get Started.
Creating a New Wallet
You have two options:
- Create a new wallet
- Or import an existing one.
The second option is useful if you want to import a wallet, for example from MetaMask. In this guide, we will create a new wallet.

Click Create New Wallet, set and confirm your password (remember, SafePal doesn’t store your password, so make sure you don’t lose it), then click Next.

The next step is crucial: SafePal will generate a 12-word mnemonic phrase needed to restore your wallet in case you lose access.
Backup
Make sure the screen is private, click Generate, write down the words in the correct order, and click Next.
Confirm the seed phrase by arranging the words in the proper sequence.
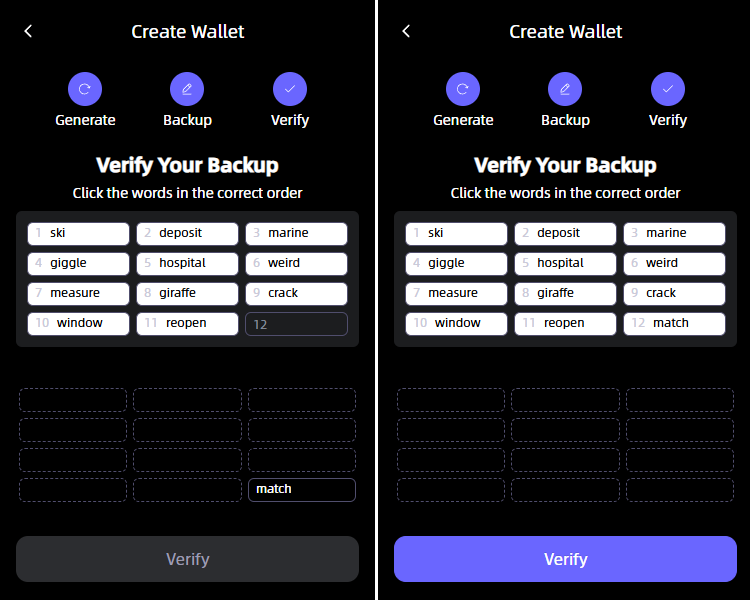
Keep this phrase in a secure place – losing it means permanent loss of access to your wallet and assets. Never share it to avoid compromising security!
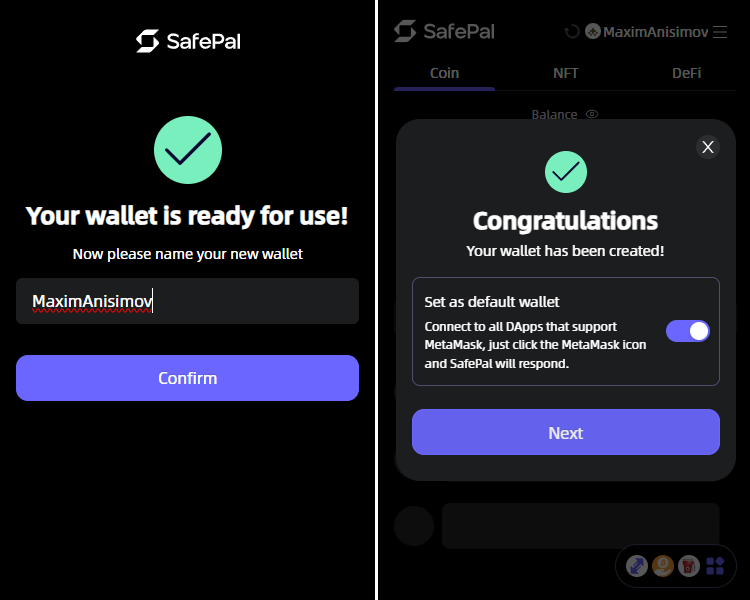
After verification, name your wallet, click Confirm, and it’s ready to use! You can set it as your default wallet or simply start using it.
How to Use
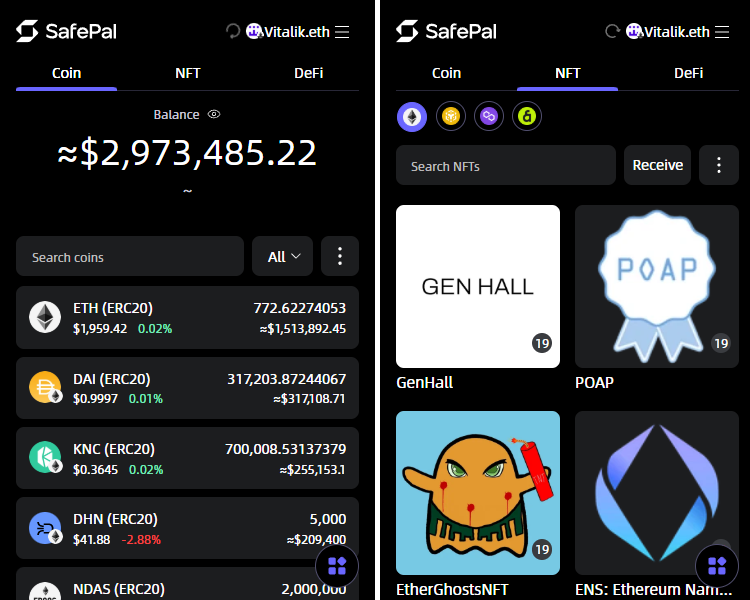
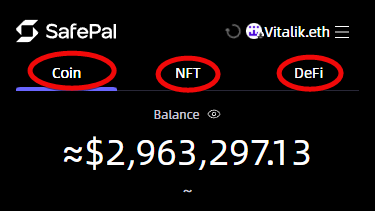
Let’s explore the interface. At the top of the screen, you’ll find tabs for coins, NFTs, and DeFi, along with your wallet balance, which you can hide if needed.
Below are the core functions for crypto transactions: Send, Receive, Swap, Buy, Sell and More.
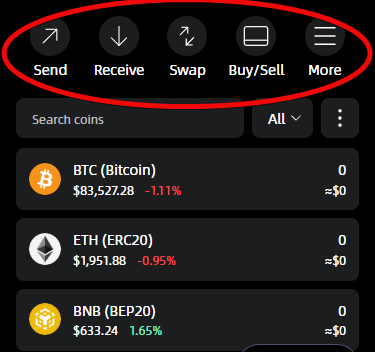
A list of coins appears below these functions, and you can use the search bar to find a specific coin, or click All to view all tokens.
Add new coins in the Manage Coins menu by selecting them and clicking Confirm.
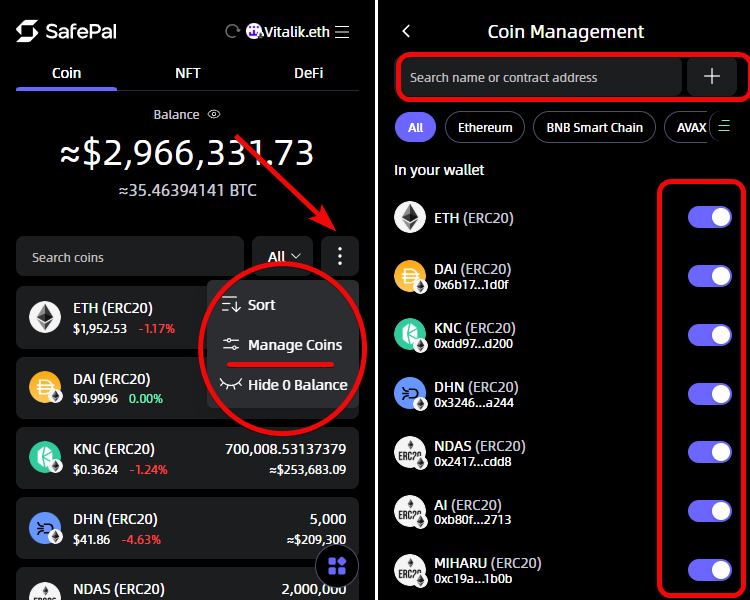
For convenience, there are features to hide coins with a zero balance and to sort them by total assets, coin count, or alphabetically.
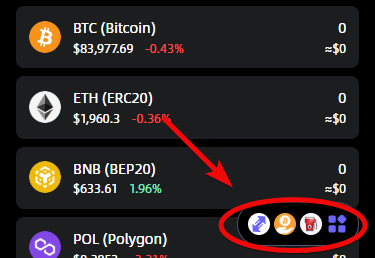
The bottom of the screen displays buttons for coin swaps, buying crypto, gas purchases, and accessing dApps.
Let’s start by obtaining your address.
How to Create an Address
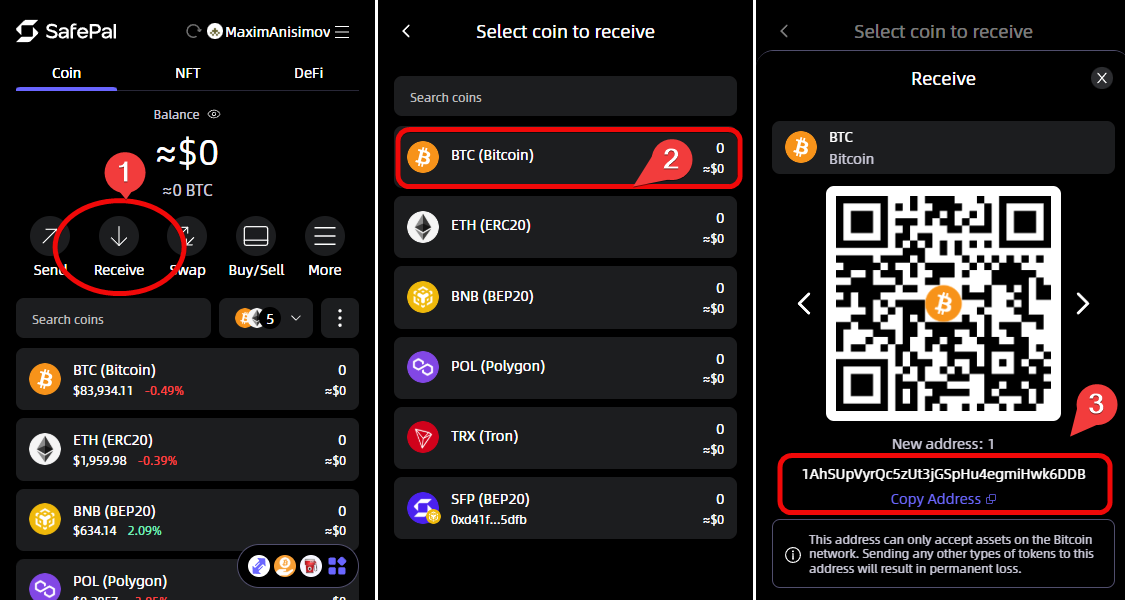
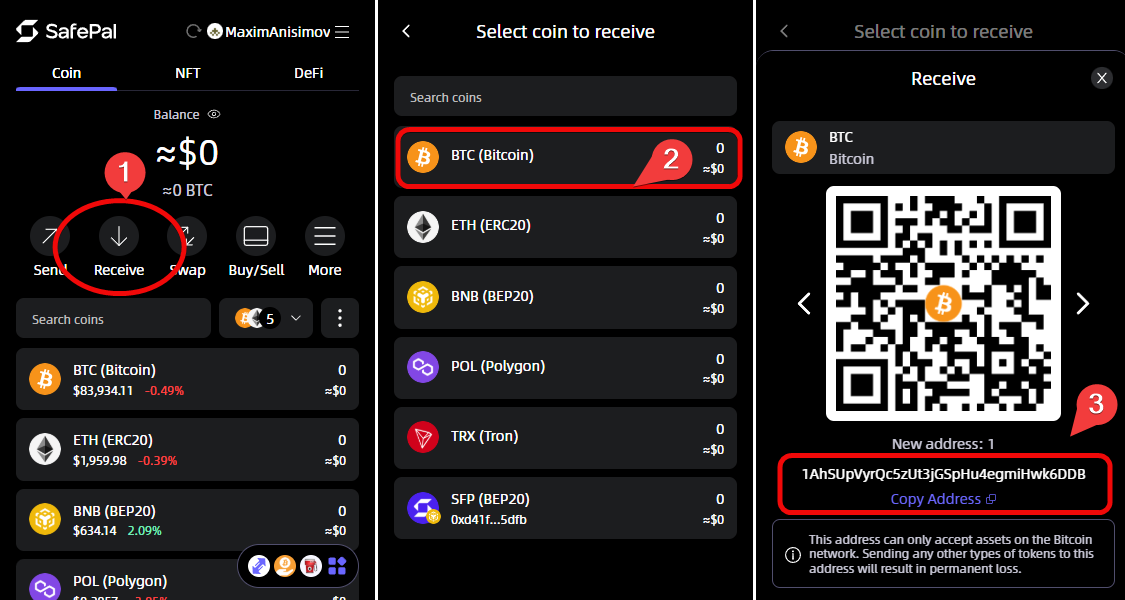
To get your address:
- Click
Receive - Select a coin
- Your address and QR code will appear. There are 10 available addresses that you can cycle through using the arrows.
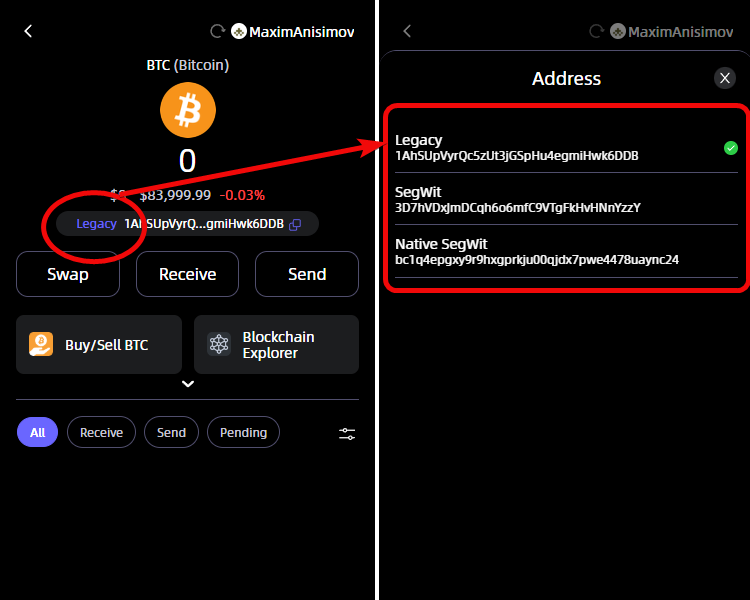
For experts: clicking on BTC allows you to choose the address type: Legacy, SegWit, or Native SegWit.
Native SegWit is preferable due to its lower fees, if the recipient supports such addresses; otherwise, use SegWit, and reserve Legacy only for legacy systems.
Once you have your address, you can fund your wallet.
How to Fund
To receive coins, click Receive and select a coin from the list. For example, choose Bitcoin, then copy and send your wallet address to the sender or display your QR code.
Once funds are received, they will appear in your balance.
You can also receive coins by selecting one from the token list on the main tab. For instance, click on ETH, choose Receive, and follow the same process.
Your overall balance is displayed at the top, while each coin’s balance appears in its respective tab.

Transaction History
Click on a coin to view transaction details including the date, time, and amount. All transactions are shown at the bottom of the selected coin’s tab, with the coin’s balance, its equivalent in your local currency, and a button to copy your address at the top.
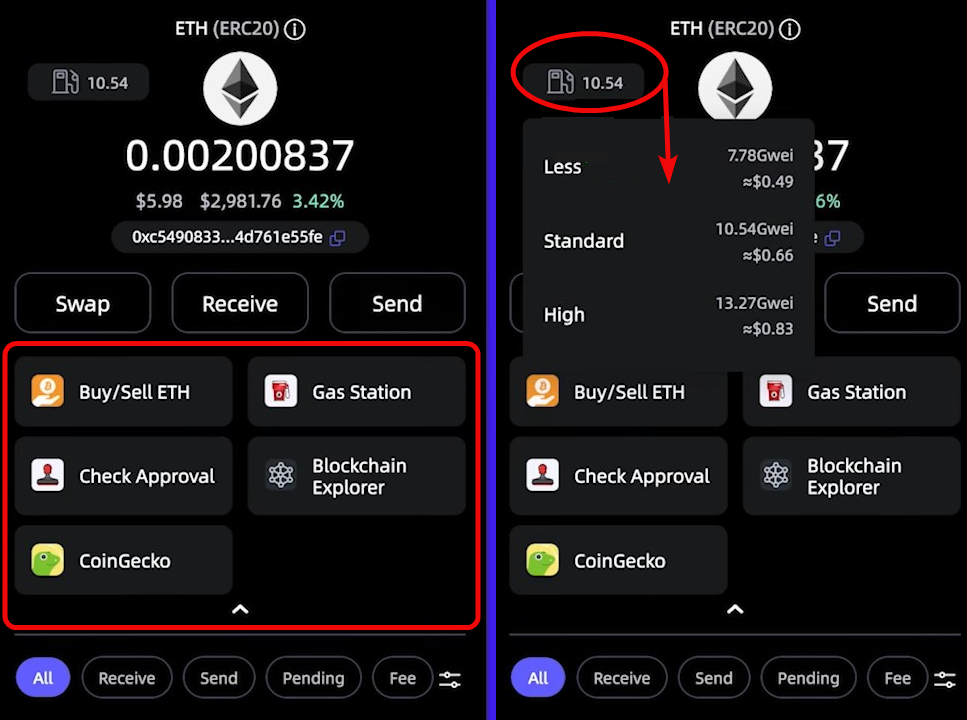
You can also view the current gas price, buy or sell coins directly in the wallet, top up gas, check application permissions, and view the coin on Blockchain Explorer or CoinGecko.
Scroll down to conveniently view not only the history of funds received and sent, but also the fees.
On the left, you see a list of transactions related to gas payments – the cost of executing operations on the Ethereum network. On the right, details of the selected transaction are shown.
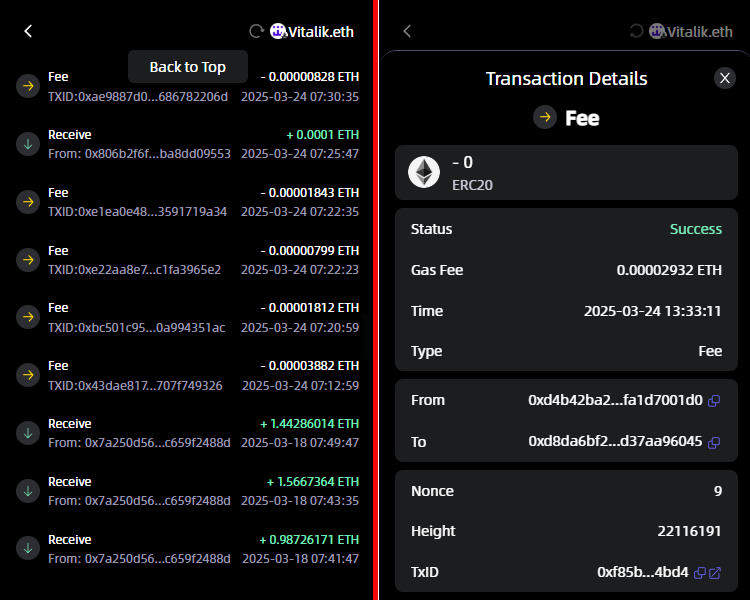
You can clearly see how much ETH was spent on fees and how much was sent or received in the main transaction.
How to Send
To send cryptocurrency:
- Click
Sendin the main menu or first select a coin and then clickSend. - Enter the recipient’s address, then either click
MAXor manually enter the desired amount, and clickNext. - Review the transaction details, adjust the gas fee if necessary, and click
Continue. TheCustomoption allows you to manually set the fee. - Your funds are sent, and the balance is updated accordingly.
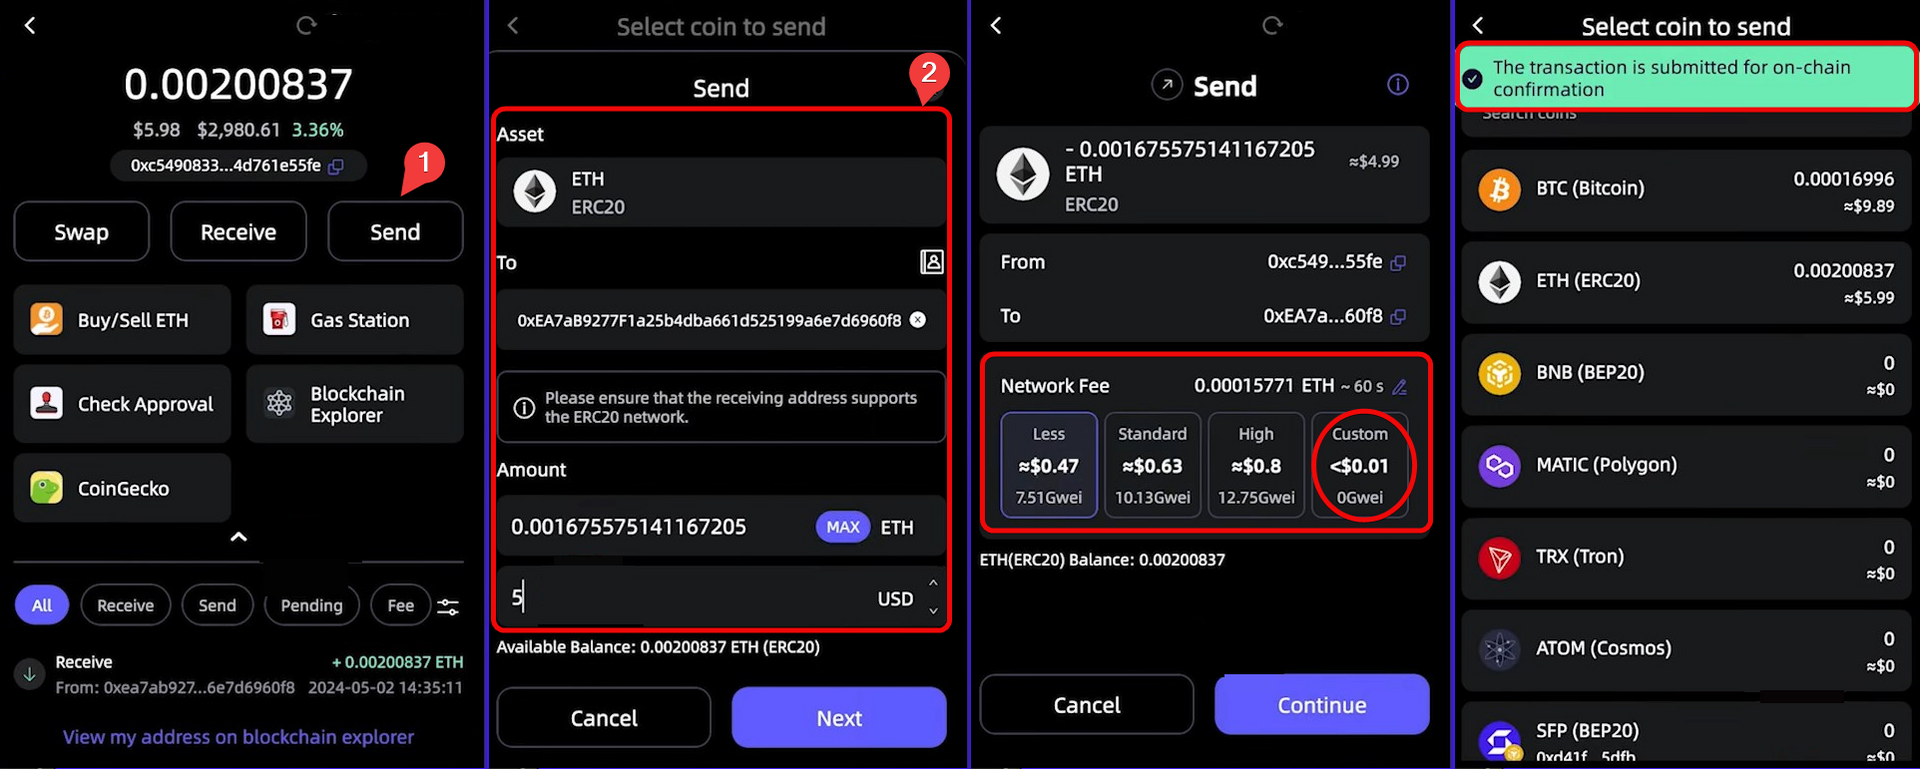
Fees
You can adjust the fee if you want to save. When sending a transaction, the following fee options are available:
- Less – the lowest fee, which may result in slower confirmations.
- Standard – an optimal balance between speed and cost. Transactions typically confirm within a few minutes.
- High – a higher fee ensures faster confirmation, especially during network congestion.
- Custom – manually set the fee. Setting it too low may lead to long delays or the transaction being ignored.
Use Standard for most routine transactions as it strikes a balance between speed and cost.
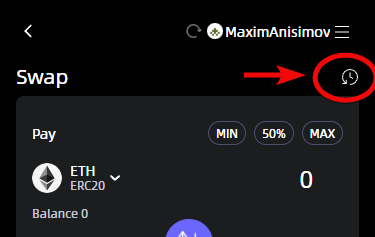
Swap
Click Swap to exchange coins directly within the SafePal wallet.
Select the coins, enter the swap amount, choose a provider, review the details, and click Swap to proceed if desired.
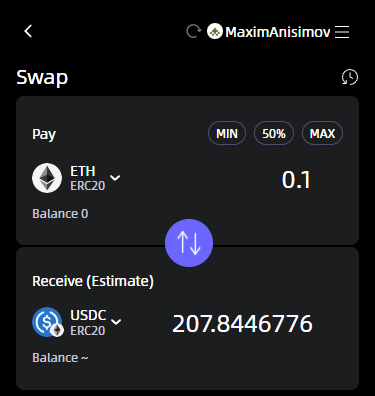
However, it is recommended to first review the exchange conditions that the wallet found for you:
- Exchange Provider – 1inch.
- Fee – 0.2%, which is quite low and doesn’t significantly affect overall gains.
- 1% Slippage – allowing a price variance of ±1%, meaning the final USDC amount may slightly differ (e.g., from 12.38 to 12.63 USDC). This is standard in decentralized exchanges to account for price fluctuations during the transaction.
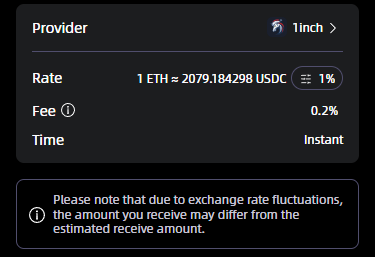
A 0.2% fee is comparable to exchange fees and quite low. However, check the rates on other aggregators (Uniswap, Paraswap) – it is possible that 1inch may not offer the best price for your amount.
Click on Provider (currently 1inch) to see the list of available options and their rates. For instance, you may find that Kyberswap offers a more favorable rate.
You can also click on 1% to adjust the allowed slippage percentage:
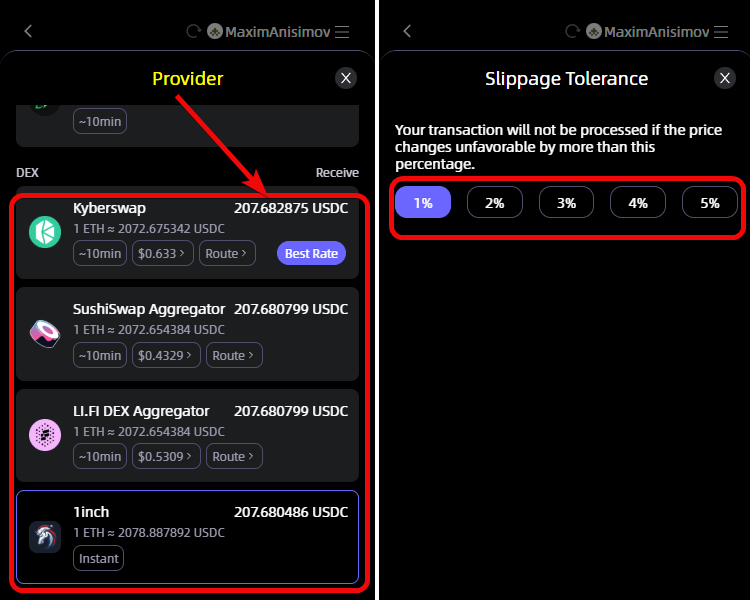
You can view your entire swap history in the upper right corner of this tab.
Buy
The wallet supports the Buy and Sell features for crypto transactions using bank cards.
Enter the amount you wish to spend, select the coin to buy, choose a provider, click Continue, and follow the provider’s instructions.
The buying providers will require verification: your full name, address, etc.
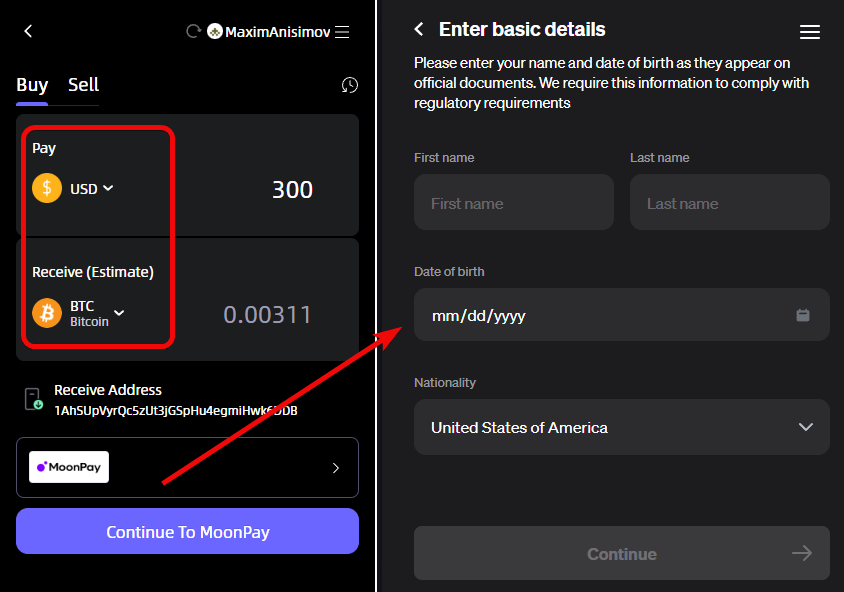
Providers may not operate in all regions and their lists may change. For example, there is Binance Connect, which allows you to safely and quickly purchase over 200 cryptocurrencies using Visa and MasterCard, as well as more than 90 local currencies (such as USD, CAD, EUR).
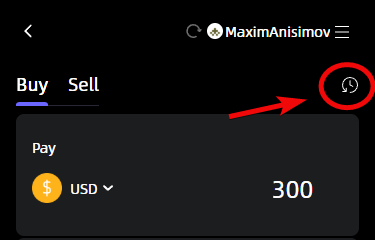
To sell cryptocurrency, select the coin, enter the desired amount, and continue with the provider. The history of your purchases and sales is available in the upper right corner.
NFTs
The NFT tab lets you receive and view NFTs from various blockchains within a single interface.
What are the benefits of owning an NFT? Let’s use ENS usernames as an example. Beyond speculative purposes, owning an ENS domain offers benefits such as:
- Web3 Integration – an increasing number of services (wallets, NFT platforms, DAOs) support ENS, so owning an ENS domain provides extra features, simplified logins, etc.
- Transaction Convenience – enabling friends, clients, or partners to send you crypto using a simple address like
yourname.eth. - Personal Branding – if you’re actively engaged in crypto, DeFi, and NFTs, having a recognizable wallet name can be an advantage.
- Investment Value – some buy ENS domains with the hope of reselling them at a profit (especially short or attractive names).
The available options include:
Manage NFTs – choose which collections to display.
View As – select the display mode.
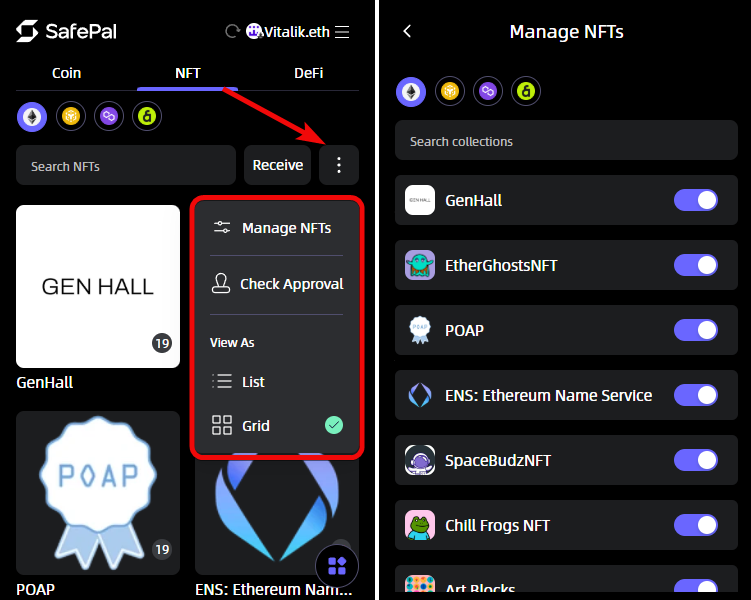
Check Approval – manage smart contract permissions, such as who can spend or transfer your tokens.
Clicking on one of your NFTs will show detailed statistics:
Floor– the lowest current selling price for an NFT in the collection. For example, 0.00013 ETH means you can’t buy it for less.Volume– the total sum of all buy/sell transactions. A high volume (136459 ETH) indicates popularity and liquidity in the collection.Items– the total number of ENS domains in the collection (4,004,185). More items mean more variety.Owners– the number of unique wallets holding NFTs from the collection (1,086,245). A higher number of owners suggests better decentralization and demand.
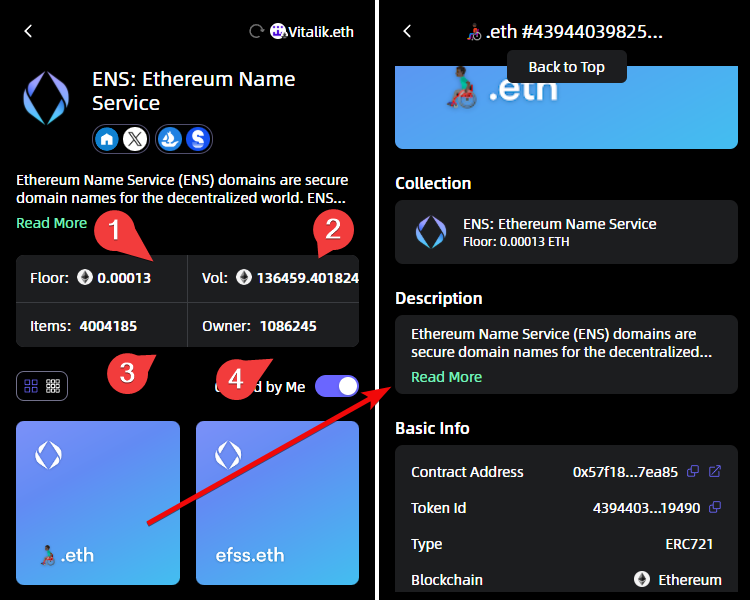
Clicking on an ENS will reveal further details such as the contract address, network type, and more.
Adding Tokens
To add a token not listed by default:
- Open the
Manage Coinsmenu. - Click the plus icon.
- Select the network, then paste the token’s contract address and other token details.
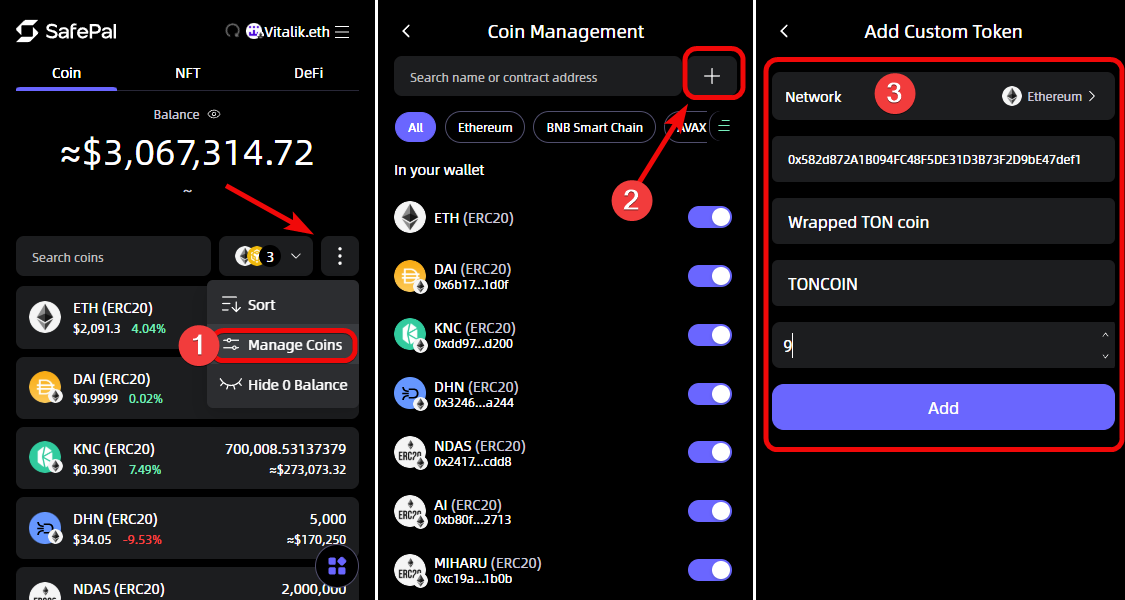
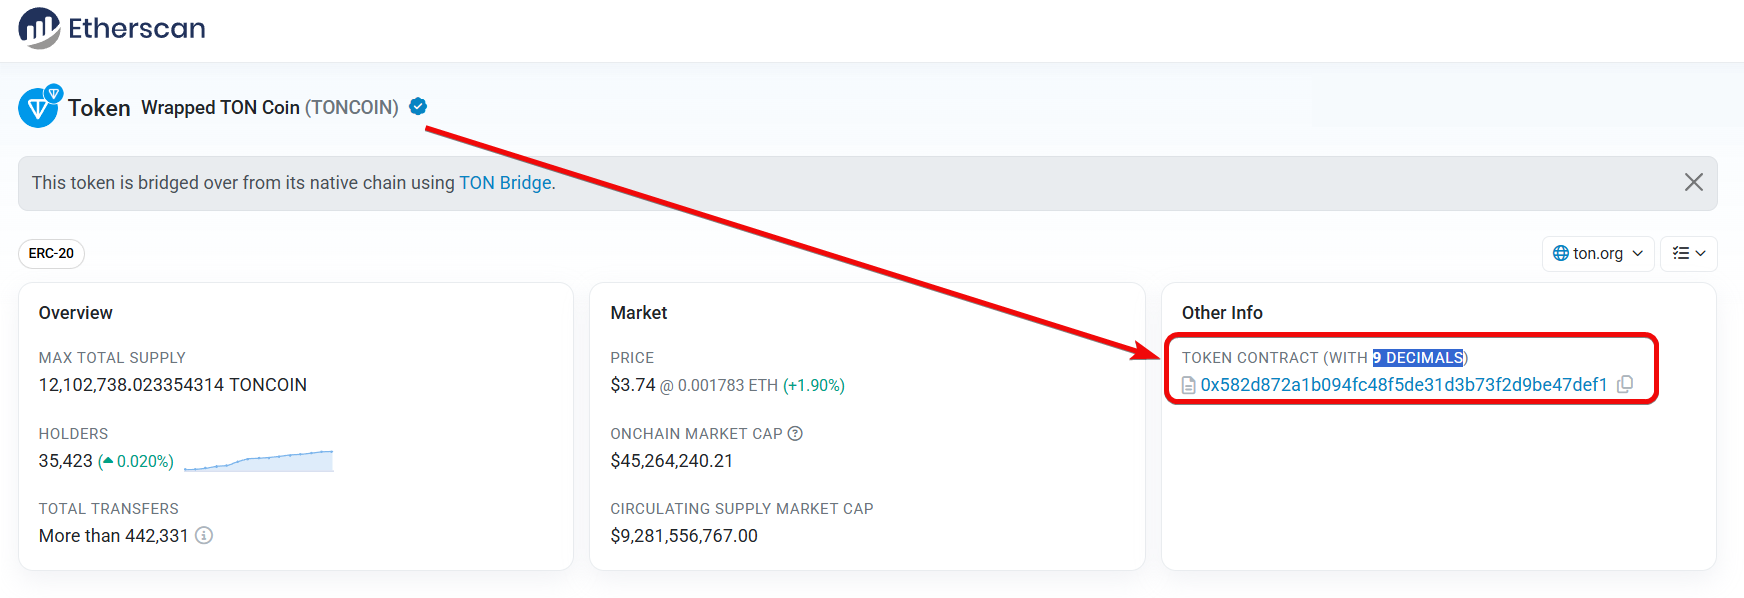
Token details include: Contract Address, Name, Symbol, and Decimals. You can find these on blockchain explorers such as Etherscan, where they are provided under the Other info section.
Gas Station
Gas is the fuel for transaction execution on the network.
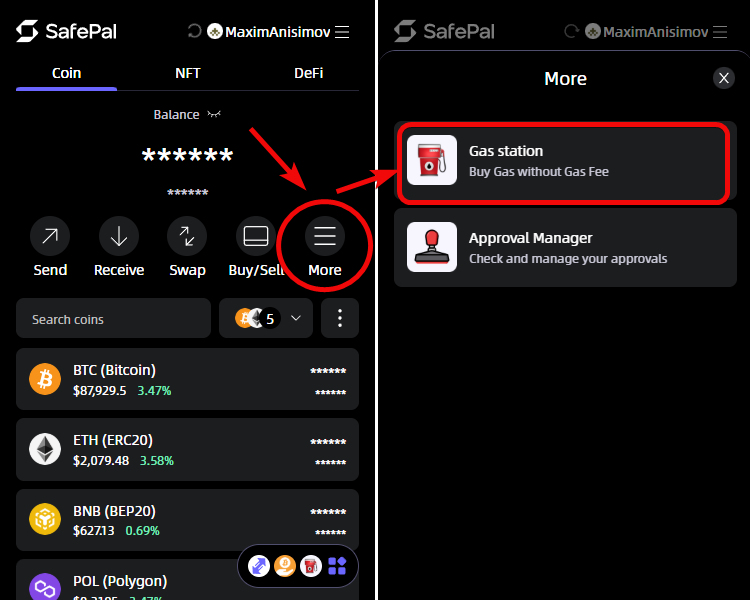
The Gas Station feature solves the problem of lacking tokens to pay for fees. For example, if you receive USDT but don’t have BNB to cover gas fees, you wouldn’t be able to send tokens. Normally, you’d have to buy BNB on an exchange, but Gas Station allows you to swap a portion of your other tokens for BNB right within the wallet.
In short, with Gas Station you can perform transactions without needing to hold gas tokens (e.g., BNB) in your balance.
You can access the fee-free gas purchase feature via the wallet’s More menu.
Select tokens to pay for gas in the Gas Station tab.
This menu also displays a gas tracker showing current fee rates.
For example, with 10 SFP you receive approximately 0.007773968 BNB.

According to the Gas Tracker, the transaction fee is minimal – about $0.01 for a standard transaction.
You can also check smart contract permissions for different networks in the More menu.
DApps
The wallet supports dApps tools including staking protocols, exchanges, liquidity farming, cross-chain bridges, NFTs, and more. This extends the wallet’s functionality from simple storage to earning rewards.
For example, you can use protocols for:
- Staking – earning passive income and participating in blockchain governance.
- DEX (Decentralized Exchange) – swapping tokens without intermediaries at competitive rates.
- Farming – earning rewards for providing liquidity plus project tokens.
- Bridges – transferring assets between networks while saving on fees.
- NFTs – managing, trading, and gaming with non-fungible tokens.
- DeFi and Web3 – access loans, games, and various applications all in one wallet.
To connect with dApps protocols, visit an aggregator such as DappRadar, review the projects, and choose one with potential.
Warning: when connecting to dApps, keep in mind that vulnerabilities in smart contracts, phishing attacks, fraud, and operational opacity may pose security risks to your wallet.
Then, open a website— for example, the 1inch exchange aggregator at 1inch— and click Connect wallet on the site.
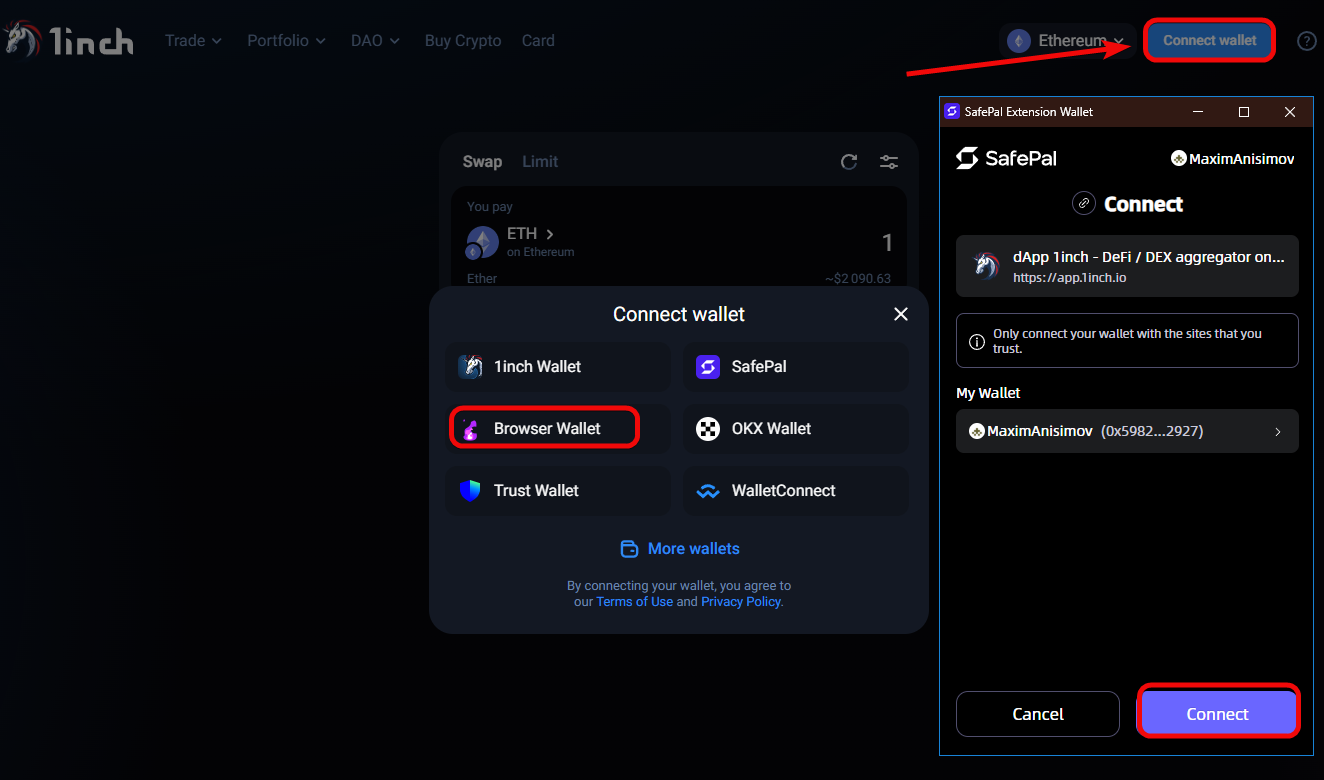
Select the browser wallet version and confirm the connection in the wallet by clicking Connect.
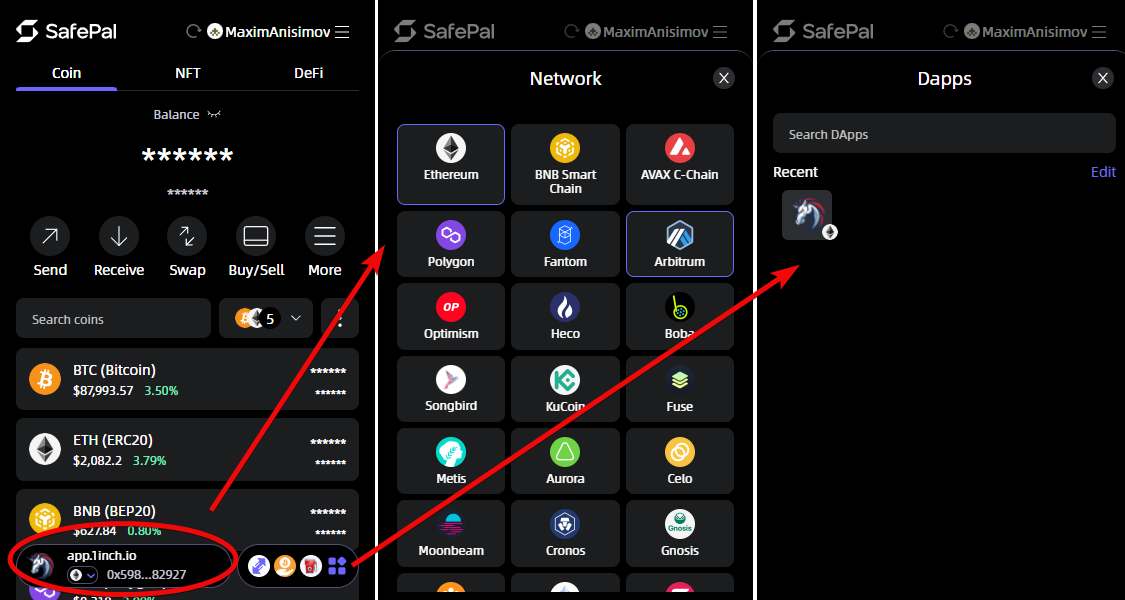
Within the wallet, you will see the connected dApps. Clicking on one allows you to choose the network. Clicking the dApps icon shows the full list of connected applications, which you can disconnect if needed.
Staking
The browser wallet does not have a built-in staking function. It is available in the mobile app. However, you can connect to dApps protocols via the browser version to start staking.
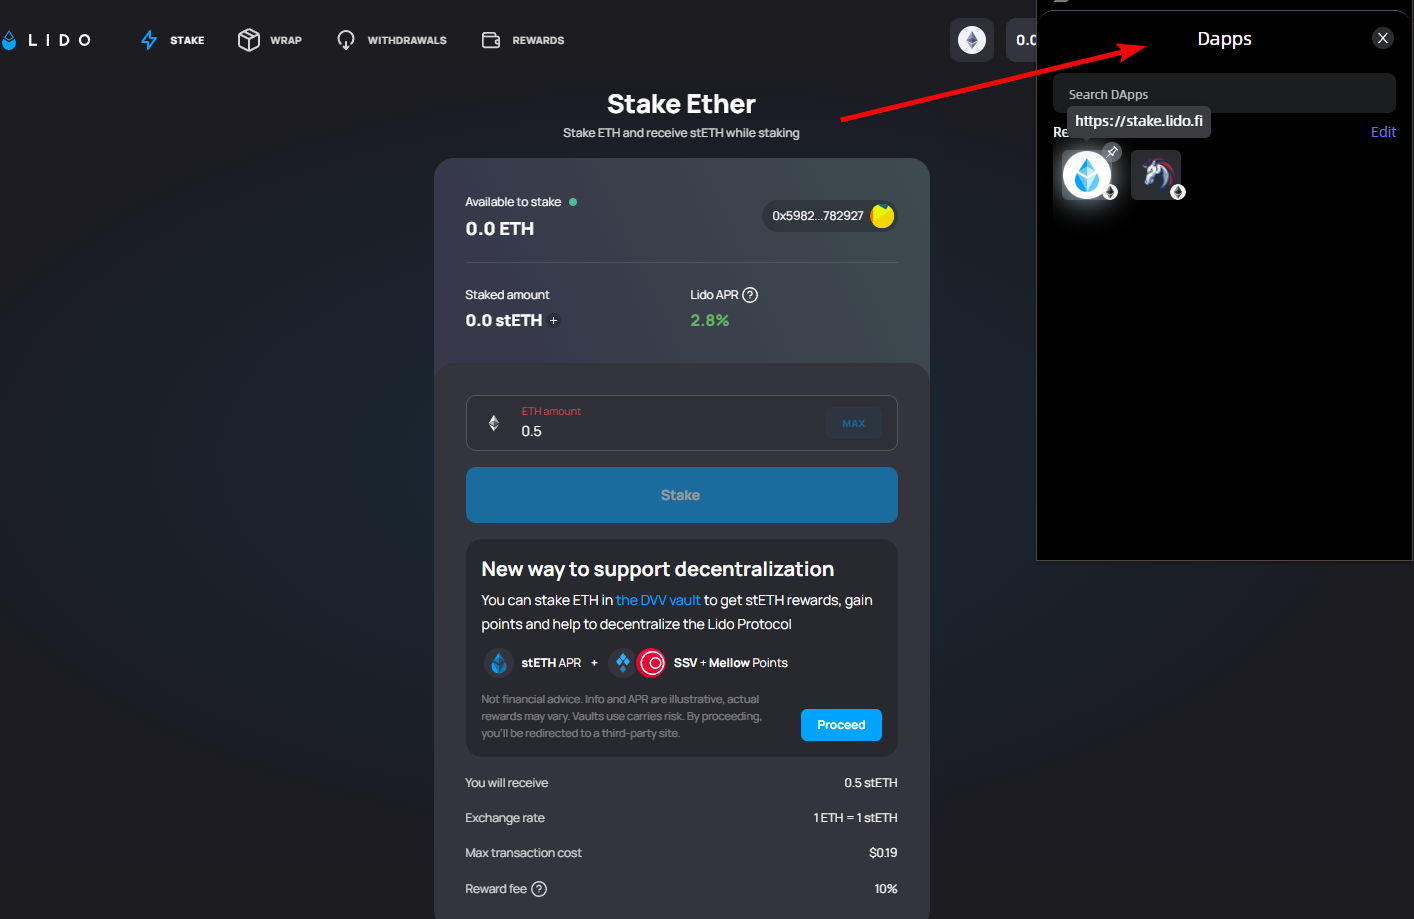
For example, let’s connect to one of the popular staking platforms – Lido.
In this example, you will earn 2.8% per annum. For instance, if you stake 0.5 ETH, you will receive approximately 0.014 ETH per year as rewards (0.5 × 2.8% = 0.014 ETH) before fees are deducted.
We’ve now covered all the features of the browser extension. Next, let’s look at advanced settings.
Advanced Settings
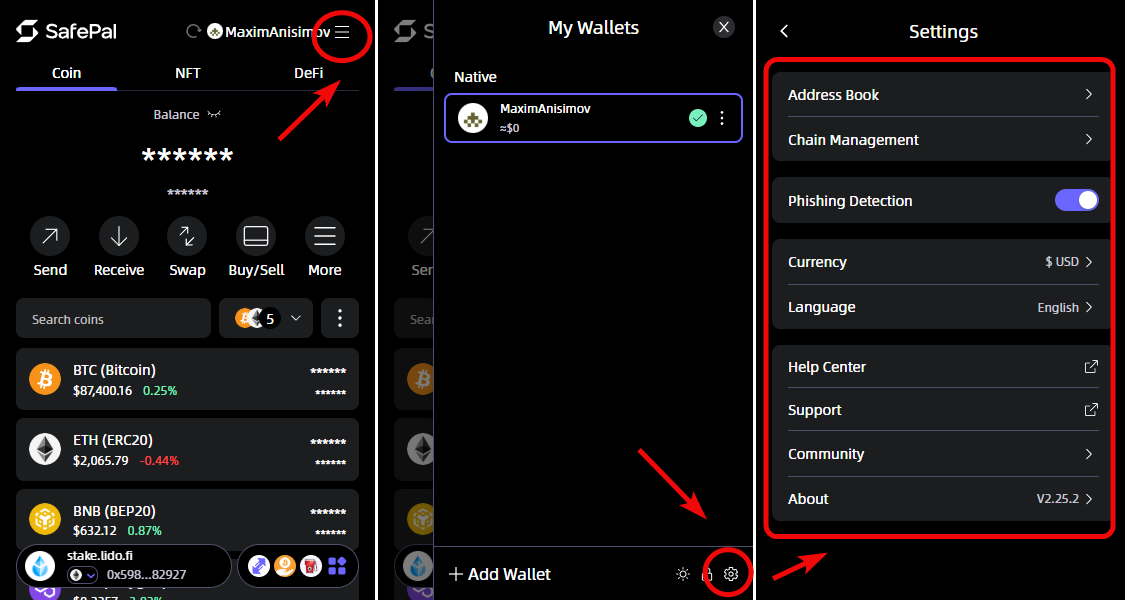
Access advanced settings through the hamburger menu. Then click the gear icon to reveal the settings block:
Address Book– add addresses to your whitelist for quick access and to avoid errors when sending funds.Chain Management– manage the display of coins/tokens, and add networks and tokens via theRPC URL.Phishing Detection– enable protection against phishing sites with warnings about suspicious dApps and transactions.
Additional settings follow below.
Interface:
Currency– choose the currency in which your balance is displayed (USD, EUR, RUB, etc.).Language– set the interface language (English, Chinese, Spanish, Russian, Japanese, etc.).
Help:
Help Center– get instructions on wallet setup, sending/receiving funds, as well as FAQs on security and seed phrase recovery.Support– use the form to submit tickets regarding issues (transactions, security, technical glitches).Community– join the community via Twitter and Discord.About– view the extension version. This is useful when contacting support.
There is also a toggle for switching between light and dark themes via an icon.
Private Key and Seed Phrase
To access your seed phrase and private key, create an account, or delete the wallet, open the hamburger menu on the main tab. Then click the wallet menu to see the options for exporting the seed phrase and private key.
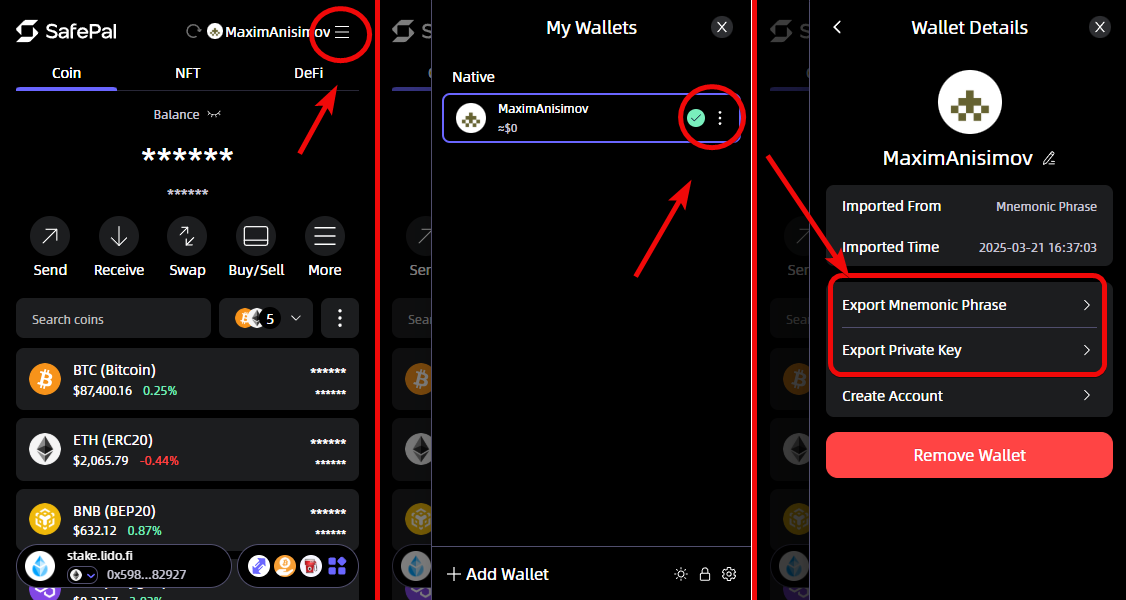
The seed phrase is like a “sprout” from which the same wallet will grow across all blockchains. In contrast, you should save a separate private key for each blockchain since a key only unlocks the asset it’s associated with.
Import and Recovery
To import a wallet, go to the main tab menu, then select Add Wallet and SafePal will show import options.
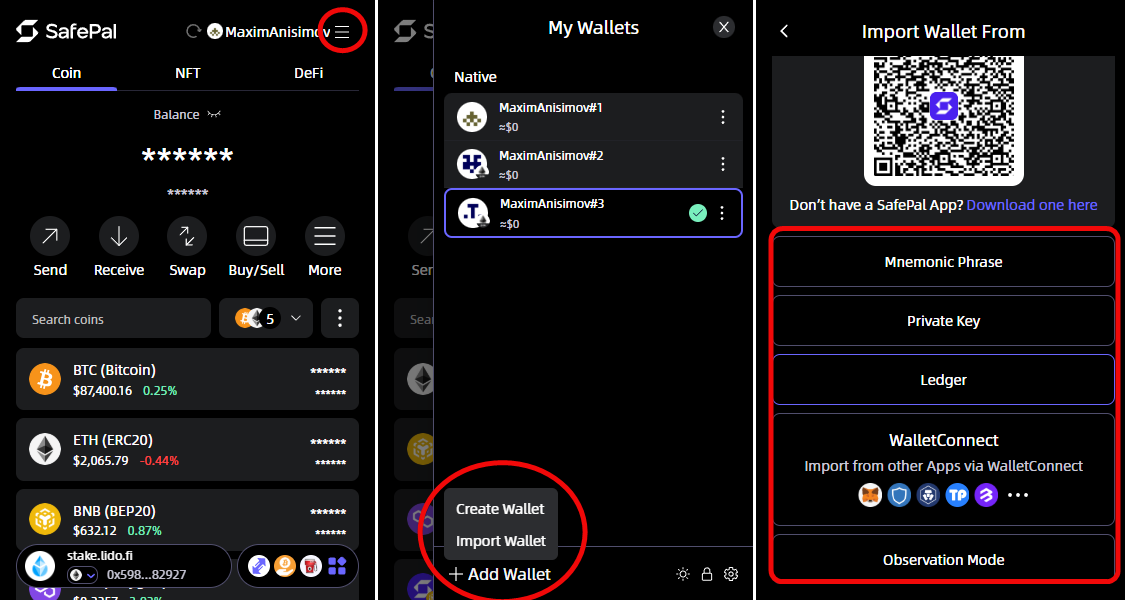
Here you can recover a wallet using a seed phrase, a private key, integrate with Ledger, import other browser wallets, or create a watch-only wallet.
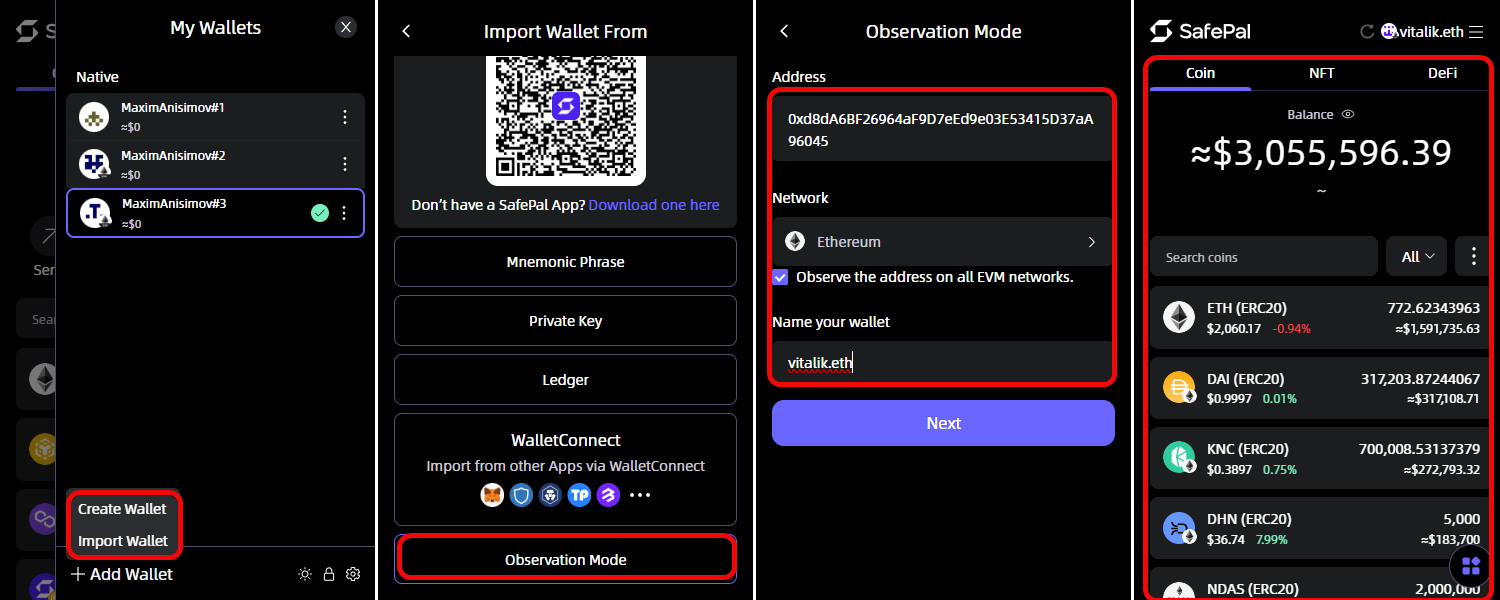
Watch-Only
Watch-only wallets are used to monitor other people’s crypto addresses to observe their trading strategies, DeFi activities, NFT holdings, etc.
To add a watch-only wallet, go to the wallet addition menu (as described above) and select Observation Mode.
Select the network and paste the wallet address, for example, Vitalik Buterin’s Ethereum address – 0xd8dA6BF26964aF9D7eEd9e03E53415D37aA96045.
Now you can view all its activity on the network and the token balances.
Integration with Ledger
The SafePal extension supports integration with the Ledger hardware wallet. To pair with it, follow these steps:
- Select
Import→Ledger→Connect.
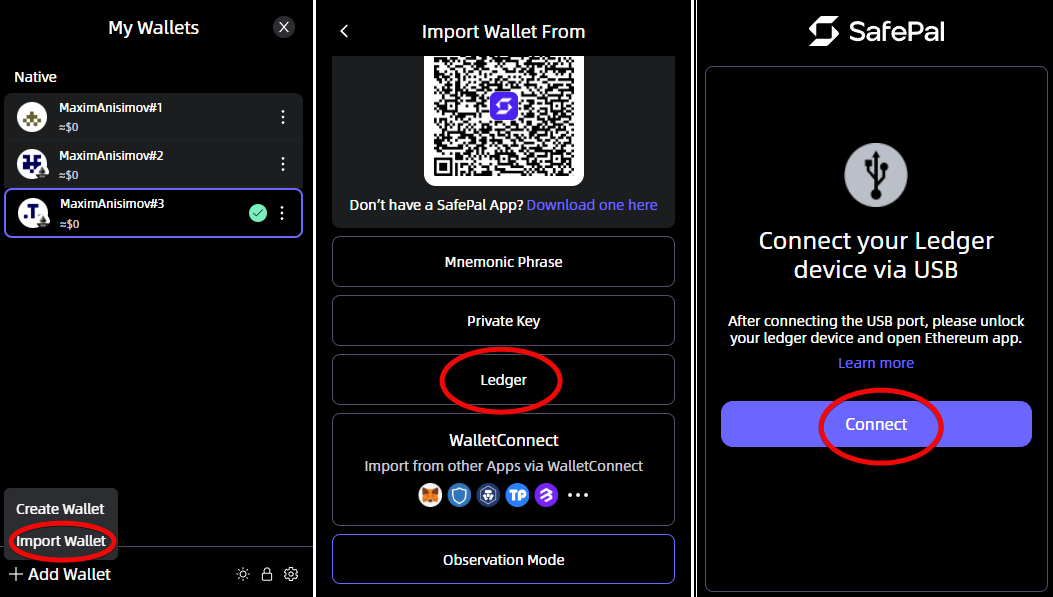
- Connect your Ledger to the computer via USB, unlock it with your PIN, and open the Ethereum app.
- In the SafePal interface, select the connected Ledger and click Connect.
- Confirm the connection on the Ledger itself by pressing both buttons simultaneously.
- Select an EVM-compatible address from the list (e.g., Ethereum, BSC, Polygon).
- Confirm the selection to import the wallet.
- After the message
Import Successfullyappears, your Ledger will be ready in SafePal for EVM transactions.
Conclusion: Is It Worth Using?
The SafePal browser wallet is a solid alternative to OKX wallet, 1inch, and MetaMask. SafePal has never been hacked, whereas MetaMask and TrustWallet have experienced some security issues in the past.
The extension offers convenient asset management, integration with both the mobile app and hardware wallets, along with good security. Its simple interface, Ledger integration, and support for EVM networks expand its appeal to experienced users.
SafePal combines cost-effectiveness, usability, and reliability, making it a worthy alternative to popular wallets like MetaMask or Trust Wallet—especially for those actively engaging with DeFi and NFTs. However, it is recommended to perform your own comparison of wallet security.
Feel free to leave questions and comments. We’ll answer everyone!
Support:


